1. Deployment overview
Strimzi simplifies the process of running Apache Kafka in a Kubernetes cluster.
This guide provides instructions on all the options available for deploying and upgrading Strimzi, describing what is deployed, and the order of deployment required to run Apache Kafka in a Kubernetes cluster.
As well as describing the deployment steps, the guide also provides pre- and post-deployment instructions to prepare for and verify a deployment. Additional deployment options described include the steps to introduce metrics. Upgrade instructions are provided for Strimzi and Kafka upgrades.
Strimzi is designed to work on all types of Kubernetes cluster regardless of distribution, from public and private clouds to local deployments intended for development.
1.1. How Strimzi supports Kafka
Strimzi provides container images and Operators for running Kafka on Kubernetes. Strimzi Operators are fundamental to the running of Strimzi. The Operators provided with Strimzi are purpose-built with specialist operational knowledge to effectively manage Kafka.
Operators simplify the process of:
-
Deploying and running Kafka clusters
-
Deploying and running Kafka components
-
Configuring access to Kafka
-
Securing access to Kafka
-
Upgrading Kafka
-
Managing brokers
-
Creating and managing topics
-
Creating and managing users
1.2. Strimzi Operators
Strimzi supports Kafka using Operators to deploy and manage the components and dependencies of Kafka to Kubernetes.
Operators are a method of packaging, deploying, and managing a Kubernetes application. Strimzi Operators extend Kubernetes functionality, automating common and complex tasks related to a Kafka deployment. By implementing knowledge of Kafka operations in code, Kafka administration tasks are simplified and require less manual intervention.
Operators
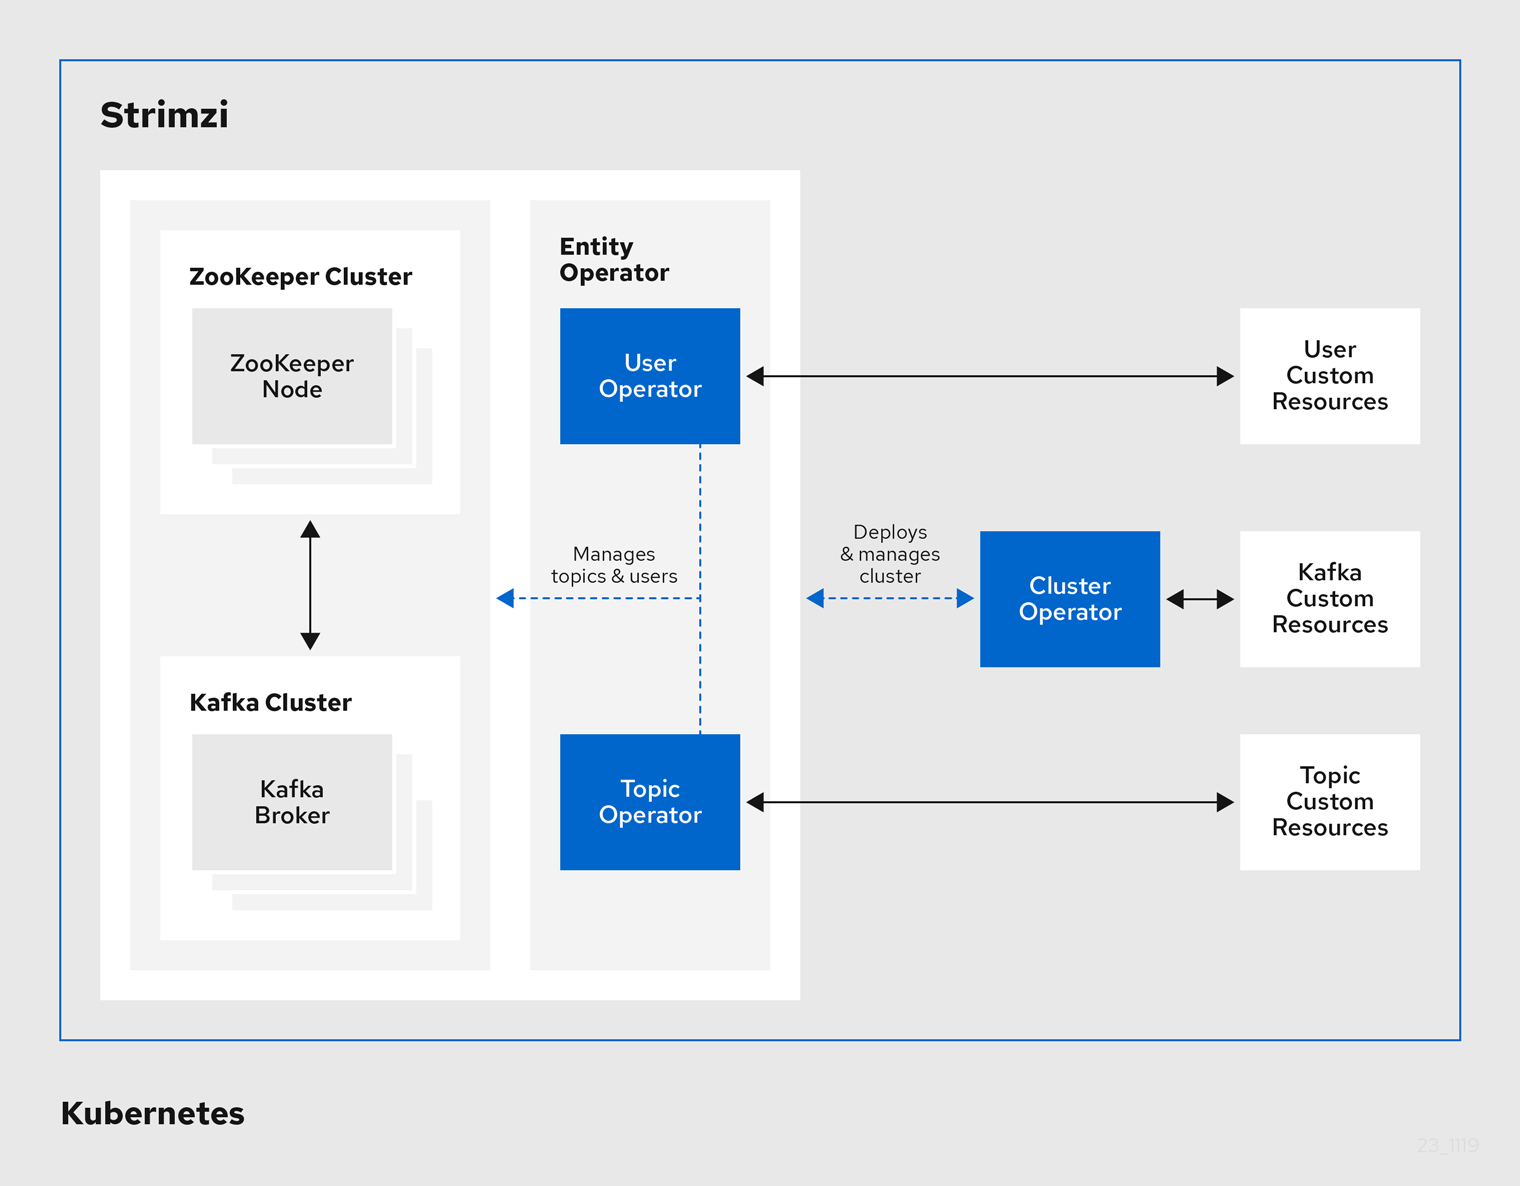
Strimzi provides Operators for managing a Kafka cluster running within a Kubernetes cluster.
- Cluster Operator
-
Deploys and manages Apache Kafka clusters, Kafka Connect, Kafka MirrorMaker, Kafka Bridge, Kafka Exporter, and the Entity Operator
- Entity Operator
-
Comprises the Topic Operator and User Operator
- Topic Operator
-
Manages Kafka topics
- User Operator
-
Manages Kafka users
The Cluster Operator can deploy the Topic Operator and User Operator as part of an Entity Operator configuration at the same time as a Kafka cluster.
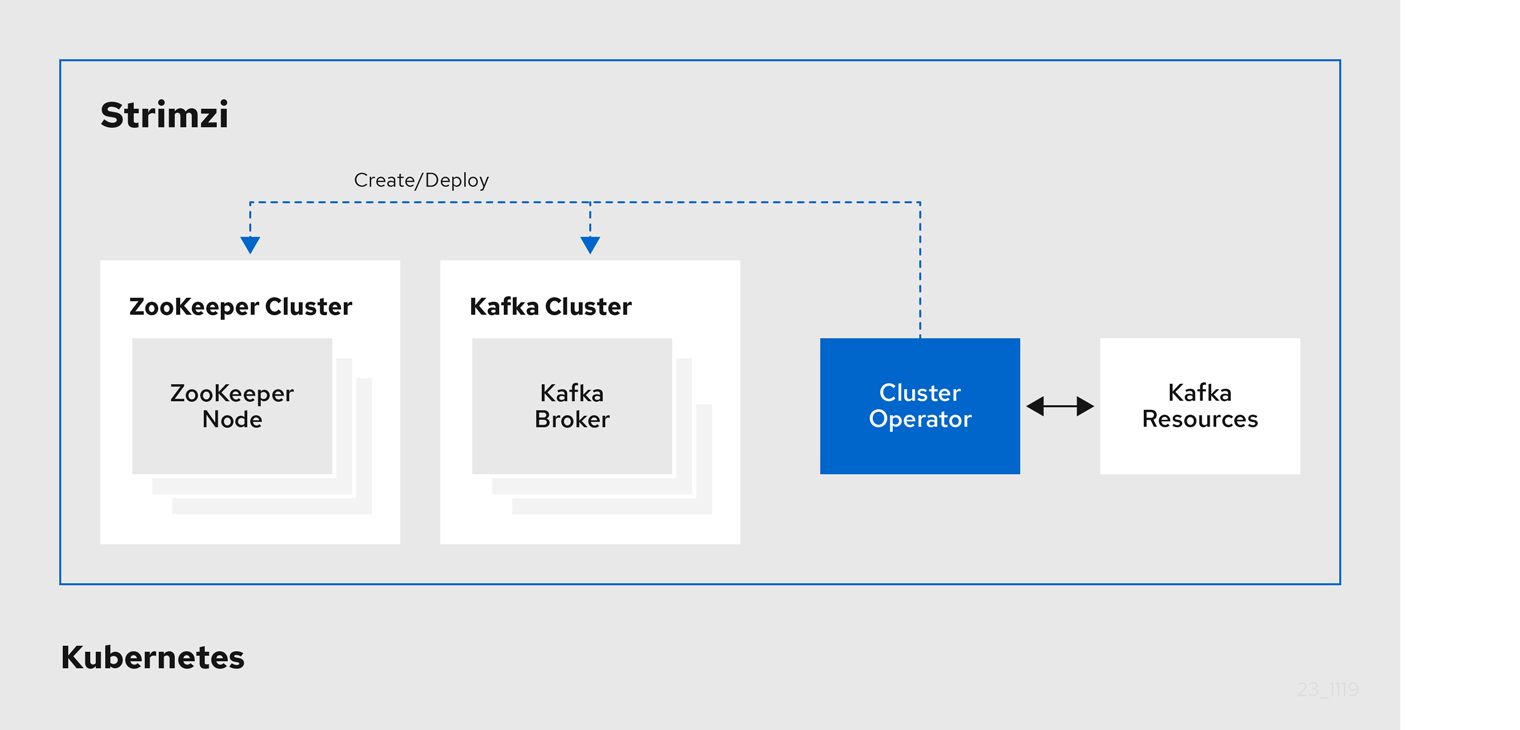
1.2.1. Cluster Operator
Strimzi uses the Cluster Operator to deploy and manage clusters for:
-
Kafka (including ZooKeeper, Entity Operator, Kafka Exporter, and Cruise Control)
-
Kafka Connect
-
Kafka MirrorMaker
-
Kafka Bridge
Custom resources are used to deploy the clusters.
For example, to deploy a Kafka cluster:
-
A
Kafkaresource with the cluster configuration is created within the Kubernetes cluster. -
The Cluster Operator deploys a corresponding Kafka cluster, based on what is declared in the
Kafkaresource.
The Cluster Operator can also deploy (through configuration of the Kafka resource):
-
A Topic Operator to provide operator-style topic management through
KafkaTopiccustom resources -
A User Operator to provide operator-style user management through
KafkaUsercustom resources
The Topic Operator and User Operator function within the Entity Operator on deployment.
1.2.2. Topic Operator
The Topic Operator provides a way of managing topics in a Kafka cluster through Kubernetes resources.
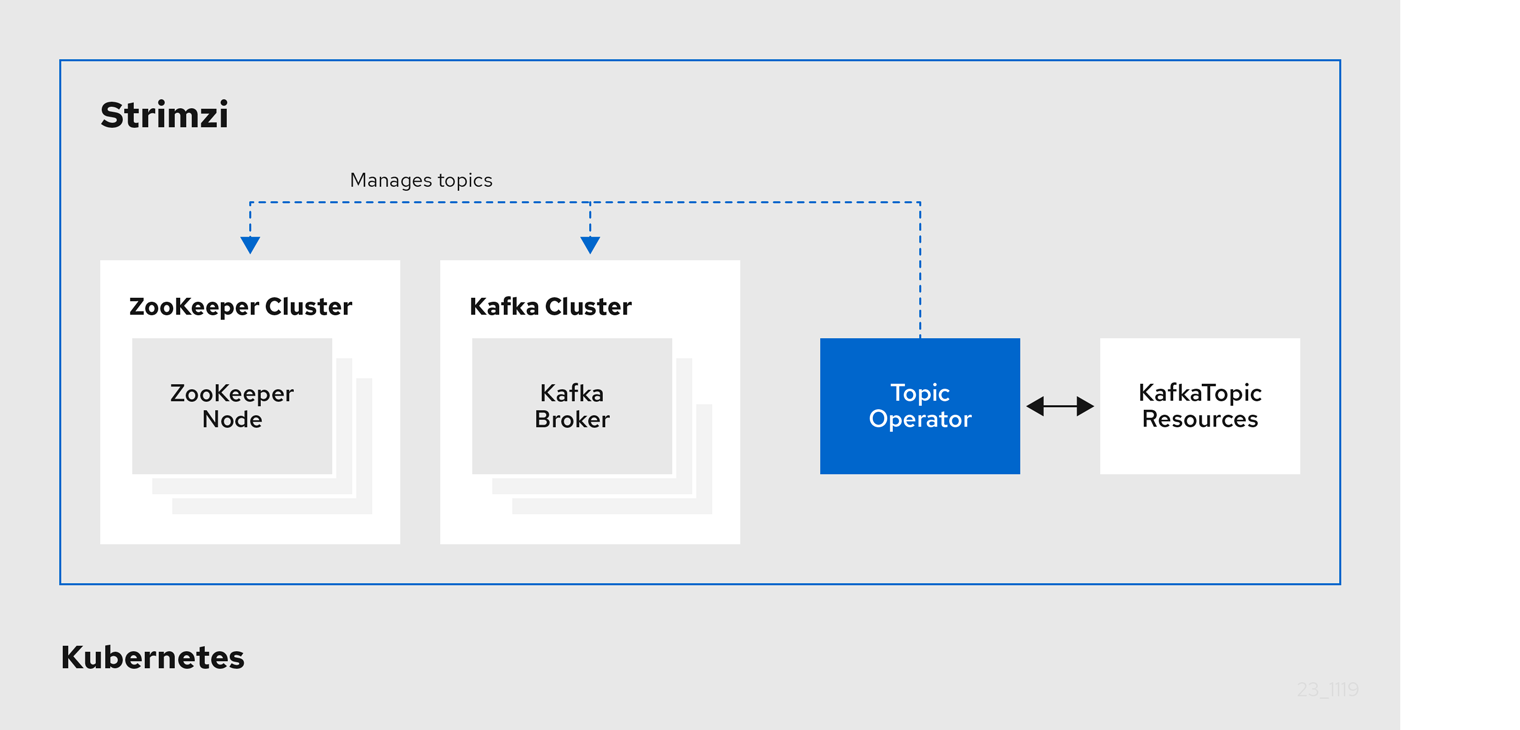
The role of the Topic Operator is to keep a set of KafkaTopic Kubernetes resources describing Kafka topics in-sync with corresponding Kafka topics.
Specifically, if a KafkaTopic is:
-
Created, the Topic Operator creates the topic
-
Deleted, the Topic Operator deletes the topic
-
Changed, the Topic Operator updates the topic
Working in the other direction, if a topic is:
-
Created within the Kafka cluster, the Operator creates a
KafkaTopic -
Deleted from the Kafka cluster, the Operator deletes the
KafkaTopic -
Changed in the Kafka cluster, the Operator updates the
KafkaTopic
This allows you to declare a KafkaTopic as part of your application’s deployment and the Topic Operator will take care of creating the topic for you.
Your application just needs to deal with producing or consuming from the necessary topics.
The Topic Operator maintains information about each topic in a topic store, which is continually synchronized with updates from Kafka topics or Kubernetes KafkaTopic custom resources.
Updates from operations applied to a local in-memory topic store are persisted to a backup topic store on disk.
If a topic is reconfigured or reassigned to other brokers, the KafkaTopic will always be up to date.
1.2.3. User Operator
The User Operator manages Kafka users for a Kafka cluster by watching for KafkaUser resources that describe Kafka users,
and ensuring that they are configured properly in the Kafka cluster.
For example, if a KafkaUser is:
-
Created, the User Operator creates the user it describes
-
Deleted, the User Operator deletes the user it describes
-
Changed, the User Operator updates the user it describes
Unlike the Topic Operator, the User Operator does not sync any changes from the Kafka cluster with the Kubernetes resources. Kafka topics can be created by applications directly in Kafka, but it is not expected that the users will be managed directly in the Kafka cluster in parallel with the User Operator.
The User Operator allows you to declare a KafkaUser resource as part of your application’s deployment.
You can specify the authentication and authorization mechanism for the user.
You can also configure user quotas that control usage of Kafka resources to ensure, for example, that a user does not monopolize access to a broker.
When the user is created, the user credentials are created in a Secret.
Your application needs to use the user and its credentials for authentication and to produce or consume messages.
In addition to managing credentials for authentication, the User Operator also manages authorization rules by including a description of the user’s access rights in the KafkaUser declaration.
1.3. Strimzi custom resources
A deployment of Kafka components to a Kubernetes cluster using Strimzi is highly configurable through the application of custom resources. Custom resources are created as instances of APIs added by Custom resource definitions (CRDs) to extend Kubernetes resources.
CRDs act as configuration instructions to describe the custom resources in a Kubernetes cluster, and are provided with Strimzi for each Kafka component used in a deployment, as well as users and topics. CRDs and custom resources are defined as YAML files. Example YAML files are provided with the Strimzi distribution.
CRDs also allow Strimzi resources to benefit from native Kubernetes features like CLI accessibility and configuration validation.
1.3.1. Strimzi custom resource example
CRDs require a one-time installation in a cluster to define the schemas used to instantiate and manage Strimzi-specific resources.
After a new custom resource type is added to your cluster by installing a CRD, you can create instances of the resource based on its specification.
Depending on the cluster setup, installation typically requires cluster admin privileges.
|
Note
|
Access to manage custom resources is limited to Strimzi administrators. For more information, see Designating Strimzi administrators in the Deploying and Upgrading Strimzi guide. |
A CRD defines a new kind of resource, such as kind:Kafka, within a Kubernetes cluster.
The Kubernetes API server allows custom resources to be created based on the kind and understands from the CRD how to validate and store the custom resource when it is added to the Kubernetes cluster.
|
Warning
|
When CRDs are deleted, custom resources of that type are also deleted. Additionally, the resources created by the custom resource, such as pods and statefulsets are also deleted. |
Each Strimzi-specific custom resource conforms to the schema defined by the CRD for the resource’s kind.
The custom resources for Strimzi components have common configuration properties, which are defined under spec.
To understand the relationship between a CRD and a custom resource, let’s look at a sample of the CRD for a Kafka topic.
apiVersion: kafka.strimzi.io/v1beta2
kind: CustomResourceDefinition
metadata: (1)
  name: kafkatopics.kafka.strimzi.io
  labels:
    app: strimzi
spec: (2)
  group: kafka.strimzi.io
  versions:
    v1beta2
  scope: Namespaced
  names:
    # ...
    singular: kafkatopic
    plural: kafkatopics
    shortNames:
    - kt (3)
  additionalPrinterColumns: (4)
      # ...
  subresources:
    status: {} (5)
  validation: (6)
    openAPIV3Schema:
      properties:
        spec:
          type: object
          properties:
            partitions:
              type: integer
              minimum: 1
            replicas:
              type: integer
              minimum: 1
              maximum: 32767
# ...-
The metadata for the topic CRD, its name and a label to identify the CRD.
-
The specification for this CRD, including the group (domain) name, the plural name and the supported schema version, which are used in the URL to access the API of the topic. The other names are used to identify instance resources in the CLI. For example,
kubectl get kafkatopic my-topicorkubectl get kafkatopics. -
The shortname can be used in CLI commands. For example,
kubectl get ktcan be used as an abbreviation instead ofkubectl get kafkatopic. -
The information presented when using a
getcommand on the custom resource. -
The current status of the CRD as described in the schema reference for the resource.
-
openAPIV3Schema validation provides validation for the creation of topic custom resources. For example, a topic requires at least one partition and one replica.
|
Note
|
You can identify the CRD YAML files supplied with the Strimzi installation files, because the file names contain an index number followed by ‘Crd’. |
Here is a corresponding example of a KafkaTopic custom resource.
apiVersion: kafka.strimzi.io/v1beta2
kind: KafkaTopic (1)
metadata:
  name: my-topic
  labels:
    strimzi.io/cluster: my-cluster (2)
spec: (3)
  partitions: 1
  replicas: 1
  config:
    retention.ms: 7200000
    segment.bytes: 1073741824
status:
  conditions: (4)
    lastTransitionTime: "2019-08-20T11:37:00.706Z"
    status: "True"
    type: Ready
  observedGeneration: 1
/ ...-
The
kindandapiVersionidentify the CRD of which the custom resource is an instance. -
A label, applicable only to
KafkaTopicandKafkaUserresources, that defines the name of the Kafka cluster (which is same as the name of theKafkaresource) to which a topic or user belongs. -
The spec shows the number of partitions and replicas for the topic as well as the configuration parameters for the topic itself. In this example, the retention period for a message to remain in the topic and the segment file size for the log are specified.
-
Status conditions for the
KafkaTopicresource. Thetypecondition changed toReadyat thelastTransitionTime.
Custom resources can be applied to a cluster through the platform CLI. When the custom resource is created, it uses the same validation as the built-in resources of the Kubernetes API.
After a KafkaTopic custom resource is created, the Topic Operator is notified and corresponding Kafka topics are created in Strimzi.
2. What is deployed with Strimzi
Apache Kafka components are provided for deployment to Kubernetes with the Strimzi distribution. The Kafka components are generally run as clusters for availability.
A typical deployment incorporating Kafka components might include:
-
Kafka cluster of broker nodes
-
ZooKeeper cluster of replicated ZooKeeper instances
-
Kafka Connect cluster for external data connections
-
Kafka MirrorMaker cluster to mirror the Kafka cluster in a secondary cluster
-
Kafka Exporter to extract additional Kafka metrics data for monitoring
-
Kafka Bridge to make HTTP-based requests to the Kafka cluster
Not all of these components are mandatory, though you need Kafka and ZooKeeper as a minimum. Some components can be deployed without Kafka, such as MirrorMaker or Kafka Connect.
2.1. Order of deployment
The required order of deployment to a Kubernetes cluster is as follows:
-
Deploy the Cluster operator to manage your Kafka cluster
-
Deploy the Kafka cluster with the ZooKeeper cluster, and include the Topic Operator and User Operator in the deployment
-
Optionally deploy:
-
The Topic Operator and User Operator standalone if you did not deploy them with the Kafka cluster
-
Kafka Connect
-
Kafka MirrorMaker
-
Kafka Bridge
-
Components for the monitoring of metrics
-
2.2. Additional deployment configuration options
The deployment procedures in this guide describe a deployment using the example installation YAML files provided with Strimzi. The procedures highlight any important configuration considerations, but they do not describe all the configuration options available.
You can use custom resources to refine your deployment.
You may wish to review the configuration options available for Kafka components before you deploy Strimzi. For more information on the configuration through custom resources, see Deployment configuration in the Using Strimzi guide.
2.2.1. Securing Kafka
On deployment, the Cluster Operator automatically sets up TLS certificates for data encryption and authentication within your cluster.
Strimzi provides additional configuration options for encryption, authentication and authorization, which are described in the Using Strimzi guide:
-
Secure data exchange between the Kafka cluster and clients by Managing secure access to Kafka.
-
Configure your deployment to use an authorization server to provide OAuth 2.0 authentication and OAuth 2.0 authorization.
2.2.2. Monitoring your deployment
Strimzi supports additional deployment options to monitor your deployment.
-
Extract metrics and monitor Kafka components by deploying Prometheus and Grafana with your Kafka cluster.
-
Extract additional metrics, particularly related to monitoring consumer lag, by deploying Kafka Exporter with your Kafka cluster.
-
Track messages end-to-end by setting up distributed tracing, as described in the Using Strimzi guide.
3. Preparing for your Strimzi deployment
This section shows how you prepare for a Strimzi deployment, describing:
-
How to download the Strimzi release artifacts to use in your deployment
-
How to push the Strimzi container images into you own registry (if required)
-
How to set up admin roles for configuration of custom resources used in deployment
-
Alternative deployment options to Kubernetes using Minikube or Minishift
|
Note
|
To run the commands in this guide, your cluster user must have the rights to manage role-based access control (RBAC) and CRDs. |
3.1. Deployment prerequisites
To deploy Strimzi, make sure:
-
A Kubernetes 1.16 and later cluster is available
-
The
kubectlcommand-line tool is installed and configured to connect to the running cluster.
|
Note
|
Strimzi supports some features that are specific to OpenShift, where such integration benefits OpenShift users and there is no equivalent implementation using standard Kubernetes. |
Alternatives if a Kubernetes cluster is not available
If you do not have access to a Kubernetes cluster, as an alternative you can try installing Strimzi with:
3.2. Downloading Strimzi release artifacts
To install Strimzi, download the release artifacts from GitHub.
Strimzi release artifacts include sample YAML files to help you deploy the components of Strimzi to Kubernetes, perform common operations, and configure your Kafka cluster.
Use kubectl to deploy the Cluster Operator from the install/cluster-operator folder of the downloaded ZIP file.
For more information about deploying and configuring the Cluster Operator, see Deploying the Cluster Operator.
In addition, if you want to use standalone installations of the Topic and User Operators with a Kafka cluster that is not managed by the Strimzi Cluster Operator, you can deploy them from the install/topic-operator and install/user-operator folders.
|
Note
|
Additionally, Strimzi container images are available through the Container Registry. However, we recommend that you use the YAML files provided to deploy Strimzi. |
3.3. Pushing container images to your own registry
Container images for Strimzi are available in the Container Registry. The installation YAML files provided by Strimzi will pull the images directly from the Container Registry.
If you do not have access to the Container Registry or want to use your own container repository:
-
Pull all container images listed here
-
Push them into your own registry
-
Update the image names in the YAML files used in deployment
|
Note
|
Each Kafka version supported for the release has a separate image. |
| Container image | Namespace/Repository | Description |
|---|---|---|
Kafka |
|
Strimzi image for running Kafka, including:
|
Operator |
|
Strimzi image for running the operators:
|
Kafka Bridge |
|
Strimzi image for running the Strimzi kafka Bridge |
JmxTrans |
|
Strimzi image for running the Strimzi JmxTrans |
3.4. Designating Strimzi administrators
Strimzi provides custom resources for configuration of your deployment. By default, permission to view, create, edit, and delete these resources is limited to Kubernetes cluster administrators. Strimzi provides two cluster roles that you can use to assign these rights to other users:
-
strimzi-viewallows users to view and list Strimzi resources. -
strimzi-adminallows users to also create, edit or delete Strimzi resources.
When you install these roles, they will automatically aggregate (add) these rights to the default Kubernetes cluster roles.
strimzi-view aggregates to the view role, and strimzi-admin aggregates to the edit and admin roles.
Because of the aggregation, you might not need to assign these roles to users who already have similar rights.
The following procedure shows how to assign a strimzi-admin role that allows non-cluster administrators to manage Strimzi resources.
A system administrator can designate Strimzi administrators after the Cluster Operator is deployed.
-
The Strimzi Custom Resource Definitions (CRDs) and role-based access control (RBAC) resources to manage the CRDs have been deployed with the Cluster Operator.
-
Create the
strimzi-viewandstrimzi-admincluster roles in Kubernetes.kubectl create -f install/strimzi-admin -
If needed, assign the roles that provide access rights to users that require them.
kubectl create clusterrolebinding strimzi-admin --clusterrole=strimzi-admin --user=user1 --user=user2
3.5. Alternative cluster deployment options
This section suggests alternatives to using a Kubernetes cluster.
If a Kubernetes cluster is unavailable, you can use:
-
Minikube to create a local cluster
-
Minishift to create a local OpenShift cluster and use OpenShift-specific features
3.5.1. Installing a local Kubernetes cluster
The easiest way to get started with Kubernetes is using Minikube. This section provides basic guidance on how to use it. For more information on the tools, refer to the documentation available online.
In order to interact with a Kubernetes cluster the kubectl
utility needs to be installed.
You can download and install Minikube from the Kubernetes website. Depending on the number of brokers you want to deploy inside the cluster, and if you need Kafka Connect running as well, try running Minikube with at least with 4 GB of RAM instead of the default 2 GB.
Once installed, start Minikube using:
minikube start --memory 40963.5.2. Installing a local OpenShift cluster
The easiest way to get started with OpenShift is using Minishift or oc cluster up.
This section provides basic guidance on how to use them.
For more information on the tools, refer to the documentation available online.
oc cluster up
The oc utility is one of the main tools for interacting with OpenShift.
It provides a simple way of starting a local cluster using the command:
oc cluster upThis command requires Docker to be installed. You can find more inforation on here.
Minishift
Minishift is an OpenShift installation within a VM. It can be downloaded and installed from the Minishift website. Depending on the number of brokers you want to deploy inside the cluster, and if you need Kafka Connect running as well, try running Minishift with at least 4 GB of RAM instead of the default 2 GB.
Once installed, start Minishift using:
minishift start --memory 4GBIf you want to use kubectl with either an oc cluster up or minishift cluster,
you will need to configure it, as unlike with Minikube this won’t be done automatically.
oc and kubectl commands
The oc command functions as an alternative to kubectl.
In almost all cases the example kubectl commands given in this guide can be done using oc simply by replacing the command name (options and arguments remain the same).
In other words, instead of using:
kubectl apply -f your-filewhen using OpenShift you can use
oc apply -f your-file|
Note
|
As an exception to this general rule, oc uses oc adm subcommands for cluster management,
while kubectl does not make such a distinction.
For example, the oc equivalent of kubectl taint is oc adm taint.
|
4. Deploying Strimzi
Having prepared your environment for a deployment of Strimzi, this section shows:
-
Optional procedures to deploy other Kafka components according to your requirements:
The procedures assume a Kubernetes cluster is available and running.
This section describes the procedures to deploy Strimzi on Kubernetes 1.16 and later.
|
Note
|
To run the commands in this guide, your cluster user must have the rights to manage role-based access control (RBAC) and CRDs. |
4.1. Create the Kafka cluster
In order to create your Kafka cluster, you deploy the Cluster Operator to manage the Kafka cluster, then deploy the Kafka cluster.
When deploying the Kafka cluster using the Kafka resource, you can deploy the Topic Operator and User Operator at the same time.
Alternatively, if you are using a non-Strimzi Kafka cluster, you can deploy the Topic Operator and User Operator as standalone components.
Deploying a Kafka cluster with the Topic Operator and User Operator
Perform these deployment steps if you want to use the Topic Operator and User Operator with a Kafka cluster managed by Strimzi.
-
Use the Cluster Operator to deploy the:
Deploying a standalone Topic Operator and User Operator
Perform these deployment steps if you want to use the Topic Operator and User Operator with a Kafka cluster that is not managed by Strimzi.
4.1.1. Deploying the Cluster Operator
The Cluster Operator is responsible for deploying and managing Apache Kafka clusters within a Kubernetes cluster.
The procedures in this section show:
-
How to deploy the Cluster Operator to watch:
-
Alternative deployment options:
Watch options for a Cluster Operator deployment
When the Cluster Operator is running, it starts to watch for updates of Kafka resources.
You can choose to deploy the Cluster Operator to watch Kafka resources from:
-
A single namespace (the same namespace containing the Cluster Operator)
-
Multiple namespaces
-
All namespaces
|
Note
|
Strimzi provides example YAML files to make the deployment process easier. |
The Cluster Operator watches for changes to the following resources:
-
Kafkafor the Kafka cluster. -
KafkaConnectfor the Kafka Connect cluster. -
KafkaConnectS2Ifor the Kafka Connect cluster with Source2Image support. -
KafkaConnectorfor creating and managing connectors in a Kafka Connect cluster. -
KafkaMirrorMakerfor the Kafka MirrorMaker instance. -
KafkaBridgefor the Kafka Bridge instance
When one of these resources is created in the Kubernetes cluster, the operator gets the cluster description from the resource and starts creating a new cluster for the resource by creating the necessary Kubernetes resources, such as StatefulSets, Services and ConfigMaps.
Each time a Kafka resource is updated, the operator performs corresponding updates on the Kubernetes resources that make up the cluster for the resource.
Resources are either patched or deleted, and then recreated in order to make the cluster for the resource reflect the desired state of the cluster. This operation might cause a rolling update that might lead to service disruption.
When a resource is deleted, the operator undeploys the cluster and deletes all related Kubernetes resources.
Deploying the Cluster Operator to watch a single namespace
This procedure shows how to deploy the Cluster Operator to watch Strimzi resources in a single namespace in your Kubernetes cluster.
-
This procedure requires use of a Kubernetes user account which is able to create
CustomResourceDefinitions,ClusterRolesandClusterRoleBindings. Use of Role Base Access Control (RBAC) in the Kubernetes cluster usually means that permission to create, edit, and delete these resources is limited to Kubernetes cluster administrators, such assystem:admin.
-
Edit the Strimzi installation files to use the namespace the Cluster Operator is going to be installed into.
For example, in this procedure the Cluster Operator is installed into the namespace
my-cluster-operator-namespace.On Linux, use:
sed -i 's/namespace: .*/namespace: my-cluster-operator-namespace/' install/cluster-operator/*RoleBinding*.yamlOn MacOS, use:
sed -i '' 's/namespace: .*/namespace: my-cluster-operator-namespace/' install/cluster-operator/*RoleBinding*.yaml -
Deploy the Cluster Operator:
kubectl create -f install/cluster-operator -n my-cluster-operator-namespace -
Verify that the Cluster Operator was successfully deployed:
kubectl get deployments
Deploying the Cluster Operator to watch multiple namespaces
This procedure shows how to deploy the Cluster Operator to watch Strimzi resources across multiple namespaces in your Kubernetes cluster.
-
This procedure requires use of a Kubernetes user account which is able to create
CustomResourceDefinitions,ClusterRolesandClusterRoleBindings. Use of Role Base Access Control (RBAC) in the Kubernetes cluster usually means that permission to create, edit, and delete these resources is limited to Kubernetes cluster administrators, such assystem:admin.
-
Edit the Strimzi installation files to use the namespace the Cluster Operator is going to be installed into.
For example, in this procedure the Cluster Operator is installed into the namespace
my-cluster-operator-namespace.On Linux, use:
sed -i 's/namespace: .*/namespace: my-cluster-operator-namespace/' install/cluster-operator/*RoleBinding*.yamlOn MacOS, use:
sed -i '' 's/namespace: .*/namespace: my-cluster-operator-namespace/' install/cluster-operator/*RoleBinding*.yaml -
Edit the
install/cluster-operator/060-Deployment-strimzi-cluster-operator.yamlfile to add a list of all the namespaces the Cluster Operator will watch to theSTRIMZI_NAMESPACEenvironment variable.For example, in this procedure the Cluster Operator will watch the namespaces
watched-namespace-1,watched-namespace-2,watched-namespace-3.apiVersion: apps/v1 kind: Deployment spec: # ... template: spec: serviceAccountName: strimzi-cluster-operator containers: - name: strimzi-cluster-operator image: quay.io/strimzi/operator:0.22.1 imagePullPolicy: IfNotPresent env: - name: STRIMZI_NAMESPACE value: watched-namespace-1,watched-namespace-2,watched-namespace-3 -
For each namespace listed, install the
RoleBindings.In this example, we replace
watched-namespacein these commands with the namespaces listed in the previous step, repeating them forwatched-namespace-1,watched-namespace-2,watched-namespace-3:kubectl create -f install/cluster-operator/020-RoleBinding-strimzi-cluster-operator.yaml -n watched-namespace kubectl create -f install/cluster-operator/031-RoleBinding-strimzi-cluster-operator-entity-operator-delegation.yaml -n watched-namespace kubectl create -f install/cluster-operator/032-RoleBinding-strimzi-cluster-operator-topic-operator-delegation.yaml -n watched-namespace -
Deploy the Cluster Operator:
kubectl create -f install/cluster-operator -n my-cluster-operator-namespace -
Verify that the Cluster Operator was successfully deployed:
kubectl get deployments
Deploying the Cluster Operator to watch all namespaces
This procedure shows how to deploy the Cluster Operator to watch Strimzi resources across all namespaces in your Kubernetes cluster.
When running in this mode, the Cluster Operator automatically manages clusters in any new namespaces that are created.
-
This procedure requires use of a Kubernetes user account which is able to create
CustomResourceDefinitions,ClusterRolesandClusterRoleBindings. Use of Role Base Access Control (RBAC) in the Kubernetes cluster usually means that permission to create, edit, and delete these resources is limited to Kubernetes cluster administrators, such assystem:admin.
-
Edit the Strimzi installation files to use the namespace the Cluster Operator is going to be installed into.
For example, in this procedure the Cluster Operator is installed into the namespace
my-cluster-operator-namespace.On Linux, use:
sed -i 's/namespace: .*/namespace: my-cluster-operator-namespace/' install/cluster-operator/*RoleBinding*.yamlOn MacOS, use:
sed -i '' 's/namespace: .*/namespace: my-cluster-operator-namespace/' install/cluster-operator/*RoleBinding*.yaml -
Edit the
install/cluster-operator/060-Deployment-strimzi-cluster-operator.yamlfile to set the value of theSTRIMZI_NAMESPACEenvironment variable to*.apiVersion: apps/v1 kind: Deployment spec: # ... template: spec: # ... serviceAccountName: strimzi-cluster-operator containers: - name: strimzi-cluster-operator image: quay.io/strimzi/operator:0.22.1 imagePullPolicy: IfNotPresent env: - name: STRIMZI_NAMESPACE value: "*" # ... -
Create
ClusterRoleBindingsthat grant cluster-wide access for all namespaces to the Cluster Operator.kubectl create clusterrolebinding strimzi-cluster-operator-namespaced --clusterrole=strimzi-cluster-operator-namespaced --serviceaccount my-cluster-operator-namespace:strimzi-cluster-operator kubectl create clusterrolebinding strimzi-cluster-operator-entity-operator-delegation --clusterrole=strimzi-entity-operator --serviceaccount my-cluster-operator-namespace:strimzi-cluster-operator kubectl create clusterrolebinding strimzi-cluster-operator-topic-operator-delegation --clusterrole=strimzi-topic-operator --serviceaccount my-cluster-operator-namespace:strimzi-cluster-operatorReplace
my-cluster-operator-namespacewith the namespace you want to install the Cluster Operator into. -
Deploy the Cluster Operator to your Kubernetes cluster.
kubectl create -f install/cluster-operator -n my-cluster-operator-namespace -
Verify that the Cluster Operator was successfully deployed:
kubectl get deployments
Deploying the Cluster Operator using a Helm Chart
As an alternative to using the YAML deployment files, this procedure shows how to deploy the Cluster Operator using a Helm chart provided with Strimzi.
-
The Helm client must be installed on a local machine.
-
Helm must be installed to the Kubernetes cluster.
For more information about Helm, see the Helm website.
-
Add the Strimzi Helm Chart repository:
helm repo add strimzi https://strimzi.io/charts/ -
Deploy the Cluster Operator using the Helm command line tool:
helm install strimzi/strimzi-kafka-operator -
Verify that the Cluster Operator has been deployed successfully using the Helm command line tool:
helm ls
Deploying the Cluster Operator from OperatorHub.io
OperatorHub.io is a catalog of Kubernetes Operators sourced from multiple providers. It offers you an alternative way to install stable versions of Strimzi using the Strimzi Kafka Operator.
The Operator Lifecycle Manager is used for the installation and management of all Operators published on OperatorHub.io.
To install Strimzi from OperatorHub.io, locate the Strimzi Kafka Operator and follow the instructions provided.
4.1.2. Deploying Kafka
Apache Kafka is an open-source distributed publish-subscribe messaging system for fault-tolerant real-time data feeds.
The procedures in this section show:
-
How to use the Cluster Operator to deploy:
-
The Topic Operator and User Operator by configuring the
Kafkacustom resource:
-
Alternative standalone deployment procedures for the Topic Operator and User Operator:
When installing Kafka, Strimzi also installs a ZooKeeper cluster and adds the necessary configuration to connect Kafka with ZooKeeper.
Deploying the Kafka cluster
This procedure shows how to deploy a Kafka cluster to your Kubernetes using the Cluster Operator.
The deployment uses a YAML file to provide the specification to create a Kafka resource.
Strimzi provides example YAMLs files for deployment in examples/kafka/:
kafka-persistent.yaml-
Deploys a persistent cluster with three ZooKeeper and three Kafka nodes.
kafka-jbod.yaml-
Deploys a persistent cluster with three ZooKeeper and three Kafka nodes (each using multiple persistent volumes).
kafka-persistent-single.yaml-
Deploys a persistent cluster with a single ZooKeeper node and a single Kafka node.
kafka-ephemeral.yaml-
Deploys an ephemeral cluster with three ZooKeeper and three Kafka nodes.
kafka-ephemeral-single.yaml-
Deploys an ephemeral cluster with three ZooKeeper nodes and a single Kafka node.
In this procedure, we use the examples for an ephemeral and persistent Kafka cluster deployment:
- Ephemeral cluster
-
In general, an ephemeral (or temporary) Kafka cluster is suitable for development and testing purposes, not for production. This deployment uses
emptyDirvolumes for storing broker information (for ZooKeeper) and topics or partitions (for Kafka). Using anemptyDirvolume means that its content is strictly related to the pod life cycle and is deleted when the pod goes down. - Persistent cluster
-
A persistent Kafka cluster uses
PersistentVolumesto store ZooKeeper and Kafka data. ThePersistentVolumeis acquired using aPersistentVolumeClaimto make it independent of the actual type of thePersistentVolume. For example, it can use Amazon EBS volumes in Amazon AWS deployments without any changes in the YAML files. ThePersistentVolumeClaimcan use aStorageClassto trigger automatic volume provisioning.
The example YAML files specify the latest supported Kafka version, and configuration for its supported log message format version and inter-broker protocol version. Updates to these properties are required when upgrading Kafka.
The example clusters are named my-cluster by default.
The cluster name is defined by the name of the resource and cannot be changed after the cluster has been deployed.
To change the cluster name before you deploy the cluster, edit the Kafka.metadata.name property of the Kafka resource in the relevant YAML file.
apiVersion: kafka.strimzi.io/v1beta2
kind: Kafka
metadata:
  name: my-cluster
spec:
  kafka:
    version: 2.7.0
    #...
    config:
      #...
      log.message.format.version: 2.7
      inter.broker.protocol.version: 2.7
  # ...
For more information about configuring the Kafka resource, see Kafka cluster configuration in the Using Strimzi guide.
-
Create and deploy an ephemeral or persistent cluster.
For development or testing, you might prefer to use an ephemeral cluster. You can use a persistent cluster in any situation.
-
To create and deploy an ephemeral cluster:
kubectl apply -f examples/kafka/kafka-ephemeral.yaml -
To create and deploy a persistent cluster:
kubectl apply -f examples/kafka/kafka-persistent.yaml
-
-
Verify that the Kafka cluster was successfully deployed:
kubectl get deployments
Deploying the Topic Operator using the Cluster Operator
This procedure describes how to deploy the Topic Operator using the Cluster Operator.
You configure the entityOperator property of the Kafka resource to include the topicOperator.
If you want to use the Topic Operator with a Kafka cluster that is not managed by Strimzi, you must deploy the Topic Operator as a standalone component.
For more information about configuring the entityOperator and topicOperator properties,
see Configuring the Entity Operator in the Using Strimzi guide.
-
Edit the
entityOperatorproperties of theKafkaresource to includetopicOperator:apiVersion: kafka.strimzi.io/v1beta2 kind: Kafka metadata: name: my-cluster spec: #... entityOperator: topicOperator: {} userOperator: {} -
Configure the Topic Operator
specusing the properties described inEntityTopicOperatorSpecschema reference.Use an empty object (
{}) if you want all properties to use their default values. -
Create or update the resource:
Use
kubectl apply:kubectl apply -f <your-file>
Deploying the User Operator using the Cluster Operator
This procedure describes how to deploy the User Operator using the Cluster Operator.
You configure the entityOperator property of the Kafka resource to include the userOperator.
If you want to use the User Operator with a Kafka cluster that is not managed by Strimzi, you must deploy the User Operator as a standalone component.
For more information about configuring the entityOperator and userOperator properties, see Configuring the Entity Operator in the Using Strimzi guide.
-
Edit the
entityOperatorproperties of theKafkaresource to includeuserOperator:apiVersion: kafka.strimzi.io/v1beta2 kind: Kafka metadata: name: my-cluster spec: #... entityOperator: topicOperator: {} userOperator: {} -
Configure the User Operator
specusing the properties described inEntityUserOperatorSpecschema reference in the Using Strimzi guide.Use an empty object (
{}) if you want all properties to use their default values. -
Create or update the resource:
kubectl apply -f <your-file>
4.1.3. Alternative standalone deployment options for Strimzi Operators
When deploying a Kafka cluster using the Cluster Operator, you can also deploy the Topic Operator and User Operator. Alternatively, you can perform a standalone deployment.
A standalone deployment means the Topic Operator and User Operator can operate with a Kafka cluster that is not managed by Strimzi.
Deploying the standalone Topic Operator
This procedure shows how to deploy the Topic Operator as a standalone component.
A standalone deployment requires configuration of environment variables, and is more complicated than deploying the Topic Operator using the Cluster Operator. However, a standalone deployment is more flexible as the Topic Operator can operate with any Kafka cluster, not necessarily one deployed by the Cluster Operator.
-
You need an existing Kafka cluster for the Topic Operator to connect to.
-
Edit the
Deployment.spec.template.spec.containers[0].envproperties in theinstall/topic-operator/05-Deployment-strimzi-topic-operator.yamlfile by setting:-
STRIMZI_KAFKA_BOOTSTRAP_SERVERSto list the bootstrap brokers in your Kafka cluster, given as a comma-separated list ofhostname:portpairs. -
STRIMZI_ZOOKEEPER_CONNECTto list the ZooKeeper nodes, given as a comma-separated list ofhostname:portpairs. This should be the same ZooKeeper cluster that your Kafka cluster is using. -
STRIMZI_NAMESPACEto the Kubernetes namespace in which you want the operator to watch forKafkaTopicresources. -
STRIMZI_RESOURCE_LABELSto the label selector used to identify theKafkaTopicresources managed by the operator. -
STRIMZI_FULL_RECONCILIATION_INTERVAL_MSto specify the interval between periodic reconciliations, in milliseconds. -
STRIMZI_TOPIC_METADATA_MAX_ATTEMPTSto specify the number of attempts at getting topic metadata from Kafka. The time between each attempt is defined as an exponential back-off. Consider increasing this value when topic creation could take more time due to the number of partitions or replicas. Default6. -
STRIMZI_ZOOKEEPER_SESSION_TIMEOUT_MSto the ZooKeeper session timeout, in milliseconds. For example,10000. Default20000(20 seconds). -
STRIMZI_TOPICS_PATHto the Zookeeper node path where the Topic Operator stores its metadata. Default/strimzi/topics. -
STRIMZI_TLS_ENABLEDto enable TLS support for encrypting the communication with Kafka brokers. Defaulttrue. -
STRIMZI_TRUSTSTORE_LOCATIONto the path to the truststore containing certificates for enabling TLS based communication. Mandatory only if TLS is enabled throughSTRIMZI_TLS_ENABLED. -
STRIMZI_TRUSTSTORE_PASSWORDto the password for accessing the truststore defined bySTRIMZI_TRUSTSTORE_LOCATION. Mandatory only if TLS is enabled throughSTRIMZI_TLS_ENABLED. -
STRIMZI_KEYSTORE_LOCATIONto the path to the keystore containing private keys for enabling TLS based communication. Mandatory only if TLS is enabled throughSTRIMZI_TLS_ENABLED. -
STRIMZI_KEYSTORE_PASSWORDto the password for accessing the keystore defined bySTRIMZI_KEYSTORE_LOCATION. Mandatory only if TLS is enabled throughSTRIMZI_TLS_ENABLED. -
STRIMZI_LOG_LEVELto the level for printing logging messages. The value can be set to:ERROR,WARNING,INFO,DEBUG, andTRACE. DefaultINFO. -
STRIMZI_JAVA_OPTS(optional) to the Java options used for the JVM running the Topic Operator. An example is-Xmx=512M -Xms=256M. -
STRIMZI_JAVA_SYSTEM_PROPERTIES(optional) to list the-Doptions which are set to the Topic Operator. An example is-Djavax.net.debug=verbose -DpropertyName=value.
-
-
Deploy the Topic Operator:
kubectl create -f install/topic-operator -
Verify that the Topic Operator has been deployed successfully:
kubectl describe deployment strimzi-topic-operatorThe Topic Operator is deployed when the
Replicas:entry shows1 available.NoteYou may experience a delay with the deployment if you have a slow connection to the Kubernetes cluster and the images have not been downloaded before.
Deploying the standalone User Operator
This procedure shows how to deploy the User Operator as a standalone component.
A standalone deployment requires configuration of environment variables, and is more complicated than deploying the User Operator using the Cluster Operator. However, a standalone deployment is more flexible as the User Operator can operate with any Kafka cluster, not necessarily one deployed by the Cluster Operator.
-
You need an existing Kafka cluster for the User Operator to connect to.
-
Edit the following
Deployment.spec.template.spec.containers[0].envproperties in theinstall/user-operator/05-Deployment-strimzi-user-operator.yamlfile by setting:-
STRIMZI_KAFKA_BOOTSTRAP_SERVERSto list the Kafka brokers, given as a comma-separated list ofhostname:portpairs. -
STRIMZI_ZOOKEEPER_CONNECTto list the ZooKeeper nodes, given as a comma-separated list ofhostname:portpairs. This must be the same ZooKeeper cluster that your Kafka cluster is using. Connecting to ZooKeeper nodes with TLS encryption is not supported. -
STRIMZI_NAMESPACEto the Kubernetes namespace in which you want the operator to watch forKafkaUserresources. -
STRIMZI_LABELSto the label selector used to identify theKafkaUserresources managed by the operator. -
STRIMZI_FULL_RECONCILIATION_INTERVAL_MSto specify the interval between periodic reconciliations, in milliseconds. -
STRIMZI_ZOOKEEPER_SESSION_TIMEOUT_MSto the ZooKeeper session timeout, in milliseconds. For example,10000. Default20000(20 seconds). -
STRIMZI_CA_CERT_NAMEto point to a KubernetesSecretthat contains the public key of the Certificate Authority for signing new user certificates for TLS client authentication. TheSecretmust contain the public key of the Certificate Authority under the keyca.crt. -
STRIMZI_CA_KEY_NAMEto point to a KubernetesSecretthat contains the private key of the Certificate Authority for signing new user certificates for TLS client authentication. TheSecretmust contain the private key of the Certificate Authority under the keyca.key. -
STRIMZI_CLUSTER_CA_CERT_SECRET_NAMEto point to a KubernetesSecretcontaining the public key of the Certificate Authority used for signing Kafka brokers certificates for enabling TLS-based communication. TheSecretmust contain the public key of the Certificate Authority under the keyca.crt. This environment variable is optional and should be set only if the communication with the Kafka cluster is TLS based. -
STRIMZI_EO_KEY_SECRET_NAMEto point to a KubernetesSecretcontaining the private key and related certificate for TLS client authentication against the Kafka cluster. TheSecretmust contain the keystore with the private key and certificate under the keyentity-operator.p12, and the related password under the keyentity-operator.password. This environment variable is optional and should be set only if TLS client authentication is needed when the communication with the Kafka cluster is TLS based. -
STRIMZI_CA_VALIDITYthe validity period for the Certificate Authority. Default is365days. -
STRIMZI_CA_RENEWALthe renewal period for the Certificate Authority. -
STRIMZI_LOG_LEVELto the level for printing logging messages. The value can be set to:ERROR,WARNING,INFO,DEBUG, andTRACE. DefaultINFO. -
STRIMZI_GC_LOG_ENABLEDto enable garbage collection (GC) logging. Defaulttrue. Default is30days to initiate certificate renewal before the old certificates expire. -
STRIMZI_JAVA_OPTS(optional) to the Java options used for the JVM running User Operator. An example is-Xmx=512M -Xms=256M. -
STRIMZI_JAVA_SYSTEM_PROPERTIES(optional) to list the-Doptions which are set to the User Operator. An example is-Djavax.net.debug=verbose -DpropertyName=value.
-
-
Deploy the User Operator:
kubectl create -f install/user-operator -
Verify that the User Operator has been deployed successfully:
kubectl describe deployment strimzi-user-operatorThe User Operator is deployed when the
Replicas:entry shows1 available.NoteYou may experience a delay with the deployment if you have a slow connection to the Kubernetes cluster and the images have not been downloaded before.
4.2. Deploy Kafka Connect
Kafka Connect is a tool for streaming data between Apache Kafka and external systems.
In Strimzi, Kafka Connect is deployed in distributed mode. Kafka Connect can also work in standalone mode, but this is not supported by Strimzi.
Using the concept of connectors, Kafka Connect provides a framework for moving large amounts of data into and out of your Kafka cluster while maintaining scalability and reliability.
Kafka Connect is typically used to integrate Kafka with external databases and storage and messaging systems.
The procedures in this section show how to:
-
Deploy a Kafka Connect cluster using a
KafkaConnectresource -
Create a Kafka Connect image containing the connectors you need to make your connection
-
Create and manage connectors using a KafkaConnector resource or the Kafka Connect REST API
-
Restart a Kafka connector by annotating a KafkaConnector resource
-
Restart a Kafka connector task by annotating a KafkaConnector resource
|
Note
|
The term connector is used interchangeably to mean a connector instance running within a Kafka Connect cluster, or a connector class. In this guide, the term connector is used when the meaning is clear from the context. |
4.2.1. Deploying Kafka Connect to your Kubernetes cluster
This procedure shows how to deploy a Kafka Connect cluster to your Kubernetes cluster using the Cluster Operator.
A Kafka Connect cluster is implemented as a Deployment with a configurable number of nodes (also called workers) that distribute the workload of connectors as tasks so that the message flow is highly scalable and reliable.
The deployment uses a YAML file to provide the specification to create a KafkaConnect resource.
In this procedure, we use the example file provided with Strimzi:
-
examples/connect/kafka-connect.yaml
For information about configuring the KafkaConnect resource (or the KafkaConnectS2I resource with Source-to-Image (S2I) support),
see Kafka Connect cluster configuration in the Using Strimzi guide.
-
Deploy Kafka Connect to your Kubernetes cluster. For a Kafka cluster with 3 or more brokers, use the
examples/connect/kafka-connect.yamlfile. For a Kafka cluster with less than 3 brokers, use theexamples/connect/kafka-connect-single-node-kafka.yamlfile.kubectl apply -f examples/connect/kafka-connect.yaml -
Verify that Kafka Connect was successfully deployed:
kubectl get deployments
4.2.2. Kafka Connect configuration for multiple instances
If you are running multiple instances of Kafka Connect, you have to change the default configuration of the following config properties:
apiVersion: kafka.strimzi.io/v1beta2
kind: KafkaConnect
metadata:
  name: my-connect
spec:
  # ...
  config:
    group.id: connect-cluster (1)
    offset.storage.topic: connect-cluster-offsets (2)
    config.storage.topic: connect-cluster-configs (3)
    status.storage.topic: connect-cluster-status  (4)
    # ...
# ...-
Kafka Connect cluster group that the instance belongs to.
-
Kafka topic that stores connector offsets.
-
Kafka topic that stores connector and task status configurations.
-
Kafka topic that stores connector and task status updates.
|
Note
|
Values for the three topics must be the same for all Kafka Connect instances with the same group.id.
|
Unless you change the default settings, each Kafka Connect instance connecting to the same Kafka cluster is deployed with the same values. What happens, in effect, is all instances are coupled to run in a cluster and use the same topics.
If multiple Kafka Connect clusters try to use the same topics, Kafka Connect will not work as expected and generate errors.
If you wish to run multiple Kafka Connect instances, change the values of these properties for each instance.
4.2.3. Extending Kafka Connect with connector plug-ins
The Strimzi container images for Kafka Connect include two built-in file connectors for moving file-based data into and out of your Kafka cluster.
| File Connector | Description |
|---|---|
|
Transfers data to your Kafka cluster from a file (the source). |
|
Transfers data from your Kafka cluster to a file (the sink). |
The procedures in this section show how to add your own connector classes to connector images by:
|
Important
|
You create the configuration for connectors directly using the Kafka Connect REST API or KafkaConnector custom resources. |
Creating a new container image automatically using Strimzi
This procedure shows how to configure Kafka Connect so that Strimzi automatically builds a new container image with additional connectors.
You define the connector plugins using the .spec.build.plugins property of the KafkaConnect custom resource.
Strimzi will automatically download and add the connector plugins into a new container image.
The container is pushed into the container repository specified in .spec.build.output and automatically used in the Kafka Connect deployment.
-
A container registry.
You need to provide your own container registry where images can be pushed to, stored, and pulled from. Strimzi supports private container registries as well as public registries such as Quay or Docker Hub.
-
Configure the
KafkaConnectcustom resource by specifying the container registry in.spec.build.output, and additional connectors in.spec.build.plugins:apiVersion: kafka.strimzi.io/v1beta2 kind: KafkaConnect metadata: name: my-connect-cluster spec: # (1) #... build: output: # (2) type: docker image: my-registry.io/my-org/my-connect-cluster:latest pushSecret: my-registry-credentials plugins: # (3) - name: debezium-postgres-connector artifacts: - type: tgz url: https://repo1.maven.org/maven2/io/debezium/debezium-connector-postgres/1.3.1.Final/debezium-connector-postgres-1.3.1.Final-plugin.tar.gz sha512sum: 962a12151bdf9a5a30627eebac739955a4fd95a08d373b86bdcea2b4d0c27dd6e1edd5cb548045e115e33a9e69b1b2a352bee24df035a0447cb820077af00c03 - name: camel-telegram artifacts: - type: tgz url: https://repo.maven.apache.org/maven2/org/apache/camel/kafkaconnector/camel-telegram-kafka-connector/0.7.0/camel-telegram-kafka-connector-0.7.0-package.tar.gz sha512sum: a9b1ac63e3284bea7836d7d24d84208c49cdf5600070e6bd1535de654f6920b74ad950d51733e8020bf4187870699819f54ef5859c7846ee4081507f48873479 #...-
(Required) Configuration of the container registry where new images are pushed.
-
(Required) List of connector plugins and their artifacts to add to the new container image. Each plugin must be configured with at least one
artifact.
-
Create or update the resource:
$ kubectl apply -f KAFKA-CONNECT-CONFIG-FILE -
Wait for the new container image to build, and for the Kafka Connect cluster to be deployed.
-
Use the Kafka Connect REST API or the KafkaConnector custom resources to use the connector plugins you added.
See the Using Strimzi guide for more information on:
Creating a Docker image from the Kafka Connect base image
This procedure shows how to create a custom image and add it to the /opt/kafka/plugins directory.
You can use the Kafka container image on Container Registry as a base image for creating your own custom image with additional connector plug-ins.
At startup, the Strimzi version of Kafka Connect loads any third-party connector plug-ins contained in the /opt/kafka/plugins directory.
-
Create a new
Dockerfileusingquay.io/strimzi/kafka:0.22.1-kafka-2.7.0as the base image:FROM quay.io/strimzi/kafka:0.22.1-kafka-2.7.0 USER root:root COPY ./my-plugins/ /opt/kafka/plugins/ USER 1001Example plug-in file$ tree ./my-plugins/ ./my-plugins/ ├── debezium-connector-mongodb │ ├── bson-3.4.2.jar │ ├── CHANGELOG.md │ ├── CONTRIBUTE.md │ ├── COPYRIGHT.txt │ ├── debezium-connector-mongodb-0.7.1.jar │ ├── debezium-core-0.7.1.jar │ ├── LICENSE.txt │ ├── mongodb-driver-3.4.2.jar │ ├── mongodb-driver-core-3.4.2.jar │ └── README.md ├── debezium-connector-mysql │ ├── CHANGELOG.md │ ├── CONTRIBUTE.md │ ├── COPYRIGHT.txt │ ├── debezium-connector-mysql-0.7.1.jar │ ├── debezium-core-0.7.1.jar │ ├── LICENSE.txt │ ├── mysql-binlog-connector-java-0.13.0.jar │ ├── mysql-connector-java-5.1.40.jar │ ├── README.md │ └── wkb-1.0.2.jar └── debezium-connector-postgres ├── CHANGELOG.md ├── CONTRIBUTE.md ├── COPYRIGHT.txt ├── debezium-connector-postgres-0.7.1.jar ├── debezium-core-0.7.1.jar ├── LICENSE.txt ├── postgresql-42.0.0.jar ├── protobuf-java-2.6.1.jar └── README.md -
Build the container image.
-
Push your custom image to your container registry.
-
Point to the new container image.
You can either:
-
Edit the
KafkaConnect.spec.imageproperty of theKafkaConnectcustom resource.If set, this property overrides the
STRIMZI_KAFKA_CONNECT_IMAGESvariable in the Cluster Operator.apiVersion: kafka.strimzi.io/v1beta2 kind: KafkaConnect metadata: name: my-connect-cluster spec: (1) #... image: my-new-container-image (2) config: (3) #...-
The docker image for the pods.
-
Configuration of the Kafka Connect workers (not connectors).
or
-
In the
install/cluster-operator/060-Deployment-strimzi-cluster-operator.yamlfile, edit theSTRIMZI_KAFKA_CONNECT_IMAGESvariable to point to the new container image, and then reinstall the Cluster Operator.
-
See the Using Strimzi guide for more information on:
Creating a container image using OpenShift builds and Source-to-Image
This procedure shows how to use OpenShift builds and the Source-to-Image (S2I) framework to create a new container image.
An OpenShift build takes a builder image with S2I support, together with source code and binaries provided by the user, and uses them to build a new container image. Once built, container images are stored in OpenShift’s local container image repository and are available for use in deployments.
A Kafka Connect builder image with S2I support is provided on the Container Registry as part of the quay.io/strimzi/kafka:0.22.1-kafka-2.7.0 image.
This S2I image takes your binaries (with plug-ins and connectors) and stores them in the /tmp/kafka-plugins/s2i directory.
It creates a new Kafka Connect image from this directory, which can then be used with the Kafka Connect deployment.
When started using the enhanced image, Kafka Connect loads any third-party plug-ins from the /tmp/kafka-plugins/s2i directory.
|
Important
|
With the introduction of build configuration to the KafkaConnect resource, Strimzi can now automatically build a container image with the connector plugins you require for your data connections.
As a result, support for Kafka Connect with Source-to-Image (S2I) is deprecated. To prepare for this change, you can migrate Kafka Connect S2I instances to Kafka Connect instances.
|
-
On the command line, use the
oc applycommand to create and deploy a Kafka Connect S2I cluster:oc apply -f examples/connect/kafka-connect-s2i.yaml -
Create a directory with Kafka Connect plug-ins:
$ tree ./my-plugins/ ./my-plugins/ ├── debezium-connector-mongodb │ ├── bson-3.4.2.jar │ ├── CHANGELOG.md │ ├── CONTRIBUTE.md │ ├── COPYRIGHT.txt │ ├── debezium-connector-mongodb-0.7.1.jar │ ├── debezium-core-0.7.1.jar │ ├── LICENSE.txt │ ├── mongodb-driver-3.4.2.jar │ ├── mongodb-driver-core-3.4.2.jar │ └── README.md ├── debezium-connector-mysql │ ├── CHANGELOG.md │ ├── CONTRIBUTE.md │ ├── COPYRIGHT.txt │ ├── debezium-connector-mysql-0.7.1.jar │ ├── debezium-core-0.7.1.jar │ ├── LICENSE.txt │ ├── mysql-binlog-connector-java-0.13.0.jar │ ├── mysql-connector-java-5.1.40.jar │ ├── README.md │ └── wkb-1.0.2.jar └── debezium-connector-postgres ├── CHANGELOG.md ├── CONTRIBUTE.md ├── COPYRIGHT.txt ├── debezium-connector-postgres-0.7.1.jar ├── debezium-core-0.7.1.jar ├── LICENSE.txt ├── postgresql-42.0.0.jar ├── protobuf-java-2.6.1.jar └── README.md -
Use the
oc start-buildcommand to start a new build of the image using the prepared directory:oc start-build my-connect-cluster-connect --from-dir ./my-plugins/NoteThe name of the build is the same as the name of the deployed Kafka Connect cluster. -
When the build has finished, the new image is used automatically by the Kafka Connect deployment.
4.2.4. Creating and managing connectors
When you have created a container image for your connector plug-in, you need to create a connector instance in your Kafka Connect cluster. You can then configure, monitor, and manage a running connector instance.
A connector is an instance of a particular connector class that knows how to communicate with the relevant external system in terms of messages. Connectors are available for many external systems, or you can create your own.
You can create source and sink types of connector.
- Source connector
-
A source connector is a runtime entity that fetches data from an external system and feeds it to Kafka as messages.
- Sink connector
-
A sink connector is a runtime entity that fetches messages from Kafka topics and feeds them to an external system.
Strimzi provides two APIs for creating and managing connectors:
-
KafkaConnector resources (referred to as KafkaConnectors)
-
Kafka Connect REST API
Using the APIs, you can:
-
Check the status of a connector instance
-
Reconfigure a running connector
-
Increase or decrease the number of connector tasks for a connector instance
-
Restart connectors
-
Restart connector tasks, including failed tasks
-
Pause a connector instance
-
Resume a previously paused connector instance
-
Delete a connector instance
KafkaConnector resources
KafkaConnectors allow you to create and manage connector instances for Kafka Connect in a Kubernetes-native way, so an HTTP client such as cURL is not required. Like other Kafka resources, you declare a connector’s desired state in a KafkaConnector YAML file that is deployed to your Kubernetes cluster to create the connector instance. KafkaConnector resources must be deployed to the same namespace as the Kafka Connect cluster they link to.
You manage a running connector instance by updating its corresponding KafkaConnector resource, and then applying the updates. Annotations are used to manually restart connector instances and connector tasks. You remove a connector by deleting its corresponding KafkaConnector.
To ensure compatibility with earlier versions of Strimzi, KafkaConnectors are disabled by default. To enable them for a Kafka Connect cluster, you must use annotations on the KafkaConnect resource.
For instructions, see Configuring Kafka Connect in the Using Strimzi guide.
When KafkaConnectors are enabled, the Cluster Operator begins to watch for them. It updates the configurations of running connector instances to match the configurations defined in their KafkaConnectors.
Strimzi includes an example KafkaConnector, named examples/connect/source-connector.yaml. You can use this example to create and manage a FileStreamSourceConnector and a FileStreamSinkConnector as described in Deploying the example KafkaConnector resources.
Availability of the Kafka Connect REST API
The Kafka Connect REST API is available on port 8083 as the <connect-cluster-name>-connect-api service.
If KafkaConnectors are enabled, manual changes made directly using the Kafka Connect REST API are reverted by the Cluster Operator.
The operations supported by the REST API are described in the Apache Kafka documentation.
4.2.5. Deploying the example KafkaConnector resources
Strimzi includes an example KafkaConnector in examples/connect/source-connector.yaml.
This creates a basic FileStreamSourceConnector instance that sends each line of the Kafka license file (an example file source) to a single Kafka topic.
This procedure describes how to create:
-
A
FileStreamSourceConnectorthat reads data from the Kafka license file (the source) and writes the data as messages to a Kafka topic. -
A
FileStreamSinkConnectorthat reads messages from the Kafka topic and writes the messages to a temporary file (the sink).
|
Note
|
In a production environment, you prepare container images containing your desired Kafka Connect connectors, as described in Extending Kafka Connect with connector plug-ins. The |
-
A Kafka Connect deployment
-
The Cluster Operator is running
-
Edit the
examples/connect/source-connector.yamlfile:apiVersion: kafka.strimzi.io/v1beta2 kind: KafkaConnector metadata: name: my-source-connector (1) labels: strimzi.io/cluster: my-connect-cluster (2) spec: class: org.apache.kafka.connect.file.FileStreamSourceConnector (3) tasksMax: 2 (4) config: (5) file: "/opt/kafka/LICENSE" (6) topic: my-topic (7) # ...-
Name of the KafkaConnector resource, which is used as the name of the connector. Use any name that is valid for a Kubernetes resource.
-
Name of the Kafka Connect cluster to create the connector instance in. Connectors must be deployed to the same namespace as the Kafka Connect cluster they link to.
-
Full name or alias of the connector class. This should be present in the image being used by the Kafka Connect cluster.
-
Maximum number of Kafka Connect
Tasksthat the connector can create. -
Connector configuration as key-value pairs.
-
This example source connector configuration reads data from the
/opt/kafka/LICENSEfile. -
Kafka topic to publish the source data to.
-
-
Create the source
KafkaConnectorin your Kubernetes cluster:kubectl apply -f examples/connect/source-connector.yaml -
Create an
examples/connect/sink-connector.yamlfile:touch examples/connect/sink-connector.yaml -
Paste the following YAML into the
sink-connector.yamlfile:apiVersion: kafka.strimzi.io/v1beta2 kind: KafkaConnector metadata: name: my-sink-connector labels: strimzi.io/cluster: my-connect spec: class: org.apache.kafka.connect.file.FileStreamSinkConnector (1) tasksMax: 2 config: (2) file: "/tmp/my-file" (3) topics: my-topic (4)-
Full name or alias of the connector class. This should be present in the image being used by the Kafka Connect cluster.
-
Connector configuration as key-value pairs.
-
Temporary file to publish the source data to.
-
Kafka topic to read the source data from.
-
-
Create the sink
KafkaConnectorin your Kubernetes cluster:kubectl apply -f examples/connect/sink-connector.yaml -
Check that the connector resources were created:
kubectl get kctr --selector strimzi.io/cluster=MY-CONNECT-CLUSTER -o name

my-source-connector
my-sink-connector
Replace MY-CONNECT-CLUSTER with your Kafka Connect cluster.
-
In the container, execute
kafka-console-consumer.shto read the messages that were written to the topic by the source connector:kubectl exec MY-CLUSTER-kafka-0 -i -t -- bin/kafka-console-consumer.sh --bootstrap-server MY-CLUSTER-kafka-bootstrap.NAMESPACE.svc:9092 --topic my-topic --from-beginning
Source and sink connector configuration options
The connector configuration is defined in the spec.config property of the KafkaConnector resource.
The FileStreamSourceConnector and FileStreamSinkConnector classes support the same configuration options as the Kafka Connect REST API.
Other connectors support different configuration options.
| Name | Type | Default value | Description |
|---|---|---|---|
|
String |
Null |
Source file to write messages to. If not specified, the standard input is used. |
|
List |
Null |
The Kafka topic to publish data to. |
| Name | Type | Default value | Description |
|---|---|---|---|
|
String |
Null |
Destination file to write messages to. If not specified, the standard output is used. |
|
List |
Null |
One or more Kafka topics to read data from. |
|
String |
Null |
A regular expression matching one or more Kafka topics to read data from. |
4.2.6. Performing a restart of a Kafka connector
This procedure describes how to manually trigger a restart of a Kafka connector by using a Kubernetes annotation.
-
The Cluster Operator is running.
-
Find the name of the
KafkaConnectorcustom resource that controls the Kafka connector you want to restart:kubectl get KafkaConnector -
To restart the connector, annotate the
KafkaConnectorresource in Kubernetes. For example, usingkubectl annotate:kubectl annotate KafkaConnector KAFKACONNECTOR-NAME strimzi.io/restart=true -
Wait for the next reconciliation to occur (every two minutes by default).
The Kafka connector is restarted, as long as the annotation was detected by the reconciliation process. When Kafka Connect accepts the restart request, the annotation is removed from the
KafkaConnectorcustom resource.
-
Creating and managing connectors in the Deploying and Upgrading guide.
4.2.7. Performing a restart of a Kafka connector task
This procedure describes how to manually trigger a restart of a Kafka connector task by using a Kubernetes annotation.
-
The Cluster Operator is running.
-
Find the name of the
KafkaConnectorcustom resource that controls the Kafka connector task you want to restart:kubectl get KafkaConnector -
Find the ID of the task to be restarted from the
KafkaConnectorcustom resource. Task IDs are non-negative integers, starting from 0.kubectl describe KafkaConnector KAFKACONNECTOR-NAME -
To restart the connector task, annotate the
KafkaConnectorresource in Kubernetes. For example, usingkubectl annotateto restart task 0:kubectl annotate KafkaConnector KAFKACONNECTOR-NAME strimzi.io/restart-task=0 -
Wait for the next reconciliation to occur (every two minutes by default).
The Kafka connector task is restarted, as long as the annotation was detected by the reconciliation process. When Kafka Connect accepts the restart request, the annotation is removed from the
KafkaConnectorcustom resource.
-
Creating and managing connectors in the Deploying and Upgrading guide.
4.3. Deploy Kafka MirrorMaker
The Cluster Operator deploys one or more Kafka MirrorMaker replicas to replicate data between Kafka clusters. This process is called mirroring to avoid confusion with the Kafka partitions replication concept. MirrorMaker consumes messages from the source cluster and republishes those messages to the target cluster.
4.3.1. Deploying Kafka MirrorMaker to your Kubernetes cluster
This procedure shows how to deploy a Kafka MirrorMaker cluster to your Kubernetes cluster using the Cluster Operator.
The deployment uses a YAML file to provide the specification to create a KafkaMirrorMaker or KafkaMirrorMaker2 resource depending on the version of MirrorMaker deployed.
In this procedure, we use the example files provided with Strimzi:
-
examples/mirror-maker/kafka-mirror-maker.yaml -
examples/mirror-maker/kafka-mirror-maker-2.yaml
For information about configuring KafkaMirrorMaker or KafkaMirrorMaker2 resources,
see Kafka MirrorMaker cluster configuration in the Using Strimzi guide.
-
Deploy Kafka MirrorMaker to your Kubernetes cluster:
For MirrorMaker:
kubectl apply -f examples/mirror-maker/kafka-mirror-maker.yamlFor MirrorMaker 2.0:
kubectl apply -f examples/mirror-maker/kafka-mirror-maker-2.yaml -
Verify that MirrorMaker was successfully deployed:
kubectl get deployments
4.4. Deploy Kafka Bridge
The Cluster Operator deploys one or more Kafka bridge replicas to send data between Kafka clusters and clients via HTTP API.
4.4.1. Deploying Kafka Bridge to your Kubernetes cluster
This procedure shows how to deploy a Kafka Bridge cluster to your Kubernetes cluster using the Cluster Operator.
The deployment uses a YAML file to provide the specification to create a KafkaBridge resource.
In this procedure, we use the example file provided with Strimzi:
-
examples/bridge/kafka-bridge.yaml
For information about configuring the KafkaBridge resource,
see Kafka Bridge cluster configuration in the Using Strimzi guide.
-
Deploy Kafka Bridge to your Kubernetes cluster:
kubectl apply -f examples/bridge/kafka-bridge.yaml -
Verify that Kafka Bridge was successfully deployed:
kubectl get deployments
5. Setting up client access to the Kafka cluster
After you have deployed Strimzi, the procedures in this section explain how to:
-
Deploy example producer and consumer clients, which you can use to verify your deployment
-
Set up external client access to the Kafka cluster
The steps to set up access to the Kafka cluster for a client outside Kubernetes are more complex, and require familiarity with the Kafka component configuration procedures described in the Using Strimzi guide.
5.1. Deploying example clients
This procedure shows how to deploy example producer and consumer clients that use the Kafka cluster you created to send and receive messages.
-
The Kafka cluster is available for the clients.
-
Deploy a Kafka producer.
kubectl run kafka-producer -ti --image=quay.io/strimzi/kafka:0.22.1-kafka-2.7.0 --rm=true --restart=Never -- bin/kafka-console-producer.sh --broker-list cluster-name-kafka-bootstrap:9092 --topic my-topic -
Type a message into the console where the producer is running.
-
Press Enter to send the message.
-
Deploy a Kafka consumer.
kubectl run kafka-consumer -ti --image=quay.io/strimzi/kafka:0.22.1-kafka-2.7.0 --rm=true --restart=Never -- bin/kafka-console-consumer.sh --bootstrap-server cluster-name-kafka-bootstrap:9092 --topic my-topic --from-beginning -
Confirm that you see the incoming messages in the consumer console.
5.2. Setting up access for clients outside of Kubernetes
This procedure shows how to configure client access to a Kafka cluster from outside Kubernetes.
Using the address of the Kafka cluster, you can provide external access to a client on a different Kubernetes namespace or outside Kubernetes entirely.
You configure an external Kafka listener to provide the access.
The following external listener types are supported:
-
routeto use OpenShiftRouteand the default HAProxy router -
loadbalancerto use loadbalancer services -
nodeportto use ports on Kubernetes nodes -
ingressto use Kubernetes Ingress and the NGINX Ingress Controller for Kubernetes
The type chosen depends on your requirements, and your environment and infrastructure. For example, loadbalancers might not be suitable for certain infrastructure, such as bare metal, where node ports provide a better option.
In this procedure:
-
An external listener is configured for the Kafka cluster, with TLS encryption and authentication, and Kafka simple authorization is enabled.
-
A
KafkaUseris created for the client, with TLS authentication and Access Control Lists (ACLs) defined for simple authorization.
You can configure your listener to use TLS or SCRAM-SHA-512 authentication, both of which can be used with TLS encryption. If you are using an authorization server, you can use token-based OAuth 2.0 authentication and OAuth 2.0 authorization. Open Policy Agent (OPA) authorization is also supported as a Kafka authorization option.
When you configure the KafkaUser authentication and authorization mechanisms, ensure they match the equivalent Kafka configuration:
-
KafkaUser.spec.authenticationmatchesKafka.spec.kafka.listeners[*].authentication -
KafkaUser.spec.authorizationmatchesKafka.spec.kafka.authorization
You should have at least one listener supporting the authentication you want to use for the KafkaUser.
|
Note
|
Authentication between Kafka users and Kafka brokers depends on the authentication settings for each. For example, it is not possible to authenticate a user with TLS if it is not also enabled in the Kafka configuration. |
Strimzi operators automate the configuration process:
-
The Cluster Operator creates the listeners and sets up the cluster and client certificate authority (CA) certificates to enable authentication within the Kafka cluster.
-
The User Operator creates the user representing the client and the security credentials used for client authentication, based on the chosen authentication type.
In this procedure, the certificates generated by the Cluster Operator are used, but you can replace them by installing your own certificates. You can also configure your listener to use a Kafka listener certificate managed by an external Certificate Authority.
Certificates are available in PKCS #12 format (.p12) and PEM (.crt) formats.
-
The Kafka cluster is available for the client
-
The Cluster Operator and User Operator are running in the cluster
-
A client outside the Kubernetes cluster to connect to the Kafka cluster
-
Configure the Kafka cluster with an
externalKafka listener.-
Define the authentication required to access the Kafka broker through the listener
-
Enable authorization on the Kafka broker
For example:
apiVersion: kafka.strimzi.io/v1beta2 kind: Kafka metadata: name: my-cluster namespace: myproject spec: kafka: # ... listeners: (1) - name: external (2) port: 9094 (3) type: LISTENER-TYPE (4) tls: true (5) authentication: type: tls (6) configuration: preferredNodePortAddressType: InternalDNS (7) bootstrap and broker service overrides (8) #... authorization: (9) type: simple superUsers: - super-user-name (10) # ...-
Configuration options for enabling external listeners are described in the Generic Kafka listener schema reference.
-
Name to identify the listener. Must be unique within the Kafka cluster.
-
Port number used by the listener inside Kafka. The port number has to be unique within a given Kafka cluster. Allowed port numbers are 9092 and higher with the exception of ports 9404 and 9999, which are already used for Prometheus and JMX. Depending on the listener type, the port number might not be the same as the port number that connects Kafka clients.
-
External listener type specified as
route,loadbalancer,nodeportoringress. An internal listener is specified asinternal. -
Enables TLS encryption on the listener. Default is
false. TLS encryption is not required forroutelisteners. -
Authentication specified as
tls. -
(Optional, for
nodeportlisteners only) Configuration to specify a preference for the first address type used by Strimzi as the node address. -
(Optional) Strimzi automatically determines the addresses to advertise to clients. The addresses are automatically assigned by Kubernetes. You can override bootstrap and broker service addresses if the infrastructure on which you are running Strimzi does not provide the right address. Validation is not performed on the overrides. The override configuration differs according to the listener type. For example, you can override hosts for
route, DNS names or IP addresses forloadbalancer, and node ports fornodeport. -
Authoization specified as
simple, which uses theAclAuthorizerKafka plugin. -
(Optional) Super users can access all brokers regardless of any access restrictions defined in ACLs.
WarningAn OpenShift Route address comprises the name of the Kafka cluster, the name of the listener, and the name of the namespace it is created in. For example, my-cluster-kafka-listener1-bootstrap-myproject(CLUSTER-NAME-kafka-LISTENER-NAME-bootstrap-NAMESPACE). If you are using aroutelistener type, be careful that the whole length of the address does not exceed a maximum limit of 63 characters. -
-
-
Create or update the
Kafkaresource.kubectl apply -f KAFKA-CONFIG-FILEThe Kafka cluster is configured with a Kafka broker listener using TLS authentication.
A service is created for each Kafka broker pod.
A service is created to serve as the bootstrap address for connection to the Kafka cluster.
A service is also created as the external bootstrap address for external connection to the Kafka cluster using
nodeportlisteners.The cluster CA certificate to verify the identity of the kafka brokers is also created with the same name as the
Kafkaresource. -
Find the bootstrap address and port from the status of the
Kafkaresource.kubectl get kafka KAFKA-CLUSTER-NAME -o jsonpath='{.status.listeners[?(@.type=="external")].bootstrapServers}'Use the bootstrap address in your Kafka client to connect to the Kafka cluster.
-
Extract the public cluster CA certificate and password from the generated
KAFKA-CLUSTER-NAME-cluster-ca-certSecret.kubectl get secret KAFKA-CLUSTER-NAME-cluster-ca-cert -o jsonpath='{.data.ca\.p12}' | base64 -d > ca.p12kubectl get secret KAFKA-CLUSTER-NAME-cluster-ca-cert -o jsonpath='{.data.ca\.password}' | base64 -d > ca.passwordUse the certificate and password in your Kafka client to connect to the Kafka cluster with TLS encryption.
NoteCluster CA certificates renew automatically by default. If you are using your own Kafka listener certificates, you will need to renew the certificates manually. -
Create or modify a user representing the client that requires access to the Kafka cluster.
-
Specify the same authentication type as the
Kafkalistener. -
Specify the authorization ACLs for simple authorization.
For example:
apiVersion: kafka.strimzi.io/v1beta2 kind: KafkaUser metadata: name: my-user labels: strimzi.io/cluster: my-cluster (1) spec: authentication: type: tls (2) authorization: type: simple acls: (3) - resource: type: topic name: my-topic patternType: literal operation: Read - resource: type: topic name: my-topic patternType: literal operation: Describe - resource: type: group name: my-group patternType: literal operation: Read-
The label must match the label of the Kafka cluster for the user to be created.
-
Authentication specified as
tls. -
Simple authorization requires an accompanying list of ACL rules to apply to the user. The rules define the operations allowed on Kafka resources based on the username (
my-user).
-
-
-
Create or modify the
KafkaUserresource.kubectl apply -f USER-CONFIG-FILEThe user is created, as well as a Secret with the same name as the
KafkaUserresource. The Secret contains a private and public key for TLS client authentication.For example:
apiVersion: v1 kind: Secret metadata: name: my-user labels: strimzi.io/kind: KafkaUser strimzi.io/cluster: my-cluster type: Opaque data: ca.crt: PUBLIC-KEY-OF-THE-CLIENT-CA user.crt: USER-CERTIFICATE-CONTAINING-PUBLIC-KEY-OF-USER user.key: PRIVATE-KEY-OF-USER user.p12: P12-ARCHIVE-FILE-STORING-CERTIFICATES-AND-KEYS user.password: PASSWORD-PROTECTING-P12-ARCHIVE -
Configure your client to connect to the Kafka cluster with the properties required to make a secure connection to the Kafka cluster.
-
Add the authentication details for the public cluster certificates:
security.protocol: SSL (1) ssl.truststore.location: PATH-TO/ssl/keys/truststore (2) ssl.truststore.password: CLUSTER-CA-CERT-PASSWORD (3) ssl.truststore.type=PKCS12 (4)-
Enables TLS encryption (with or without TLS client authentication).
-
Specifies the truststore location where the certificates were imported.
-
Specifies the password for accessing the truststore. This property can be omitted if it is not needed by the truststore.
-
Identifies the truststore type.
NoteUse security.protocol: SASL_SSLwhen using SCRAM-SHA authentication over TLS. -
-
Add the bootstrap address and port for connecting to the Kafka cluster:
bootstrap.servers: BOOTSTRAP-ADDRESS:PORT -
Add the authentication details for the public user certificates:
ssl.keystore.location: PATH-TO/ssl/keys/user1.keystore (1) ssl.keystore.password: USER-CERT-PASSWORD (2)-
Specifies the keystore location where the certificates were imported.
-
Specifies the password for accessing the keystore. This property can be omitted if it is not needed by the keystore.
The public user certificate is signed by the client CA when it is created.
-
-
6. Introducing Metrics to Kafka
This section describes how to monitor your Strimzi deployment.
Depending on your requirements, you can:
-
Configure the
Kafkaresource to deploy Kafka Exporter with your Kafka clusterKafka Exporter provides additional monitoring related to consumer lag.
With Prometheus and Grafana set up, you can use the example Grafana dashboards provided by Strimzi for monitoring.
Additionally, you can configure your deployment to track messages end-to-end by setting up distributed tracing, as described in the Using Strimzi guide.
-
Apache Kafka Monitoring describes JMX metrics exposed by Apache Kafka
-
ZooKeeper JMX describes JMX metrics exposed by Apache ZooKeeper
6.1. Example metrics files
You can find example Grafana dashboards and other metrics configuration files in the examples/metrics directory.
metrics
├── grafana-dashboards (1)
│   ├── strimzi-cruise-control.json
│   ├── strimzi-kafka-bridge.json
│   ├── strimzi-kafka-connect.json
│   ├── strimzi-kafka-exporter.json
│   ├── strimzi-kafka-mirror-maker-2.json
│   ├── strimzi-kafka.json
│   ├── strimzi-operators.json
│   └── strimzi-zookeeper.json
├── grafana-install
│   └── grafana.yaml (2)
├── prometheus-additional-properties
│   └── prometheus-additional.yaml (3)
├── prometheus-alertmanager-config
│   └── alert-manager-config.yaml (4)
├── prometheus-install
│    ├── alert-manager.yaml (5)
│    ├── prometheus-rules.yaml (6)
│    ├── prometheus.yaml (7)
│    ├── strimzi-pod-monitor.yaml (8)
├── kafka-bridge-metrics.yaml (9)
├── kafka-connect-metrics.yaml (10)
├── kafka-cruise-control-metrics.yaml (11)
├── kafka-metrics.yaml (12)
└── kafka-mirror-maker-2-metrics.yaml (13)-
Example Grafana dashboards for the different Strimzi components.
-
Installation file for the Grafana image.
-
Additional configuration to scrape metrics for CPU, memory and disk volume usage, which comes directly from the Kubernetes cAdvisor agent and kubelet on the nodes.
-
Hook definitions for sending notifications through Alertmanager.
-
Resources for deploying and configuring Alertmanager.
-
Alerting rules examples for use with Prometheus Alertmanager (deployed with Prometheus).
-
Installation resource file for the Prometheus image.
-
PodMonitor definitions translated by the Prometheus Operator into jobs for the Prometheus server to be able to scrape metrics data directly from pods.
-
Kafka Bridge resource with metrics enabled.
-
Metrics configuration that defines Prometheus JMX Exporter relabeling rules for Kafka Connect.
-
Metrics configuration that defines Prometheus JMX Exporter relabeling rules for Cruise Control.
-
Metrics configuration that defines Prometheus JMX Exporter relabeling rules for Kafka and ZooKeeper.
-
Metrics configuration that defines Prometheus JMX Exporter relabeling rules for Kafka Mirror Maker 2.0.
6.1.1. Example Grafana dashboards
Example Grafana dashboards are provided for monitoring:
-
Strimzi Operators
-
Kafka
-
Kafka ZooKeeper
-
Kafka Connect
-
Kafka MirrorMaker 2.0
All dashboards provide JVM metrics, as well as metrics specific to the component. For example, the Grafana dashboard for Strimzi Operators provides information on the number of reconciliations or custom resources they are processing.
6.1.2. Example Prometheus metrics configuration
Strimzi uses the Prometheus JMX Exporter to expose JMX metrics using an HTTP endpoint, which is then scraped by the Prometheus server.
Grafana dashboards are dependent on Prometheus JMX Exporter relabeling rules, which are defined for Strimzi components as custom resource configuration.
A label is a name-value pair. Relabeling is the process of writing a label dynamically. For example, the value of a label may be derived from the name of a Kafka server and client ID.
Strimzi provides example custom resource configuration YAML files with relabeling rules. When deploying Prometheus metrics configuration, you can can deploy the example custom resource or copy the metrics configuration to your own custom resource definition.
| Component | Custom resource | Example YAML file |
|---|---|---|
Kafka and ZooKeeper |
|
|
Kafka Connect |
|
|
Kafka MirrorMaker 2.0 |
|
|
Kafka Bridge |
|
|
Cruise Control |
|
|
For more information on the use of relabeling, see Configuration in the Prometheus documentation.
6.2. Add Prometheus and Grafana
You can use Prometheus to provide monitoring data for the example Grafana dashboards provided with Strimzi.
In order to run the example Grafana dashboards, you must:
|
Note
|
The resources referenced in this section are intended as a starting point for setting up monitoring, but they are provided as examples only. If you require further support on configuring and running Prometheus or Grafana in production, try reaching out to their respective communities. |
6.2.1. Deploying Prometheus metrics configuration
Strimzi provides example custom resource configuration YAML files with relabeling rules.
To apply metrics configuration of relabeling rules, do one of the following:
Copying Prometheus metrics configuration to a custom resource
To use Grafana dashboards for monitoring, copy the example metrics configuration to a custom resource.
In this procedure, the Kafka resource is updated, but the procedure is the same for all components that support monitoring.
Perform the following steps for each Kafka resource in your deployment.
-
Update the
Kafkaresource in an editor.kubectl edit kafka KAFKA-CONFIG-FILE -
Copy the example configuration in
kafka-metrics.yamlto your ownKafkaresource definition. -
Save the file, and wait for the updated resource to be reconciled.
Deploying a Kafka cluster with Prometheus metrics configuration
To use Grafana dashboards for monitoring, you can deploy an example Kafka cluster with metrics configuration.
In this procedure, The kafka-metrics.yaml file is used for the Kafka resource.
-
Deploy the Kafka cluster with the example metrics configuration.
kubectl apply -f kafka-metrics.yaml
6.2.2. Setting up Prometheus
Prometheus provides an open source set of components for systems monitoring and alert notification.
We describe here how you can use the CoreOS Prometheus Operator to run and manage a Prometheus server that is suitable for use in production environments, but with the correct configuration you can run any Prometheus server.
|
Note
|
The Prometheus server configuration uses service discovery to discover the pods in the cluster from which it gets metrics. For this feature to work correctly, the service account used for running the Prometheus service pod must have access to the API server so it can retrieve the pod list. For more information, see Discovering services. |
Prometheus configuration
Strimzi provides example configuration files for the Prometheus server.
A Prometheus image is provided for deployment:
-
prometheus.yaml
Additional Prometheus-related configuration is also provided in the following files:
-
prometheus-additional.yaml -
prometheus-rules.yaml -
strimzi-pod-monitor.yaml
For Prometheus to obtain monitoring data:
Then use the configuration files to:
The prometheus-rules.yaml file provides example alerting rule examples for use with Alertmanager.
Prometheus resources
When you apply the Prometheus configuration, the following resources are created in your Kubernetes cluster and managed by the Prometheus Operator:
-
A
ClusterRolethat grants permissions to Prometheus to read the health endpoints exposed by the Kafka and ZooKeeper pods, cAdvisor and the kubelet for container metrics. -
A
ServiceAccountfor the Prometheus pods to run under. -
A
ClusterRoleBindingwhich binds theClusterRoleto theServiceAccount. -
A
Deploymentto manage the Prometheus Operator pod. -
A
PodMonitorto manage the configuration of the Prometheus pod. -
A
Prometheusto manage the configuration of the Prometheus pod. -
A
PrometheusRuleto manage alerting rules for the Prometheus pod. -
A
Secretto manage additional Prometheus settings. -
A
Serviceto allow applications running in the cluster to connect to Prometheus (for example, Grafana using Prometheus as datasource).
Deploying the CoreOS Prometheus Operator
To deploy the Prometheus Operator to your Kafka cluster, apply the YAML bundle resources file from the Prometheus CoreOS repository.
-
Download the
bundle.yamlresources file from the repository.On Linux, use:
curl -s https://raw.githubusercontent.com/coreos/prometheus-operator/master/bundle.yaml | sed -e '/[[:space:]]*namespace: [a-zA-Z0-9-]*$/s/namespace:[[:space:]]*[a-zA-Z0-9-]*$/namespace: my-namespace/' > prometheus-operator-deployment.yamlOn MacOS, use:
curl -s https://raw.githubusercontent.com/coreos/prometheus-operator/master/bundle.yaml | sed -e '' '/[[:space:]]*namespace: [a-zA-Z0-9-]*$/s/namespace:[[:space:]]*[a-zA-Z0-9-]*$/namespace: my-namespace/' > prometheus-operator-deployment.yaml-
Replace the example
namespacewith your own. -
Use the latest
masterrelease as shown, or choose a release that is compatible with your version of Kubernetes (see the Kubernetes compatibility matrix). Themasterrelease of the Prometheus Operator works with Kubernetes 1.18+.NoteIf using OpenShift, specify a release of the OpenShift fork of the Prometheus Operator repository.
-
-
(Optional) If it is not required, you can manually remove the
spec.template.spec.securityContextproperty from theprometheus-operator-deployment.yamlfile. -
Deploy the Prometheus Operator:
kubectl apply -f prometheus-operator-deployment.yaml
Deploying Prometheus
To obtain monitoring data in your Kafka cluster, you can use your own Prometheus deployment or deploy Prometheus by applying the example installation resource file for the Prometheus docker image and the YAML files for Prometheus-related resources.
The deployment process creates a ClusterRoleBinding and discovers an Alertmanager instance in the namespace specified for the deployment.
|
Note
|
By default, the Prometheus Operator only supports jobs that include an endpoints role for service discovery. Targets are discovered and scraped for each endpoint port address. For endpoint discovery, the port address may be derived from service (role: service) or pod (role: pod) discovery.
|
-
Check the example alerting rules provided
-
Modify the Prometheus installation file (
prometheus.yaml) according to the namespace Prometheus is going to be installed into:On Linux, use:
sed -i 's/namespace: .*/namespace: my-namespace/' prometheus.yamlOn MacOS, use:
sed -i '' 's/namespace: .*/namespace: my-namespace/' prometheus.yaml -
Edit the
PodMonitorresource instrimzi-pod-monitor.yamlto define Prometheus jobs that will scrape the metrics data from pods.Update the
namespaceSelector.matchNamesproperty with the namespace where the pods to scrape the metrics from are running.PodMonitoris used to scrape data directly from pods for Apache Kafka, ZooKeeper, Operators, the Kafka Bridge and Cruise Control. -
Edit the
prometheus.yamlinstallation file to include additional configuration for scraping metrics directly from nodes.The Grafana dashboards provided show metrics for CPU, memory and disk volume usage, which come directly from the Kubernetes cAdvisor agent and kubelet on the nodes.
The Prometheus Operator does not have a monitoring resource like
PodMonitorfor scraping the nodes, so theprometheus-additional.yamlfile contains the additional configuration needed.-
Create a
Secretresource from the configuration file (prometheus-additional.yamlin theexamples/metrics/prometheus-additional-propertiesdirectory):kubectl apply -f prometheus-additional.yaml -
Edit the
additionalScrapeConfigsproperty in theprometheus.yamlfile to include the name of theSecretand theprometheus-additional.yamlfile.
-
-
Deploy the Prometheus resources:
kubectl apply -f strimzi-pod-monitor.yaml
kubectl apply -f prometheus-rules.yaml
kubectl apply -f prometheus.yaml
6.2.3. Setting up Prometheus Alertmanager
Prometheus Alertmanager is a plugin for handling alerts and routing them to a notification service. Alertmanager supports an essential aspect of monitoring, which is to be notified of conditions that indicate potential issues based on alerting rules.
Alertmanager configuration
Strimzi provides example configuration files for Prometheus Alertmanager.
A configuration file defines the resources for deploying Alertmanager:
-
alert-manager.yaml
An additional configuration file provides the hook definitions for sending notifications from your Kafka cluster.
-
alert-manager-config.yaml
For Alertmanger to handle Prometheus alerts, use the configuration files to:
Alerting rules
Alerting rules provide notifications about specific conditions observed in the metrics. Rules are declared on the Prometheus server, but Prometheus Alertmanager is responsible for alert notifications.
Prometheus alerting rules describe conditions using PromQL expressions that are continuously evaluated.
When an alert expression becomes true, the condition is met and the Prometheus server sends alert data to the Alertmanager. Alertmanager then sends out a notification using the communication method configured for its deployment.
Alertmanager can be configured to use email, chat messages or other notification methods.
For more information about setting up alerting rules, see Configuration in the Prometheus documentation.
Alerting rule examples
Example alerting rules for Kafka and ZooKeeper metrics are provided with Strimzi for use in a Prometheus deployment.
General points about the alerting rule definitions:
-
A
forproperty is used with the rules to determine the period of time a condition must persist before an alert is triggered. -
A tick is a basic ZooKeeper time unit, which is measured in milliseconds and configured using the
tickTimeparameter ofKafka.spec.zookeeper.config. For example, if ZooKeepertickTime=3000, 3 ticks (3 x 3000) equals 9000 milliseconds. -
The availability of the
ZookeeperRunningOutOfSpacemetric and alert is dependent on the Kubernetes configuration and storage implementation used. Storage implementations for certain platforms may not be able to supply the information on available space required for the metric to provide an alert.
UnderReplicatedPartitions-
Gives the number of partitions for which the current broker is the lead replica but which have fewer replicas than the
min.insync.replicasconfigured for their topic. This metric provides insights about brokers that host the follower replicas. Those followers are not keeping up with the leader. Reasons for this could include being (or having been) offline, and over-throttled interbroker replication. An alert is raised when this value is greater than zero, providing information on the under-replicated partitions for each broker. AbnormalControllerState-
Indicates whether the current broker is the controller for the cluster. The metric can be 0 or 1. During the life of a cluster, only one broker should be the controller and the cluster always needs to have an active controller. Having two or more brokers saying that they are controllers indicates a problem. If the condition persists, an alert is raised when the sum of all the values for this metric on all brokers is not equal to 1, meaning that there is no active controller (the sum is 0) or more than one controller (the sum is greater than 1).
UnderMinIsrPartitionCount-
Indicates that the minimum number of in-sync replicas (ISRs) for a lead Kafka broker, specified using
min.insync.replicas, that must acknowledge a write operation has not been reached. The metric defines the number of partitions that the broker leads for which the in-sync replicas count is less than the minimum in-sync. An alert is raised when this value is greater than zero, providing information on the partition count for each broker that did not achieve the minimum number of acknowledgments. OfflineLogDirectoryCount-
Indicates the number of log directories which are offline (for example, due to a hardware failure) so that the broker cannot store incoming messages anymore. An alert is raised when this value is greater than zero, providing information on the number of offline log directories for each broker.
KafkaRunningOutOfSpace-
Indicates the remaining amount of disk space that can be used for writing data. An alert is raised when this value is lower than 5GiB, providing information on the disk that is running out of space for each persistent volume claim. The threshold value may be changed in
prometheus-rules.yaml.
AvgRequestLatency-
Indicates the amount of time it takes for the server to respond to a client request. An alert is raised when this value is greater than 10 (ticks), providing the actual value of the average request latency for each server.
OutstandingRequests-
Indicates the number of queued requests in the server. This value goes up when the server receives more requests than it can process. An alert is raised when this value is greater than 10, providing the actual number of outstanding requests for each server.
ZookeeperRunningOutOfSpace-
Indicates the remaining amount of disk space that can be used for writing data to ZooKeeper. An alert is raised when this value is lower than 5GiB., providing information on the disk that is running out of space for each persistent volume claim.
Deploying Alertmanager
To deploy Alertmanager, apply the example configuration files.
The sample configuration provided with Strimzi configures the Alertmanager to send notifications to a Slack channel.
The following resources are defined on deployment:
-
An
Alertmanagerto manage the Alertmanager pod. -
A
Secretto manage the configuration of the Alertmanager. -
A
Serviceto provide an easy to reference hostname for other services to connect to Alertmanager (such as Prometheus).
-
Create a
Secretresource from the Alertmanager configuration file (alert-manager-config.yamlin theexamples/metrics/prometheus-alertmanager-configdirectory):kubectl apply -f alert-manager-config.yaml -
Update the
alert-manager-config.yamlfile to replace the:-
slack_api_urlproperty with the actual value of the Slack API URL related to the application for the Slack workspace -
channelproperty with the actual Slack channel on which to send notifications
-
-
Deploy Alertmanager:
kubectl apply -f alert-manager.yaml
6.2.4. Setting up Grafana
Grafana provides visualizations of Prometheus metrics.
You can deploy and enable the example Grafana dashboards provided with Strimzi.
Deploying Grafana
To provide visualizations of Prometheus metrics,
you can use your own Grafana installation or deploy Grafana by applying the grafana.yaml file provided in the examples/metrics directory.
-
Deploy Grafana:
kubectl apply -f grafana.yaml
Enabling the example Grafana dashboards
Strimzi provides example dashboard configuration files for Grafana.
Example dashboards are provided in the examples/metrics/grafana-dashboards directory as JSON files:
-
strimzi-kafka.json -
strimzi-zookeeper.json -
strimzi-operators.json -
strimzi-kafka-connect.json -
strimzi-kafka-mirror-maker-2.json -
strimzi-kafka-bridge.json -
strimzi-cruise-control.json -
strimzi-kafka-exporter.json
The example dashboards are a good starting point for monitoring key metrics, but they do not represent all available metrics. You can modify the example dashboards or add other metrics, depending on your infrastructure.
After setting up Prometheus and Grafana, you can visualize the Strimzi data on the Grafana dashboards.
|
Note
|
No alert notification rules are defined. |
When accessing a dashboard, you can use the port-forward command to forward traffic from the Grafana pod to the host.
|
Note
|
The name of the Grafana pod is different for each user. |
-
Get the details of the Grafana service:
kubectl get service grafanaFor example:
NAME TYPE CLUSTER-IP PORT(S) grafana
ClusterIP
172.30.123.40
3000/TCP
Note the port number for port forwarding.
-
Use
port-forwardto redirect the Grafana user interface tolocalhost:3000:kubectl port-forward svc/grafana 3000:3000 -
Point a web browser to
http://localhost:3000.The Grafana Log In page appears.
-
Enter your user name and password, and then click Log In.
The default Grafana user name and password are both
admin. After logging in for the first time, you can change the password. -
Add Prometheus as a data source.
-
Specify a name
-
Add Prometheus as the type
-
Specify a Prometheus server URL (http://prometheus-operated:9090)
Save and test the connection when you have added the details.
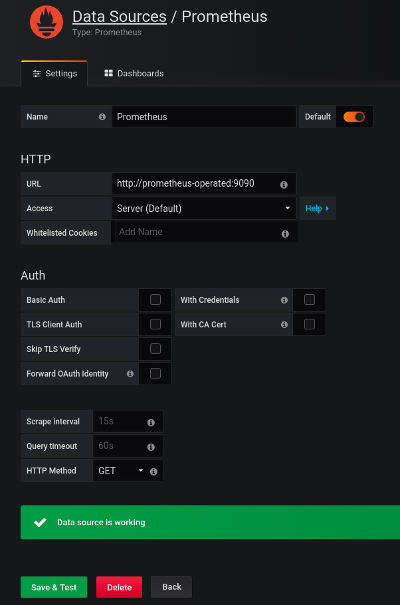
-
-
From , upload the example dashboards or paste the JSON directly.
-
On the top header, click the dashboard drop-down menu, and then select the dashboard you want to view.
When the Prometheus server has been collecting metrics for a Strimzi cluster for some time, the dashboards are populated.
- Strimzi Kafka
-
Shows metrics for:
-
Brokers online count
-
Active controllers in the cluster count
-
Unclean leader election rate
-
Replicas that are online
-
Under-replicated partitions count
-
Partitions which are at their minimum in sync replica count
-
Partitions which are under their minimum in sync replica count
-
Partitions that do not have an active leader and are hence not writable or readable
-
Kafka broker pods memory usage
-
Aggregated Kafka broker pods CPU usage
-
Kafka broker pods disk usage
-
JVM memory used
-
JVM garbage collection time
-
JVM garbage collection count
-
Total incoming byte rate
-
Total outgoing byte rate
-
Incoming messages rate
-
Total produce request rate
-
Byte rate
-
Produce request rate
-
Fetch request rate
-
Network processor average time idle percentage
-
Request handler average time idle percentage
-
Log size
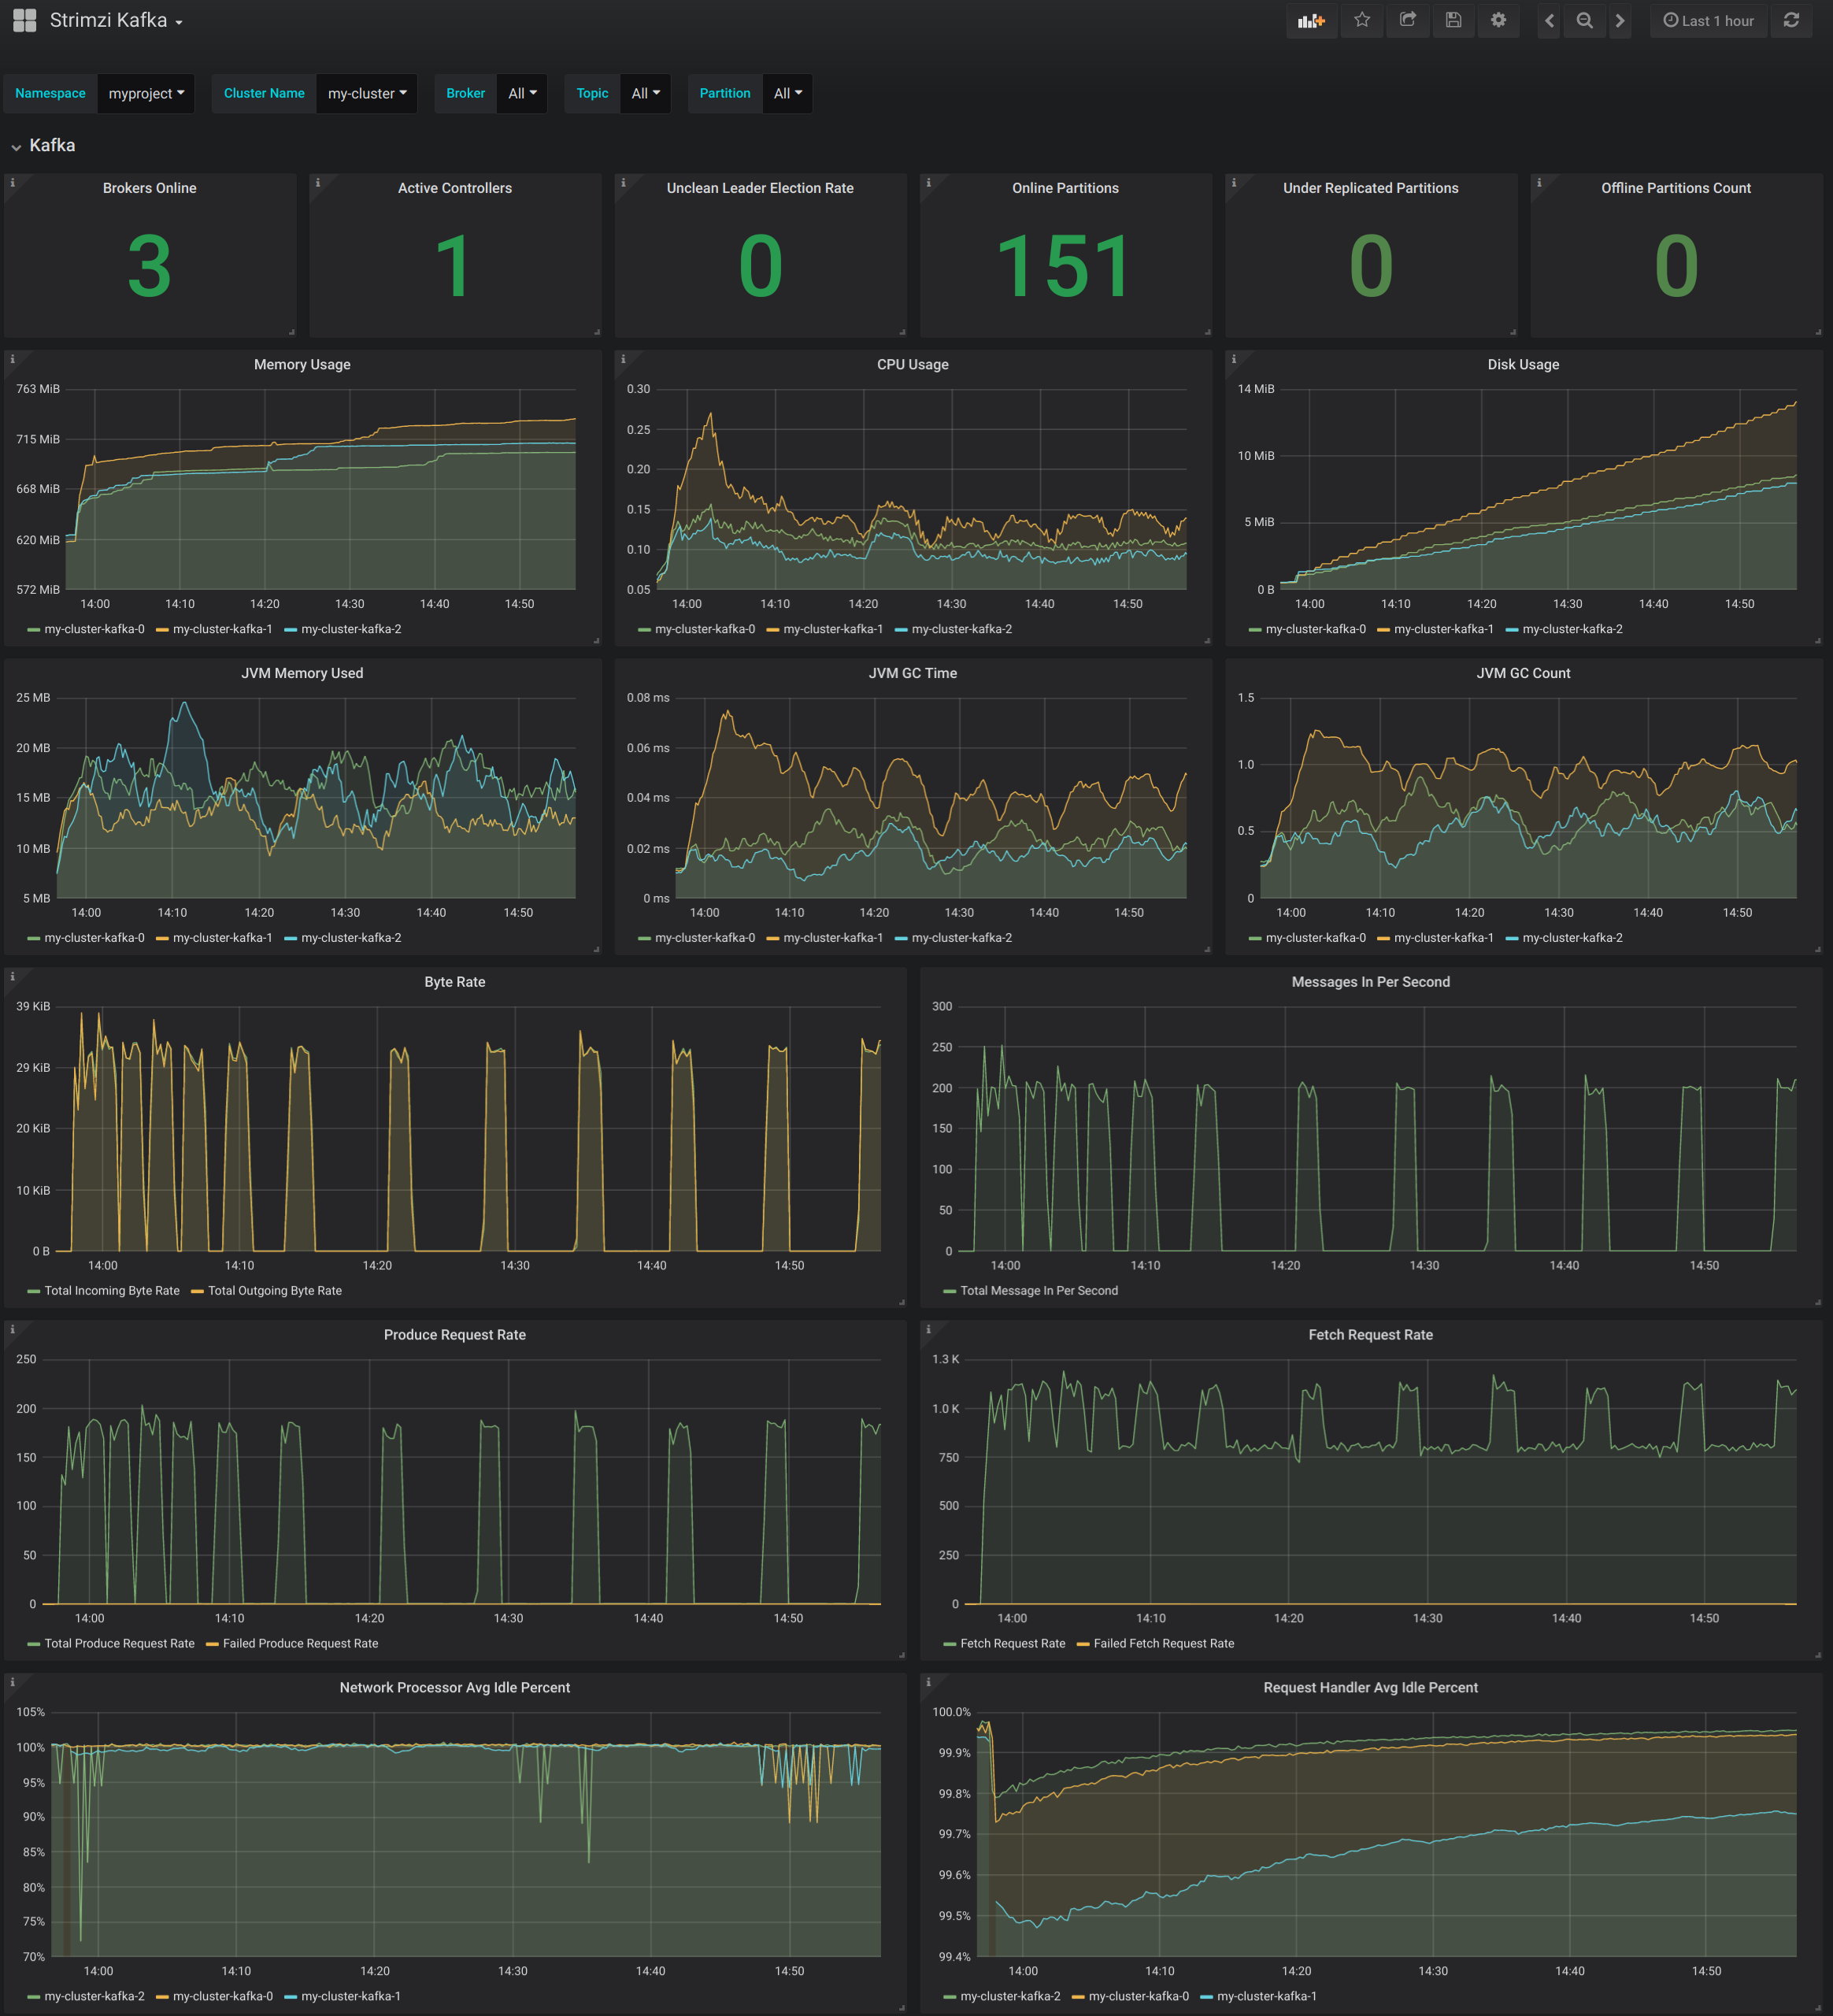 Figure 2. Strimzi Kafka dashboard
-
- Strimzi ZooKeeper
-
Shows metrics for:
-
Quorum Size of Zookeeper ensemble
-
Number of alive connections
-
Queued requests in the server count
-
Watchers count
-
ZooKeeper pods memory usage
-
Aggregated ZooKeeper pods CPU usage
-
ZooKeeper pods disk usage
-
JVM memory used
-
JVM garbage collection time
-
JVM garbage collection count
-
Amount of time it takes for the server to respond to a client request (maximum, minimum and average)
-
- Strimzi Operators
-
Shows metrics for:
-
Custom resources
-
Successful custom resource reconciliations per hour
-
Failed custom resource reconciliations per hour
-
Reconciliations without locks per hour
-
Reconciliations started hour
-
Periodical reconciliations per hour
-
Maximum reconciliation time
-
Average reconciliation time
-
JVM memory used
-
JVM garbage collection time
-
JVM garbage collection count
-
- Strimzi Kafka Connect
-
Shows metrics for:
-
Total incoming byte rate
-
Total outgoing byte rate
-
Disk usage
-
JVM memory used
-
JVM garbage collection time
-
- Strimzi Kafka MirrorMaker 2
-
Shows metrics for:
-
Number of connectors
-
Number of tasks
-
Total incoming byte rate
-
Total outgoing byte rate
-
Disk usage
-
JVM memory used
-
JVM garbage collection time
-
- Strimzi Kafka Bridge
-
See Monitor Kafka Bridge.
- Strimzi Cruise Control
- Strimzi Kafka Exporter
6.2.5. Using metrics with Minikube or Minishift
When adding Prometheus and Grafana servers to an Apache Kafka deployment using Minikube or Minishift, the memory available to the virtual machine should be increased (to 4 GB of RAM, for example, instead of the default 2 GB).
For information on how to increase the default amount of memory, see:
-
Prometheus - Monitoring Docker Container Metrics using cAdvisor describes how to use cAdvisor (short for container Advisor) metrics with Prometheus to analyze and expose resource usage (CPU, Memory, and Disk) and performance data from running containers within pods on Kubernetes.
6.3. Add Kafka Exporter
Kafka Exporter is an open source project to enhance monitoring of Apache Kafka brokers and clients. Kafka Exporter is provided with Strimzi for deployment with a Kafka cluster to extract additional metrics data from Kafka brokers related to offsets, consumer groups, consumer lag, and topics.
The metrics data is used, for example, to help identify slow consumers.
Lag data is exposed as Prometheus metrics, which can then be presented in Grafana for analysis.
If you are already using Prometheus and Grafana for monitoring of built-in Kafka metrics, you can configure Prometheus to also scrape the Kafka Exporter Prometheus endpoint.
Strimzi includes an example Kafka Exporter dashboard in examples/metrics/grafana-dashboards/strimzi-kafka-exporter.json.
6.3.1. Monitoring Consumer lag
Consumer lag indicates the difference in the rate of production and consumption of messages. Specifically, consumer lag for a given consumer group indicates the delay between the last message in the partition and the message being currently picked up by that consumer.
The lag reflects the position of the consumer offset in relation to the end of the partition log.
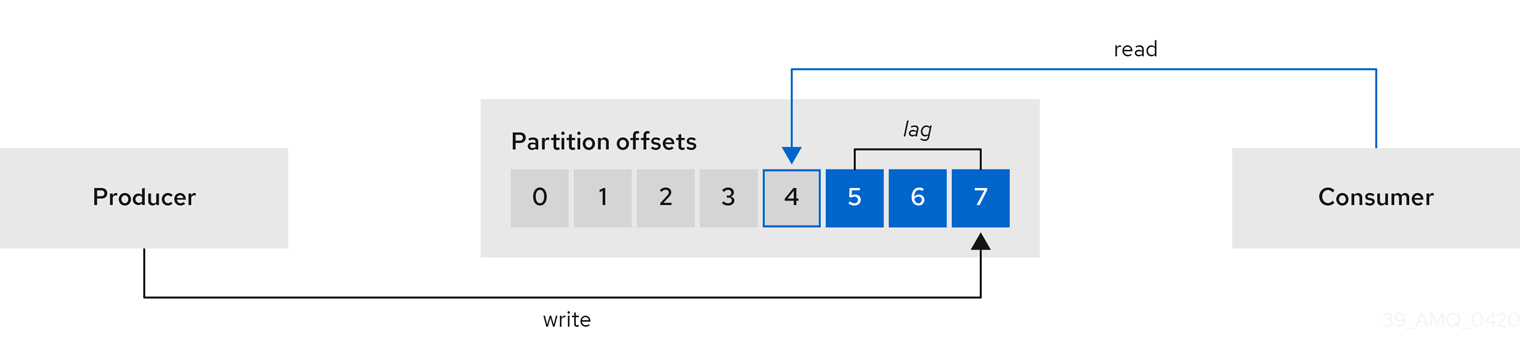
This difference is sometimes referred to as the delta between the producer offset and consumer offset: the read and write positions in the Kafka broker topic partitions.
Suppose a topic streams 100 messages a second. A lag of 1000 messages between the producer offset (the topic partition head) and the last offset the consumer has read means a 10-second delay.
The importance of monitoring consumer lag
For applications that rely on the processing of (near) real-time data, it is critical to monitor consumer lag to check that it does not become too big. The greater the lag becomes, the further the process moves from the real-time processing objective.
Consumer lag, for example, might be a result of consuming too much old data that has not been purged, or through unplanned shutdowns.
Reducing consumer lag
Typical actions to reduce lag include:
-
Scaling-up consumer groups by adding new consumers
-
Increasing the retention time for a message to remain in a topic
-
Adding more disk capacity to increase the message buffer
Actions to reduce consumer lag depend on the underlying infrastructure and the use cases Strimzi is supporting. For instance, a lagging consumer is less likely to benefit from the broker being able to service a fetch request from its disk cache. And in certain cases, it might be acceptable to automatically drop messages until a consumer has caught up.
6.3.2. Example Kafka Exporter alerting rules
If you performed the steps to introduce metrics to your deployment, you will already have your Kafka cluster configured to use the alert notification rules that support Kafka Exporter.
The rules for Kafka Exporter are defined in prometheus-rules.yaml, and are deployed with Prometheus.
For more information, see Prometheus.
The sample alert notification rules specific to Kafka Exporter are as follows:
UnderReplicatedPartition-
An alert to warn that a topic is under-replicated and the broker is not replicating to enough partitions. The default configuration is for an alert if there are one or more under-replicated partitions for a topic. The alert might signify that a Kafka instance is down or the Kafka cluster is overloaded. A planned restart of the Kafka broker may be required to restart the replication process.
TooLargeConsumerGroupLag-
An alert to warn that the lag on a consumer group is too large for a specific topic partition. The default configuration is 1000 records. A large lag might indicate that consumers are too slow and are falling behind the producers.
NoMessageForTooLong-
An alert to warn that a topic has not received messages for a period of time. The default configuration for the time period is 10 minutes. The delay might be a result of a configuration issue preventing a producer from publishing messages to the topic.
Adapt the default configuration of these rules according to your specific needs.
6.3.3. Exposing Kafka Exporter metrics
Lag information is exposed by Kafka Exporter as Prometheus metrics for presentation in Grafana.
Kafka Exporter exposes metrics data for brokers, topics and consumer groups.
These metrics are displayed on the example strimzi-kafka-exporter dashboard.
The data extracted is described here.
| Name | Information |
|---|---|
|
Number of brokers in the Kafka cluster |
| Name | Information |
|---|---|
|
Number of partitions for a topic |
|
Current topic partition offset for a broker |
|
Oldest topic partition offset for a broker |
|
Number of in-sync replicas for a topic partition |
|
Leader broker ID of a topic partition |
|
Shows |
|
Number of replicas for this topic partition |
|
Shows |
| Name | Information |
|---|---|
|
Current topic partition offset for a consumer group |
|
Current approximate lag for a consumer group at a topic partition |
Consumer group metrics are only displayed on the Kafka Exporter dashboard if at least one consumer group has a lag greater than zero.
6.3.4. Configuring Kafka Exporter
This procedure shows how to configure Kafka Exporter in the Kafka resource through KafkaExporter properties.
For more information about configuring the Kafka resource, see Kafka cluster configuration in the Using Strimzi guide.
The properties relevant to the Kafka Exporter configuration are shown in this procedure.
You can configure these properties as part of a deployment or redeployment of the Kafka cluster.
-
A Kubernetes cluster
-
A running Cluster Operator
-
Edit the
KafkaExporterproperties for theKafkaresource.The properties you can configure are shown in this example configuration:
apiVersion: kafka.strimzi.io/v1beta2 kind: Kafka metadata: name: my-cluster spec: # ... kafkaExporter: image: my-org/my-image:latest (1) groupRegex: ".*" (2) topicRegex: ".*" (3) resources: (4) requests: cpu: 200m memory: 64Mi limits: cpu: 500m memory: 128Mi logging: debug (5) enableSaramaLogging: true (6) template: (7) pod: metadata: labels: label1: value1 imagePullSecrets: - name: my-docker-credentials securityContext: runAsUser: 1000001 fsGroup: 0 terminationGracePeriodSeconds: 120 readinessProbe: (8) initialDelaySeconds: 15 timeoutSeconds: 5 livenessProbe: (9) initialDelaySeconds: 15 timeoutSeconds: 5 # ...-
ADVANCED OPTION: Container image configuration, which is recommended only in special situations.
-
A regular expression to specify the consumer groups to include in the metrics.
-
A regular expression to specify the topics to include in the metrics.
-
Logging configuration, to log messages with a given severity (debug, info, warn, error, fatal) or above.
-
Boolean to enable Sarama logging, a Go client library used by Kafka Exporter.
-
-
Create or update the resource:
kubectl apply -f kafka.yaml
After configuring and deploying Kafka Exporter, you can enable Grafana to present the Kafka Exporter dashboards.
6.3.5. Enabling the Kafka Exporter Grafana dashboard
Strimzi provides example dashboard configuration files for Grafana.
The Kafka Exporter dashboard is provided in the examples/metrics directory as a JSON file:
-
strimzi-kafka-exporter.json
If you deployed Kafka Exporter with your Kafka cluster, you can visualize the metrics data it exposes on the Grafana dashboard.
This procedure assumes you already have access to the Grafana user interface and Prometheus has been added as a data source. If you are accessing the user interface for the first time, see Grafana.
-
Select the Strimzi Kafka Exporter dashboard.
When metrics data has been collected for some time, the Kafka Exporter charts are populated.
- Strimzi Kafka Exporter
-
Shows metrics for:
-
Topic count
-
Partition count
-
Replicas count
-
In-sync replicas count
-
Under-replicated partitions count
-
Partitions which are at their minimum in sync replica count
-
Partitions which are under their minimum in sync replica count
-
Partitions not on a preferred node
-
Messages in per second from topics
-
Messages consumed per second from topics
-
Messages consumed per minute by consumer groups
-
Lag by consumer group
-
Number of partitions
-
Latest offsets
-
Oldest offsets
-
Use the Grafana charts to analyze lag and to check if actions to reduce lag are having an impact on an affected consumer group. If, for example, Kafka brokers are adjusted to reduce lag, the dashboard will show the Lag by consumer group chart going down and the Messages consumed per minute chart going up.
6.4. Monitor Kafka Bridge
If you are already using Prometheus and Grafana for monitoring of built-in Kafka metrics, you can configure Prometheus to also scrape the Kafka Bridge Prometheus endpoint.
The example Grafana dashboard for the Kafka Bridge provides:
-
Information about HTTP connections and related requests to the different endpoints
-
Information about the Kafka consumers and producers used by the bridge
-
JVM metrics from the bridge itself
6.4.1. Configuring Kafka Bridge
You can enable the Kafka Bridge metrics in the KafkaBridge resource using the enableMetrics property.
You can configure this property as part of a deployment or redeployment of the Kafka Bridge.
For example:
apiVersion: kafka.strimzi.io/v1beta2
kind: KafkaBridge
metadata:
  name: my-bridge
spec:
  # ...
  bootstrapServers: my-cluster-kafka:9092
  http:
    # ...
  enableMetrics: true
  # ...
6.4.2. Enabling the Kafka Bridge Grafana dashboard
If you deployed Kafka Bridge with your Kafka cluster, you can enable Grafana to present the metrics data it exposes.
A Kafka Bridge dashboard is provided in the examples/metrics directory as a JSON file:
-
strimzi-kafka-bridge.json
When metrics data has been collected for some time, the Kafka Bridge charts are populated.
- Kafka Bridge
-
Shows metrics for:
-
HTTP connections to the Kafka Bridge count
-
HTTP requests being processed count
-
Requests processed per second grouped by HTTP method
-
The total request rate grouped by response codes (2XX, 4XX, 5XX)
-
Bytes received and sent per second
-
Requests for each Kafka Bridge endpoint
-
Number of Kafka consumers, producers, and related opened connections used by the Kafka Bridge itself
-
Kafka producer:
-
The average number of records sent per second (grouped by topic)
-
The number of outgoing bytes sent to all brokers per second (grouped by topic)
-
The average number of records per second that resulted in errors (grouped by topic)
-
-
Kafka consumer:
-
The average number of records consumed per second (grouped by clientId-topic)
-
The average number of bytes consumed per second (grouped by clientId-topic)
-
Partitions assigned (grouped by clientId)
-
-
JVM memory used
-
JVM garbage collection time
-
JVM garbage collection count
-
6.5. Monitor Cruise Control
If you are already using Prometheus and Grafana for monitoring of built-in Kafka metrics, you can configure Prometheus to also scrape the Cruise Control Prometheus endpoint.
The example Grafana dashboard for Cruise Control provides:
-
Information about optimization proposals computation, goals violation, cluster balancedness, and more
-
Information about REST API calls for rebalance proposals and actual rebalance operations
-
JVM metrics from Cruise Control itself
6.5.1. Configuring Cruise Control
Enable Cruise Control metrics using the cruiseControl.metricsConfig property in the Kafka resource to provide a reference to a ConfigMap that contains JMX exporter configuration for the metrics to expose.
For example:
apiVersion: kafka.strimzi.io/v1beta2
kind: Kafka
metadata:
  name: my-cluster
spec:
  # ...
  kafka:
    # ...
  zookeeper:
    # ...
  cruiseControl:
    metricsConfig:
       type: jmxPrometheusExporter
       valueFrom:
         configMapKeyRef:
           name: my-config-map
           key: my-key
6.5.2. Enabling the Cruise Control Grafana dashboard
If you deployed Cruise Control with your Kafka cluster with the metrics enabled, you can enable Grafana to present the metrics data it exposes.
A Cruise Control dashboard is provided in the examples/metrics directory as a JSON file:
-
strimzi-cruise-control.json
When metrics data has been collected for some time, the Cruise Control charts are populated.
- Cruise Control
-
Shows metrics for:
-
Number of snapshot windows that are monitored by Cruise Control
-
Number of time windows considered valid because they contain enough samples to compute an optimization proposal
-
Number of ongoing executions running for proposals or rebalances
-
Current balancedness score of the Kafka cluster as calculated by the anomaly detector component of Cruise Control (every 5 minutes by default)
-
Percentage of monitored partitions
-
Number of goal violations reported by the anomaly detector (every 5 minutes by default)
-
How often a disk read failure happens on the brokers
-
Rate of metric sample fetch failures
-
Time needed to compute an optimization proposal
-
Time needed to create the cluster model
-
How often a proposal request or an actual rebalance request is made through the Cruise Control REST API
-
How often the overall cluster state and the user tasks state are requested through the Cruise Control REST API
-
JVM memory used
-
JVM garbage collection time
-
JVM garbage collection count
-
7. Upgrading Strimzi
Strimzi can be upgraded to version 0.22.1 to take advantage of new features and enhancements, performance improvements, and security options.
As part of the upgrade, you upgrade Kafka to the latest supported version. Each Kafka release introduces new features, improvements, and bug fixes to your Strimzi deployment.
Strimzi can be downgraded to the previous version if you encounter issues with the newer version.
Two upgrade paths are possible:
- Incremental
-
Upgrading Strimzi from the previous minor version to version 0.22.1.
- Multi-version
-
Upgrading Strimzi from an old version to version 0.22.1 within a single upgrade (skipping one or more intermediate versions).
For example, upgrading from Strimzi 0.20.0 directly to Strimzi 0.22.1.
You can review supported Kafka versions in the Supported versions table.
-
The Operators column lists all released Strimzi versions (the Strimzi version is often called the "Operator version").
-
The Kafka versions column lists the supported Kafka versions for each Strimzi version.
Decide which Kafka version to upgrade to before beginning the Strimzi upgrade process.
|
Note
|
You can upgrade to a higher Kafka version as long as it is supported by your version of Strimzi. In some cases, you can also downgrade to a previous supported Kafka version. |
If topics are configured for high availability, upgrading Strimzi should not cause any downtime for consumers and producers that publish and read data from those topics. Highly available topics have a replication factor of at least 3 and partitions distributed evenly among the brokers.
Upgrading Strimzi triggers rolling updates, where all brokers are restarted in turn, at different stages of the process. During rolling updates, not all brokers are online, so overall cluster availability is temporarily reduced. A reduction in cluster availability increases the chance that a broker failure will result in lost messages.
7.1. Strimzi and Kafka upgrades
Upgrading Strimzi is a three-stage process. To upgrade brokers and clients without downtime, you must complete the upgrade procedures in the following order:
-
Update your Cluster Operator to a new Strimzi version.
The approach you take depends on how you deployed the Cluster Operator.
-
If you deployed the Cluster Operator using the installation YAML files, perform your upgrade by modifying the Operator installation files, as described in Upgrading the Cluster Operator.
-
If you deployed the Cluster Operator from OperatorHub.io, use the Operator Lifecycle Manager (OLM) to change the update channel for the Strimzi Operators to a new Strimzi version.
Depending on your chosen upgrade strategy, after updating the channel, either:
-
An automatic upgrade is initiated
-
A manual upgrade will require approval before the installation begins
For more information on using OperatorHub.io to upgrade Operators, see the Operator Lifecycle Manager documentation.
-
-
-
Upgrade all Kafka brokers and client applications to the latest supported Kafka version.
-
If applicable, perform the following tasks:
-
Update existing custom resources to handle deprecated custom resource properties
-
Strimzi custom resource upgrades
NoteCustom resources can also be updated before the Kafka upgrade.
-
-
Update listeners to use the
GenericKafkaListenerschema
-
Consider upgrading consumers and Kafka Streams applications to use the incremental cooperative rebalance protocol for partition rebalances.
7.1.1. Kafka versions
Kafka’s log message format version and inter-broker protocol version specify, respectively, the log format version appended to messages and the version of the Kafka protocol used in a cluster. To ensure the correct versions are used, the upgrade process involves making configuration changes to existing Kafka brokers and code changes to client applications (consumers and producers).
The following table shows the differences between Kafka versions:
| Kafka version | Interbroker protocol version | Log message format version | ZooKeeper version |
|---|---|---|---|
2.5.0 |
2.5 |
2.5 |
3.5.7 |
2.5.1 |
2.5 |
2.5 |
3.5.8 |
2.6.0 |
2.6 |
2.6 |
3.5.8 |
2.6.1 |
2.6 |
2.6 |
3.5.8 |
2.7.0 |
2.7 |
2.7 |
3.5.8 |
In Kafka, the network protocol used for inter-broker communication is called the inter-broker protocol. Each version of Kafka has a compatible version of the inter-broker protocol. The minor version of the protocol typically increases to match the minor version of Kafka, as shown in the preceding table.
The inter-broker protocol version is set cluster wide in the Kafka resource.
To change it, you edit the inter.broker.protocol.version property in Kafka.spec.kafka.config.
When a producer sends a message to a Kafka broker, the message is encoded using a specific format. The format can change between Kafka releases, so messages specify which version of the format they were encoded with. You can configure a Kafka broker to convert messages from newer format versions to a given older format version before the broker appends the message to the log.
In Kafka, there are two different methods for setting the message format version:
-
The
message.format.versionproperty is set on topics. -
The
log.message.format.versionproperty is set on Kafka brokers.
The default value of message.format.version for a topic is defined by the log.message.format.version that is set on the Kafka broker. You can manually set the message.format.version of a topic by modifying its topic configuration.
The upgrade tasks in this section assume that the message format version is defined by the log.message.format.version.
7.1.2. Upgrading the Cluster Operator
The steps to upgrade your Cluster Operator deployment to use Strimzi 0.22.1 are described in this section.
Follow this procedure if you deployed the Cluster Operator using the installation YAML files rather than OperatorHub.io.
The availability of Kafka clusters managed by the Cluster Operator is not affected by the upgrade operation.
|
Note
|
Refer to the documentation supporting a specific version of Strimzi for information on how to upgrade to that version. |
Upgrading the Cluster Operator
This procedure describes how to upgrade a Cluster Operator deployment to use Strimzi 0.22.1.
-
An existing Cluster Operator deployment is available.
-
You have downloaded the release artifacts for Strimzi 0.22.1.
-
Take note of any configuration changes made to the existing Cluster Operator resources (in the
/install/cluster-operatordirectory). Any changes will be overwritten by the new version of the Cluster Operator. -
Update your custom resources to reflect the supported configuration options available for Strimzi version 0.22.1.
-
Update the Cluster Operator.
-
Modify the installation files for the new Cluster Operator version according to the namespace the Cluster Operator is running in.
On Linux, use:
sed -i 's/namespace: .*/namespace: my-cluster-operator-namespace/' install/cluster-operator/*RoleBinding*.yamlOn MacOS, use:
sed -i '' 's/namespace: .*/namespace: my-cluster-operator-namespace/' install/cluster-operator/*RoleBinding*.yaml -
If you modified one or more environment variables in your existing Cluster Operator
Deployment, edit theinstall/cluster-operator/060-Deployment-strimzi-cluster-operator.yamlfile to use those environment variables.
-
-
When you have an updated configuration, deploy it along with the rest of the installation resources:
kubectl replace -f install/cluster-operatorWait for the rolling updates to complete.
-
If the new Operator version no longer supports the Kafka version you are upgrading from, the Cluster Operator returns a "Version not found" error message. Otherwise, no error message is returned.
For example:
"Version 2.4.0 is not supported. Supported versions are: 2.6.0, 2.6.1, 2.7.0."-
If the error message is returned, upgrade to a Kafka version that is supported by the new Cluster Operator version:
-
Edit the
Kafkacustom resource. -
Change the
spec.kafka.versionproperty to a supported Kafka version.
-
-
If the error message is not returned, go to the next step. You will upgrade the Kafka version later.
-
-
Get the image for the Kafka pod to ensure the upgrade was successful:
kubectl get pods my-cluster-kafka-0 -o jsonpath='{.spec.containers[0].image}'The image tag shows the new Operator version. For example:
quay.io/strimzi/kafka:0.22.1-kafka-2.7.0
Your Cluster Operator was upgraded to version 0.22.1 but the version of Kafka running in the cluster it manages is unchanged.
Following the Cluster Operator upgrade, you must perform a Kafka upgrade.
7.1.3. Upgrading Kafka
After you have upgraded your Cluster Operator to 0.22.1, the next step is to upgrade all Kafka brokers to the latest supported version of Kafka.
Kafka upgrades are performed by the Cluster Operator through rolling updates of the Kafka brokers.
The Cluster Operator initiates rolling updates based on the Kafka cluster configuration.
If Kafka.spec.kafka.config contains… |
The Cluster Operator initiates… |
|---|---|
Both the |
A single rolling update. |
Either the |
Two rolling updates. |
No configuration for the |
Two rolling updates. |
As part of the Kafka upgrade, the Cluster Operator initiates rolling updates for ZooKeeper.
-
A single rolling update occurs even if the ZooKeeper version is unchanged.
-
Additional rolling updates occur if the new version of Kafka requires a new ZooKeeper version.
Kafka version and image mappings
When upgrading Kafka, consider your settings for the STRIMZI_KAFKA_IMAGES environment variable and the Kafka.spec.kafka.version property.
-
Each
Kafkaresource can be configured with aKafka.spec.kafka.version. -
The Cluster Operator’s
STRIMZI_KAFKA_IMAGESenvironment variable provides a mapping between the Kafka version and the image to be used when that version is requested in a givenKafkaresource.-
If
Kafka.spec.kafka.imageis not configured, the default image for the given version is used. -
If
Kafka.spec.kafka.imageis configured, the default image is overridden.
-
|
Warning
|
The Cluster Operator cannot validate that an image actually contains a Kafka broker of the expected version. Take care to ensure that the given image corresponds to the given Kafka version. |
Upgrading Kafka brokers and client applications
This procedure describes how to upgrade a Strimzi Kafka cluster to the latest supported Kafka version.
Compared to your current Kafka version, the new version might support a higher log message format version or inter-broker protocol version, or both. Follow the steps to upgrade these versions, if required. For more information, see Kafka versions.
You should also choose a strategy for upgrading clients. Kafka clients are upgraded in step 6 of this procedure.
For the Kafka resource to be upgraded, check that:
-
The Cluster Operator, which supports both versions of Kafka, is up and running.
-
The
Kafka.spec.kafka.configdoes not contain options that are not supported in the new Kafka version.
-
Update the Kafka cluster configuration:
kubectl edit kafka my-cluster -
If the
log.message.format.versionandinter.broker.protocol.versionof the current Kafka version are the same as the new Kafka version, go to step 3.Otherwise, ensure that
Kafka.spec.kafka.confighas thelog.message.format.versionandinter.broker.protocol.versionconfigured to the defaults for the current Kafka version.For example, if upgrading from Kafka version 2.6.1 to 2.7.0:
kind: Kafka spec: # ... kafka: version: 2.6.1 config: log.message.format.version: "2.6" inter.broker.protocol.version: "2.6" # ...NoteThe value of log.message.format.versionandinter.broker.protocol.versionmust be strings to prevent them from being interpreted as floating point numbers. -
Change the
Kafka.spec.kafka.versionto specify the new Kafka version; leave thelog.message.format.versionandinter.broker.protocol.versionat the defaults for the current Kafka version.NoteChanging the
kafka.versionensures that all brokers in the cluster will be upgraded to start using the new broker binaries. During this process, some brokers are using the old binaries while others have already upgraded to the new ones. Leaving theinter.broker.protocol.versionunchanged ensures that the brokers can continue to communicate with each other throughout the upgrade.For example, if upgrading from Kafka 2.6.1 to 2.7.0:
apiVersion: kafka.strimzi.io/v1beta2 kind: Kafka spec: # ... kafka: version: 2.7.0 (1) config: log.message.format.version: "2.6" (2) inter.broker.protocol.version: "2.6" (3) # ...-
Kafka version is changed to the new version.
-
Message format version is unchanged.
-
Inter-broker protocol version is unchanged.
WarningYou cannot downgrade Kafka if the inter.broker.protocol.versionfor the new Kafka version changes. The inter-broker protocol version determines the schemas used for persistent metadata stored by the broker, including messages written to__consumer_offsets. The downgraded cluster will not understand the messages. -
-
If the image for the Kafka cluster is defined in the Kafka custom resource, in
Kafka.spec.kafka.image, update theimageto point to a container image with the new Kafka version. -
Save and exit the editor, then wait for rolling updates to complete.
Check the progress of the rolling updates by watching the pod state transitions:
kubectl get pods my-cluster-kafka-0 -o jsonpath='{.spec.containers[0].image}'The rolling updates:
-
Ensure each pod is using the broker binaries for the new version of Kafka
-
Configure the brokers to send messages using the inter-broker protocol version of the new version of Kafka
-
-
Depending on your chosen strategy for upgrading clients, upgrade all client applications to use the new version of the client binaries.
If required, set the
versionproperty for Kafka Connect and MirrorMaker as the new version of Kafka:-
For Kafka Connect, update
KafkaConnect.spec.version. -
For MirrorMaker, update
KafkaMirrorMaker.spec.version. -
For MirrorMaker 2.0, update
KafkaMirrorMaker2.spec.version.
-
-
Optional step to reduce rolling updates:
You can now perform one or more further product upgrades, starting with Upgrading the Cluster Operator. After reaching this step for the last upgrade you want to perform, you can complete this procedure.
Alternatively, skip this step and go to step 8.
-
If the
log.message.format.versionandinter.broker.protocol.versionof the new Kafka version are different from the old Kafka version, update the Kafka resource to use the new default versions. Otherwise, go to step 9.In
Kafka.spec.kafka.config, change thelog.message.format.versionandinter.broker.protocol.version.For example, if upgrading to Kafka 2.7.0:
apiVersion: kafka.strimzi.io/v1beta2 kind: Kafka spec: # ... kafka: version: 2.7.0 config: log.message.format.version: "2.7" inter.broker.protocol.version: "2.7" # ... -
Wait for the Cluster Operator to update the cluster.
The Kafka cluster and clients are now using the new Kafka version.
Following the Kafka upgrade, if required, you can:
7.1.4. Updating listeners to the generic listener configuration
Strimzi provides a GenericKafkaListener schema for the configuration of Kafka listeners in a Kafka resource.
GenericKafkaListener replaces the KafkaListeners schema, which has been removed from Strimzi.
With the GenericKafkaListener schema, you can configure as many listeners as required,
as long as their names and ports are unique.
The listeners configuration is defined as an array, but the deprecated format is also supported.
For clients inside the Kubernetes cluster, you can create plain (without encryption) or tls internal listeners.
For clients outside the Kubernetes cluster, you create external listeners and specify a connection mechanism,
which can be nodeport, loadbalancer, ingress or route.
The KafkaListeners schema used sub-properties for plain, tls and external listeners, with fixed ports for each.
At any stage in the upgrade process, you must convert listeners configured using the KafkaListeners schema into the format of the GenericKafkaListener schema.
For example, if you are currently using the following configuration in your Kafka configuration:
listeners:
  plain:
    # ...
  tls:
    # ...
  external:
    type: loadbalancer
    # ...
Convert the listeners into the new format using:
listeners:
  #...
  - name: plain
    port: 9092
    type: internal
    tls: false (1)
  - name: tls
    port: 9093
    type: internal
    tls: true
  - name: external
    port: 9094
    type: EXTERNAL-LISTENER-TYPE (2)
tls: true-
The TLS property is now required for all listeners.
-
Options:
ingress,loadbalancer,nodeport,route.
Make sure to use the exact names and port numbers shown.
For any additional configuration or overrides properties used with the old format, you need to update them to the new format.
Changes introduced to the listener configuration:
-
overridesis merged with theconfigurationsection -
dnsAnnotationshas been renamedannotations -
preferredAddressTypehas been renamedpreferredNodePortAddressType -
addresshas been renamedalternativeNames -
loadBalancerSourceRangesandexternalTrafficPolicymove to the listener configuration from the now deprecatedtemplate
For example, this configuration:
listeners:
  external:
    type: loadbalancer
    authentication:
      type: tls
    overrides:
      bootstrap:
        dnsAnnotations:
          #...
Changes to:
listeners:
    #...
  - name: external
    port: 9094
    type:loadbalancer
    tls: true
    authentication:
      type: tls
    configuration:
      bootstrap:
        annotations:
#...|
Important
|
The name and port numbers shown in the new listener configuration must be used for backwards compatibility. Using any other values will cause renaming of the Kafka listeners and Kubernetes services. |
For more information on the configuration options available for each type of listener,
see the GenericKafkaListener schema reference.
7.1.5. Strategies for upgrading clients
The right approach to upgrading your client applications (including Kafka Connect connectors) depends on your particular circumstances.
Consuming applications need to receive messages in a message format that they understand. You can ensure that this is the case in one of two ways:
-
By upgrading all the consumers for a topic before upgrading any of the producers.
-
By having the brokers down-convert messages to an older format.
Using broker down-conversion puts extra load on the brokers, so it is not ideal to rely on down-conversion for all topics for a prolonged period of time. For brokers to perform optimally they should not be down converting messages at all.
Broker down-conversion is configured in two ways:
-
The topic-level
message.format.versionconfigures it for a single topic. -
The broker-level
log.message.format.versionis the default for topics that do not have the topic-levelmessage.format.versionconfigured.
Messages published to a topic in a new-version format will be visible to consumers, because brokers perform down-conversion when they receive messages from producers, not when they are sent to consumers.
There are a number of strategies you can use to upgrade your clients:
- Consumers first
-
-
Upgrade all the consuming applications.
-
Change the broker-level
log.message.format.versionto the new version. -
Upgrade all the producing applications.
This strategy is straightforward, and avoids any broker down-conversion. However, it assumes that all consumers in your organization can be upgraded in a coordinated way, and it does not work for applications that are both consumers and producers. There is also a risk that, if there is a problem with the upgraded clients, new-format messages might get added to the message log so that you cannot revert to the previous consumer version.
-
- Per-topic consumers first
-
For each topic:
-
Upgrade all the consuming applications.
-
Change the topic-level
message.format.versionto the new version. -
Upgrade all the producing applications.
This strategy avoids any broker down-conversion, and means you can proceed on a topic-by-topic basis. It does not work for applications that are both consumers and producers of the same topic. Again, it has the risk that, if there is a problem with the upgraded clients, new-format messages might get added to the message log.
-
- Per-topic consumers first, with down conversion
-
For each topic:
-
Change the topic-level
message.format.versionto the old version (or rely on the topic defaulting to the broker-levellog.message.format.version). -
Upgrade all the consuming and producing applications.
-
Verify that the upgraded applications function correctly.
-
Change the topic-level
message.format.versionto the new version.This strategy requires broker down-conversion, but the load on the brokers is minimized because it is only required for a single topic (or small group of topics) at a time. It also works for applications that are both consumers and producers of the same topic. This approach ensures that the upgraded producers and consumers are working correctly before you commit to using the new message format version.
The main drawback of this approach is that it can be complicated to manage in a cluster with many topics and applications.
-
Other strategies for upgrading client applications are also possible.
|
Note
|
It is also possible to apply multiple strategies. For example, for the first few applications and topics the "per-topic consumers first, with down conversion" strategy can be used. When this has proved successful another, more efficient strategy can be considered acceptable to use instead. |
7.2. Strimzi custom resource upgrades
After you have upgraded Strimzi to 0.22.1, you must ensure that your custom resources are using API version v1beta2.
You can do this any time after upgrading to 0.22.1, but the upgrades must be completed before the next Strimzi minor version update.
|
Important
|
Upgrade of the custom resources to v1beta2 must be performed after upgrading the Cluster Operator, so the Cluster Operator can understand the resources.
|
|
Note
|
Upgrade of the custom resources to v1beta2 prepares Strimzi for a move to Kubernetes CRD v1,
which will be required for Kubernetes 1.22.
|
Strimzi provides an API conversion tool with its release artifacts.
You can download its ZIP or TAR.GZ file from GitHub.
To use the tool, extract it and use the scripts in the bin directory.
From its CLI, you can then use the tool to convert the format of your custom resources to v1beta2 in one of two ways:
After the conversion of your custom resources, you must set v1beta2 as the storage API version in your CRDs:
Instead of using the API conversion tool to update custom resources to v1beta2, you can manually update each custom resource to use v1beta2:
Update the Kafka custom resource, including the configurations for the other components:
-
Upgrading Cruise Control to support v1beta2 (if Cruise Control is deployed)
Update the other custom resources that apply to your deployment:
The manual procedures show the changes that are made to each custom resource. After these changes, you must use the API conversion tool to upgrade your CRDs.
7.2.1. API versioning
Custom resources are edited and controlled using APIs added to Kubernetes by CRDs. Put another way, CRDs extend the Kubernetes API to allow the creation of custom resources. CRDs are themselves resources within Kubernetes. They are installed in a Kubernetes cluster to define the versions of API for the custom resource. Each version of the custom resource API can define its own schema for that version. Kubernetes clients, including the Strimzi Operators, access the custom resources served by the Kubernetes API server using a URL path (API path), which includes the API version.
The introduction of v1beta2 updates the schemas of the custom resources.
Older API versions are deprecated.
The v1alpha1 API version is deprecated for the following Strimzi custom resources:
-
Kafka -
KafkaConnect -
KafkaConnectS2I -
KafkaConnector -
KafkaMirrorMaker -
KafkaMirrorMaker2 -
KafkaTopic -
KafkaUser -
KafkaBridge -
KafkaRebalance
The v1beta1 API version is deprecated for the following Strimzi custom resources:
-
Kafka -
KafkaConnect -
KafkaConnectS2I -
KafkaMirrorMaker -
KafkaTopic -
KafkaUser
|
Important
|
The v1alpha1 and v1beta1 versions will be removed in the next minor release.
|
7.2.2. Converting custom resources configuration files using the API conversion tool
This procedure describes how to use the API conversion tool to convert YAML files describing the configuration for Strimzi custom resources into a format applicable to v1beta2.
To do so, you use the convert-file (cf) command.
The convert-file command can convert YAML files containing multiple documents.
For a multi-document YAML file, all the Strimzi custom resources it contains are converted.
Any non-Strimzi Kubernetes resources are replicated unmodified in the converted output file.
After you have converted the YAML file, you must apply the configuration to update the custom resource in the cluster. Alternatively, if the GitOps synchronization mechanism is being used for updates on your cluster, you can use it to apply the changes. The conversion is only complete when the custom resource is updated in the Kubernetes cluster.
Alternatively, you can use the convert-resource procedure to convert custom resources directly.
-
A Cluster Operator supporting the
v1beta2API version is up and running. -
The API conversion tool, which is provided with the release artifacts.
-
The tool requires Java 11.
Use the CLI help for more information on the API conversion tool, and the flags available for the convert-file command:
bin/api-conversion.sh help
bin/api-conversion.sh help convert-file
Use bin/api-conversion.cmd for this procedure if you are using Windows.
| Flag | Description |
|---|---|
|
Specifies the YAML file for the Strimzi custom resource being converted |
|
Creates an output YAML file for the converted custom resource |
|
Updates the original source file with the converted YAML |
-
Run the API conversion tool with the
convert-filecommand and appropriate flags.Example 1, converts a YAML file and displays the output, though the file does not change:
bin/api-conversion.sh convert-file --file input.yamlExample 2, converts a YAML file, and writes the changes into the original source file:
bin/api-conversion.sh convert-file --file input.yaml --in-placeExample 3, converts a YAML file, and writes the changes into a new output file:
bin/api-conversion.sh convert-file --file input.yaml --output output.yaml -
Update the custom resources using the converted configuration file.
kubectl apply -f CONVERTED-CONFIG-FILE -
Verify that the custom resources have been converted.
kubectl get KIND CUSTOM-RESOURCE-NAME -o yaml
7.2.3. Converting custom resources directly using the API conversion tool
This procedure describes how to use the API conversion tool to convert Strimzi custom resources directly in the Kubernetes cluster into a format applicable to v1beta2.
To do so, you use the convert-resource (cr) command.
The command uses Kubernetes APIs to make the conversions.
You can specify one or more of types of Strimzi custom resources, based on the kind property, or you can convert all types.
You can also target a specific namespace or all namespaces for conversion.
When targeting a namespace, you can convert all custom resources in that namespace, or convert a single custom resource by specifying its name and kind.
Alternatively, you can use the convert-file procedure to convert and apply the YAML files describing the custom resources.
-
A Cluster Operator supporting the
v1beta2API version is up and running. -
The API conversion tool, which is provided with the release artifacts.
-
The tool requires Java 11 (OpenJDK).
-
The steps require a user admin account with RBAC permission to:
-
Get the Strimzi custom resources being converted using the
--nameoption -
List the Strimzi custom resources being converted without using the
--nameoption -
Replace the Strimzi custom resources being converted
-
Use the CLI help for more information on the API conversion tool, and the flags available for the convert-resource command:
bin/api-conversion.sh help
bin/api-conversion.sh help convert-resource
Use bin/api-conversion.cmd for this procedure if you are using Windows.
| Flag | Description |
|---|---|
|
Specifies the kinds of custom resources to be converted, or converts all resources if not specified |
|
Converts custom resources in all namespaces |
|
Specifies a Kubernetes namespace or OpenShift project, or uses the current namespace if not specified |
|
If |
-
Run the API conversion tool with the
convert-resourcecommand and appropriate flags.Example 1, converts all Strimzi resources in current namespace:
bin/api-conversion.sh convert-resourceExample 2, converts all Strimzi resources in all namespaces:
bin/api-conversion.sh convert-resource --all-namespacesExample 3, converts all Strimzi resources in the
my-kafkanamespace:bin/api-conversion.sh convert-resource --namespace my-kafkaExample 4, converts only Kafka resources in all namespaces:
bin/api-conversion.sh convert-resource --all-namespaces --kind KafkaExample 5, converts Kafka and Kafka Connect resources in all namespaces:
bin/api-conversion.sh convert-resource --all-namespaces --kind Kafka --kind KafkaConnectExample 6, converts a Kafka custom resource named
my-clusterin themy-kafkanamespace:bin/api-conversion.sh convert-resource --kind Kafka --namespace my-kafka --name my-cluster -
Verify that the custom resources have been converted.
kubectl get KIND CUSTOM-RESOURCE-NAME -o yaml
7.2.4. Upgrading CRDs to v1beta2 using the API conversion tool
This procedure describes how to use the API conversion tool to convert the CRDs that define the schemas used to instantiate and manage Strimzi-specific resources in a format applicable to v1beta2.
To do so, you use the crd-upgrade command.
Perform this procedure after converting all Strimzi custom resources in the whole Kubernetes cluster to v1beta2.
If you upgrade your CRDs first, and then convert your custom resources, you will need to run this command again.
The command updates spec.versions in the CRDs to declare v1beta2 as the storage API version.
The command also updates custom resources so they are stored under v1beta2.
New custom resource instances are created from the specification of the storage API version, so only one API version is ever marked as the storage version.
When you have upgraded the CRDs to use v1beta2 as the storage version, you should only use v1beta2 properties in your custom resources.
-
A Cluster Operator supporting the
v1beta2API version is up and running. -
The API conversion tool, which is provided with the release artifacts.
-
The tool requires Java 11 (OpenJDK).
-
Custom resources have been converted to
v1beta2. -
The steps require a user admin account with RBAC permission to:
-
List the Strimzi custom resources in all namespaces
-
Replace the Strimzi custom resources being converted
-
Update CRDs
-
Replace the status of the CRDs
-
Use the CLI help for more information on the API conversion tool:
bin/api-conversion.sh helpUse bin/api-conversion.cmd for this procedure if you are using Windows.
-
If you have not done so, convert your custom resources to use
v1beta2.You can use the API conversion tool to do this in one of two ways:
-
Converting custom resources configuration files using the API conversion tool
-
Converting custom resources directly using the API conversion tool
Or you can make the changes manually.
-
-
Run the API conversion tool with the
crd-upgradecommand.bin/api-conversion.sh crd-upgrade -
Verify that the CRDs have been upgraded so that v1beta2 is the storage version.
For example, for the Kafka topic CRD:
apiVersion: kafka.strimzi.io/v1beta2
kind: CustomResourceDefinition
metadata:
  name: kafkatopics.kafka.strimzi.io
  #...
spec:
  group: kafka.strimzi.io
  #...
  versions:
  - name: v1beta2
    served: true
    storage: true
    #...
status:
  #...
  storedVersions:
  - v1beta2
7.2.5. Upgrading Kafka resources to support v1beta2
-
A Cluster Operator supporting the
v1beta2API version is up and running.
Perform the following steps for each Kafka custom resource in your deployment.
-
Update the
Kafkacustom resource in an editor.kubectl edit kafka KAFKA-CLUSTER -
If you have not already done so, update
.spec.kafka.listenerto the new generic listener format, as described in Updating listeners to the generic listener configuration.WarningThe old listener format is not supported in API version
v1beta2. -
If present, move
affinityfrom.spec.kafka.affinityto.spec.kafka.template.pod.affinity. -
If present, move
tolerationsfrom.spec.kafka.tolerationsto.spec.kafka.template.pod.tolerations. -
If present, remove
.spec.kafka.template.tlsSidecarContainer. -
If present, remove
.spec.kafka.tlsSidecarContainer. -
If either of the following policy configurations exist:
-
.spec.kafka.template.externalBootstrapService.externalTrafficPolicy -
.spec.kafka.template.perPodService.externalTrafficPolicy-
Move the configuration to
.spec.kafka.listeners[].configuration.externalTrafficPolicy, for bothtype: loadbalancerandtype: nodeportlisteners. -
Remove
.spec.kafka.template.externalBootstrapService.externalTrafficPolicyor.spec.kafka.template.perPodService.externalTrafficPolicy.
-
-
-
If either of the following
loadbalancerlistener configurations exist:-
.spec.kafka.template.externalBootstrapService.loadBalancerSourceRanges -
.spec.kafka.template.perPodService.loadBalancerSourceRanges-
Move the configuration to
.spec.kafka.listeners[].configuration.loadBalancerSourceRanges, fortype: loadbalancerlisteners. -
Remove
.spec.kafka.template.externalBootstrapService.loadBalancerSourceRangesor.spec.kafka.template.perPodService.loadBalancerSourceRanges.
-
-
-
If
type: externallogging is configured in.spec.kafka.logging:Replace the
nameof the ConfigMap containing the logging configuration:logging: type: external name: my-config-mapWith the
valueFrom.configMapKeyReffield, and specify both the ConfigMapnameand thekeyunder which the logging is stored:logging: type: external valueFrom: configMapKeyRef: name: my-config-map key: log4j.properties -
If the
.spec.kafka.metricsfield is used to enable metrics:-
Create a new ConfigMap that stores the YAML configuration for the JMX Prometheus exporter under a key. The YAML must match what is currently in the
.spec.kafka.metricsfield.kind: ConfigMap apiVersion: v1 metadata: name: kafka-metrics labels: app: strimzi data: kafka-metrics-config.yaml: | <YAML> -
Add a
.spec.kafka.metricsConfigproperty that points to the ConfigMap and key:metricsConfig: type: jmxPrometheusExporter valueFrom: configMapKeyRef: name: kafka-metrics key: kafka-metrics-config.yaml -
Delete the old
.spec.kafka.metricsfield.
-
-
Save the file, exit the editor and wait for the updated custom resource to be reconciled.
For each Kafka custom resource, upgrade the configurations for ZooKeeper, Topic Operator, Entity Operator, and Cruise Control (if deployed) to support version v1beta2.
This is described in the following procedures.
When all Kafka configurations are updated to support v1beta2, you can upgrade the Kafka custom resource to v1beta2.
7.2.6. Upgrading ZooKeeper to support v1beta2
-
A Cluster Operator supporting the
v1beta2API version is up and running.
Perform the following steps for each Kafka custom resource in your deployment.
-
Update the
Kafkacustom resource in an editor.kubectl edit kafka KAFKA-CLUSTER -
If present, move
affinityfrom.spec.zookeeper.affinityto.spec.zookeeper.template.pod.affinity. -
If present, move
tolerationsfrom.spec.zookeeper.tolerationsto.spec.zookeeper.template.pod.tolerations. -
If present, remove
.spec.zookeeper.template.tlsSidecarContainer. -
If present, remove
.spec.zookeeper.tlsSidecarContainer. -
If
type: externallogging is configured in.spec.kafka.logging:Replace the
nameof the ConfigMap containing the logging configuration:logging: type: external name: my-config-mapWith the
valueFrom.configMapKeyReffield, and specify both the ConfigMapnameand thekeyunder which the logging is stored:logging: type: external valueFrom: configMapKeyRef: name: my-config-map key: log4j.properties -
If the
.spec.zookeeper.metricsfield is used to enable metrics:-
Create a new ConfigMap that stores the YAML configuration for the JMX Prometheus exporter under a key. The YAML must match what is currently in the
.spec.zookeeper.metricsfield.kind: ConfigMap apiVersion: v1 metadata: name: kafka-metrics labels: app: strimzi data: zookeeper-metrics-config.yaml: | <YAML> -
Add a
.spec.zookeeper.metricsConfigproperty that points to the ConfigMap and key:metricsConfig: type: jmxPrometheusExporter valueFrom: configMapKeyRef: name: kafka-metrics key: zookeeper-metrics-config.yaml -
Delete the old
.spec.zookeeper.metricsfield.
-
-
Save the file, exit the editor and wait for the updated custom resource to be reconciled.
7.2.7. Upgrading the Topic Operator to support v1beta2
-
A Cluster Operator supporting the
v1beta2API version is up and running.
Perform the following steps for each Kafka custom resource in your deployment.
-
Update the
Kafkacustom resource in an editor.kubectl edit kafka KAFKA-CLUSTER -
If
Kafka.spec.topicOperatoris used:-
Move
affinityfrom.spec.topicOperator.affinityto.spec.entityOperator.template.pod.affinity. -
Move
tolerationsfrom.spec.topicOperator.tolerationsto.spec.entityOperator.template.pod.tolerations. -
Move
.spec.topicOperator.tlsSidecarto.spec.entityOperator.tlsSidecar. -
After moving
affinity,tolerations, andtlsSidecar, move the remaining configuration in.spec.topicOperatorto.spec.entityOperator.topicOperator.
-
-
If
type: externallogging is configured in.spec.topicOperator.logging:Replace the
nameof the ConfigMap containing the logging configuration:logging: type: external name: my-config-mapWith the
valueFrom.configMapKeyReffield, and specify both the ConfigMapnameand thekeyunder which the logging is stored:logging: type: external valueFrom: configMapKeyRef: name: my-config-map key: log4j2.propertiesNoteYou can also complete this step as part of the Entity Operator upgrade. -
Save the file, exit the editor and wait for the updated custom resource to be reconciled.
7.2.8. Upgrading the Entity Operator to support v1beta2
-
A Cluster Operator supporting the
v1beta2API version is up and running. -
Kafka.spec.entityOperatoris configured, as described in Upgrading the Topic Operator to support v1beta2.
Perform the following steps for each Kafka custom resource in your deployment.
-
Update the
Kafkacustom resource in an editor.kubectl edit kafka KAFKA-CLUSTER -
Move
affinityfrom.spec.entityOperator.affinityto.spec.entityOperator.template.pod.affinity. -
Move
tolerationsfrom.spec.entityOperator.tolerationsto.spec.entityOperator.template.pod.tolerations. -
If
type: externallogging is configured in.spec.entityOperator.userOperator.loggingor.spec.entityOperator.topicOperator.logging:Replace the
nameof the ConfigMap containing the logging configuration:logging: type: external name: my-config-mapWith the
valueFrom.configMapKeyReffield, and specify both the ConfigMapnameand thekeyunder which the logging is stored:logging: type: external valueFrom: configMapKeyRef: name: my-config-map key: log4j2.properties -
Save the file, exit the editor and wait for the updated custom resource to be reconciled.
7.2.9. Upgrading Cruise Control to support v1beta2
-
A Cluster Operator supporting the
v1beta2API version is up and running. -
Cruise Control is configured and deployed. See Deploying Cruise Control in the Using Strimzi guide.
Perform the following steps for each Kafka.spec.cruiseControl configuration in your Kafka cluster.
-
Update the
Kafkacustom resource in an editor.kubectl edit kafka KAFKA-CLUSTER -
If
type: externallogging is configured in.spec.cruiseControl.logging:Replace the
nameof the ConfigMap containing the logging configuration:logging: type: external name: my-config-mapWith the
valueFrom.configMapKeyReffield, and specify both the ConfigMapnameand thekeyunder which the logging is stored:logging: type: external valueFrom: configMapKeyRef: name: my-config-map key: log4j2.properties -
If the
.spec.cruiseControl.metricsfield is used to enable metrics:-
Create a new ConfigMap that stores the YAML configuration for the JMX Prometheus exporter under a key. The YAML must match what is currently in the
.spec.cruiseControl.metricsfield.kind: ConfigMap apiVersion: v1 metadata: name: kafka-metrics labels: app: strimzi data: cruise-control-metrics-config.yaml: | <YAML> -
Add a
.spec.cruiseControl.metricsConfigproperty that points to the ConfigMap and key:metricsConfig: type: jmxPrometheusExporter valueFrom: configMapKeyRef: name: kafka-metrics key: cruise-control-metrics-config.yaml -
Delete the old
.spec.cruiseControl.metricsfield.
-
-
Save the file, exit the editor and wait for the updated custom resource to be reconciled.
7.2.10. Upgrading the API version of Kafka resources to v1beta2
-
A Cluster Operator supporting the
v1beta2API version is up and running. -
You have updated the following configurations within the
Kafkacustom resource:-
Cruise Control (if Cruise Control is deployed)
Perform the following steps for each Kafka custom resource in your deployment.
-
Update the
Kafkacustom resource in an editor.kubectl edit kafka KAFKA-CLUSTER -
Update the
apiVersionof theKafkacustom resource tov1beta2:Replace:
apiVersion: kafka.strimzi.io/v1beta1with:
apiVersion: kafka.strimzi.io/v1beta2 -
Save the file, exit the editor and wait for the updated custom resource to be reconciled.
7.2.11. Upgrading Kafka Connect resources to v1beta2
-
A Cluster Operator supporting the
v1beta2API version is up and running.
Perform the following steps for each KafkaConnect custom resource in your deployment.
-
Update the
KafkaConnectcustom resource in an editor.kubectl edit kafkaconnect KAFKA-CONNECT-CLUSTER -
If present, move:
KafkaConnect.spec.affinityKafkaConnect.spec.tolerationsto:
KafkaConnect.spec.template.pod.affinityKafkaConnect.spec.template.pod.tolerationsFor example, move:
spec:
  # ...
  affinity:
    # ...
  tolerations:
    # ...
to:
spec: # ... template: pod: affinity: # ... tolerations: # ... -
If
type: externallogging is configured in.spec.logging:Replace the
nameof the ConfigMap containing the logging configuration:logging: type: external name: my-config-mapWith the
valueFrom.configMapKeyReffield, and specify both the ConfigMapnameand thekeyunder which the logging is stored:logging: type: external valueFrom: configMapKeyRef: name: my-config-map key: log4j.properties -
If the
.spec.metricsfield is used to enable metrics:-
Create a new ConfigMap that stores the YAML configuration for the JMX Prometheus exporter under a key. The YAML must match what is currently in the
.spec.metricsfield.kind: ConfigMap apiVersion: v1 metadata: name: kafka-connect-metrics labels: app: strimzi data: connect-metrics-config.yaml: | <YAML> -
Add a
.spec.metricsConfigproperty that points to the ConfigMap and key:metricsConfig: type: jmxPrometheusExporter valueFrom: configMapKeyRef: name: kafka-connect-metrics key: connect-metrics-config.yaml -
Delete the old
.spec.metricsfield.
-
-
Update the
apiVersionof theKafkaConnectcustom resource tov1beta2:Replace:
apiVersion: kafka.strimzi.io/v1beta1with:
apiVersion: kafka.strimzi.io/v1beta2 -
Save the file, exit the editor and wait for the updated custom resource to be reconciled.
7.2.12. Upgrading Kafka Connect S2I resources to v1beta2
-
A Cluster Operator supporting the
v1beta2API version is up and running.
Perform the following steps for each KafkaConnectS2I custom resource in your deployment.
-
Update the
KafkaConnectS2Icustom resource in an editor.kubectl edit kafkaconnects2i S2I-CLUSTER -
If present, move:
KafkaConnectS2I.spec.affinityKafkaConnectS2I.spec.tolerationsto:
KafkaConnectS2I.spec.template.pod.affinityKafkaConnectS2I.spec.template.pod.tolerationsFor example, move:
spec:
  # ...
  affinity:
    # ...
  tolerations:
    # ...
to:
spec: # ... template: pod: affinity: # ... tolerations: # ... -
If
type: externallogging is configured in.spec.logging:Replace the
nameof the ConfigMap containing the logging configuration:logging: type: external name: my-config-mapWith the
valueFrom.configMapKeyReffield, and specify both the ConfigMapnameand thekeyunder which the logging is stored:logging: type: external valueFrom: configMapKeyRef: name: my-config-map key: log4j.properties -
If the
.spec.metricsfield is used to enable metrics:-
Create a new ConfigMap that stores the YAML configuration for the JMX Prometheus exporter under a key. The YAML must match what is currently in the
.spec.metricsfield.kind: ConfigMap apiVersion: v1 metadata: name: kafka-connect-s2i-metrics labels: app: strimzi data: connect-s2i-metrics-config.yaml: | <YAML> -
Add a
.spec.metricsConfigproperty that points to the ConfigMap and key:metricsConfig: type: jmxPrometheusExporter valueFrom: configMapKeyRef: name: kafka-connect-s2i-metrics key: connect-s2i-metrics-config.yaml -
Delete the old
.spec.metricsfield
-
-
Update the
apiVersionof theKafkaConnectS2Icustom resource tov1beta2:Replace:
apiVersion: kafka.strimzi.io/v1beta1with:
apiVersion: kafka.strimzi.io/v1beta2 -
Save the file, exit the editor and wait for the updated custom resource to be reconciled.
7.2.13. Upgrading Kafka MirrorMaker resources to v1beta2
-
A Cluster Operator supporting the
v1beta2API version is up and running. -
MirrorMaker is configured and deployed. See Deploying Kafka MirrorMaker to your Kubernetes cluster.
Perform the following steps for each KafkaMirrorMaker custom resource in your deployment.
-
Update the
KafkaMirrorMakercustom resource in an editor.kubectl edit kafkamirrormaker MIRROR-MAKER -
If present, move:
KafkaMirrorMaker.spec.affinityKafkaMirrorMaker.spec.tolerationsto:
KafkaMirrorMaker.spec.template.pod.affinityKafkaMirrorMaker.spec.template.pod.tolerationsFor example, move:
spec:
  # ...
  affinity:
    # ...
  tolerations:
    # ...
to:
spec: # ... template: pod: affinity: # ... tolerations: # ... -
If
type: externallogging is configured in.spec.logging:Replace the
nameof the ConfigMap containing the logging configuration:logging: type: external name: my-config-mapWith the
valueFrom.configMapKeyReffield, and specify both the ConfigMapnameand thekeyunder which the logging is stored:logging: type: external valueFrom: configMapKeyRef: name: my-config-map key: log4j.properties -
If the
.spec.metricsfield is used to enable metrics:-
Create a new ConfigMap that stores the YAML configuration for the JMX Prometheus exporter under a key. The YAML must match what is currently in the
.spec.metricsfield.kind: ConfigMap apiVersion: v1 metadata: name: kafka-mm-metrics labels: app: strimzi data: mm-metrics-config.yaml: | <YAML> -
Add a
.spec.metricsConfigproperty that points to the ConfigMap and key:metricsConfig: type: jmxPrometheusExporter valueFrom: configMapKeyRef: name: kafka-mm-metrics key: mm-metrics-config.yaml -
Delete the old
.spec.metricsfield.
-
-
Update the
apiVersionof theKafkaMirrorMakercustom resource tov1beta2:Replace:
apiVersion: kafka.strimzi.io/v1beta1with:
apiVersion: kafka.strimzi.io/v1beta2 -
Save the file, exit the editor and wait for the updated custom resource to be reconciled.
7.2.14. Upgrading Kafka MirrorMaker 2.0 resources to v1beta2
-
A Cluster Operator supporting the
v1beta2API version is up and running. -
MirrorMaker 2.0 is configured and deployed. See Deploying Kafka MirrorMaker to your Kubernetes cluster.
Perform the following steps for each KafkaMirrorMaker2 custom resource in your deployment.
-
Update the
KafkaMirrorMaker2custom resource in an editor.kubectl edit kafkamirrormaker2 MIRROR-MAKER-2 -
If present, move
affinityfrom.spec.affinityto.spec.template.pod.affinity. -
If present, move
tolerationsfrom.spec.tolerationsto.spec.template.pod.tolerations. -
If
type: externallogging is configured in.spec.logging:Replace the
nameof the ConfigMap containing the logging configuration:logging: type: external name: my-config-mapWith the
valueFrom.configMapKeyReffield, and specify both the ConfigMapnameand thekeyunder which the logging is stored:logging: type: external valueFrom: configMapKeyRef: name: my-config-map key: log4j.properties -
If the
.spec.metricsfield is used to enable metrics:-
Create a new ConfigMap that stores the YAML configuration for the JMX Prometheus exporter under a key. The YAML must match what is currently in the
.spec.metricsfield.kind: ConfigMap apiVersion: v1 metadata: name: kafka-mm2-metrics labels: app: strimzi data: mm2-metrics-config.yaml: | <YAML> -
Add a
.spec.metricsConfigproperty that points to the ConfigMap and key:metricsConfig: type: jmxPrometheusExporter valueFrom: configMapKeyRef: name: kafka-mm2-metrics key: mm2-metrics-config.yaml -
Delete the old
.spec.metricsfield.
-
-
Update the
apiVersionof theKafkaMirrorMaker2custom resource tov1beta2:Replace:
apiVersion: kafka.strimzi.io/v1alpha1with:
apiVersion: kafka.strimzi.io/v1beta2 -
Save the file, exit the editor and wait for the updated custom resource to be reconciled.
7.2.15. Upgrading Kafka Bridge resources to v1beta2
-
A Cluster Operator supporting the
v1beta2API version is up and running. -
The Kafka Bridge is configured and deployed. See Deploying Kafka Bridge to your Kubernetes cluster.
Perform the following steps for each KafkaBridge resource in your deployment.
-
Update the
KafkaBridgecustom resource in an editor.kubectl edit kafkabridge KAFKA-BRIDGE -
If
type: externallogging is configured inKafkaBridge.spec.logging:Replace the
nameof the ConfigMap containing the logging configuration:logging: type: external name: my-config-mapWith the
valueFrom.configMapKeyReffield, and specify both the ConfigMapnameand thekeyunder which the logging is stored:logging: type: external valueFrom: configMapKeyRef: name: my-config-map key: log4j2.properties -
Update the
apiVersionof theKafkaBridgecustom resource tov1beta2:Replace:
apiVersion: kafka.strimzi.io/v1alpha1with:
apiVersion: kafka.strimzi.io/v1beta2 -
Save the file, exit the editor and wait for the updated custom resource to be reconciled.
7.2.16. Upgrading Kafka User resources to v1beta2
-
A User Operator supporting the
v1beta2API version is up and running.
Perform the following steps for each KafkaUser custom resource in your deployment.
-
Update the
KafkaUsercustom resource in an editor.kubectl edit kafkauser KAFKA-USER -
Update the
apiVersionof theKafkaUsercustom resource tov1beta2:Replace:
apiVersion: kafka.strimzi.io/v1beta1with:
apiVersion: kafka.strimzi.io/v1beta2 -
Save the file, exit the editor and wait for the updated custom resource to be reconciled.
7.2.17. Upgrading Kafka Topic resources to v1beta2
-
A Topic Operator supporting the
v1beta2API version is up and running.
Perform the following steps for each KafkaTopic custom resource in your deployment.
-
Update the
KafkaTopiccustom resource in an editor.kubectl edit kafkatopic KAFKA-TOPIC -
Update the
apiVersionof theKafkaTopiccustom resource tov1beta2:Replace:
apiVersion: kafka.strimzi.io/v1beta1with:
apiVersion: kafka.strimzi.io/v1beta2 -
Save the file, exit the editor and wait for the updated custom resource to be reconciled.
7.2.18. Upgrading Kafka Connector resources to v1beta2
-
A Cluster Operator supporting the
v1beta2API version is up and running. -
KafkaConnectorcustom resources are deployed to manage connector instances. See Creating and managing connectors.
Perform the following steps for each KafkaConnector custom resource in your deployment.
-
Update the
KafkaConnectorcustom resource in an editor.kubectl edit kafkaconnector KAFKA-CONNECTOR -
Update the
apiVersionof theKafkaConnectorcustom resource tov1beta2:Replace:
apiVersion: kafka.strimzi.io/v1alpha1with:
apiVersion: kafka.strimzi.io/v1beta2 -
Save the file, exit the editor and wait for the updated custom resource to be reconciled.
7.2.19. Upgrading Kafka Rebalance resources to v1beta2
-
A Cluster Operator supporting the
v1beta2API version is up and running. -
Cruise Control is configured and deployed. See Deploying Cruise Control in the Using Strimzi guide.
Perform the following steps for each KafkaRebalance custom resource in your deployment.
-
Update the
KafkaRebalancecustom resource in an editor.kubectl edit kafkarebalance KAFKA-REBALANCE -
Update the
apiVersionof theKafkaRebalancecustom resource tov1beta2:Replace:
apiVersion: kafka.strimzi.io/v1alpha1with:
apiVersion: kafka.strimzi.io/v1beta2 -
Save the file, exit the editor and wait for the updated custom resource to be reconciled.
7.3. Upgrading consumers to cooperative rebalancing
You can upgrade Kafka consumers and Kafka Streams applications to use the incremental cooperative rebalance protocol for partition rebalances instead of the default eager rebalance protocol. The new protocol was added in Kafka 2.4.0.
Consumers keep their partition assignments in a cooperative rebalance and only revoke them at the end of the process, if needed to achieve a balanced cluster. This reduces the unavailability of the consumer group or Kafka Streams application.
|
Note
|
Upgrading to the incremental cooperative rebalance protocol is optional. The eager rebalance protocol is still supported. |
-
You have upgraded Kafka brokers and client applications to Kafka 2.7.0.
To upgrade a Kafka consumer to use the incremental cooperative rebalance protocol:
-
Replace the Kafka clients
.jarfile with the new version. -
In the consumer configuration, append
cooperative-stickyto thepartition.assignment.strategy. For example, if therangestrategy is set, change the configuration torange, cooperative-sticky. -
Restart each consumer in the group in turn, waiting for the consumer to rejoin the group after each restart.
-
Reconfigure each consumer in the group by removing the earlier
partition.assignment.strategyfrom the consumer configuration, leaving only thecooperative-stickystrategy. -
Restart each consumer in the group in turn, waiting for the consumer to rejoin the group after each restart.
To upgrade a Kafka Streams application to use the incremental cooperative rebalance protocol:
-
Replace the Kafka Streams
.jarfile with the new version. -
In the Kafka Streams configuration, set the
upgrade.fromconfiguration parameter to the Kafka version you are upgrading from (for example, 2.3). -
Restart each of the stream processors (nodes) in turn.
-
Remove the
upgrade.fromconfiguration parameter from the Kafka Streams configuration. -
Restart each consumer in the group in turn.
-
Notable changes in 2.4.0 in the Apache Kafka documentation.
8. Downgrading Strimzi
If you are encountering issues with the version of Strimzi you upgraded to, you can revert your installation to the previous version.
You can perform a downgrade to:
-
Revert your Cluster Operator to the previous Strimzi version.
-
Downgrade all Kafka brokers and client applications to the previous Kafka version.
If the previous version of Strimzi does not support the version of Kafka you are using, you can also downgrade Kafka as long as the log message format versions appended to messages match.
8.1. Downgrading the Cluster Operator to a previous version
If you are encountering issues with Strimzi, you can revert your installation.
This procedure describes how to downgrade a Cluster Operator deployment to a previous version.
-
An existing Cluster Operator deployment is available.
-
You have downloaded the installation files for the previous version.
-
Take note of any configuration changes made to the existing Cluster Operator resources (in the
/install/cluster-operatordirectory). Any changes will be overwritten by the previous version of the Cluster Operator. -
Revert your custom resources to reflect the supported configuration options available for the version of Strimzi you are downgrading to.
-
Update the Cluster Operator.
-
Modify the installation files for the previous version according to the namespace the Cluster Operator is running in.
On Linux, use:
sed -i 's/namespace: .*/namespace: my-cluster-operator-namespace/' install/cluster-operator/*RoleBinding*.yamlOn MacOS, use:
sed -i '' 's/namespace: .*/namespace: my-cluster-operator-namespace/' install/cluster-operator/*RoleBinding*.yaml -
If you modified one or more environment variables in your existing Cluster Operator
Deployment, edit theinstall/cluster-operator/060-Deployment-strimzi-cluster-operator.yamlfile to use those environment variables.
-
-
When you have an updated configuration, deploy it along with the rest of the installation resources:
kubectl replace -f install/cluster-operatorWait for the rolling updates to complete.
-
Get the image for the Kafka pod to ensure the downgrade was successful:
kubectl get pod my-cluster-kafka-0 -o jsonpath='{.spec.containers[0].image}'The image tag shows the new Strimzi version followed by the Kafka version. For example,
NEW-STRIMZI-VERSION-kafka-CURRENT-KAFKA-VERSION.
Your Cluster Operator was downgraded to the previous version.
8.2. Downgrading Kafka
Kafka version downgrades are performed by the Cluster Operator.
8.2.1. Kafka version compatibility for downgrades
Kafka downgrades are dependent on compatible current and target Kafka versions, and the state at which messages have been logged.
You cannot revert to the previous Kafka version if that version does not support any of the inter.broker.protocol.version settings which have ever been used in that cluster,
or messages have been added to message logs that use a newer log.message.format.version.
The inter.broker.protocol.version determines the schemas used for persistent metadata stored by the broker, such as the schema for messages written to __consumer_offsets.
If you downgrade to a version of Kafka that does not understand an inter.broker.protocol.version that has (ever) been previously used in the cluster the broker will encounter data it cannot understand.
If the target downgrade version of Kafka has:
-
The same
log.message.format.versionas the current version, the Cluster Operator downgrades by performing a single rolling restart of the brokers. -
A different
log.message.format.version, downgrading is only possible if the running cluster has always hadlog.message.format.versionset to the version used by the downgraded version. This is typically only the case if the upgrade procedure was aborted before thelog.message.format.versionwas changed. In this case, the downgrade requires:-
Two rolling restarts of the brokers if the interbroker protocol of the two versions is different
-
A single rolling restart if they are the same
-
Downgrading is not possible if the new version has ever used a log.message.format.version that is not supported by the previous version, including when the default value for log.message.format.version is used. For example, this resource can be downgraded to Kafka version 2.6.1 because the log.message.format.version has not been changed:
apiVersion: kafka.strimzi.io/v1beta2
kind: Kafka
spec:
  # ...
  kafka:
    version: 2.7.0
    config:
      log.message.format.version: "2.6"
      # ...
The downgrade would not be possible if the log.message.format.version was set at "2.7" or a value was absent (so that the parameter took the default value for a 2.7.0 broker of 2.7).
8.2.2. Downgrading Kafka brokers and client applications
This procedure describes how you can downgrade a Strimzi Kafka cluster to a lower (previous) version of Kafka, such as downgrading from 2.7.0 to 2.6.1.
For the Kafka resource to be downgraded, check:
-
IMPORTANT: Compatibility of Kafka versions.
-
The Cluster Operator, which supports both versions of Kafka, is up and running.
-
The
Kafka.spec.kafka.configdoes not contain options that are not supported by the Kafka version being downgraded to. -
The
Kafka.spec.kafka.confighas alog.message.format.versionandinter.broker.protocol.versionthat is supported by the Kafka version being downgraded to.
-
Update the Kafka cluster configuration.
kubectl edit kafka KAFKA-CONFIGURATION-FILE -
Change the
Kafka.spec.kafka.versionto specify the previous version.For example, if downgrading from Kafka 2.7.0 to 2.6.1:
apiVersion: kafka.strimzi.io/v1beta2 kind: Kafka spec: # ... kafka: version: 2.6.1 (1) config: log.message.format.version: "2.6" (2) inter.broker.protocol.version: "2.6" (3) # ...-
Kafka version is changed to the previous version.
-
Message format version is unchanged.
-
Inter-broker protocol version is unchanged.
NoteYou must format the value of log.message.format.versionandinter.broker.protocol.versionas a string to prevent it from being interpreted as a floating point number. -
-
If the image for the Kafka version is different from the image defined in
STRIMZI_KAFKA_IMAGESfor the Cluster Operator, updateKafka.spec.kafka.image. -
Save and exit the editor, then wait for rolling updates to complete.
Check the update in the logs or by watching the pod state transitions:
kubectl logs -f CLUSTER-OPERATOR-POD-NAME | grep -E "Kafka version downgrade from [0-9.]+ to [0-9.]+, phase ([0-9]+) of \1 completed"kubectl get pod -wCheck the Cluster Operator logs for an
INFOlevel message:Reconciliation #NUM(watch) Kafka(NAMESPACE/NAME): Kafka version downgrade from FROM-VERSION to TO-VERSION, phase 1 of 1 completed -
Downgrade all client applications (consumers) to use the previous version of the client binaries.
The Kafka cluster and clients are now using the previous Kafka version.
-
If you are reverting back to a version of Strimzi earlier than 0.22, which uses ZooKeeper for the storage of topic metadata, delete the internal topic store topics from the Kafka cluster.
kubectl run kafka-admin -ti --image={DockerKafkaImageCurrent} --rm=true --restart=Never -- ./bin/kafka-topics.sh --bootstrap-server localhost:9092 --topic __strimzi-topic-operator-kstreams-topic-store-changelog --delete && ./bin/kafka-topics.sh --bootstrap-server localhost:9092 --topic __strimzi_store_topic --delete