Scalability is one of the flagship features of Apache Kafka. It is achieved by partitioning the data and distributing the partitions across multiple brokers. Such data sharding has also a big impact on how Kafka clients connect to the brokers. This is especially visible when Kafka is running within a platform like Kubernetes but is accessed from outside of that platform. This blog-series will explain how Kafka and its clients work and how Strimzi deals with it to make it accessible for clients running outside of Kubernetes.
This post is part of a bigger series about different ways to access a Kafka cluster powered by Strimzi. The other parts published so far are:
- Part 1 - Introduction (this post)
- Part 2 - Node Ports
- Part 3 - OpenShift Routes
- Part 4 - Load Balancers
- Part 5 - Ingress
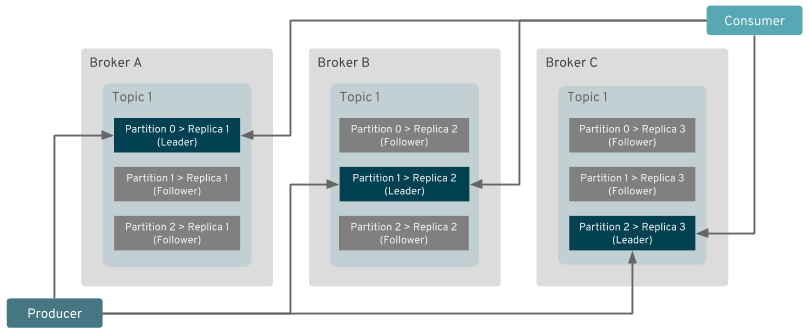
It would, of course, be insufficient to just shard the data into partitions. The ingress and egress data traffic also needs to be properly handled. The clients writing to or reading from a given partition have to connect directly to the leader broker which is hosting it. Thanks to the clients connecting directly to the individual brokers, the brokers don’t need to do any forwarding of data between the clients and other brokers. That helps to significantly reduce the amount of work the brokers have to do and the amount of traffic flowing around within the cluster. The only data traffic between the different brokers is due to replication, when the follower brokers are fetching data from the lead broker for a given partition. That makes the data shards independent of each other and that makes Kafka scale so well.

But how do the clients know where to connect?
Kafka’s discovery protocol
Kafka has its own discovery protocol. When a Kafka client is connecting to the Kafka cluster, it first connects to any broker which is member of the cluster and asks it for metadata for one or more topics. The metadata contains the information about the topics, their partitions and brokers which host these partitions. All brokers should have this data for the whole cluster because they are all synced through Zookeeper. Therefore it doesn’t matter to which broker the client connected as first - all of them will give it the same response.

Once received, the client will use the metadata to figure out where to connect when it wants to write to or read from a given partition.
The broker addresses used in the metadata will be either created by the broker itself based on the hostname of the machine where the broker runs.
Or it can be configured by the user using the advertised.listeners option.
The client will use the address from the metadata to open one or more new connections to the addresses of the brokers which hosts the particular partitions it is interested in.
Even when the metadata would point to the same broker where the client already connected and received the metadata from, it would still open a second connection.
And these connection will be used to produce or consume data.
Note: The description of the Kafka protocol is intentionally simplified for the purpose of this blog post.
What does it mean for Kafka on Kubernetes
So, what does this mean for running Kafka on Kubernetes?
If you are familiar with Kubernetes, you probably know that the most common way to expose some application is using a Kubernetes Service.
Kubernetes services work as layer 4 load-balancers.
They provide a stable DNS address, where the clients can connect.
And they just forward the connections to one of the pods which are backing the service.
This works reasonably well with most stateless applications which just want to connect randomly to one of the backends behind the service. But it can get a lot trickier if your application requires some kind of stickiness because of some state associated with a particular pod. It can be for example session stickiness - a client needs to connect to the same pod as last time because of some session information which the pod already has. Or it can be a data stickiness - a client needs to connect to a particular pod because it contains some particular data.
This is also the case with Kafka. A Kubernetes service can be used for the initial connection only - it will take the client to one of the brokers within the cluster where it can get the metadata. But the subsequent connections cannot be done through that service because it would route the connection randomly to one of the brokers in the cluster instead of leading it to one particular broker.
So how does Strimzi deal with this? There are two general ways of dealing with this problem:
- Write your own proxy / load balancer which would do more intelligent routing on the application layer (layer 7). Such a proxy could, for example, abstract the architecture of the Kafka cluster from the client and pretend that the cluster has just one big broker running everything and just route the traffic to the different brokers in the background. Kubernetes already does this for the HTTP traffic using the Ingress resource.
- Make sure you use the
advertised.listenersoption in the broker configuration in a way which allows the clients to connect directly to the broker.
In Strimzi, we currently support the second option.
Connecting from inside the same Kubernetes cluster
Doing this for clients running inside the same Kubernetes cluster as the Kafka cluster is actually quite simple. Each pod has its own IP address, which other applications can use to connect directly to it. This is normally not used by regular Kubernetes applications. One of the reasons is that Kubernetes doesn’t offer any nice way to discover these IP addresses. To find out the IP address, you would need to use the Kubernetes API, find the right pod and its IP address. And you would need to have the rights for this. Instead, Kubernetes uses the services with their stable DNS names as the main discovery mechanism. But with Kafka, this is not an issue, because it has its own discovery protocol. We do not need the clients to figure out the API address from the Kubernetes API. We just need to configure it and the advertised address and the clients will discover it through the Kafka metadata.
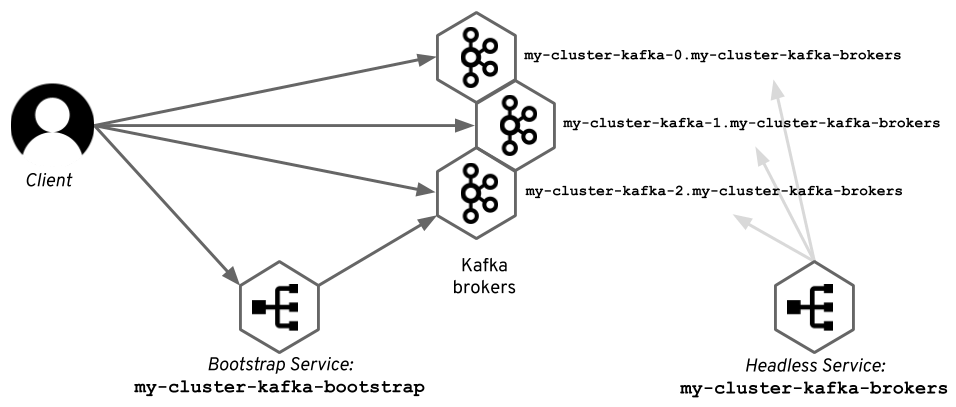
But there is even one better option which is used by Strimzi. For StatefulSets – which Strimzi is using to run the Kafka brokers – you can use the Kubernetes headless service to give each of the pods a stable DNS name. Strimzi is using these DNS names as the advertised addresses for the Kafka brokers. So with Strimzi:
- The initial connection is done using a regular Kubernetes service to get the metadata.
- The subsequent connections are opened using the DNS names given to the pods by another headless Kubernetes service.
The diagram below shows how does it look with an example Kafka cluster named
my-cluster.

Both approaches have their own pros and cons. Using the DNS can sometimes cause problems with cached DNS information. When the underlying IP addresses of the pods change, for example during rolling updates, the clients connecting to the brokers need to have the latest DNS information. However, we found out that using IP addresses causes even worse problems, because sometimes Kubernetes re-uses them very aggressively and a new pod gets the IP address used just a few seconds before by some other Kafka node.
Connecting from the outside
While the access for clients running inside the same Kubernetes cluster was relatively simple, it will get a bit harder from the outside. While there are some tools for joining the Kubernetes network with the regular network outside of Kubernetes, most Kubernetes clusters run on their own network which is separated from the world outside. That means that the things such as pod IP addresses or DNS names are not resolvable for any clients running outside the cluster. Thanks to that, it is also clear that we will need to use a separate Kafka listener for access from inside and outside of the cluster, because the advertised addresses will need to be different.
But Kubernetes and OpenShift have many different ways of exposing applications, such as node ports, load-balancers or routes. Strimzi supports all of these to let users find the way which suits best their use case. In the next parts of this series, we will look at them in more detail.
