Strimzi supports accessing Apache Kafka using load balancers. We already have a full blog post dedicated to load balancers. But when running Strimzi on Amazon AWS, it will by default use the so called Classic Load Balancers. A lot of users seem to be asking about using the newer Network Load Balancers with Strimzi and Kafka. So in this blog post we will look at whether and how Strimzi could work with Network load balancers.
Network Load Balancers
Amazon AWS currently supports three different types of load balancers:
- Classic Load Balancers
- Application Load Balancers
- and Network Load Balancers (NLB)
The Application Load Balancer is a Layer 7 load balancer and is best suited for HTTP and HTTPS traffic. That makes it unsuitable for use with Apache Kafka. Both Classic and Network Load Balancers are Layer 4 load balancers (Classic load balancer supports also some Layer 7 load balancing of HTTP / HTTPS) which are well suited for load balancing TCP connections including those from Apache Kafka clients.
Network load balancer was added to Amazon AWS only later and has some additional features which are not supported by the older Classic load balancer. For example:
- Support for static IP addresses
- Deletion protection
- Preserving of source IP address
- Load balancing multiple listeners / ports on the same instance
The last feature is especially interesting for use with Apache Kafka. It allows you to have only one load balancer to handle the whole Kafka cluster. With the Classic load balancer you would need a dedicated load balancer instance for each broker plus one additional instance for the bootstrap service.
Also the pricing is slightly different. With the Classic load balancer, you pay $0.025 per hour (per instance) plus $0.008 for each processed GB of data. With the Network load balancer, you pay $0.0225 per hour (per instance) plus $0.006 per an “LCU-hour”. The LCU-hour is a unit of scale for the load balancer. One LCU hour includes 800 new TCP connections per second, 100,000 active TCP connections and 1 GB of processed data. While the pricing model is a little bit different, the NLB should be in most cases cheaper to use than the Classic load balancer. (The prices are for the US East region)
For more detailed information about the different load balancer types in Amazon AWS and their pricing, please check the AWS documentation.
Using Strimzi with Network Load Balancer
In Kubernetes, when you create a service with type Loadbalancer, it will by default create the Classic Load Balancer.
For each service with a given type it will create a separate load balancer instance.
It is easy to change the type of the load balancer by setting an annotation on the service.
To create a Network Load balancer, the Kubernetes service needs to have the annotation service.beta.kubernetes.io/aws-load-balancer-type set to the value nlb.
For more details about the annotation see the Kubernetes documentation.
You can set the annotation easily in Strimzi using the template feature:
    # ...
    listeners:
      # ...
      external:
        type: loadbalancer
        tls: false
    template:
      externalBootstrapService:
        metadata:
          annotations:
            service.beta.kubernetes.io/aws-load-balancer-type: nlb
      perPodService:
        metadata:
          annotations:
            service.beta.kubernetes.io/aws-load-balancer-type: nlb
    # ...
(The example above has TLS and authentication disabled for simplicity)
This will set the annotation on the services and get your Kubernetes cluster to create the Network load balancers instead of the Classic ones.
Apache Kafka and Strimzi will work with this out of the box without any additional changes.
However, it will still create a separate load balancer instance for each Kafka broker plus the additional one for the bootstrap service.
Once the cluster is deployed, you can easily connect to it using the load balancer DNS name and the port 9094:
$ bin/kafka-console-consumer.sh --bootstrap-server a83231a2e37594f3fbf5c6841de6f729-f13dac31e8214877.elb.us-east-1.amazonaws.com:9094 --topic my-topic --from-beginning
Hello
World
Having a single Network Load Balancer for the whole Apache Kafka cluster
But what if we want to share a single load balancer instance for all services? I didn’t find any way of telling Kubernetes to create only a single NLB instance and share it with multiple services. So we will need to approach this a little differently. When you expose a Kubernetes service with load balancer, it essentially creates a node ports on your Kubernetes workers and configures the load balancer to forward the data to the right node port. So to work around the limitations we can do the same manually. We can:
- Expose Apache Kafka using node ports
- Create a single NLB and configure it to route the data to the node port services
- Configure the advertised addresses in Apache Kafka to use the NLB address instead of the node addresses and node ports
Let’s look in detail at each of these steps.
Exposing Apache Kafka with node ports
First, we will deploy a regular Kafka cluster with node port access:
    # ...
    listeners:
      # ...
      external:
        type: nodeport
        tls: false
    # ...
We will have to note the node port numbers of the node port services, because we will need them in the next step:
kubectl get service
NAME                                  TYPE        CLUSTER-IP     EXTERNAL-IP   PORT(S)                      AGE
my-cluster-kafka-0                    NodePort    10.96.84.161   <none>        9094:31208/TCP               35m
my-cluster-kafka-1                    NodePort    10.96.63.131   <none>        9094:31983/TCP               35m
my-cluster-kafka-2                    NodePort    10.96.35.251   <none>        9094:32279/TCP               35m
my-cluster-kafka-bootstrap            ClusterIP   10.96.17.28    <none>        9091/TCP,9092/TCP,9093/TCP   35m
my-cluster-kafka-brokers              ClusterIP   None           <none>        9091/TCP,9092/TCP,9093/TCP   35m
my-cluster-kafka-external-bootstrap   NodePort    10.96.187.42   <none>        9094:32200/TCP               35m
my-cluster-zookeeper-client           ClusterIP   10.96.58.200   <none>        2181/TCP                     36m
my-cluster-zookeeper-nodes            ClusterIP   None           <none>        2181/TCP,2888/TCP,3888/TCP   36m
In my case, the node ports are:
my-cluster-kafka-0has port31208my-cluster-kafka-1has port31983my-cluster-kafka-2has port32279my-cluster-kafka-external-bootstraphas port32200
Creating and configuring the NLB
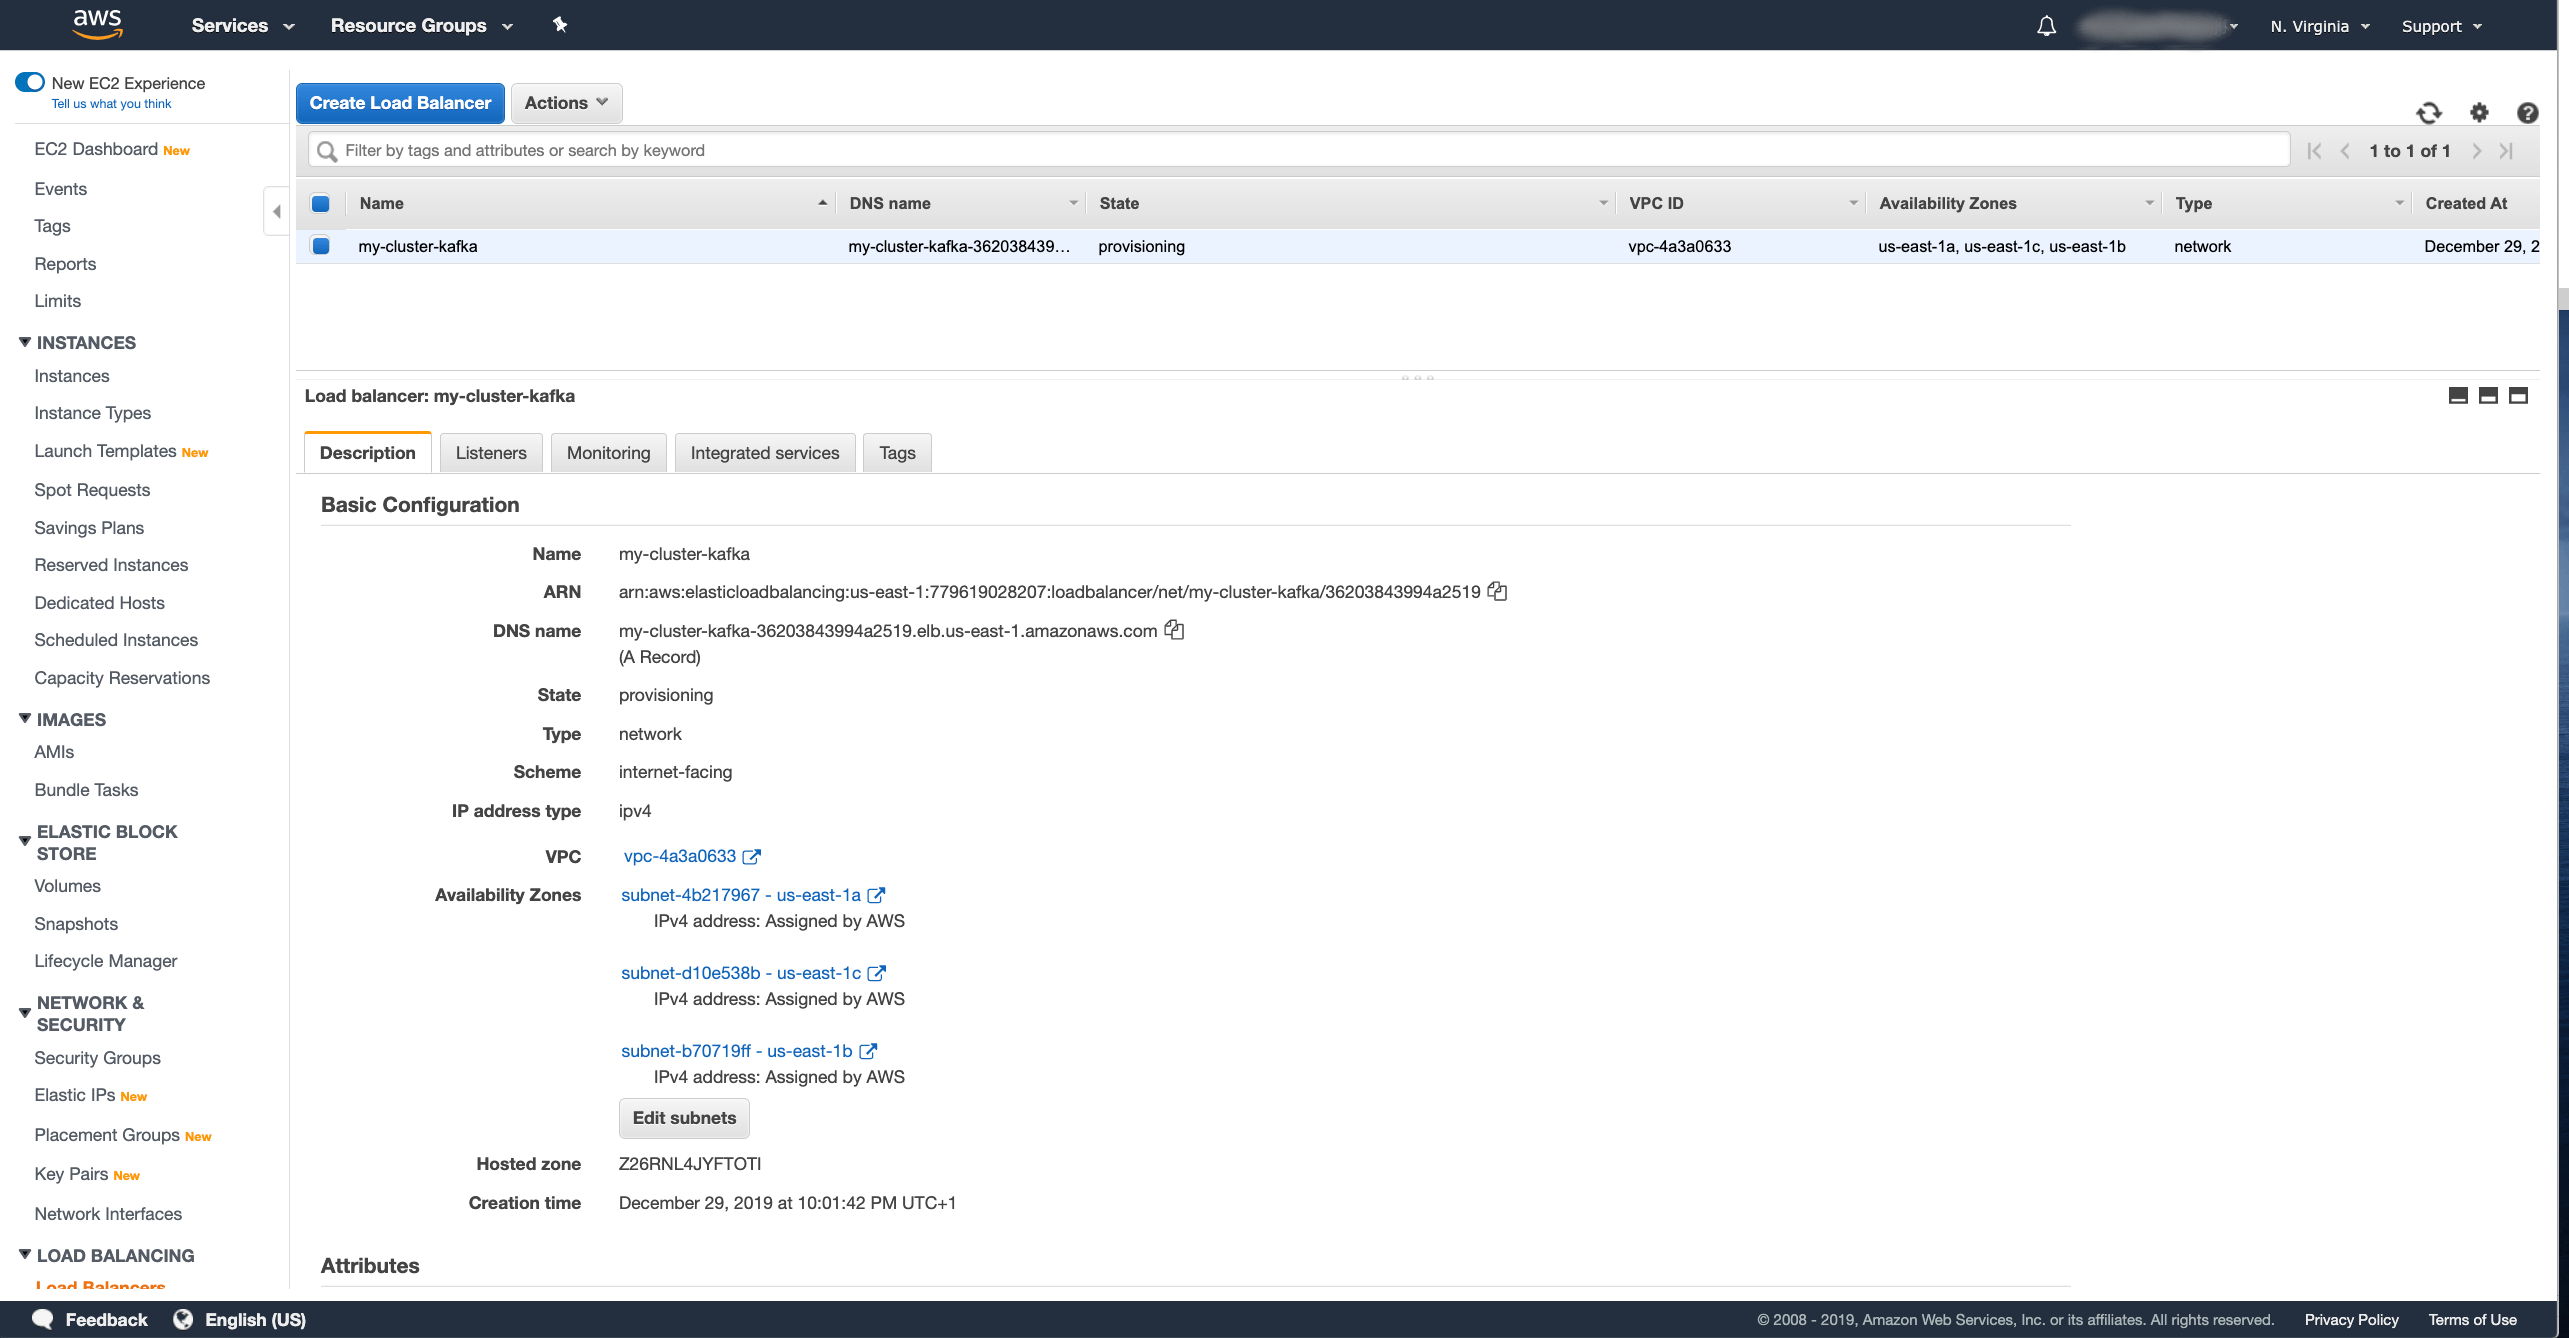
Next, we have to create the Network load balancer. In the Amazon AWS console, go to the Load Balancer section of the EC2 dashboard and create a new load balancer with the Create Load Balancer button. In the wizard, select a Network Load Balancer:
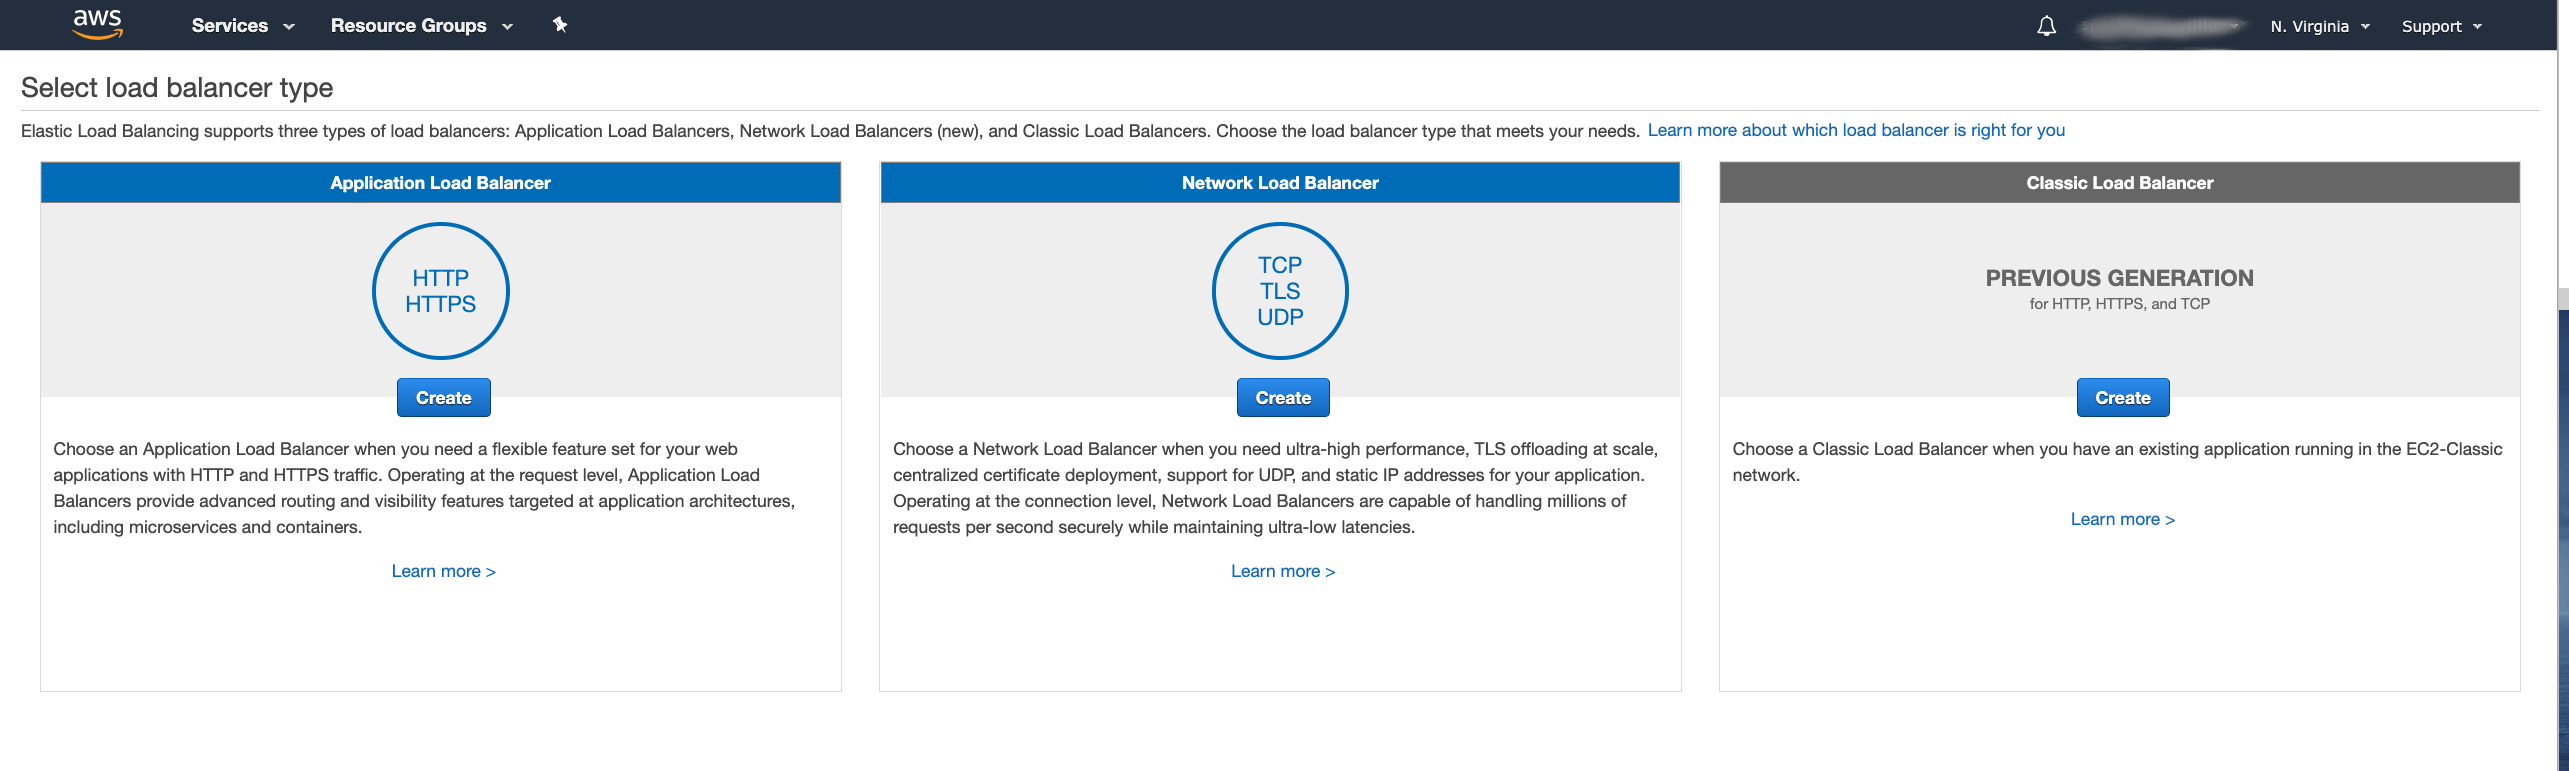
And configure the details of the load balancer:
- Pick your own name for the load balancer.
I named mine
my-cluster-kafka. - Create one listener for each broker plus one additional as bootstrap.
All listeners should use the TCP protocol.
My Kafka cluster has 3 brokers, so I configured 4 listeners on ports
9092,19092,29092and39092. - Select the right VPC where your Kubernetes cluster runs and select all availability zones which it is using.
Once you are finished, click Next: ….
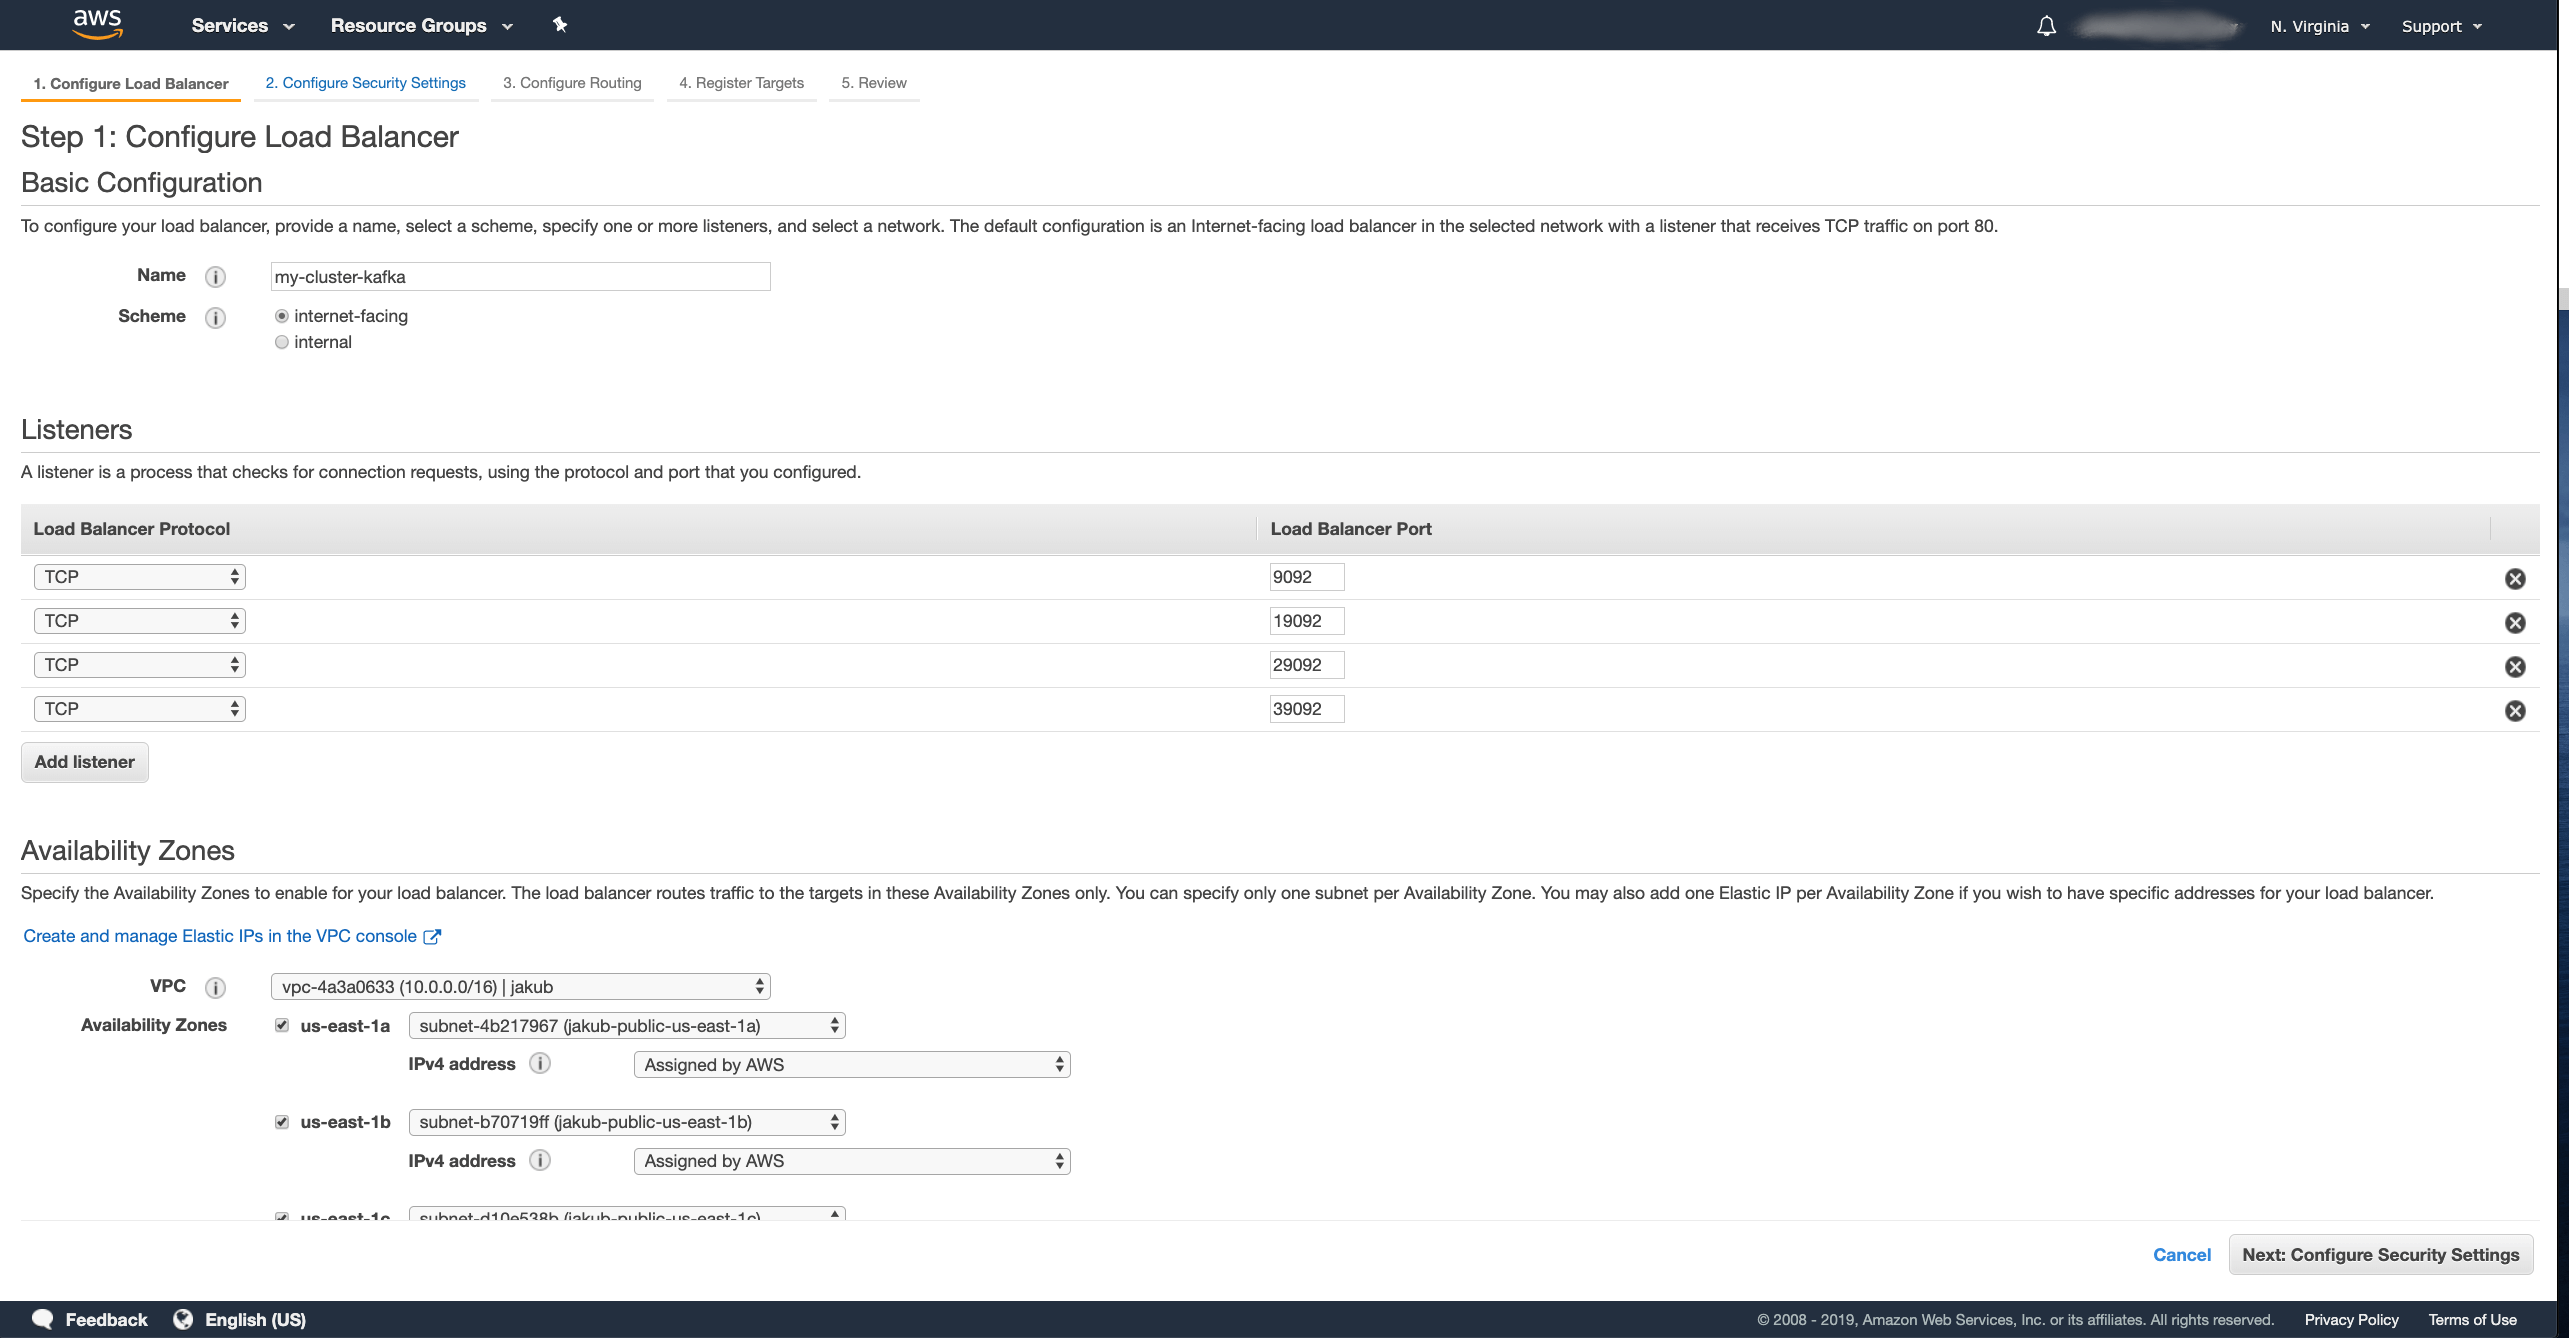
We can skip the security configuration since we do not use any TLS listeners and just click Next: … again to move to the routing configuration:
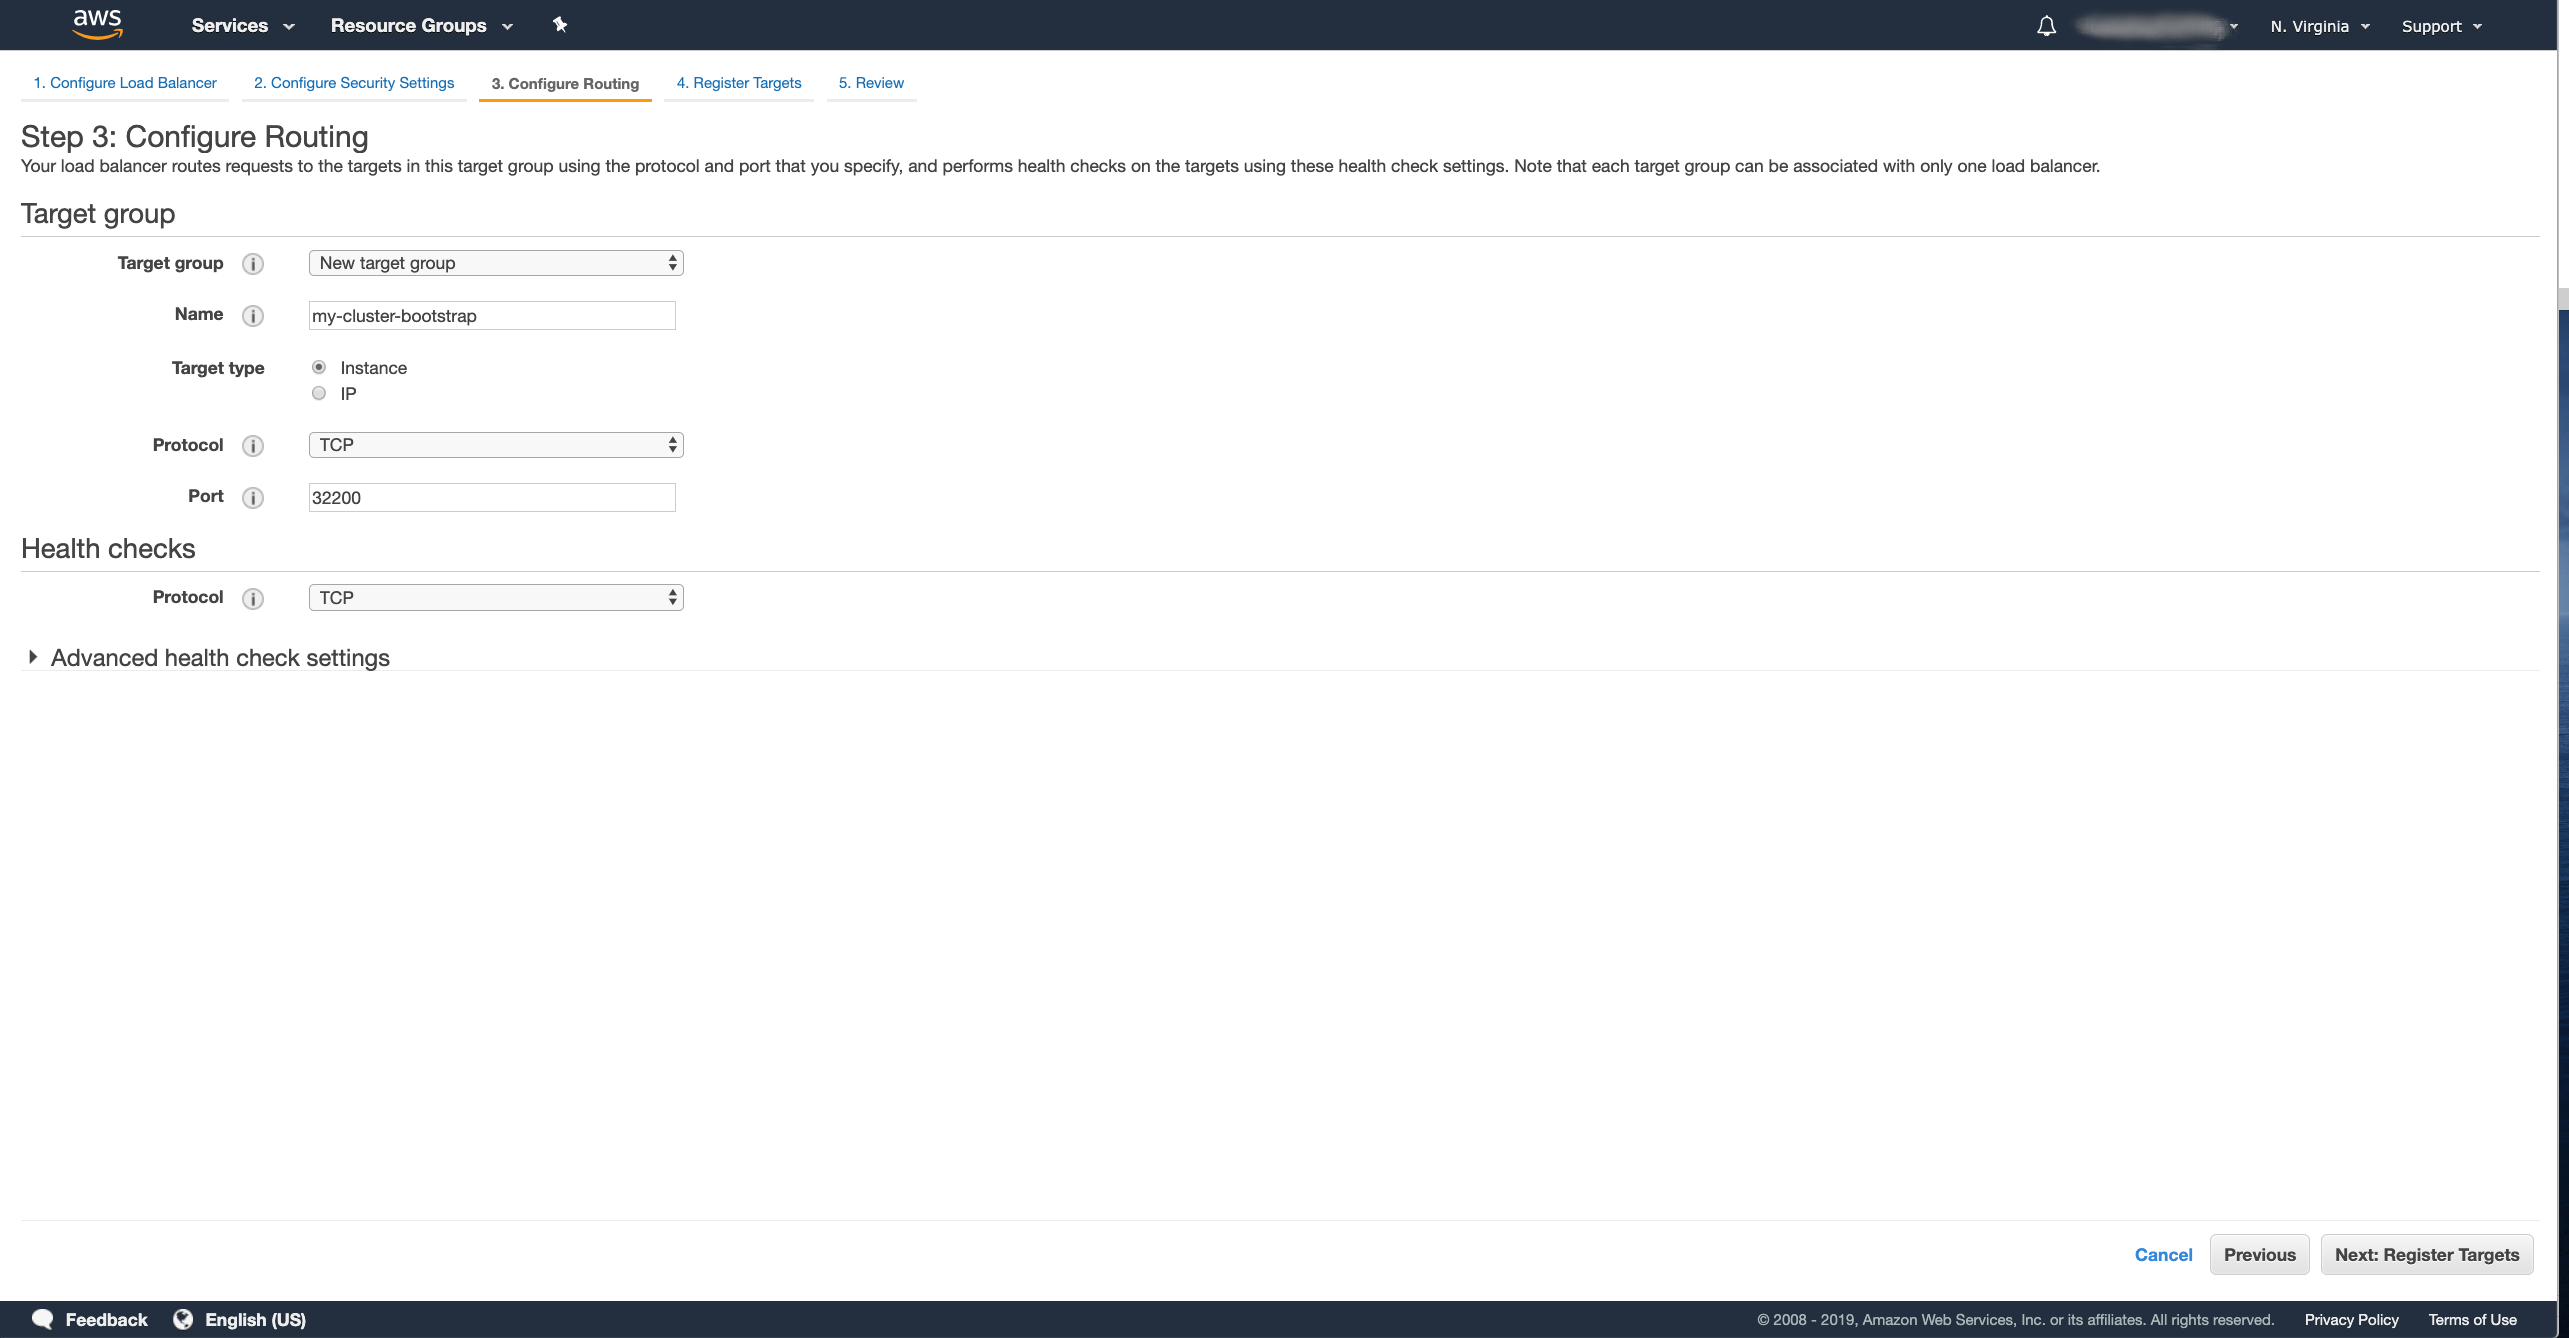
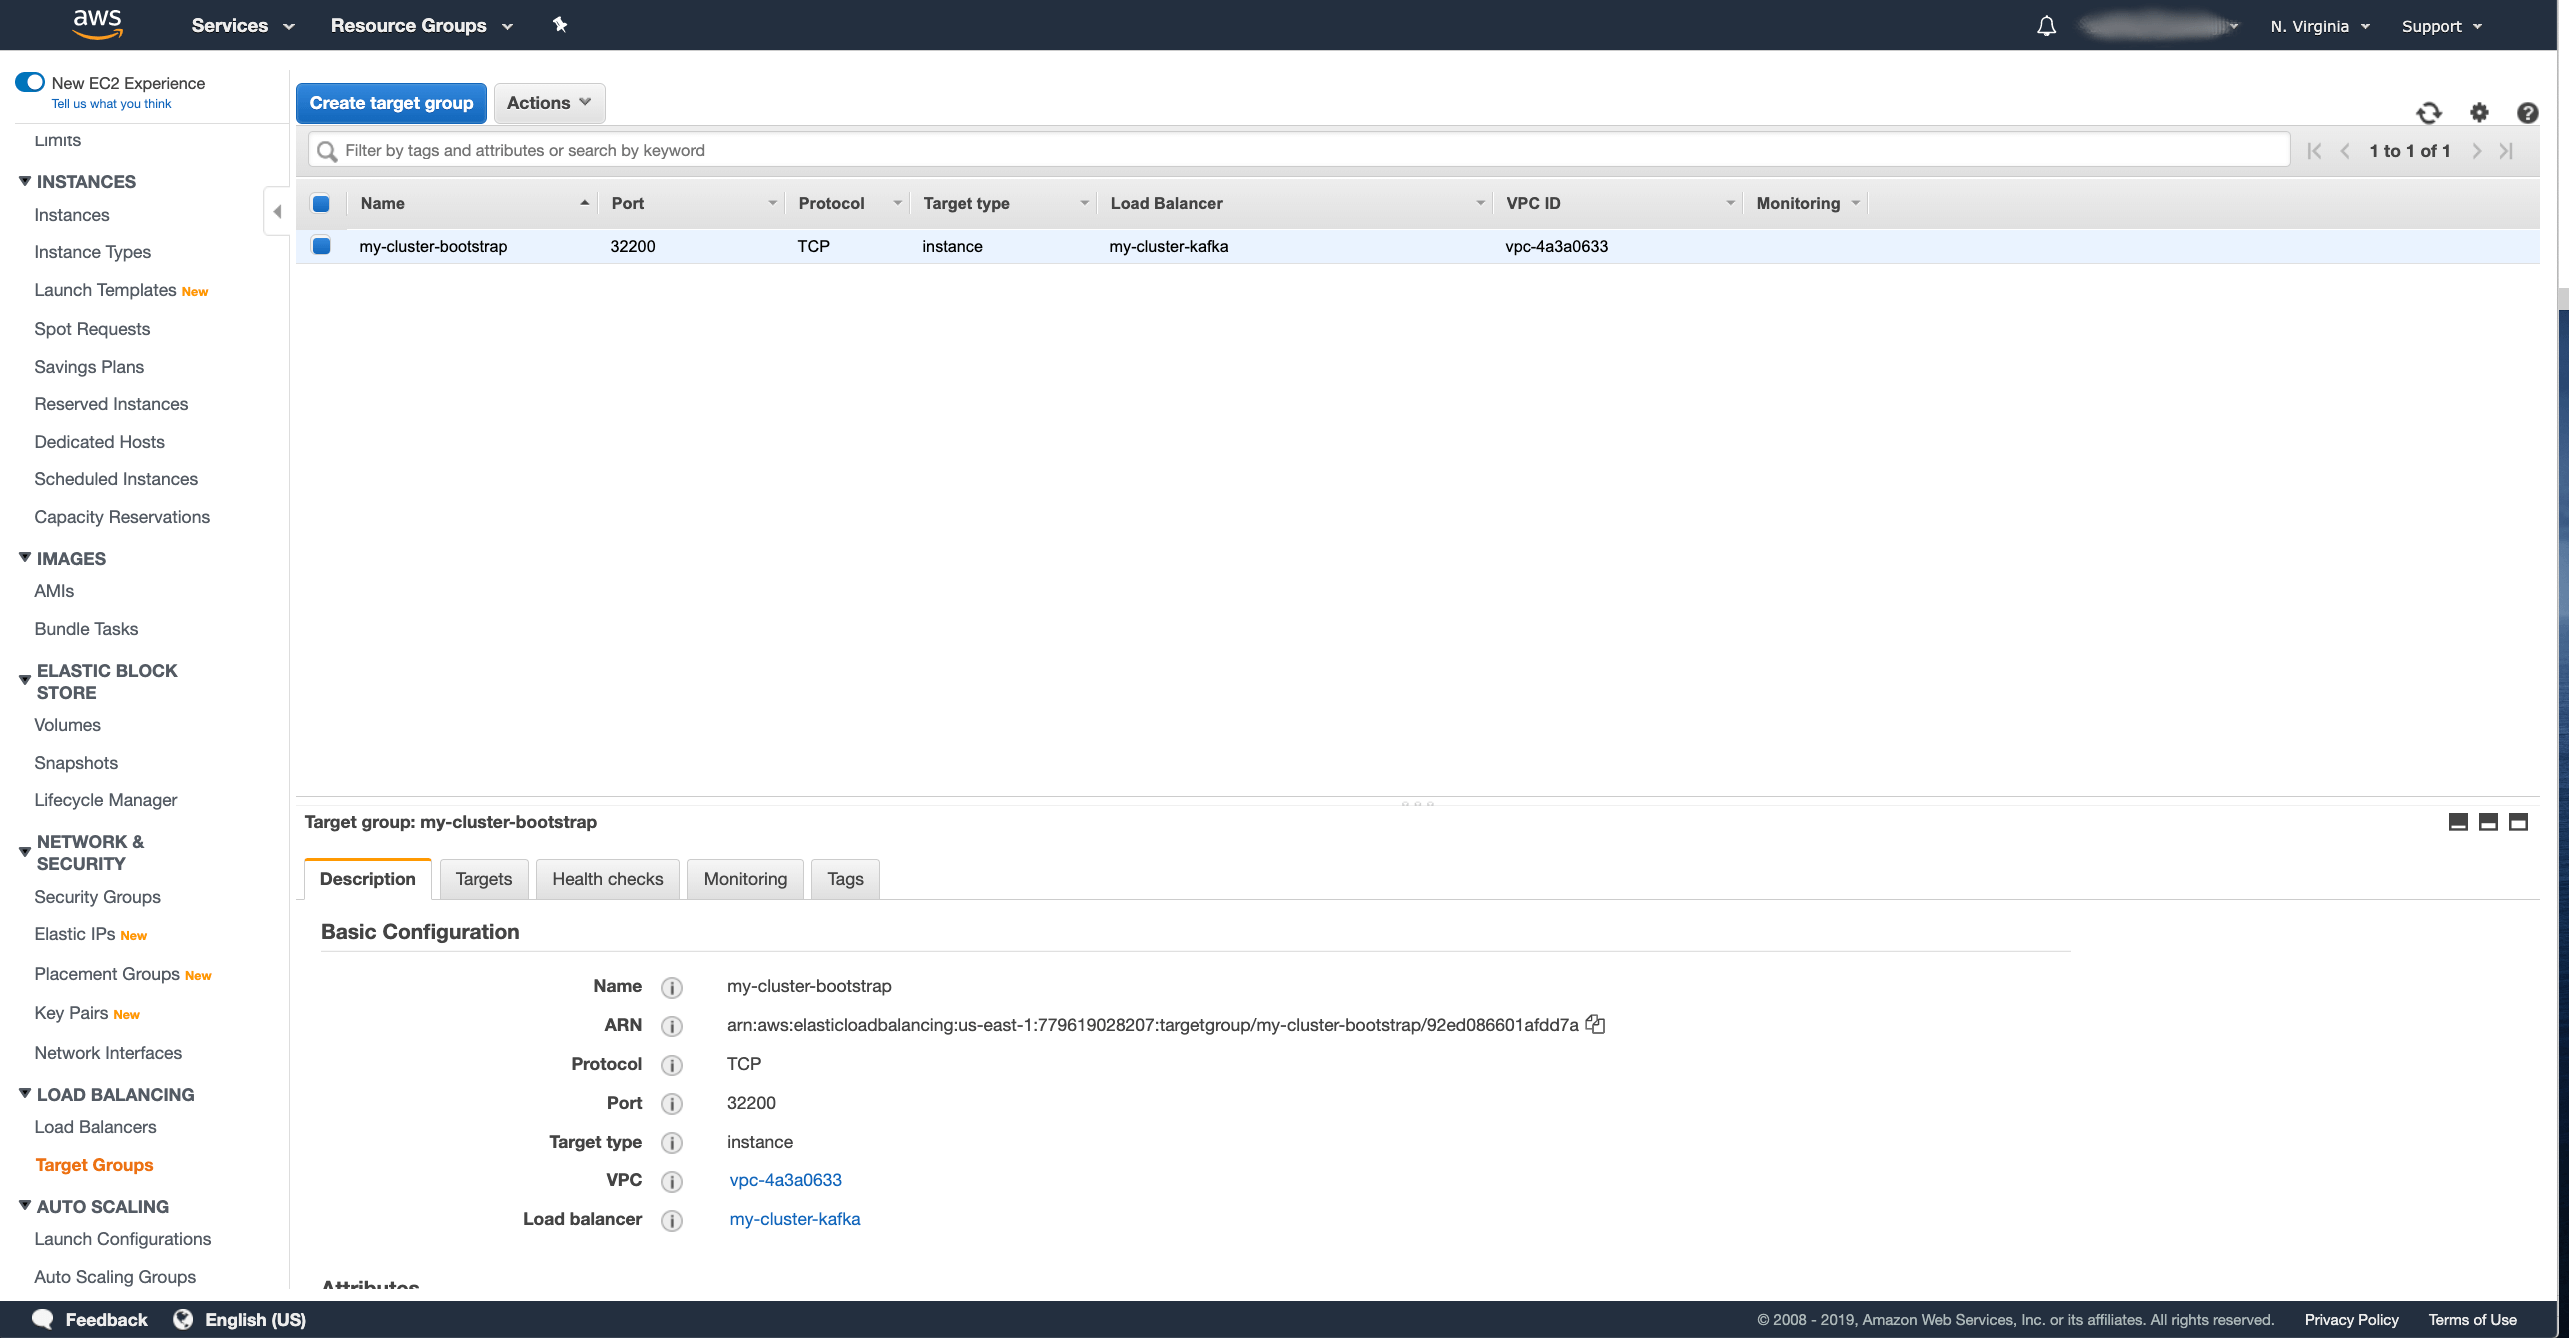
- Name the first Target Group which will be used for the bootstrap service.
I named mine
my-cluster-bootstrap. - Select the target type as Instance.
- Select the TCP protocol.
- As port, use the port number of the bootstrap service.
In my case
32200.
And press the Next: … button.
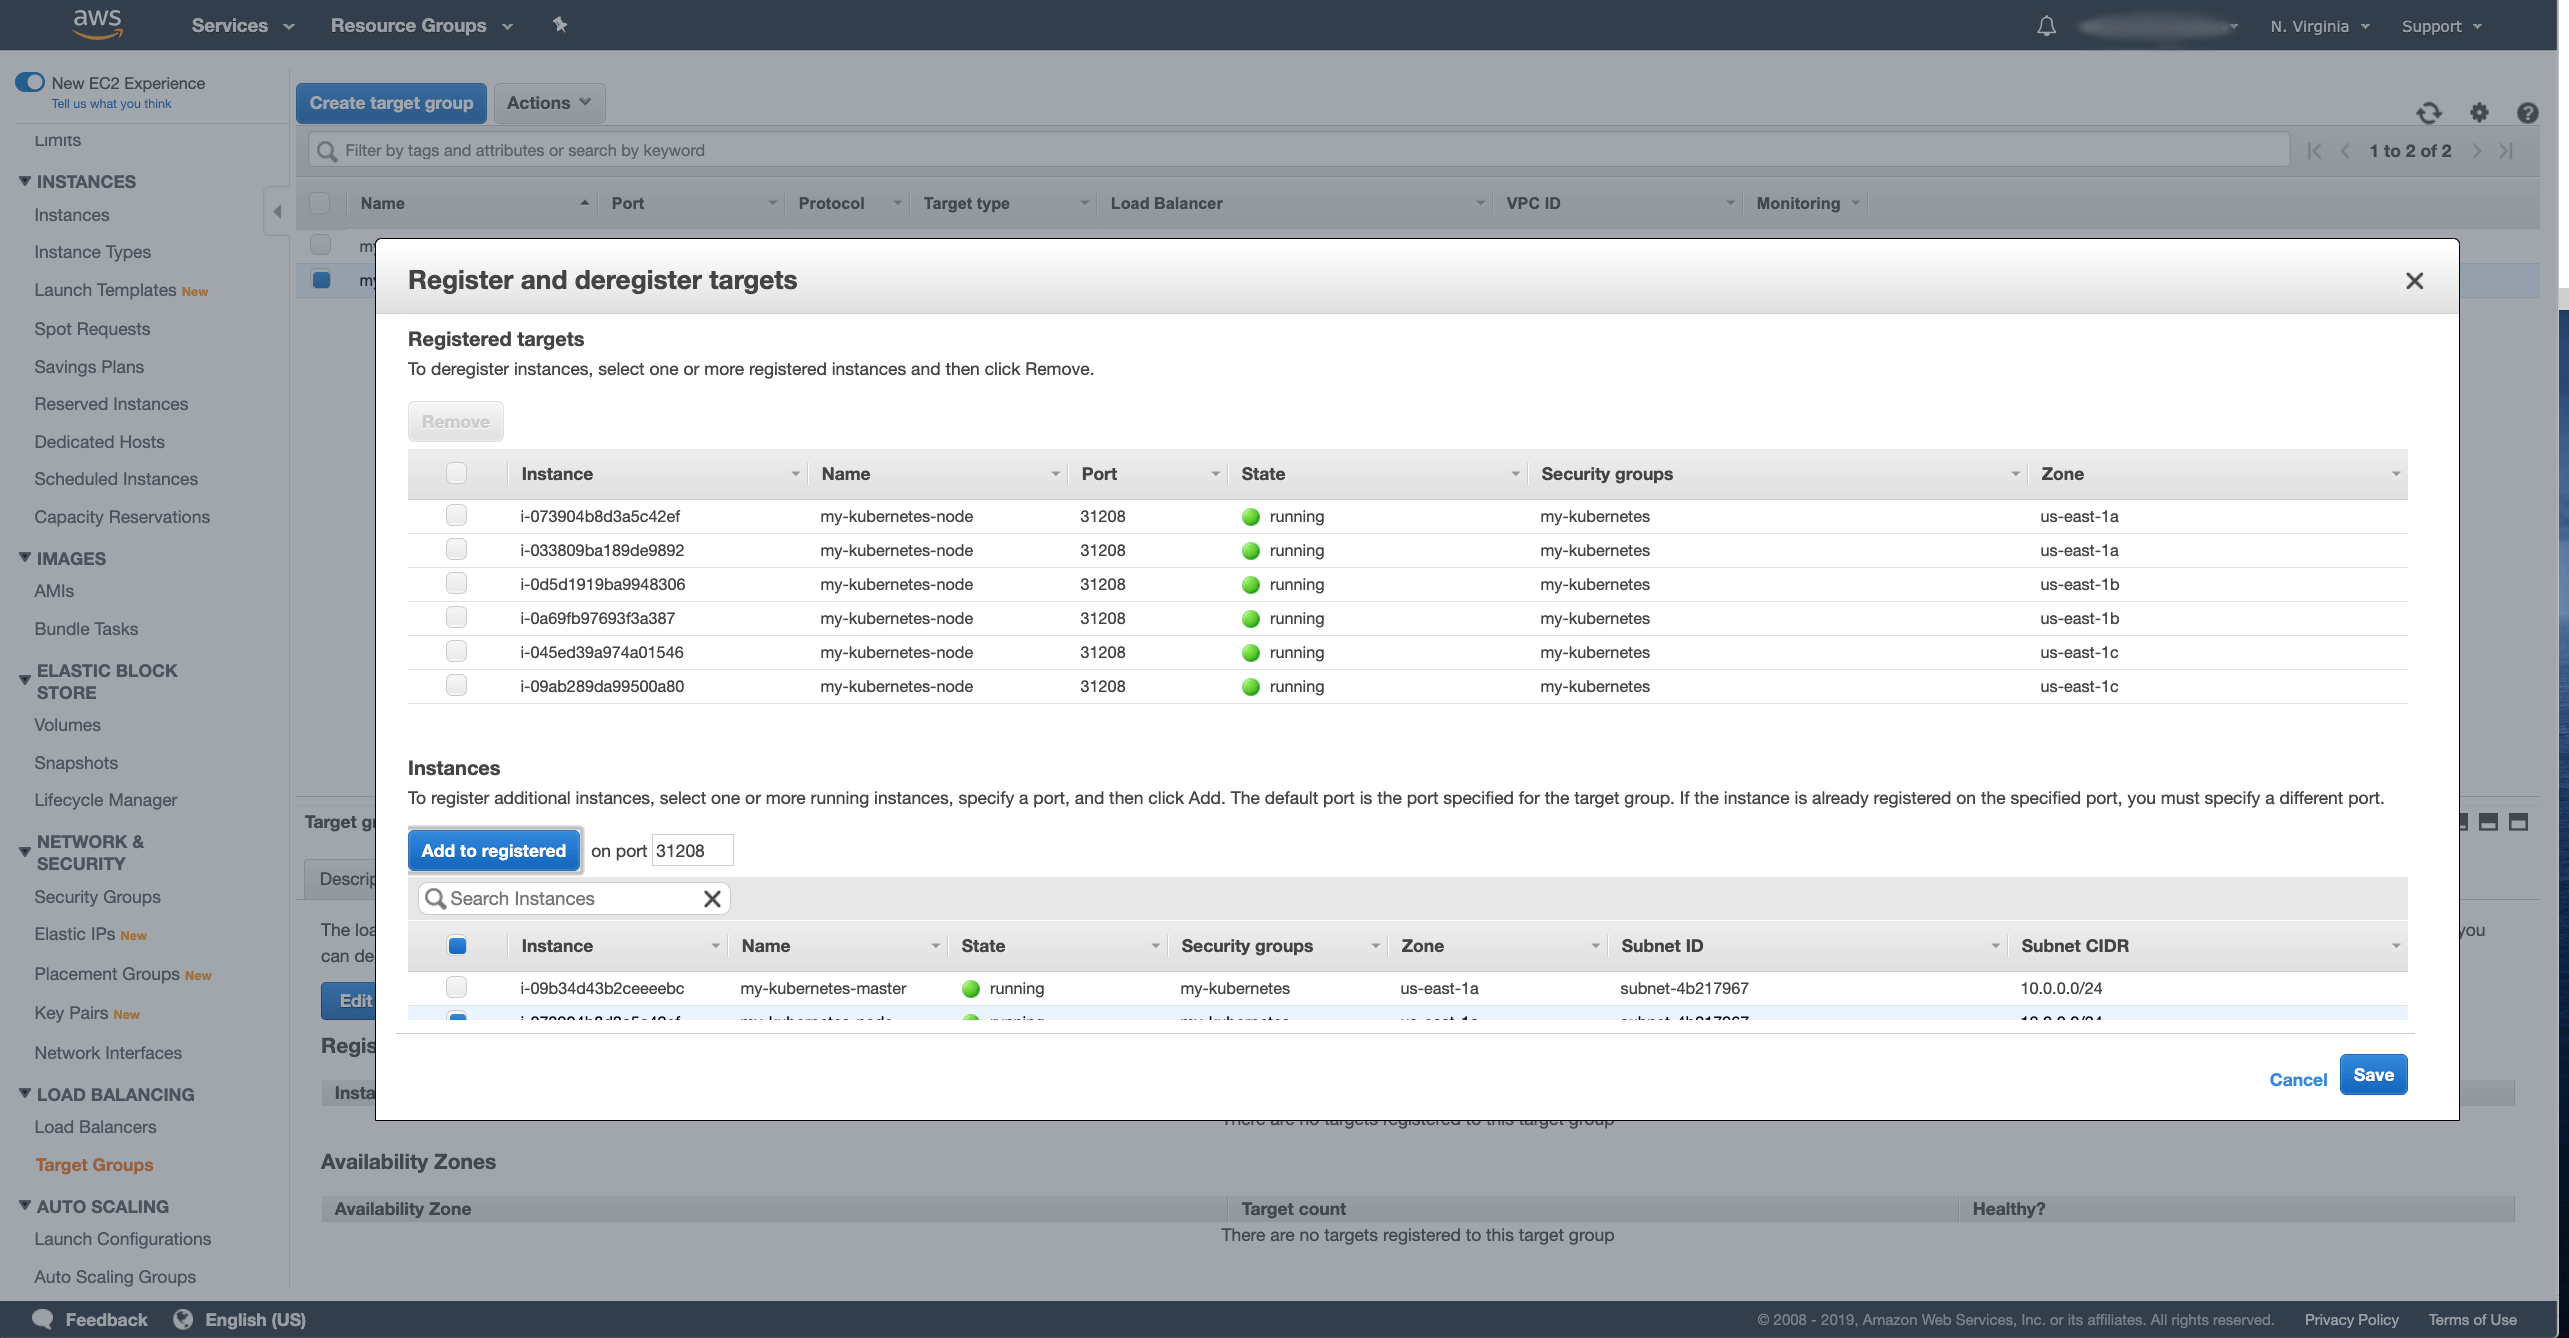
Now we have to register the target instances:
- Select the nodes where your Kafka cluster might run. This could be all your worker nodes or only some of them if you use node selectors to run Kafka only on some dedicated nodes.
- Press the Add to registered button.
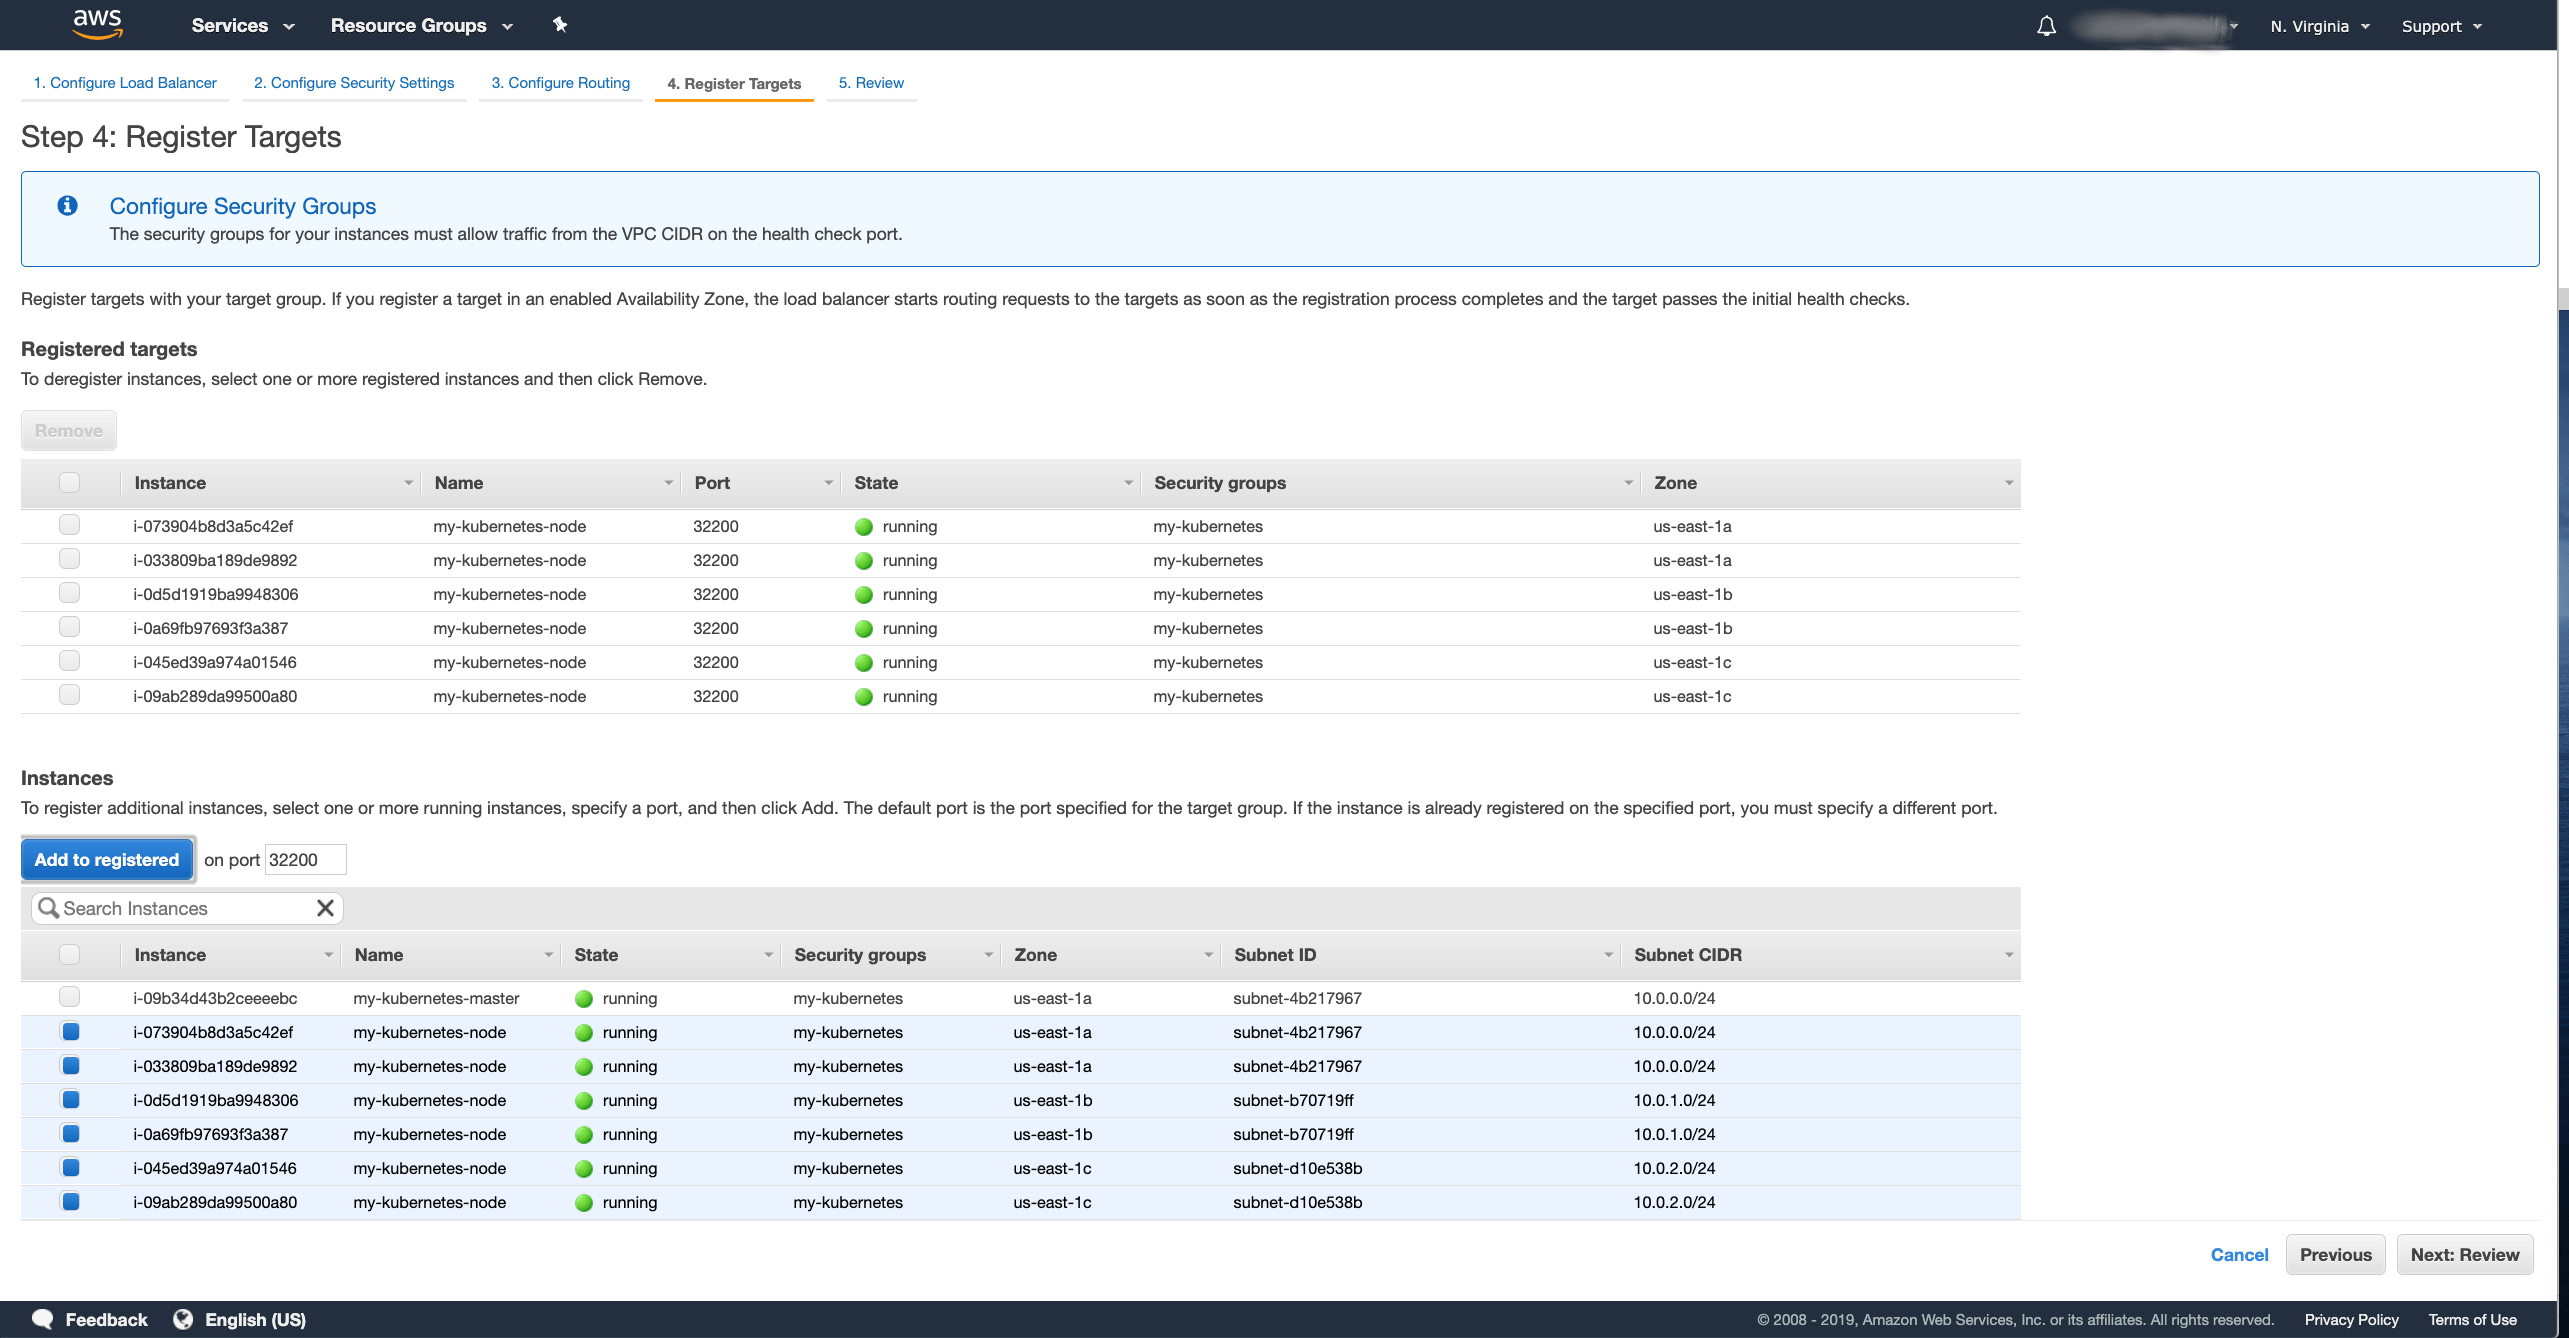
After you selected the nodes, press the Next: … button, review the NLB and if everything looks ok, press the Create button to confirm the creation.

You should now see the load balancer being provisioned. That normally takes a few minutes and when it is done the State changes to active.
However, in the wizard, we created only the target group for the bootstrap service. We will need to create the target groups also for the different brokers. That can be done in the Target Groups section of the EC2 dashboard. You should already see the bootstrap target group there.
Click the Create Target Group button and in the wizard fill in the following fields:
- Enter the name for your target group.
In my case I used
my-custer-kafka-0. - Select the Target type as Instance.
- Select TCP as Protocol.
- As a Port, use the node port of your broker service with index 0.
In my case it is
31208. - And select the VPC where your Kafka cluster runs.
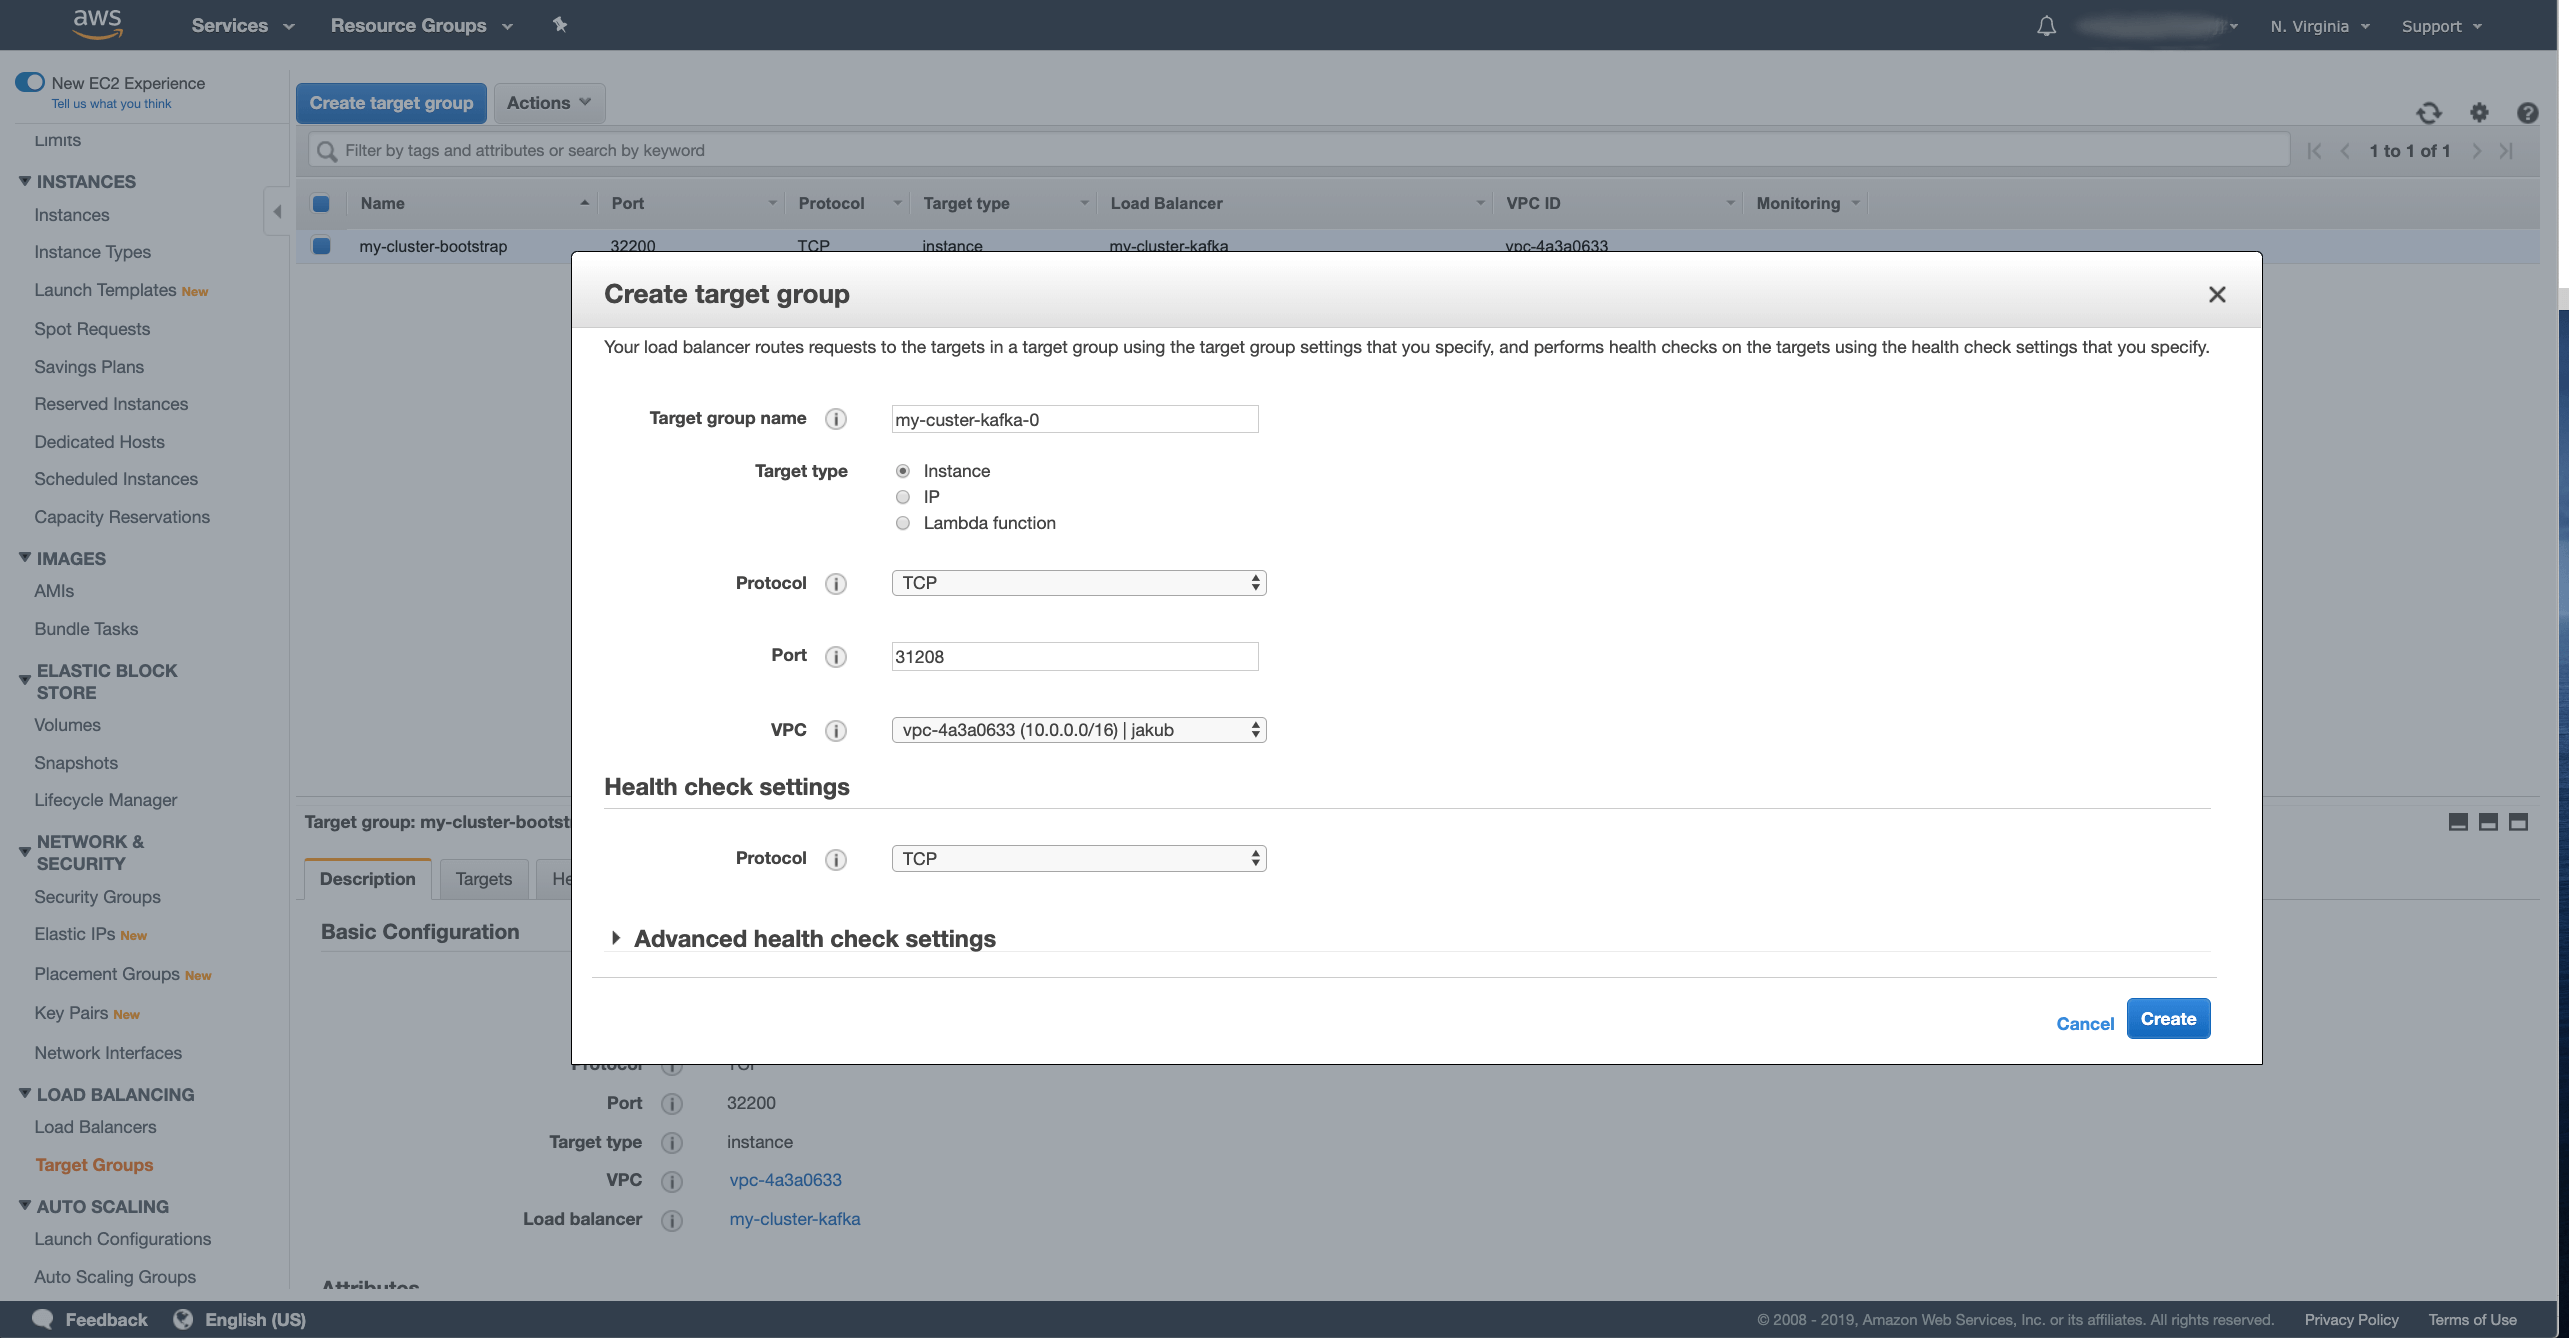
After you have filled in all the fields, press the Create button to create the target group. Once the target group is created, we have to register the target instances with it. In the Targets tab in the details of the selected target group, press the Edit button to register new targets
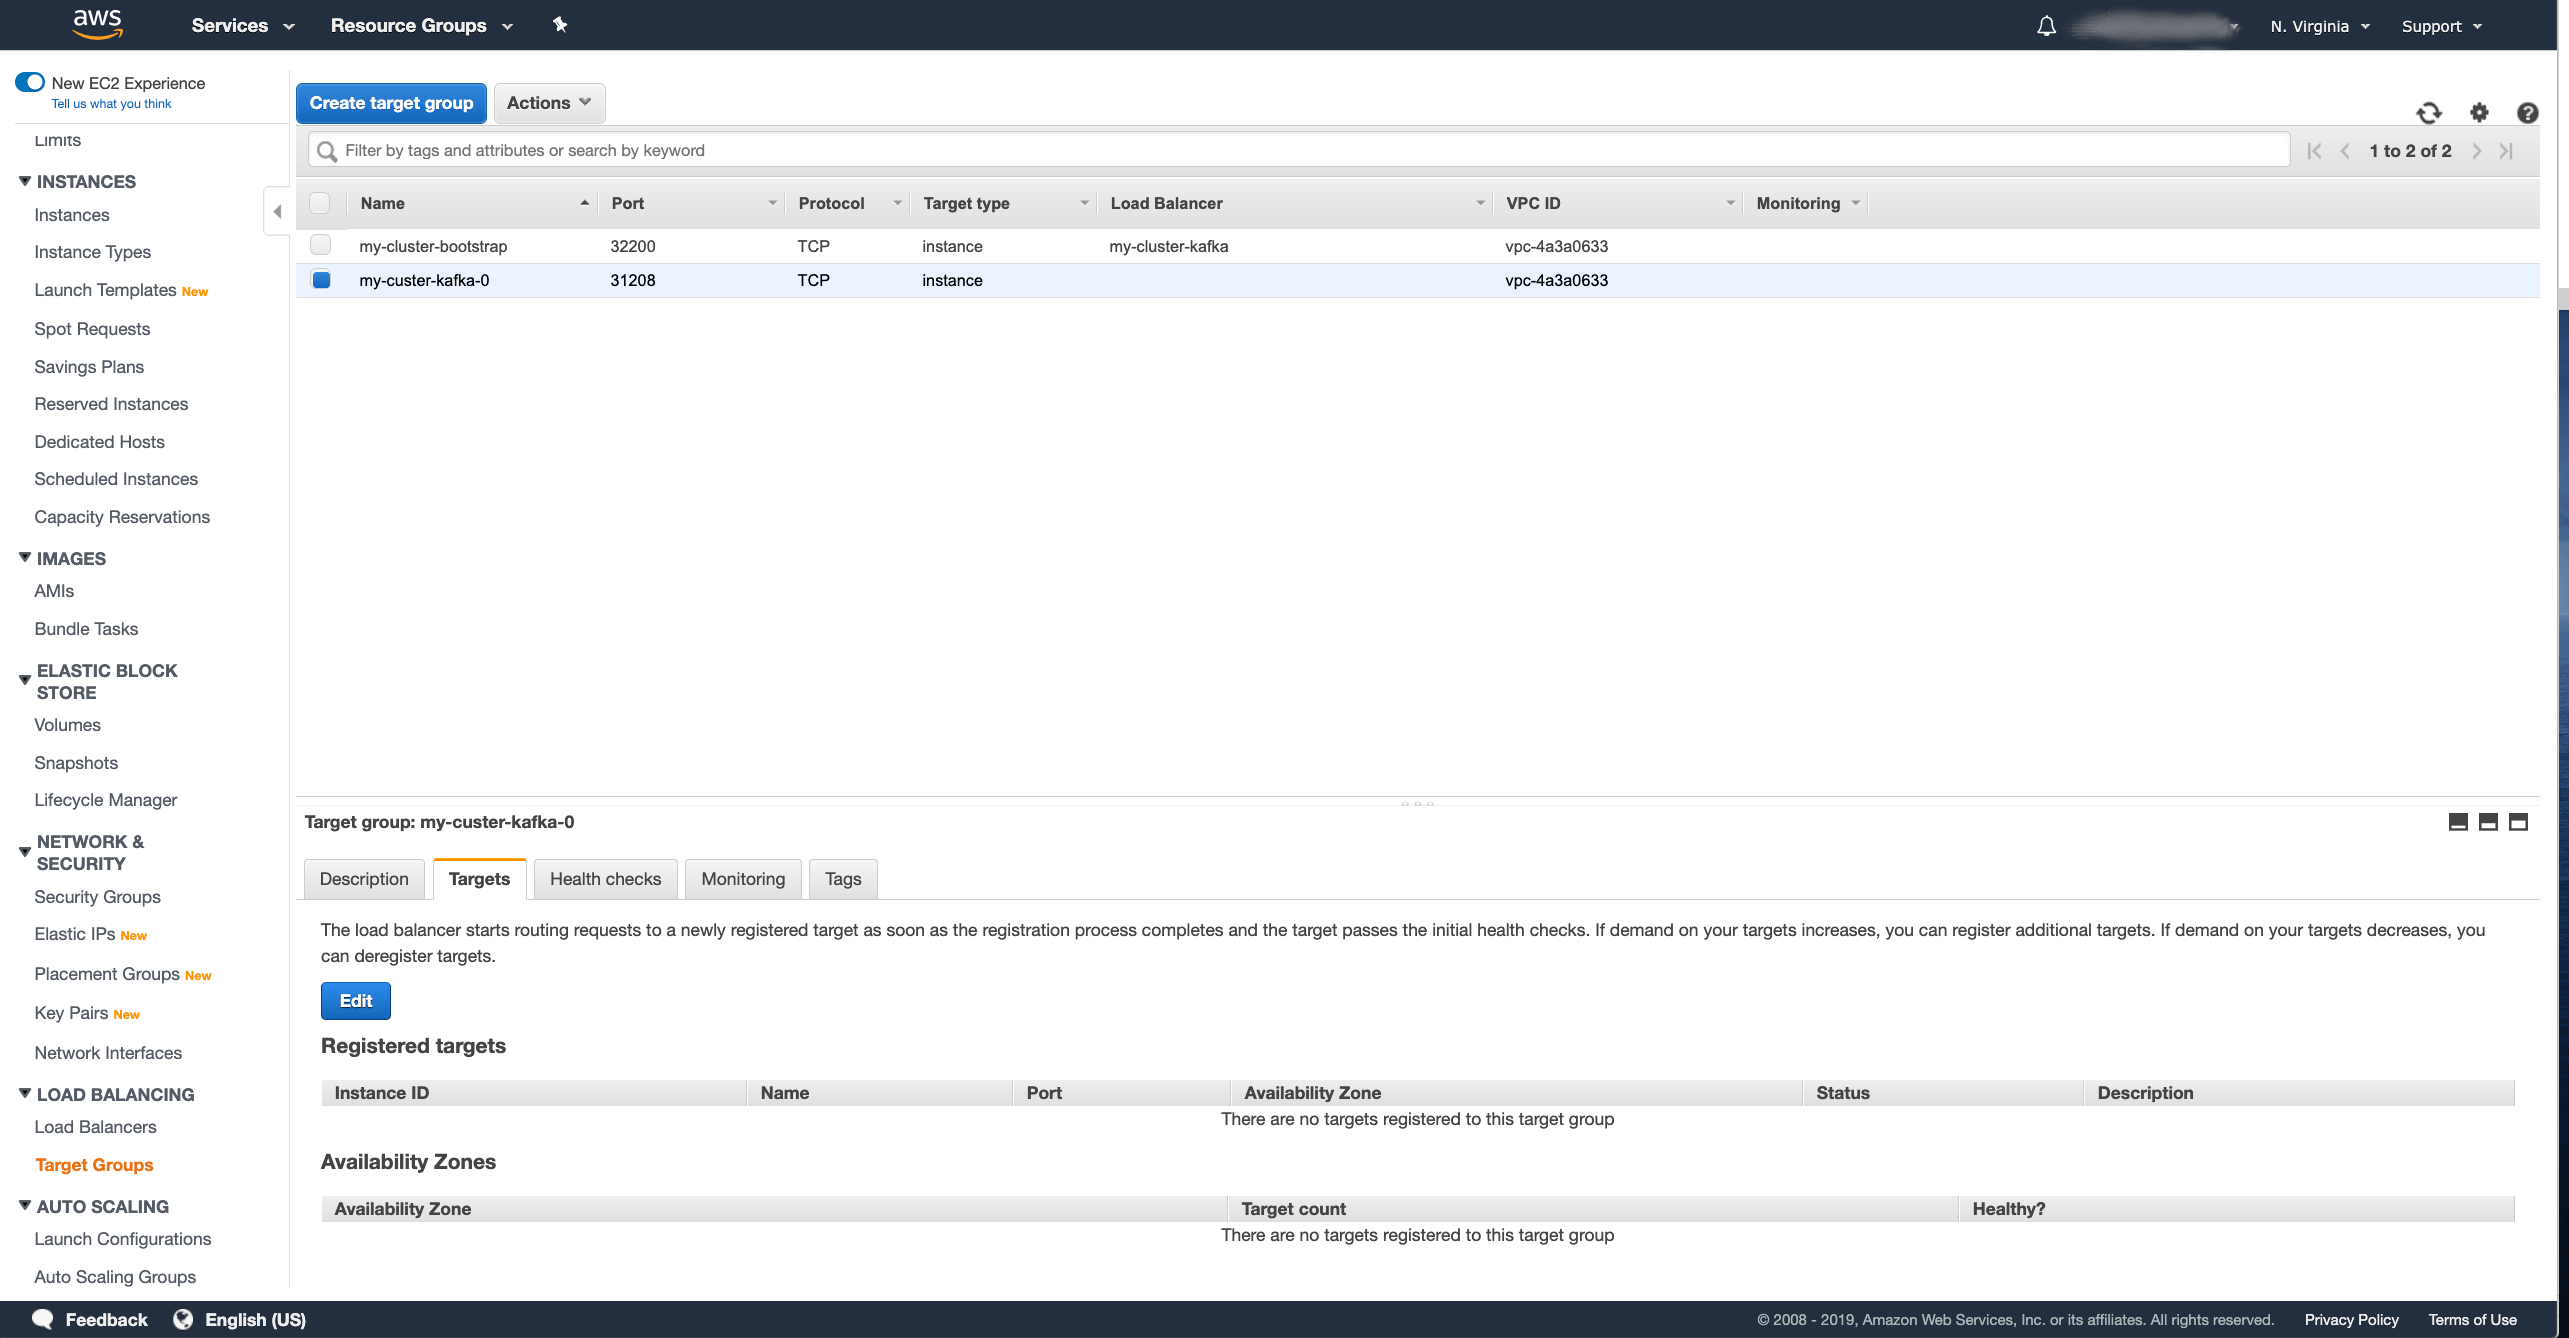
Select the same instances as you did for the bootstrap target and save them.
In the same way we need to add two more target groups for brokers 1 and 2.
Now with the target groups ready, we have to register them with the listeners.
To do that, go back to the Load Balancers section, select the load balancer we created and in the detail go to the Listeners tab.
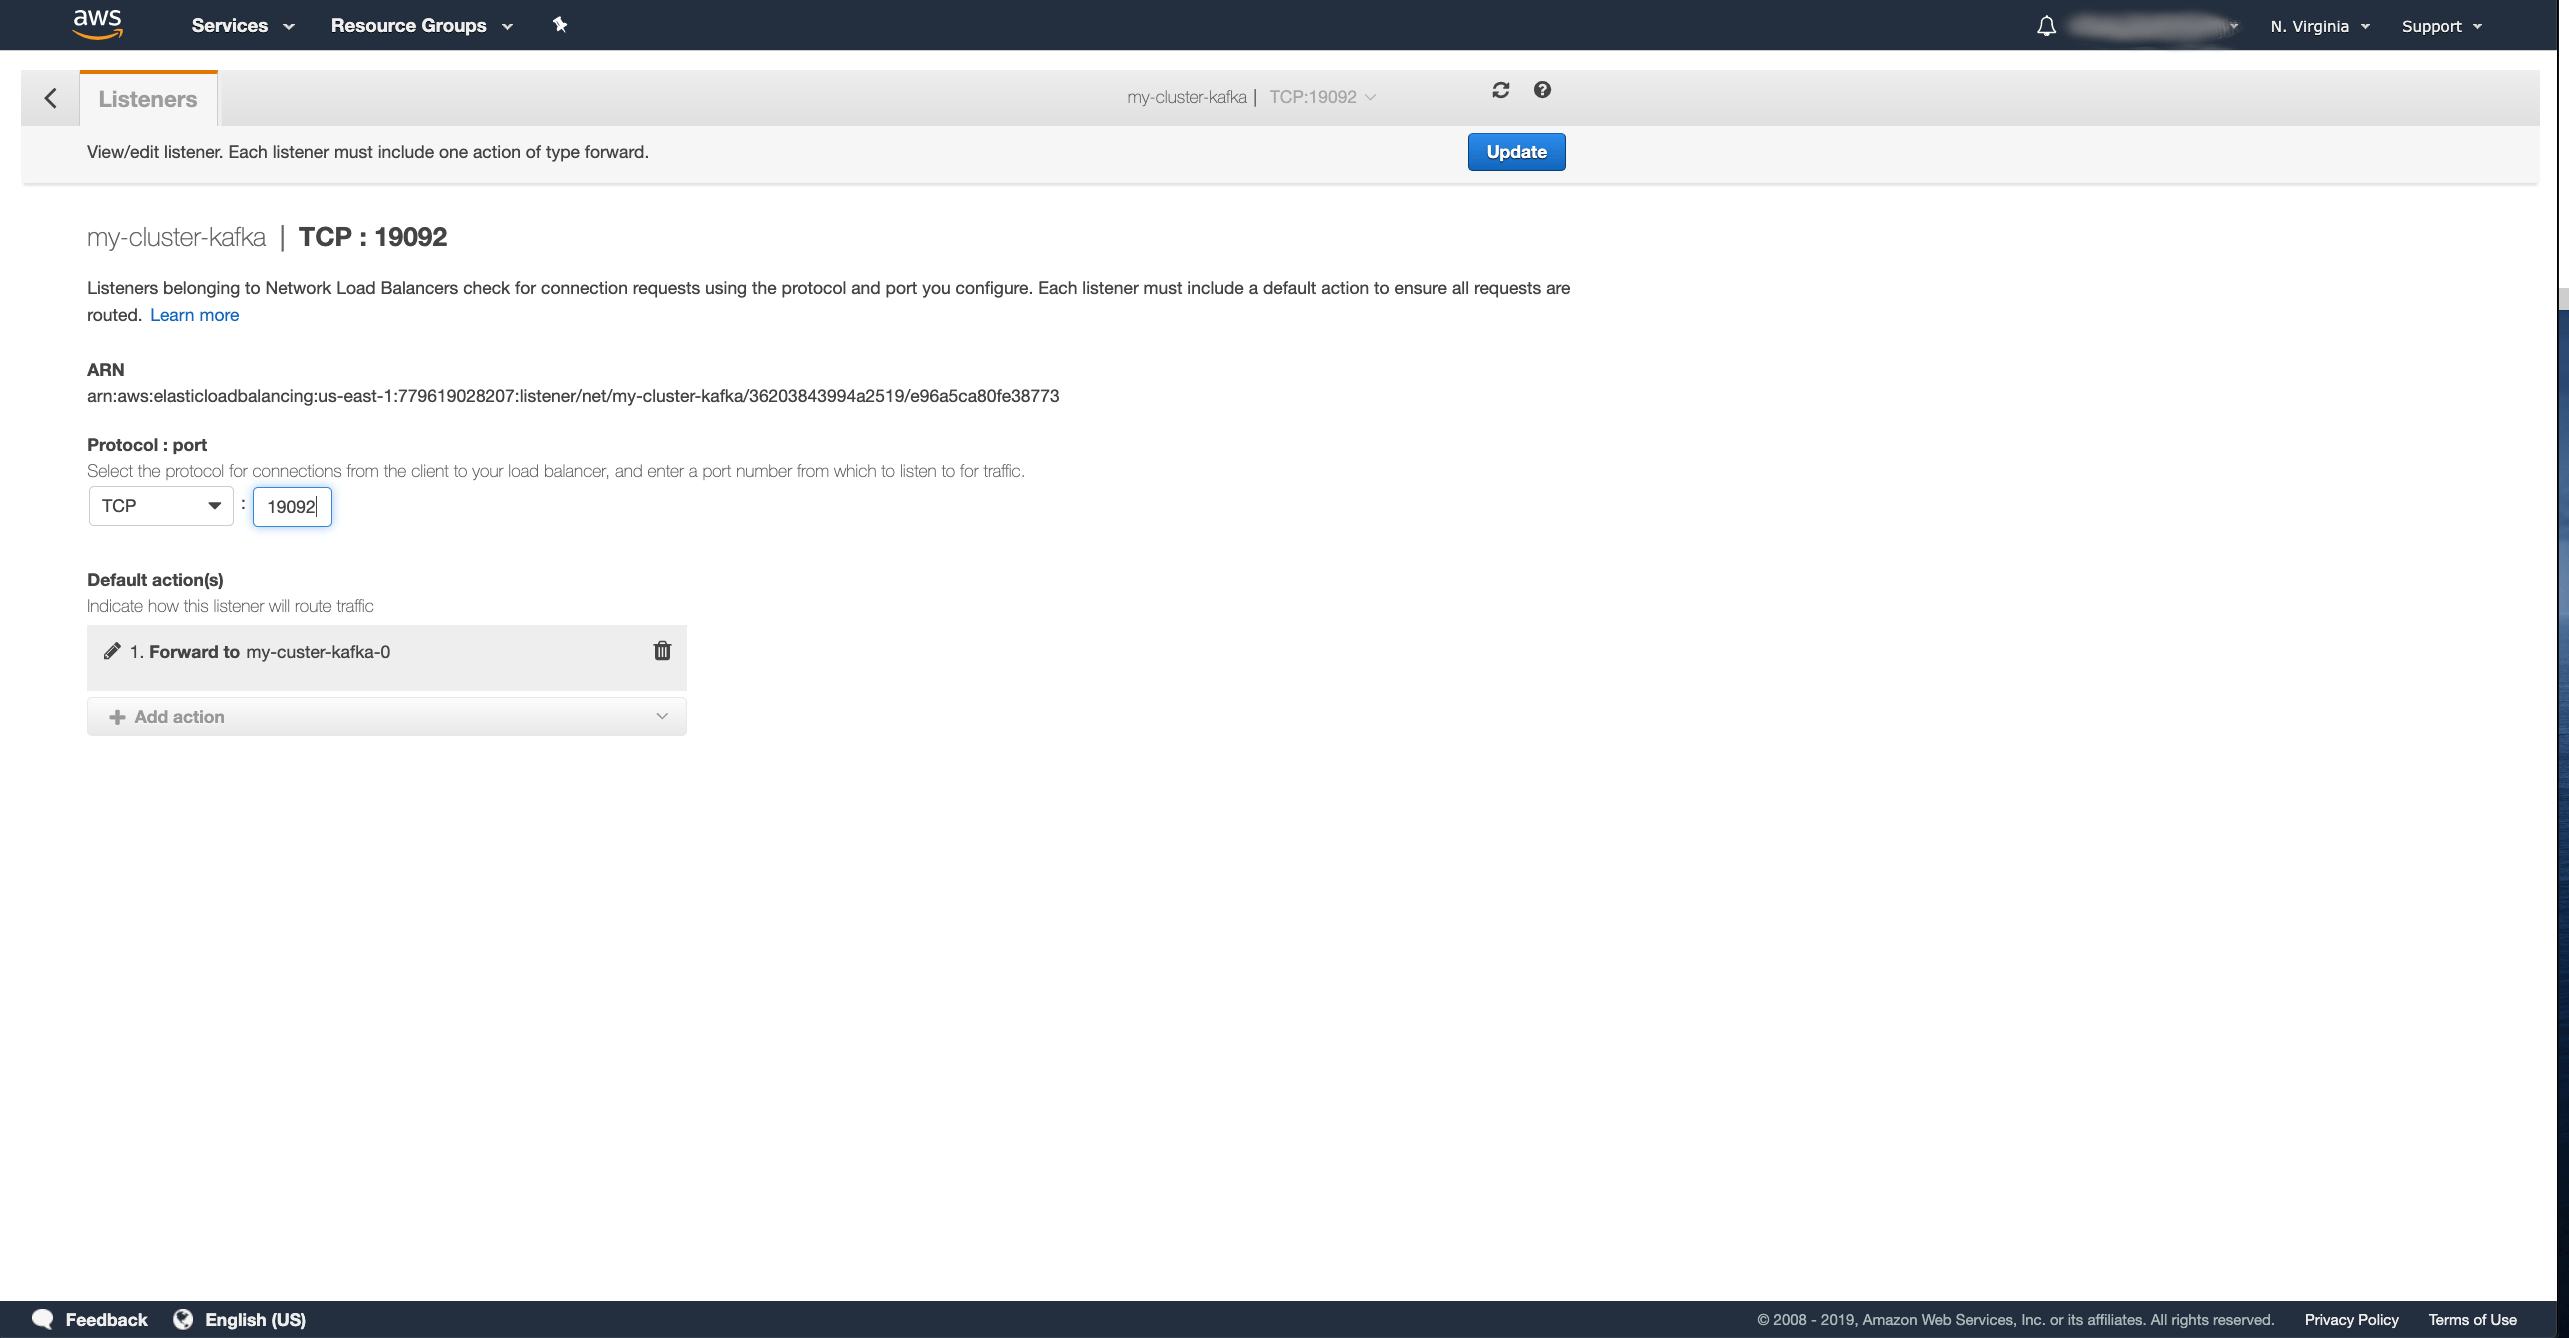
Select the listener for port 19092 and press the Edit button.
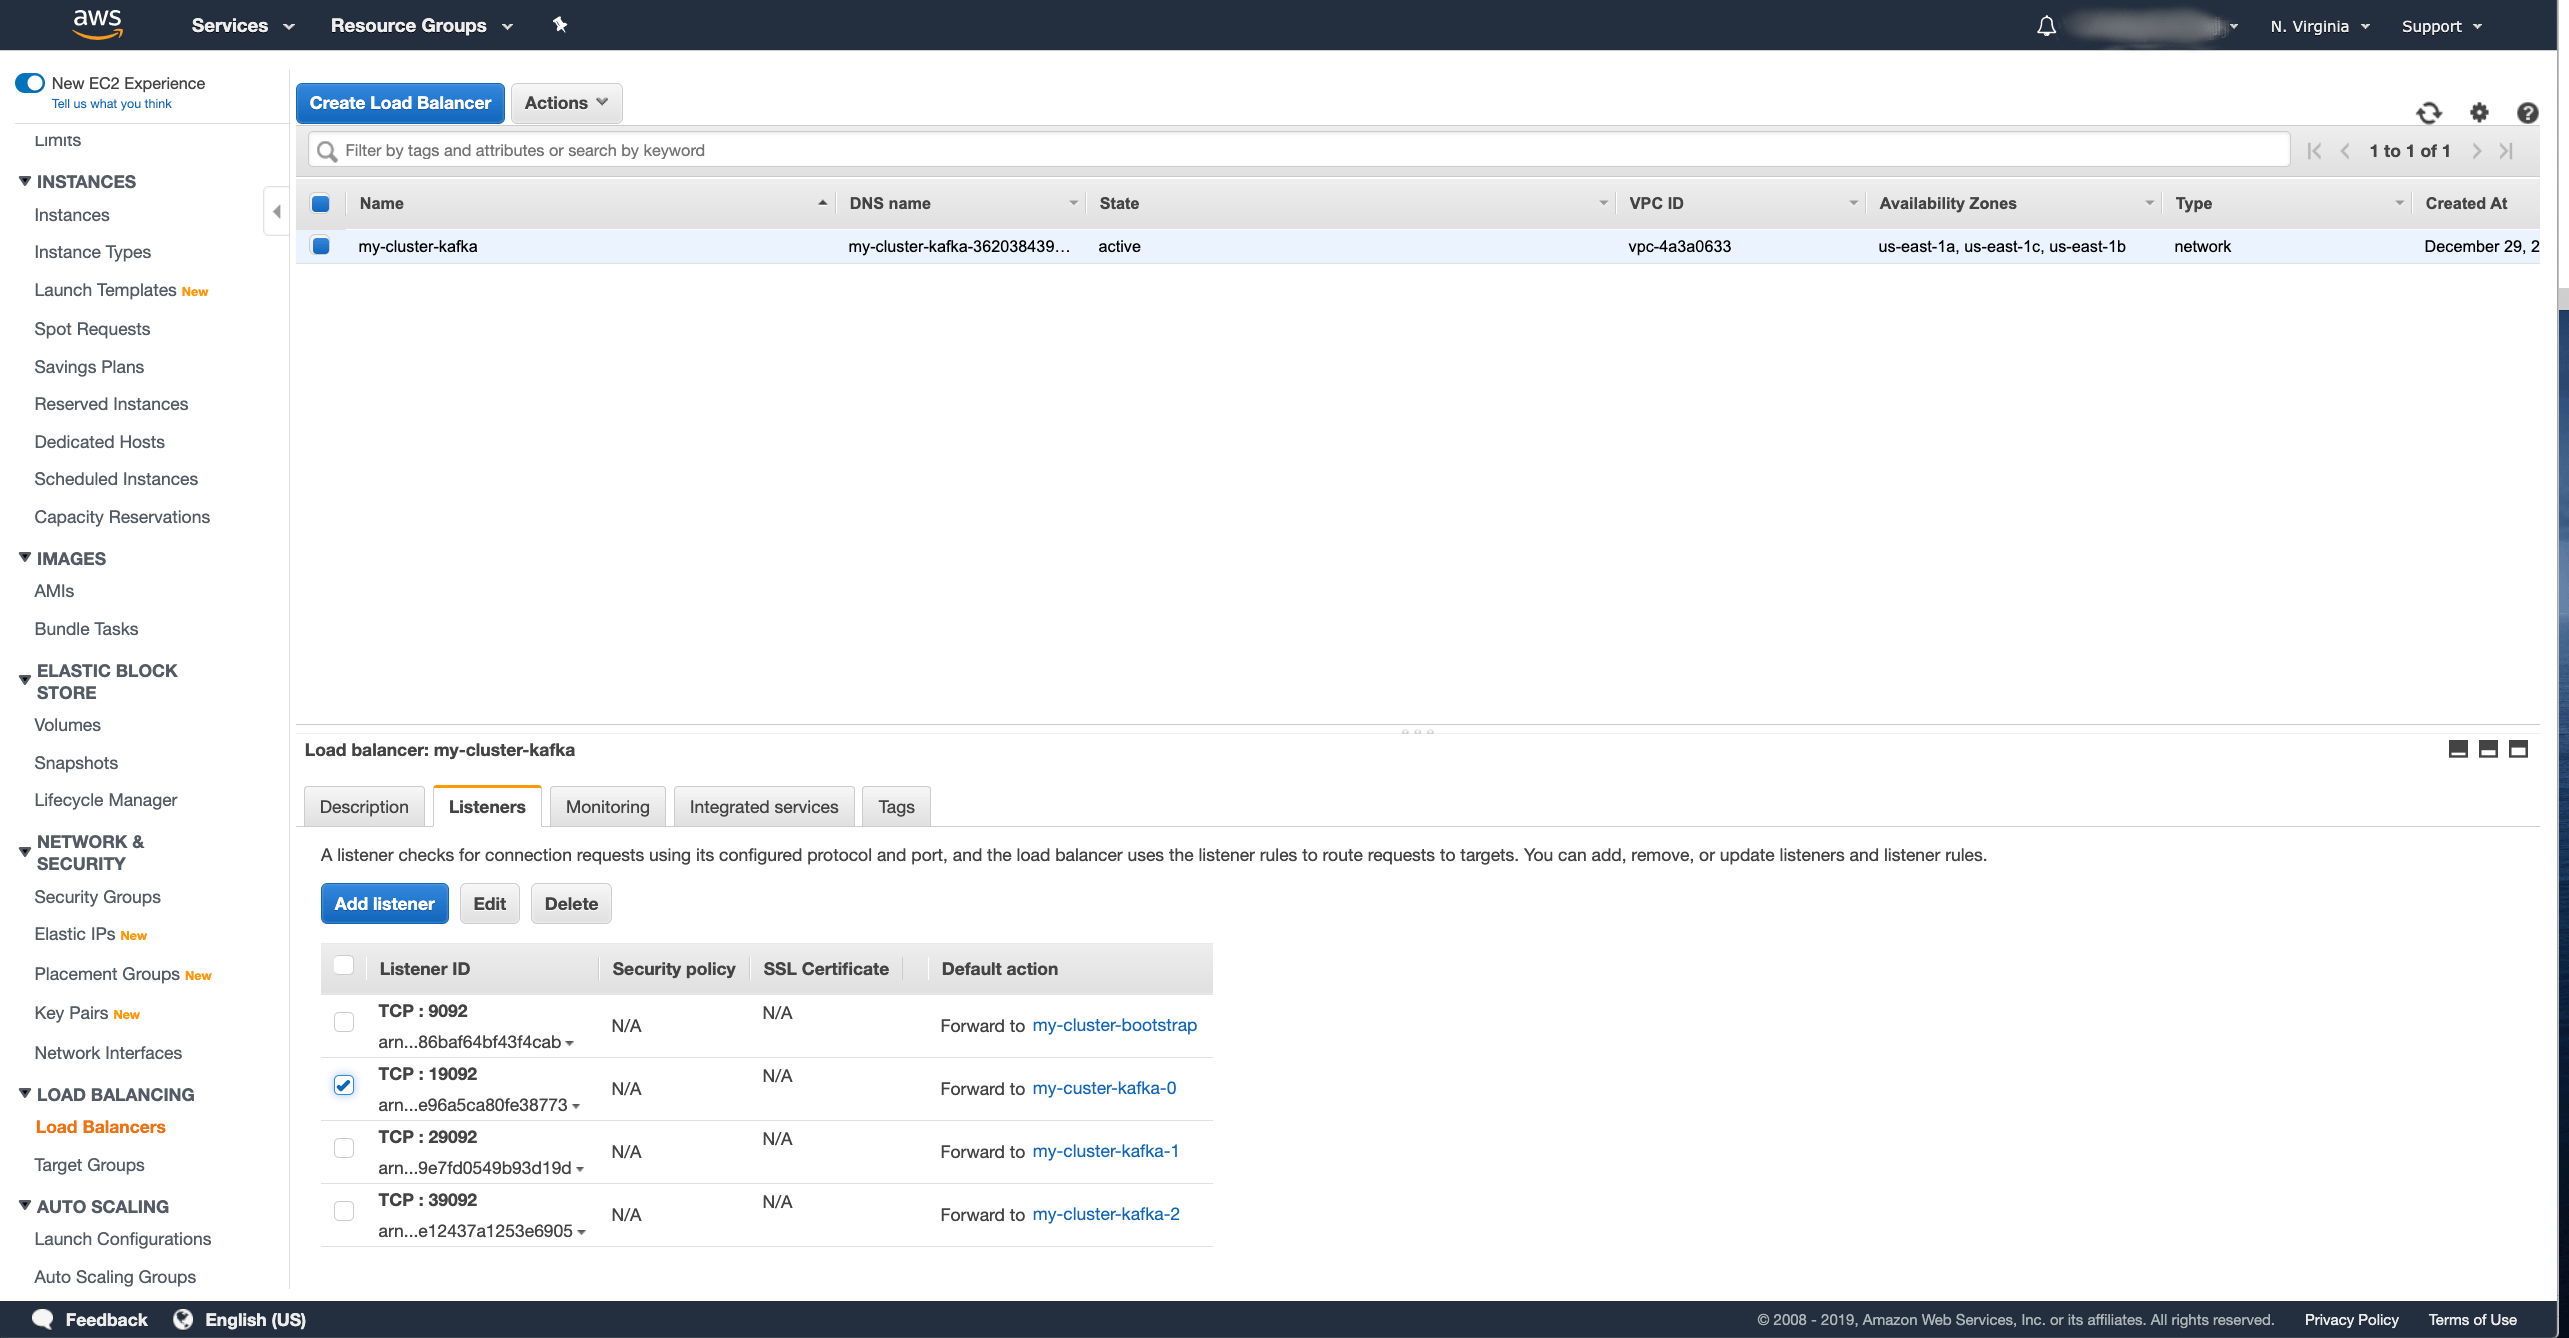
In the window for editing the listener, first delete the bootstrap target group which is selected there, than select new Forward rule to the target group for the broker 0 and click the Update button.
Repeat this for the listeners 29092 and 39092 and configure them to forward traffic to the target groups for brokers 1 and 2
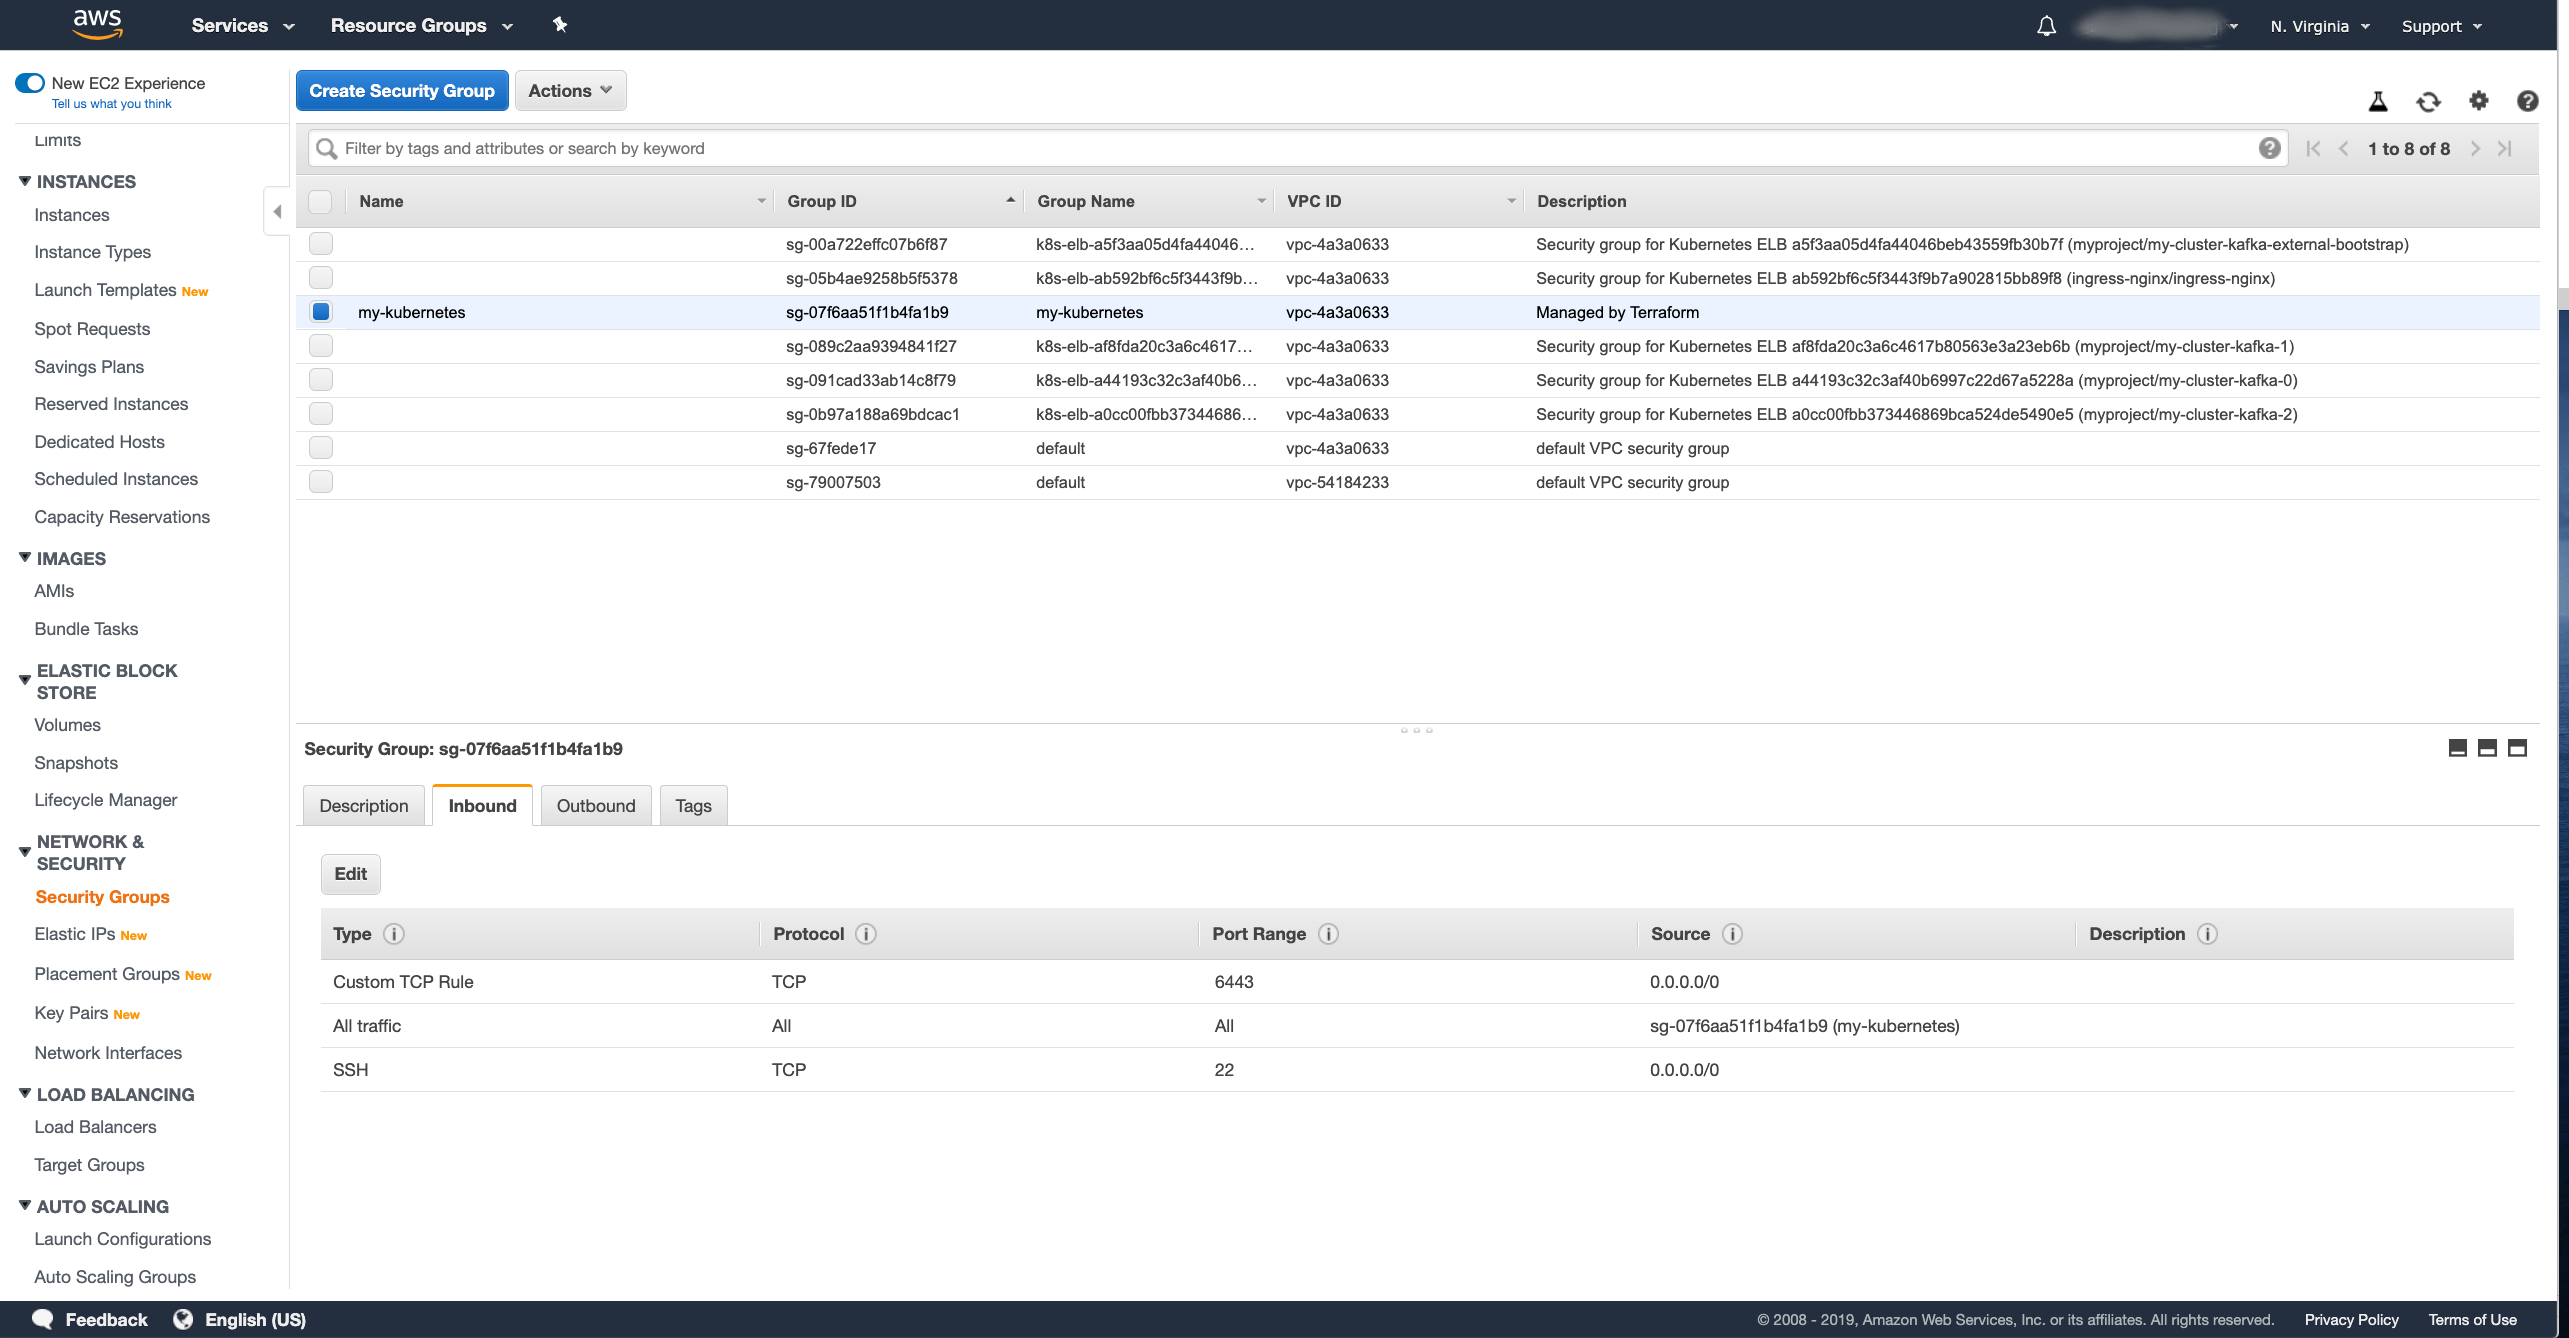
The last thing we need to do is to configure the security groups of the Kubernetes worker nodes to allow traffic from the clients and from the load balancer.
We will need to first find out the internal IP address(es) of our load balancer to get the health checks to work.
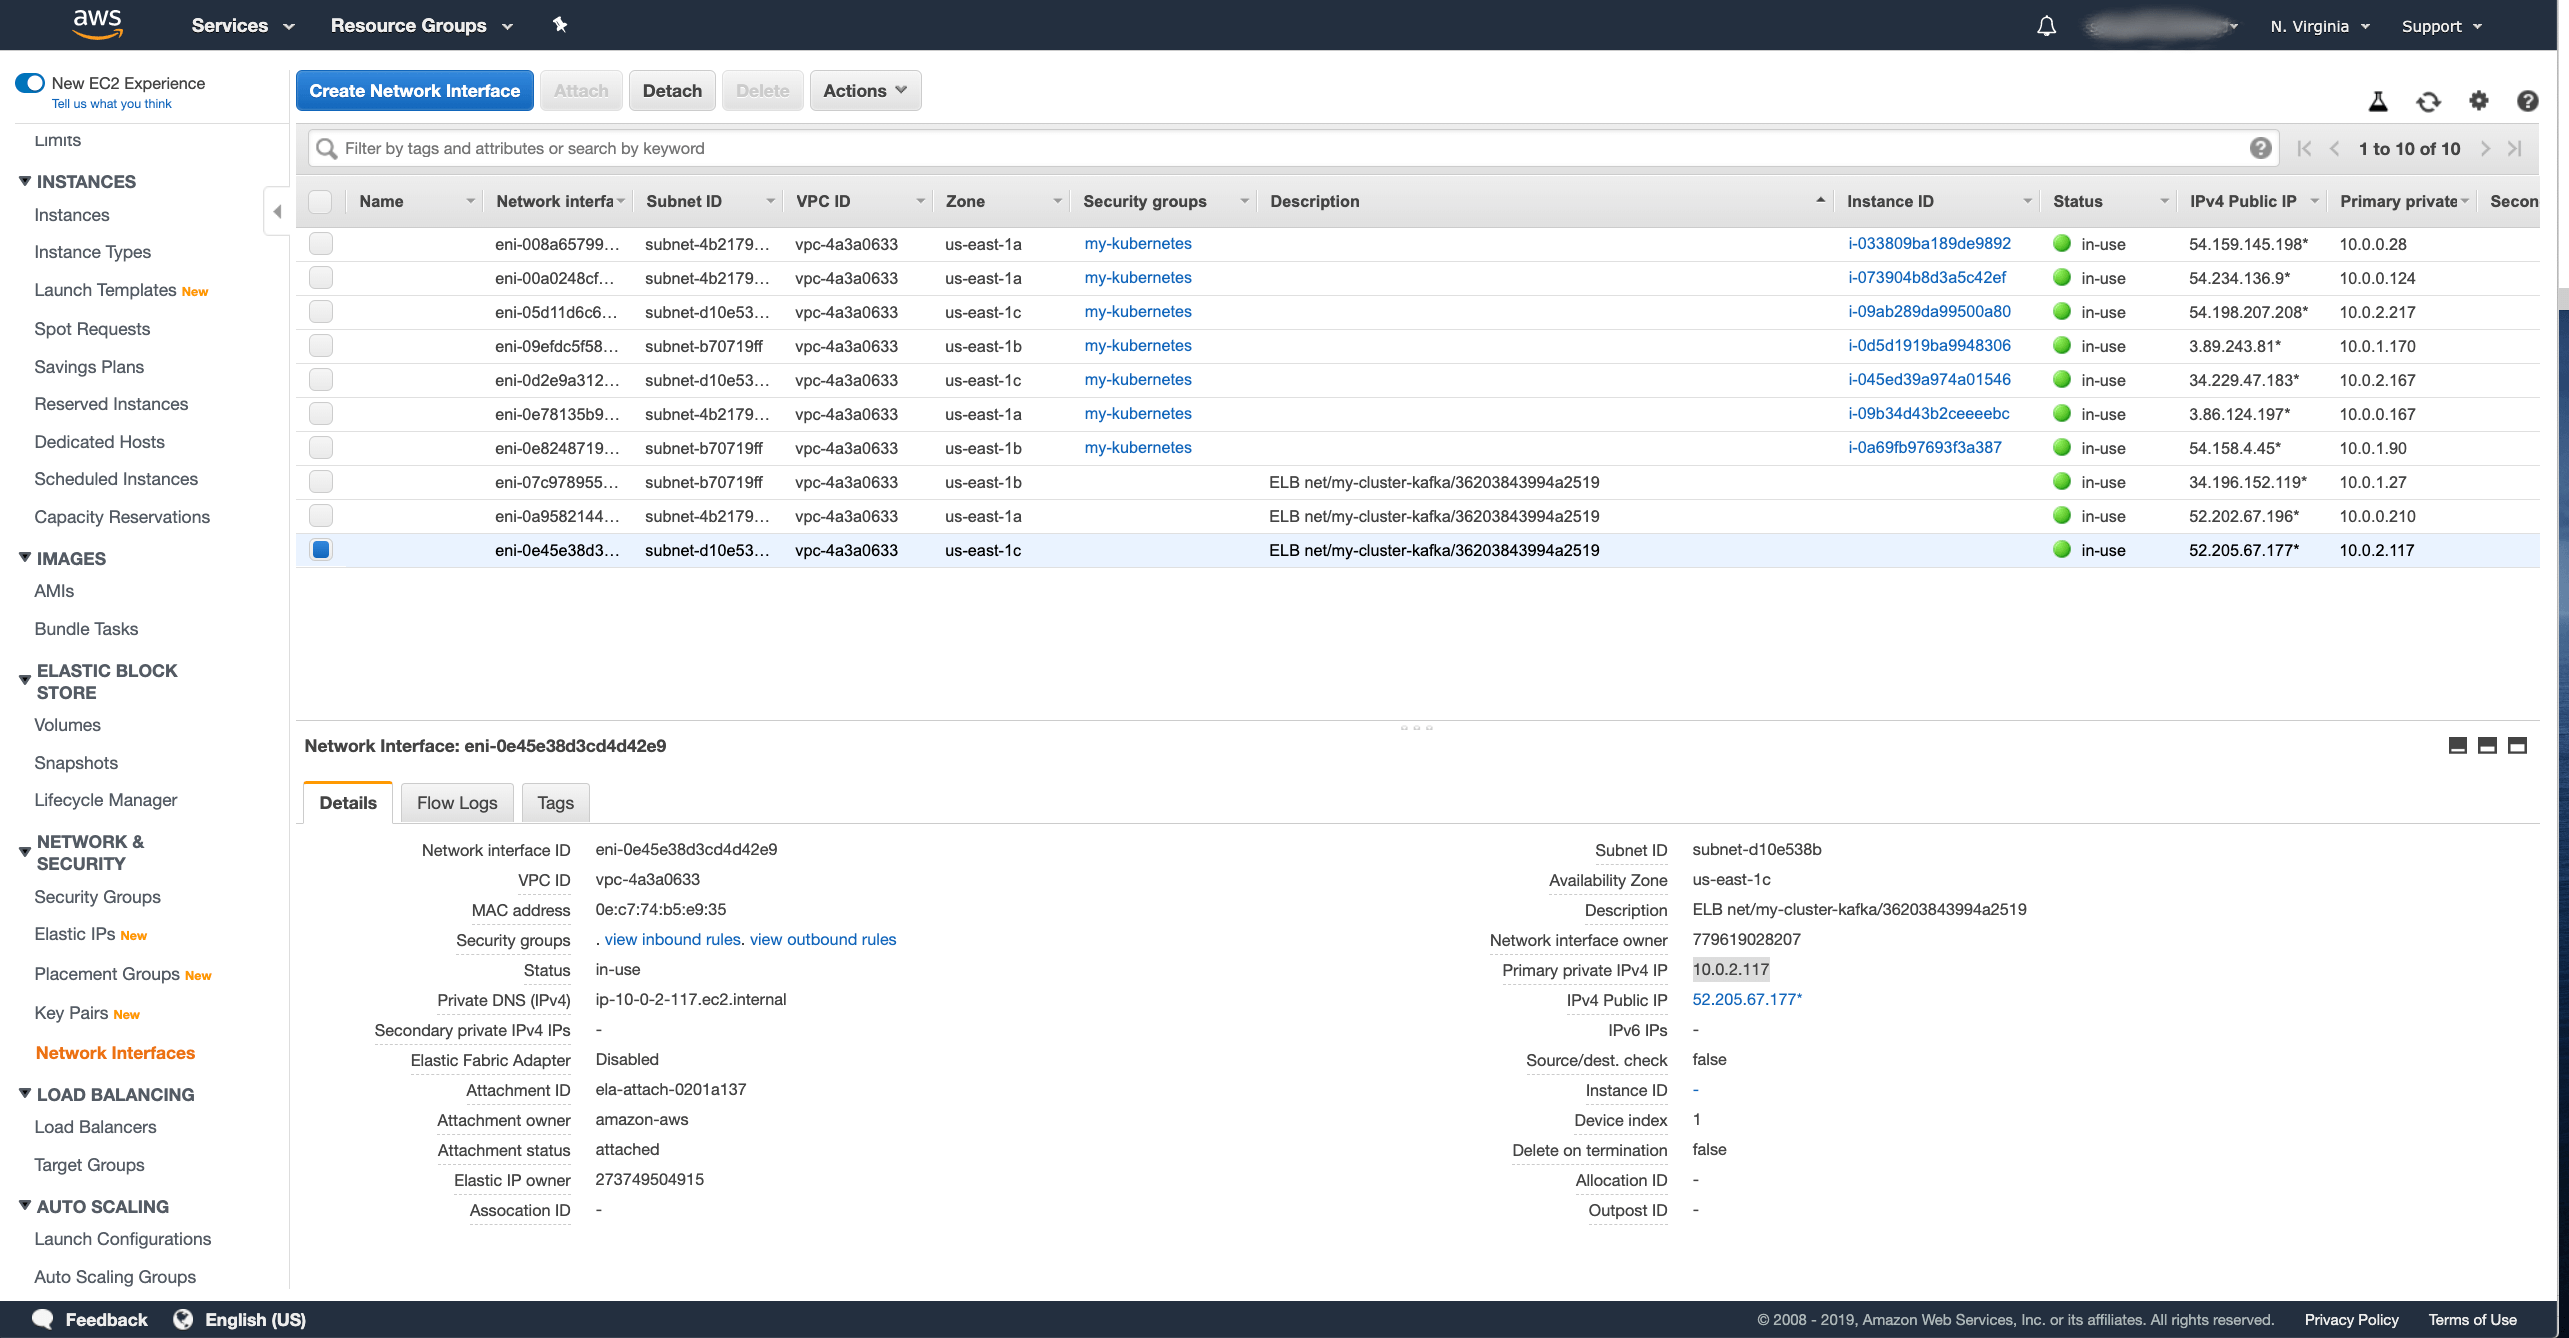
You can find them in the Network Interfaces section of the EC2 dashboard.
You should see there one or more network interfaces of the load balancer we created.
You should be able to easily recognize them from the description which will say something like ELB net/my-cluster-kafka/36203843994a2519.
The number of network interfaces depends on the number of availability zones / subnets you configured the load balancer for.
My cluster runs in 3 zones, so I have 3 network interfaces.
After selecting the interface, you should see the private IP address of the interface (as Primary private IPv4 IP).
Note these addresses for all your network interfaces. In my case it was:
10.0.1.2710.0.0.21010.0.2.117
Now we have to go to the Security Groups section and edit the security group used by your Kubernetes worker nodes.
In my case, it is just one security group for all nodes called my-kubernetes.
But it might be different in your case depending on how you deployed your Kubernetes cluster.
In the security group detail, select the Inbound tab and click the Edit button.
We will need to add several new rules here for each node port. Press the Add rule button to add a new rule. First we need to add rules for the load balancer:
- Type set as Custom TCP
- Protocol set as TCP
- In Port range enter the node port number
- In Source select Custom and enter the IP address of the network interface in CIDR notation - for example as
10.0.1.27/32.
These rules need to be added for each network listener IP and each node port.
So in my case with 3 brokers plus the bootstrap service and 3 network interfaces, I will need to add 12 rules in total.
If you are lazy like me and doing this only on your test cluster, you can also use a CIDR range such as 10.0.0.0/16 to add all network interfaces in one rule.
You can also specify a range for the node ports instead of configuring them one by one.
After enabling the load balancer to talk with the node ports, we will also need to allow the clients to talk with the brokers.
Unlike the Classic Load Balancer, the Network Load Balancer doesn’t have its own security group to configure the clients which can access it separately.
The client IP addresses need to be configured directly in the EC2 security group.
Therefore we need to add the same rules as we added for the load balancer also for the client.
The only difference is that this time, instead of the load balancer IP address, we have to use the CIDR range from which our clients will connect.
In my case, the client will connect from 88.208.0.0/16.
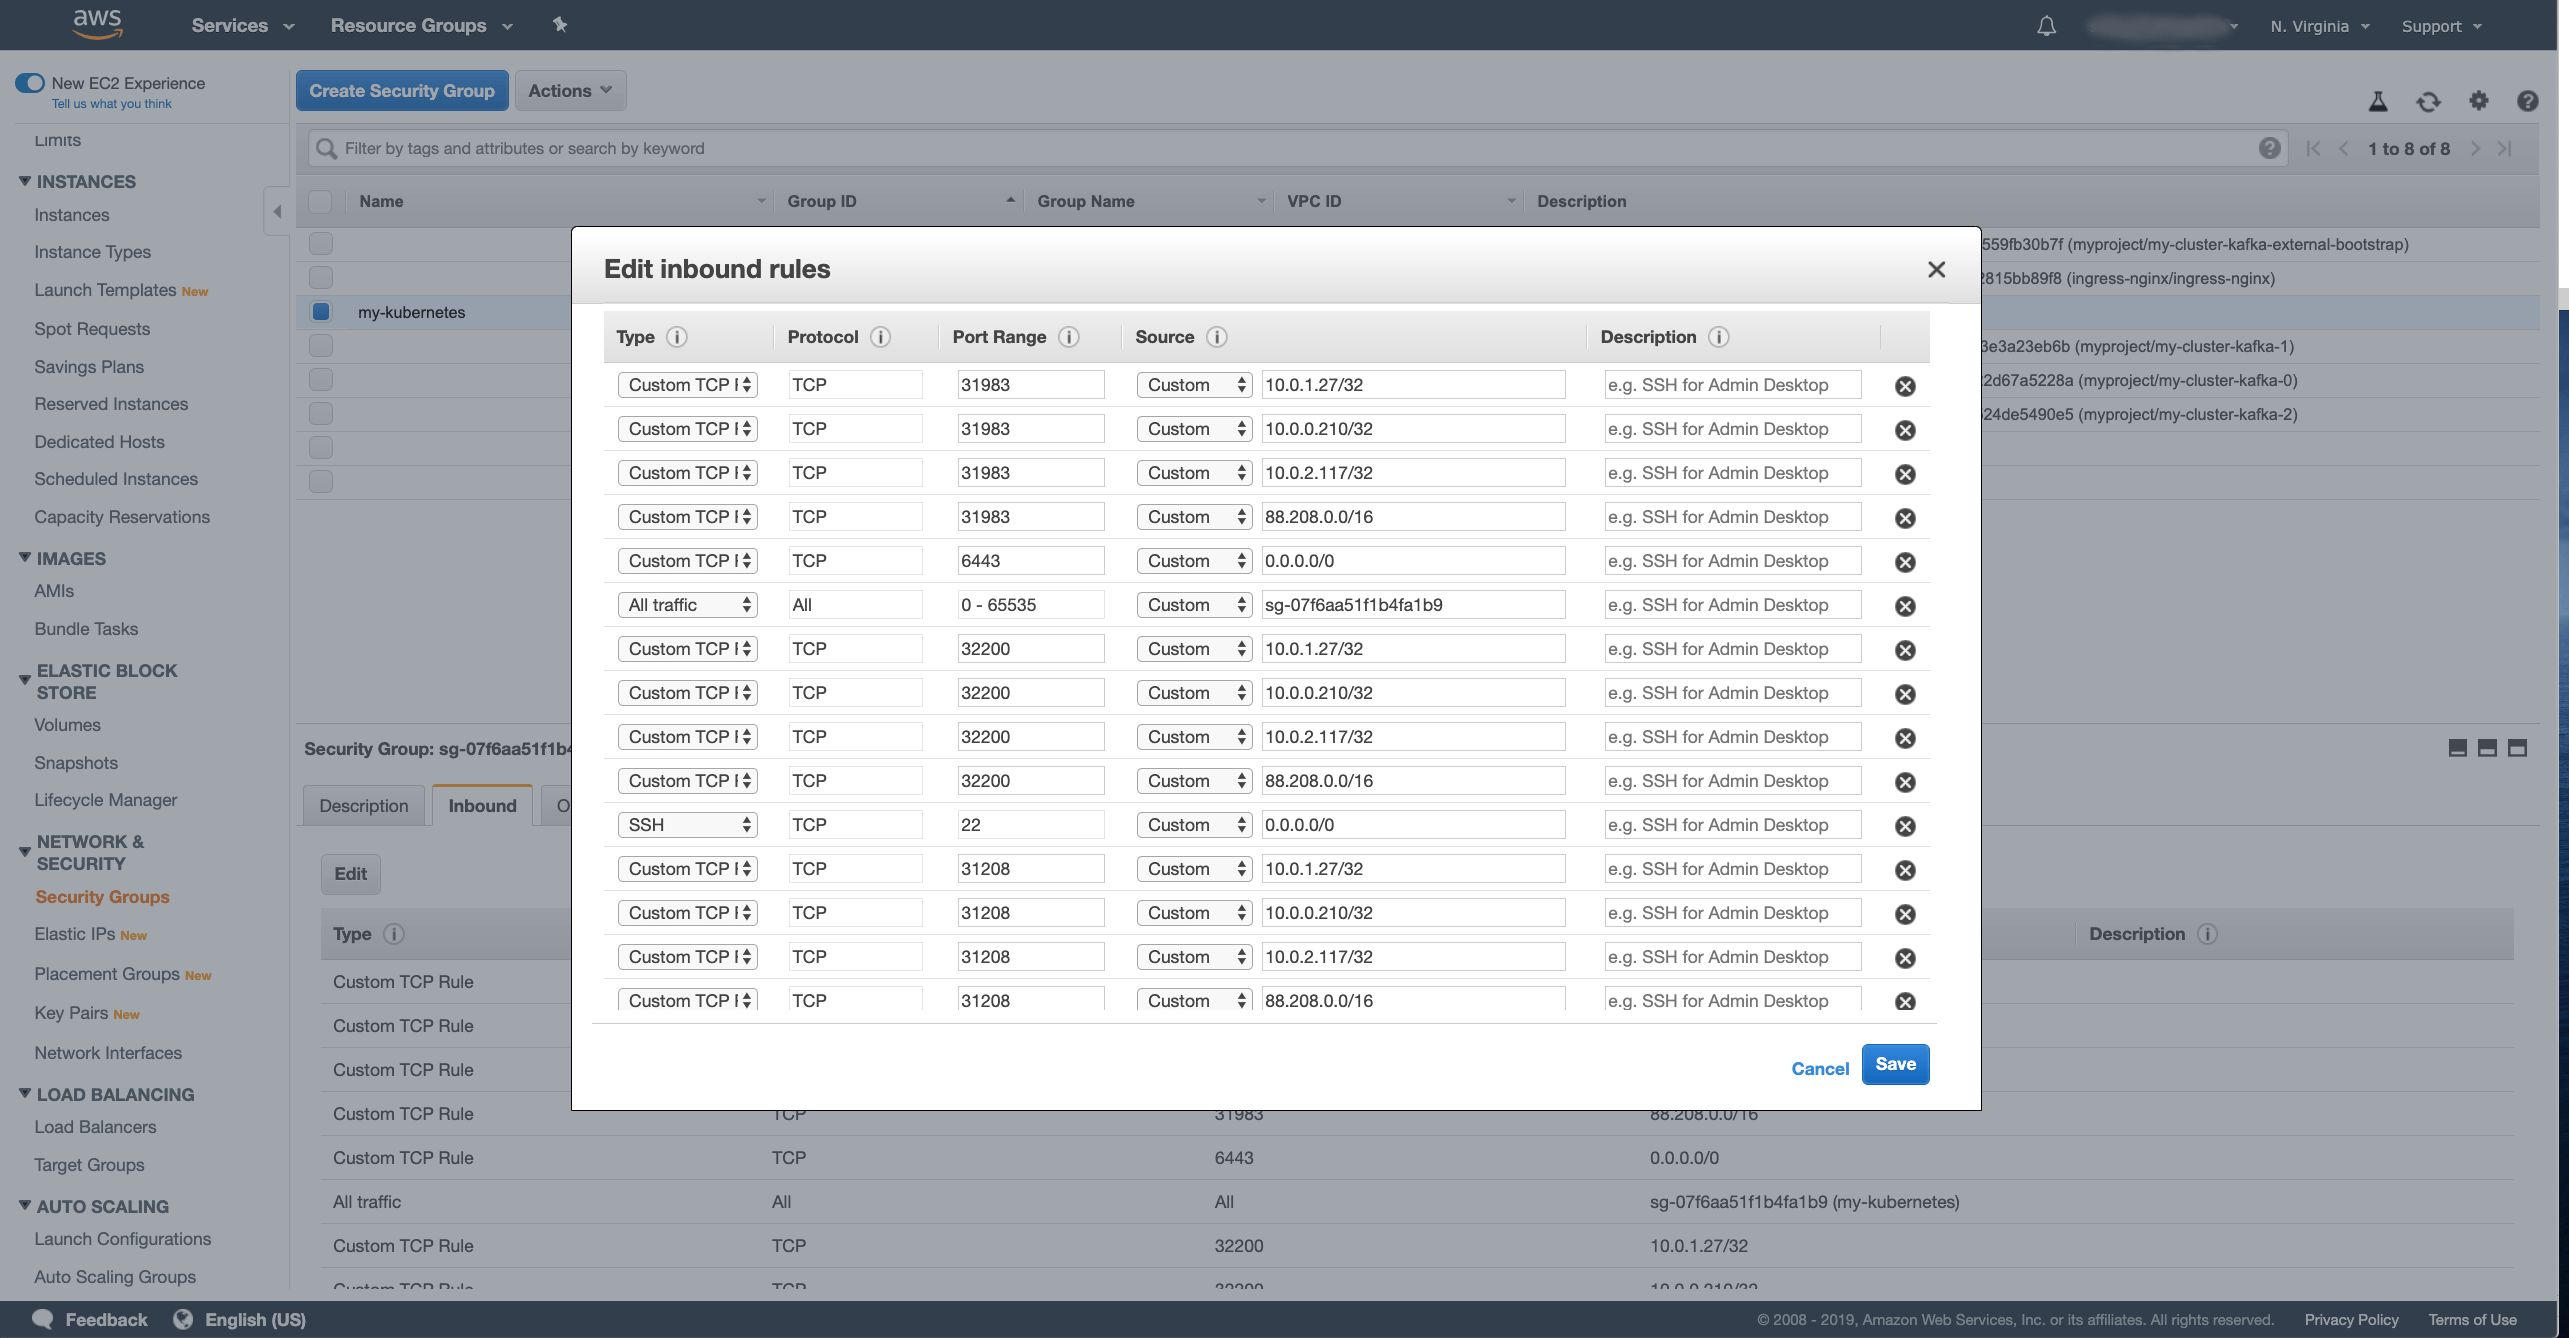
Once you have all the rules prepared, don’t forget to press the Save button to save the changes. Once you save the rules, we should have the Network load balancer prepared. But we still need to configure the Kafka broker to use the load balancer as the advertised address.
Note: the Network load balancer can also be configured using the different AWS command line tools.
Configuring the advertised addresses
The advertised address is a configuration in the Kafka brokers which is used to tell the clients how to connect to the broker.
Since we configured the Kafka cluster with node ports, it will by default use the address of the Kubernetes node and the node port of the service as the advertised address.
We need to reconfigure the advertised address to route the traffic through the load balancer.
To do so, we will need to grab the load balancer address from the AWS console.
In my case, the address is my-cluster-kafka-36203843994a2519.elb.us-east-1.amazonaws.com.
To configure the advertised address, we will need to edit the Kafka custom resource and set the advertised listener overrides to the load balancer address and to the listener ports (in our case 19092, 29092 and 39092):
# ...
listeners:
  # ...
  external:
    type: nodeport
    tls: false
    overrides:
      brokers:
      - broker: 0
        advertisedHost: my-cluster-kafka-36203843994a2519.elb.us-east-1.amazonaws.com
        advertisedPort: 19092
      - broker: 1
        advertisedHost: my-cluster-kafka-36203843994a2519.elb.us-east-1.amazonaws.com
        advertisedPort: 29092
      - broker: 2
        advertisedHost: my-cluster-kafka-36203843994a2519.elb.us-east-1.amazonaws.com
        advertisedPort: 39092
# ...
Once we change the configuration, a rolling update will be needed to reconfigure the brokers.
Connecting with clients
Once the rolling update is finished, we should be ready. We can try to connect with our client:
$ bin/kafka-console-consumer.sh --bootstrap-server my-cluster-kafka-36203843994a2519.elb.us-east-1.amazonaws.com:9092 --topic my-topic --from-beginning
Hello
World
Are there any real advantages?
When it comes to Strimzi and Kafka, the main advantages of the Network load balancers over the Classic load balancers would probably be the price and the possibility of using a single load balancer instance for many listeners.
However, there are also some disadvantages:
-
Getting Kubernetes to create NLB load balancers for you using the annotation is easy. But it will create a dedicated instance for each service. While that works well, the cost savings might not be as big as with one shared load balancer instance.
-
If you decide to use a single NLB instance for multiple Kubernetes services, you need to configure it yourself. And it is not just the initial configuration described in this blog post. If you decided to use this in your production environment, you would need to make sure that the configuration is updated when your cluster changes. New Kubernetes worker nodes would need to be registered with the load balancer target groups. New listeners and target groups would need to be added when you add brokers to your Kafka cluster. So you would probably need to develop some additional tooling to make sure these changes are done automatically.
-
With Kafka, the only service which is actually benefiting from load balancing is the bootstrap service which round-robins around all the brokers in the cluster. The other services which are used to connect the clients directly to a specific Kafka broker do not need any load balancer. From my experience, lots of users have Classic load balancers as an additional layer of isolation between their clients and the Kubernetes nodes. The Classic load balancers have their own security group and don’t need you to expose your nodes directly to the clients as when using node ports. But the Network load balancer does not work like this. It requires you to open the node ports directly on the Kubernetes worker nodes - so the nodes need to be exposed to the clients. So the additional isolation layer is gone when using network load balancers.
Overall, the additional effort for using and maintaining the Network load balancers seems to be quite high. If you want, you can use them with Strimzi and Apache Kafka. But before you decide to do so, you should carefully consider whether the advantages are really worth it or whether you should be maybe using node ports directly. With node ports you could avoid the more complicated configuration and save the costs for the load balancers completely.
Share this:
![]()
![]()
![]()
![]()
![]()