In Strimzi 0.14.0 we have added an additional authentication option to the standard set supported by Kafka brokers. Your Kafka clients can now use OAuth 2.0 token-based authentication when establishing a session to a Kafka broker. With this kind of authentication Kafka clients and brokers talk to a central OAuth 2.0 compliant authorization server. Clients use the authorization server to obtain access tokens, or are configured with access tokens issued by the server. Brokers communicate with authorization server to validate the tokens presented by clients, thus confirming their identities. In this model, the administrator doesn’t create users in Kafka. Rather, users are typically managed through identity providers exposed over LDAP. Strimzi client components like Kafka Bridge, Kafka Connect, and Kafka Mirror Maker can be configured with OAuth 2.0 authentication through custom resource definitions.
Authentication in Kafka
When using Apache Kafka you have several options to implement authentication. You can use TLS with client certificates to establish a secure channel and authenticate a client at the same time. Another option is to separately configure TLS for connection encryption and integrity, but use a specific SASL protocol for authentication.
There are several SASL based protocols you can use. One option is to use SASL PLAIN to authenticate with username and password. Another option is to use SASL SCRAM which is also username and password based, but rather than communicating, and storing clear text passwords, salted hashes are used. These two implementations both store usernames and some form of credentials in ZooKeeper. They require secure connection between Kafka clients and brokers, but also between Kafka brokers and ZooKeeper nodes.
A more advanced, enterprise-ready solution is to use SASL GSSAPI mechanism which provides support for Kerberos. That typically uses a central LDAP server for managing users, and permissions. The problem is that it is quite complex to setup, and people often find it hard to configure.
Since Kafka version 2.0.0 there is an extensible OAuth 2.0 compatible token-based mechanism available, called SASL OAUTHBEARER.
We have developed extensions that provide integration with OAuth 2.0 compliant authorization servers. That means that in principle you can use any OAuth 2.0 compliant authorization server to expose centrally managed users for authentication with Kafka.
Why OAuth 2.0?
Originally developed for scenarios where web users need to give limited access to their data inside one web site to another web site, OAuth 2.0 provides at least two main benefits. One is that user accounts and credentials for many services are managed centrally, organization-wide, by a dedicated identity service. Another important benefit is that the user only ever passes credentials like username and password to that dedicated server. The result of authenticating is a time-limited token which the user passes around to other services, and which serves to identify user, and to establish which permissions they have.
Hands-on
Let’s see how this works. As our OAuth 2.0 compliant authorization server we will use a basic setup of Keycloak with TLS support. We’ll then configure a Kafka cluster with OAuth 2.0 support, and an example Kafka producer, and Kafka consumer client applications, that will use OAuth 2.0 to authenticate.
We’ll assume that you have a Kubernetes cluster available in order to explain how this works for Strimzi, but the OAuth 2.0 support can be used with non-Strimzi Kafka installations too, by using Strimzi Kafka OAuth libraries.
If you are using minikube on your local machine, make sure to start minikube tunnel in another terminal in order for LoadBalancer services to get their externals IPs assigned:
sudo minikube tunnel
If you’re wondering, an example of the tested minikube configuration is to run it as:
minikube start --memory=4096 --cpus=4
Setting up Keycloak
For any kind of real-world use, all communication with the OAuth 2.0 authorization server has to be performed over a secure connection. We’ll configure TLS access on Keycloak to make sure we’re safe from eavesdropping or man-in-the-middle attacks. It is also important that all the clients and services accessing Keycloak use it through the same hostname in the url. That is required for token validation to work properly.
Let’s first create a server certificate for the Keycloak server.
Due to cross-namespace communication, we’ll have to access the server from pods as https://keycloak.keycloak:8443.
We’ll set the certificate’s common name to keycloak, but add keycloak.keycloak as a subject alternative name for certificate hostname validation to pass.
# create CA key
openssl genrsa -out ca.key 2048

# create CA certificate
openssl req -x509 -new -nodes -sha256 -days 3650 -subj "/CN=example.com" \
  -key ca.key -out ca.crt

# create keycloak server private key
openssl genrsa -out keycloak.key 2048

# prepare certificate configuration
# On your system the location of the file may be elsewhere.
# You may try:
#     /etc/pki/tls/openssl.cnf
#     /usr/local/ssl/openssl.cnf
#
cp /etc/ssl/openssl.cnf ssl.cnf
cat >> ssl.cnf << EOF
 [ SAN ]
 basicConstraints = CA:FALSE
 keyUsage = digitalSignature, keyEncipherment
 subjectAltName = DNS:keycloak.keycloak, DNS:keycloak.example.com
EOF

# create certificate-signing request
openssl req -new -sha256 \
  -key keycloak.key \
  -subj "/CN=keycloak" \
  -reqexts SAN \
  -config ssl.cnf \
  -out keycloak.csr

# Generate the final keycloak certificate, signed by CA
openssl x509 -req -extfile ssl.cnf -extensions SAN -in keycloak.csr -CA ca.crt \
  -CAkey ca.key -CAcreateserial -out keycloak.crt -days 365 -sha256
Now, let’s store the keycloak certificate files into Kubernetes as a secret.
First, create a new namespace for Keycloak:
kubectl create ns keycloak
Then, add the secret:
kubectl create secret tls tls-keys -n keycloak \
  --cert=./keycloak.crt --key=./keycloak.key
And let’s deploy the Keycloak server using the Keycloak project’s docker image from Docker Hub:
cat > keycloak.yaml << EOF
apiVersion: v1
kind: Service
metadata:
  name: keycloak
  labels:
    app: keycloak
spec:
  ports:
  - name: http
    port: 8080
    targetPort: 8080
  - name: https
    port: 8443
    targetPort: 8443
  selector:
    app: keycloak
  type: LoadBalancer
---
apiVersion: apps/v1
kind: Deployment
metadata:
  name: keycloak
spec:
  replicas: 1
  selector:
    matchLabels:
      app: keycloak
  template:
    metadata:
      labels:
        app: keycloak
    spec:
      containers:
      - name: keycloak
        image: jboss/keycloak
        env:
        - name: KEYCLOAK_USER
          value: "admin"
        - name: KEYCLOAK_PASSWORD
          value: "admin"
        - name: PROXY_ADDRESS_FORWARDING
          value: "true"
        ports:
        - name: http
          containerPort: 8080
        - name: https
          containerPort: 8443
        readinessProbe:
          httpGet:
            path: /auth/realms/master
            port: 8080
        volumeMounts:
        - name: tls-keys
          mountPath: "/etc/x509/https"
          readOnly: true
      volumes:
        - name: tls-keys
          secret:
            secretName: tls-keys
EOF
kubectl apply -f keycloak.yaml -n keycloak
You can observe keycloak starting up by attaching to the log:
POD=`kubectl get pod -n keycloak | grep keycloak | awk '{ print $1 }'`
kubectl logs $POD -n keycloak -f
Once Keycloak is up and running, take note of the external IP it is listening on:
kubectl get services -n keycloak
You can extract just the IP by:
KEYCLOAK=`kubectl get svc/keycloak -n keycloak | tail -n 1 | awk '{ print $4 }'`
Now, open it in your browser (you’ll need to add a certificate exception because your browser won’t trust the CA certificate we created earlier), and login using admin:admin:
open https://$KEYCLOAK:8443/auth
In OAuth 2 terminology your application servers (Kafka brokers in our case) are called ‘resource servers’ - they are the ones requiring authentication.
However, when your application servers and clients talk to the OAuth 2.0 authorization server, they are all considered ‘clients’.
Each client has to be configured on the authorization server.
We’ll manually configure a client for Kafka broker - we’ll simply call it ‘kafka-broker’.
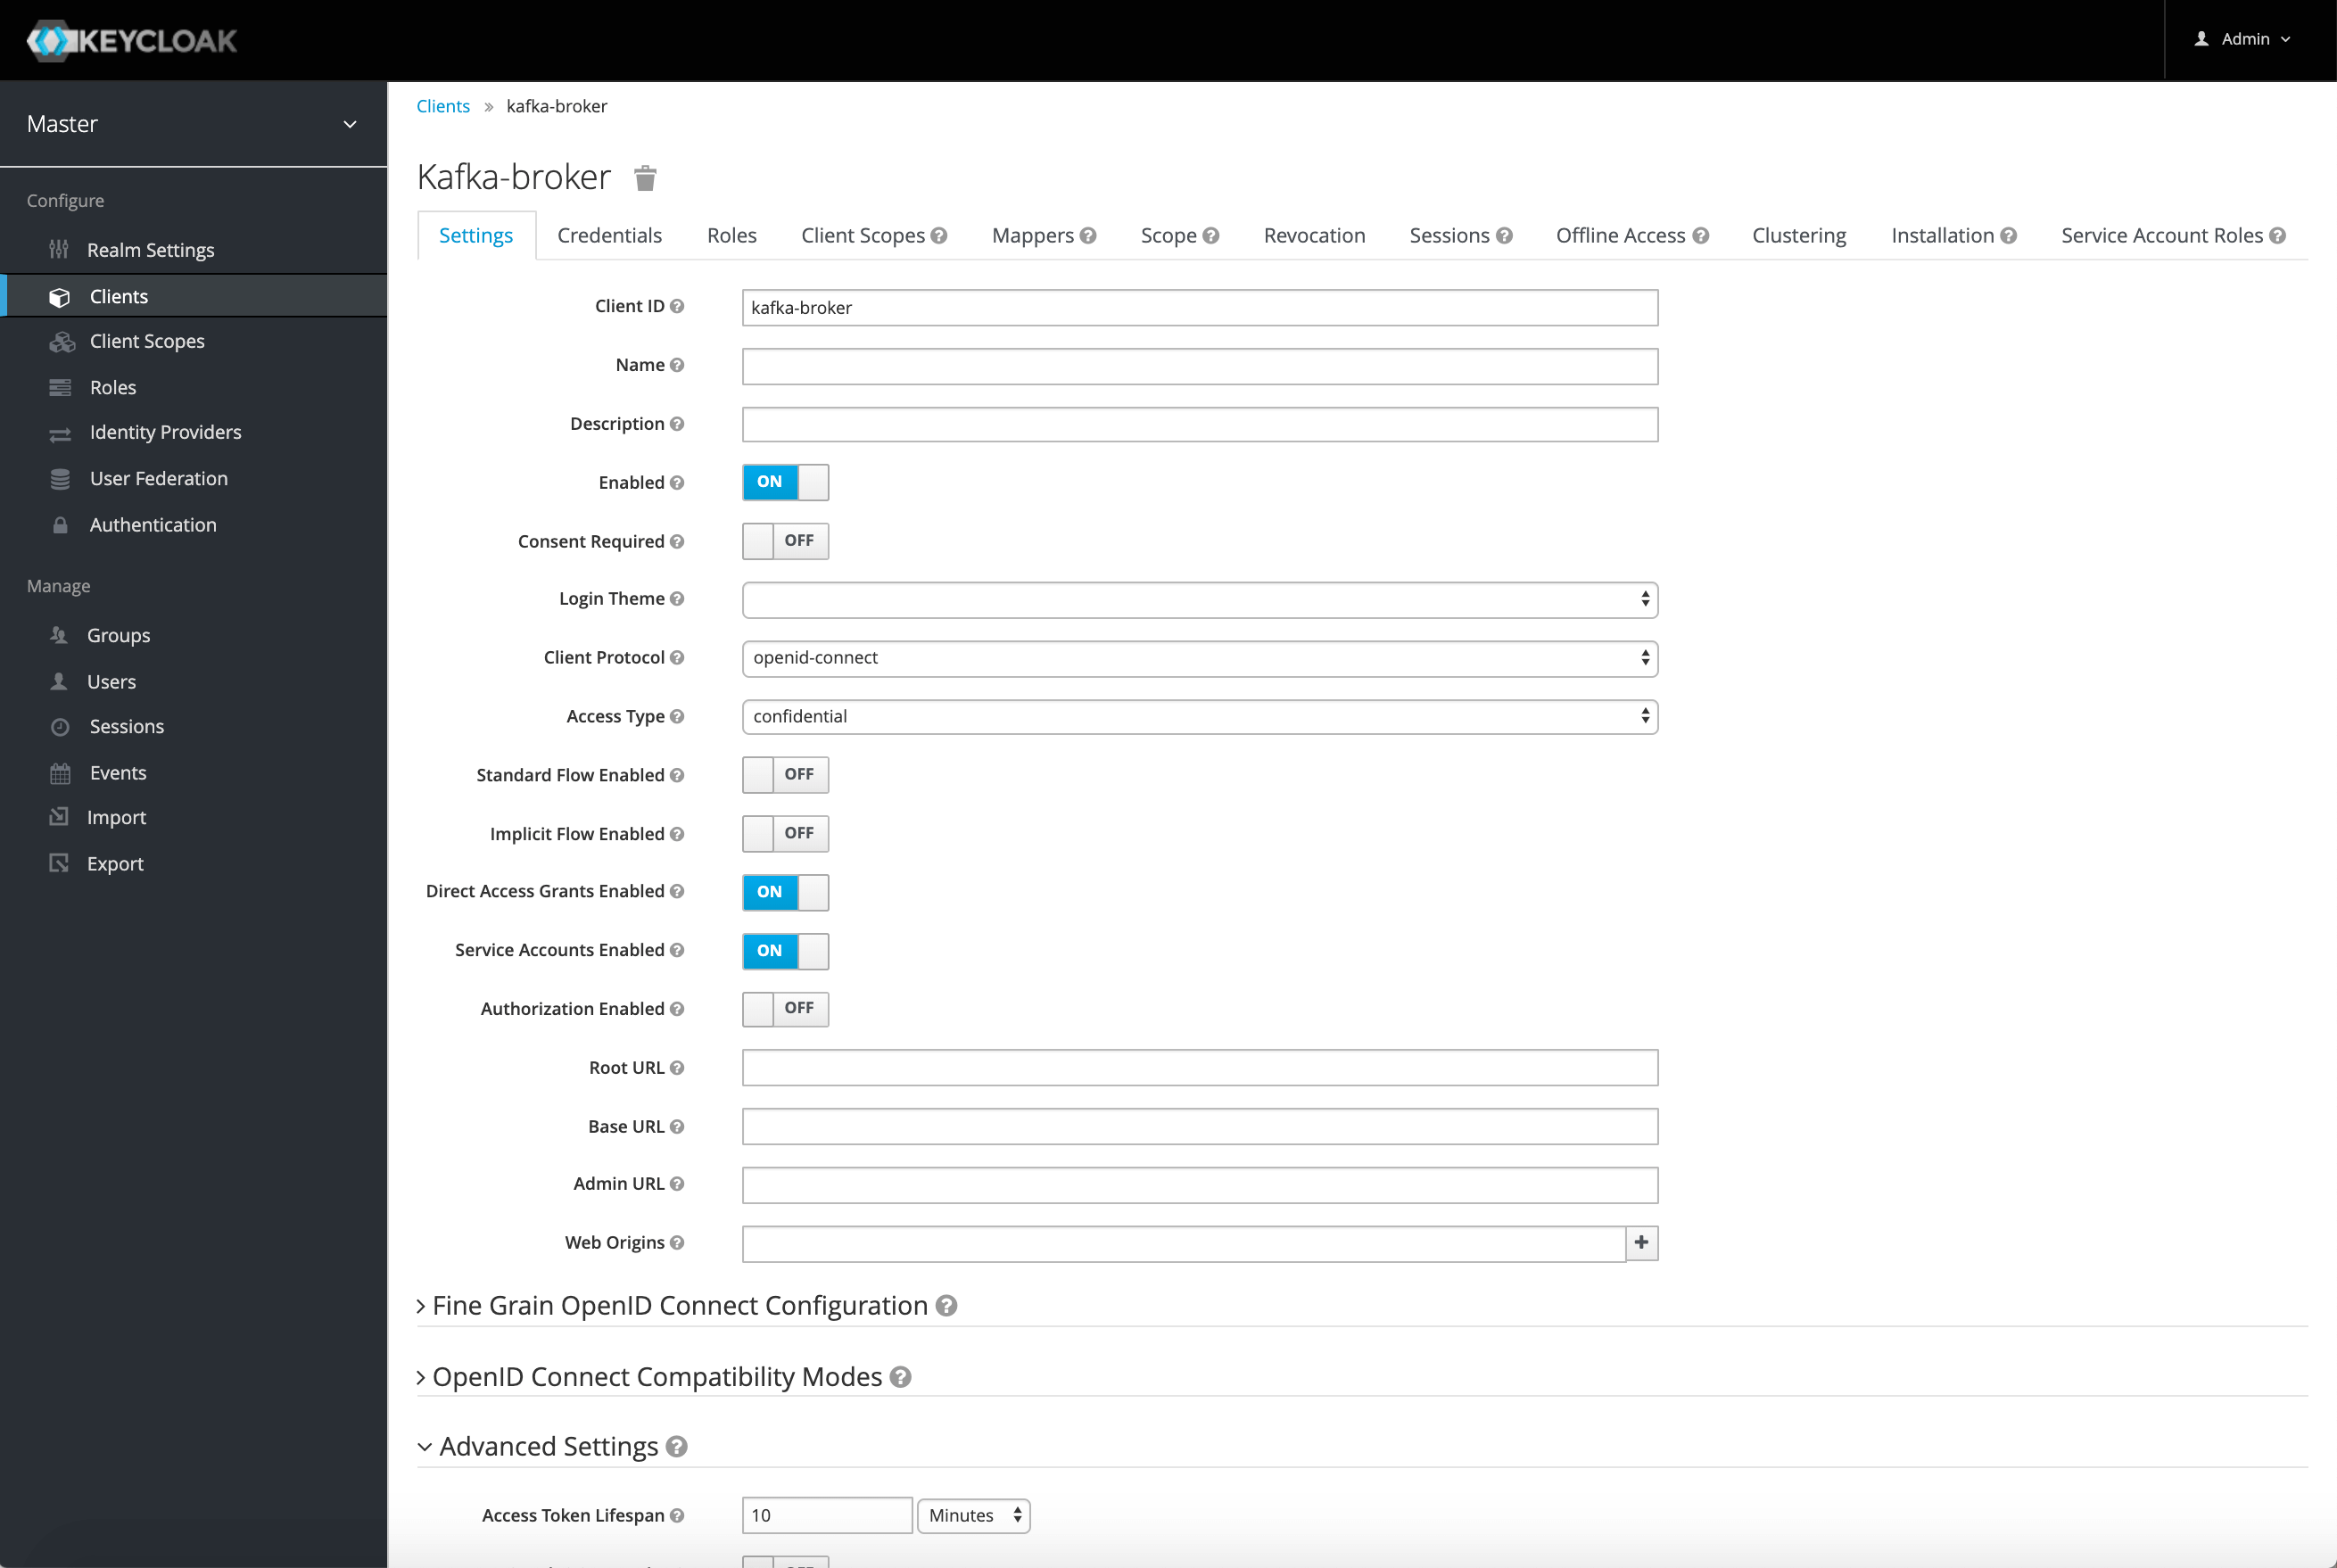
With the master realm open, click on Clients in the main navigation on the left.
Now use the Create button at the right top corner.
In the form that opens set Client ID to kafka-broker and click Save.
The Settings view opens up where you change the Access Type to Confidential.
Then turn Standard Flow Enabled to OFF, and Service Accounts Enabled to ON.
Also, scroll down to Advanced Settings section, and set Access Token Lifespan to 10 minutes.
The reason for this is because, by default, access tokens are very short-lived as they are configured for use by browser-based UI flows.
For Kafka authentication we should make their expiry time slightly longer to get rid of the warnings that result from Kafka client library refresh defaults.
Now, click Save.
Switch to another tab that appears, called Credentials.
Leave Client Authenticator set to Client Id and Secret, and take note of the Secret. We’ll need it later.
What we’ve done here is configure the kafka-broker ‘client’ in a way that it can directly authenticate with Keycloak in its own name, using its own Client ID and Secret, and at the same time can’t be used for browser based login by other users. This is a typical ‘client’ configuration for microservices, regardless of whether they are acting as application clients, or application servers.
All Kafka brokers will share the same ‘client’ configuration since they are just different instances of the same service.
Next, we configure a ‘client’ for each service that acts as a Kafka client. These are Kafka producers, consumers, connectors, streams applications - any application that talks to Kafka brokers.
In general this is done by following the same steps as for ‘kafka-broker’, but giving each new client its own Client ID, and taking note of the generated Secret.
For this demo we’ll need two more clients: ‘kafka-producer’ and ‘kafka-consumer’.
When you are done it is wise to export the current state of the realm configuration. Since we are running Keycloak as a stateless pod, it will happen sooner rather than later that the pod will be deleted and replaced with a fresh new one, and all state will be gone. Exporting the realm gives us a way to restore this state when this happens.
To export the realm click on Export in main navigation on the left.
Then in Partial Export page turn Export clients to ON, and click Export.
Note, that secrets in the exported file get lost, and if you ever perform Import, you’ll have to use the Regenerate Secret button in the Credentials tab of each client.
Installing Strimzi
Before we can start a Kafka cluster we first have to install the custom resource definitions (CRDs) and the Kubernetes operators provided by Strimzi.
The default installation assumes that the namespace where Kafka cluster is deployed is called ‘myproject’. However, we will assume here that kafka cluster is running in ‘kafka’ namespace.
In order to adjust the namespace where CRDs are installed, we can do an on-the-fly transformation of installation file:
kubectl create ns kafka

curl -L https://github.com/strimzi/strimzi-kafka-operator/releases/download/0.14.0/strimzi-cluster-operator-0.14.0.yaml \
  | sed 's/namespace: .*/namespace: kafka/' \
  | kubectl apply -f - -n kafka
Make sure the cluster operator is running:
kubectl -n kafka get pods
NOTE: If you’re using RBAC you may first need to grant current user (‘developer’ by default) cluster-admin role. For example on OpenShift:
oc adm policy --as system:admin add-cluster-role-to-user cluster-admin developer
Or, if you’re on GCP:
kubectl create clusterrolebinding cluster-admin-binding \
  --clusterrole cluster-admin --user $(gcloud config get-value account)
You might need to do something similar in other environments as well.
Configuring Kafka brokers in Strimzi
We’ll use the default Kafka cluster configuration with modified authentication settings.
OAuth 2.0 authentication is activated by specifying oauth as the type.
We need to store the Client Secret in Kubernetes as a Kubernetes Secret.
Let’s use a Bash feature that allows us to by-pass history if prefixing command with a space:
export HISTCONTROL=ignorespace
Now, let’s create a secret:
 export BROKER_SECRET=<SECRET_FOR_KAFKA_BROKER_FROM_KEYCLOAK_CONSOLE>
kubectl create secret generic broker-oauth-secret -n kafka \
  --from-literal=secret=$BROKER_SECRET
We also need to provide a truststore for TLS connectivity to Keycloak - as a Secret.
kubectl create secret generic ca-truststore --from-file=./ca.crt -n kafka
Now, we can create a Kafka cluster:
cat > kafka-persistent-single-oauth.yaml << EOF
apiVersion: kafka.strimzi.io/v1beta1
kind: Kafka
metadata:
  name: my-cluster
spec:
  kafka:
    version: 2.3.0
    replicas: 1
    listeners:
      plain: {}
      tls:
        authentication:
          type: oauth
          clientId: kafka-broker
          clientSecret:
            key: secret
            secretName: broker-oauth-secret
          validIssuerUri: https://keycloak.keycloak:8443/auth/realms/master
          jwksEndpointUri: https://keycloak.keycloak:8443/auth/realms/master/protocol/openid-connect/certs
          userNameClaim: preferred_username
          tlsTrustedCertificates:
          - secretName: ca-truststore
            certificate: ca.crt
    config:
      offsets.topic.replication.factor: 1
      transaction.state.log.replication.factor: 1
      transaction.state.log.min.isr: 1
      log.message.format.version: "2.3"
    storage:
      type: jbod
      volumes:
      - id: 0
        type: persistent-claim
        size: 100Gi
        deleteClaim: false
  zookeeper:
    replicas: 1
    storage:
      type: persistent-claim
      size: 100Gi
      deleteClaim: false
  entityOperator:
    topicOperator: {}
    userOperator: {}

EOF
kubectl apply -f kafka-persistent-single-oauth.yaml -n kafka
You can observe the cluster pods come up:
kubectl get pod -n kafka
You can follow kafka broker’s log by running:
kubectl logs my-cluster-kafka-0 -n kafka -c kafka -f
This should start up a simple single-broker Kafka cluster with tls listener on port 9093 configured with OAuth 2.0 support (OAUTHBEARER over SASL_SSL). The PLAINTEXT listener on port 9092 is left with no authentication mechanism configured. Attempting to use OAuth 2.0 authentication over port 9092 will fail.
The next step is to configure and run some Kafka client applications.
Configuring application client pods
Kafka comes with some simple and handy CLI tools like kafka-console-producer.sh, and kafka-console-consumer.sh.
Let’s create a new namespace for clients:
kubectl create ns clients
We’ll use the Strimzi Kafka image so we have all the dependent libraries already present in the image.
Let’s first connect to PLAINTEXT Kafka broker on 9092, to confirm that kafka is up, and that we can connect with the client application:
kubectl -n clients run kafka-producer -ti --rm=true --restart=Never \
  --image=strimzi/kafka:0.14.0-kafka-2.3.0 -- bin/kafka-console-producer.sh \
    --broker-list my-cluster-kafka-bootstrap.kafka:9092 --topic my-topic
Type a few lines of text. Each ENTER will send a message to Kafka broker. Type CTRL-C to quit.
Now read the messages using Kafka consumer:
kubectl -n clients run kafka-consumer -ti --rm=true --restart=Never \
  --image=strimzi/kafka:0.14.0-kafka-2.3.0 -- bin/kafka-console-consumer.sh \
    --bootstrap-server my-cluster-kafka-bootstrap.kafka:9092 --topic my-topic \
    --from-beginning
You should get the messages from the previous step.
Now, let’s try the TLS listener on port 9093 which is configured with SASL_SSL + OAUTHBEARER support - it should require a TLS based session. The following should fail, because the default PLAINTEXT connection is used rather than SASL_SSL:
kubectl -n clients run kafka-producer -ti --rm=true --restart=Never \
 --image=strimzi/kafka:0.14.0-kafka-2.3.0 -- bin/kafka-console-producer.sh \
   --broker-list my-cluster-kafka-bootstrap.kafka:9093 --topic my-topic
Then, let’s try just using TLS without OAuth 2.0, to see if authentication is required or optional:
kubectl -n clients run kafka-producer -ti --rm=true --restart=Never \
  --image=strimzi/kafka:0.14.0-kafka-2.3.0 -- bin/kafka-console-producer.sh \
    --broker-list my-cluster-kafka-bootstrap.kafka:9093 --topic my-topic \
    --producer-property 'security.protocol=SSL'
We get authentication error - SSL handshake failed, meaning creation of SSL connection failed even before any attempt of further communication. The reason is that the server certificate is not trusted by the client. We need to configure truststore with Kafka’s cluster CA certificate.
Let’s change our approach, and prepare a pod definition with the truststore mounted from a secret.
For clients we need a truststore with trusted certificates for Keycloak and the Kafka broker.
Let’s create a truststore, importing the previously created ca.crt, but also adding the Kafka cluster CA certificate.
When Strimzi creates a Kafka cluster, it also creates a CA certificate which it uses to sign all other generated cluster certificates.
For a cluster called ‘my-cluster’ the CA certificate is available as a secret called ‘my-cluster-cluster-ca-cert’.
In order to allow clients to connect, we need to export this certificate and package it in client truststore.
kubectl get secret my-cluster-cluster-ca-cert -n kafka -o yaml \
  | grep ca.crt | awk '{print $2}' | base64 --decode > kafka.crt

# inspect the certificate
#openssl x509 -text -noout -in kafka.crt

 export PASSWORD=truststorepassword
keytool -keystore kafka-client-truststore.p12 -storetype PKCS12 -alias ca \
  -storepass $PASSWORD -keypass $PASSWORD -import -file ca.crt -noprompt
keytool -keystore kafka-client-truststore.p12 -storetype PKCS12 -alias kafka \
  -storepass $PASSWORD -keypass $PASSWORD -import -file kafka.crt -noprompt

kubectl create secret generic kafka-client-truststore -n clients \
  --from-file=./kafka-client-truststore.p12
You can read more about Strimzi CAs in our Security documentation
Now, that we have the client truststore available, we can define the pod.
Note the environment variables that we set.
CLASSPATH puts the necessary Strimzi OAuth 2.0 client libraries on the classpath when running Kafka CLI tools. These libraries are already present in Strimzi Kafka image.
OAUTH_TOKEN_ENDPOINT_URI tells the OAuth 2.0 client library where to connect to retrieve an access token from authorization server.
cat > kafka-client.yaml << EOF
apiVersion: v1
kind: Pod
metadata:
  name: kafka-client-shell
spec:
  containers:
  - name: kafka-client-shell
    image: strimzi/kafka:0.14.0-kafka-2.3.0
    command: ["/bin/bash"]
    args: [ "-c", 'for((i=0;;i+=1)); do echo "Up time: \$i min" && sleep 60; done' ]
    env:
    - name: CLASSPATH
      value: /opt/kafka/libs/kafka-oauth-client-*:/opt/kafka/libs/kafka-oauth-common-*
    - name: OAUTH_TOKEN_ENDPOINT_URI
      value: https://keycloak.keycloak:8443/auth/realms/master/protocol/openid-connect/token
    volumeMounts:
    - name: truststore
      mountPath: "/opt/kafka/certificates"
      readOnly: true
  volumes:
  - name: truststore
    secret:
      secretName: kafka-client-truststore
EOF
Here, we have configured the pod with a startup command that will run indefinitely. This way we can execute other processes in the same pod while the initial shell script is running - keeping the pod alive.
Let’s start the pod:
kubectl apply -n clients -f kafka-client.yaml
We can now start an interactive shell process in the same pod:
kubectl exec -n clients -ti kafka-client-shell /bin/bash
Let’s start a CLI producer again, this time configuring it to use OAuth 2.0 over TLS for authentication.
export OAUTH_CLIENT_ID=kafka-producer
export OAUTH_CLIENT_SECRET=<SECRET_FOR_KAFKA_PRODUCER_FROM_KEYCLOAK_CONSOLE>
export PASSWORD=truststorepassword
export KAFKA_OPTS=" \
  -Djavax.net.ssl.trustStore=/opt/kafka/certificates/kafka-client-truststore.p12 \
  -Djavax.net.ssl.trustStorePassword=$PASSWORD \
  -Djavax.net.ssl.trustStoreType=PKCS12"

bin/kafka-console-producer.sh --broker-list \
  my-cluster-kafka-bootstrap.kafka:9093 --topic my-topic \
  --producer-property 'security.protocol=SASL_SSL' \
  --producer-property 'sasl.mechanism=OAUTHBEARER' \
  --producer-property 'sasl.jaas.config=org.apache.kafka.common.security.oauthbearer.OAuthBearerLoginModule required;' \
  --producer-property 'sasl.login.callback.handler.class=io.strimzi.kafka.oauth.client.JaasClientOauthLoginCallbackHandler'
If you get a warning about credentials expiring really soon, you probably forgot to configure a longer access token lifespan, as instructed in Setting up Keycloak section.
One question we haven’t answered yet is if authentication is in fact mandatory or if can we connect by using only TLS - without the client actually authenticating.
Let’s try with the consumer this time.
export PASSWORD=truststorepassword
export KAFKA_OPTS=" \
  -Djavax.net.ssl.trustStore=/opt/kafka/certificates/kafka-client-truststore.p12 \
  -Djavax.net.ssl.trustStorePassword=$PASSWORD \
  -Djavax.net.ssl.trustStoreType=PKCS12"

bin/kafka-console-consumer.sh --bootstrap-server /
  my-cluster-kafka-bootstrap.kafka:9093 --topic my-topic --from-beginning \
  --consumer-property 'security.protocol=SSL'
We should get a disconnected error. In the Kafka broker log we should see ‘Failed authentication’ error message.
Let’s fix that with proper authentication configuration:
export OAUTH_CLIENT_ID=kafka-consumer
export OAUTH_CLIENT_SECRET=<SECRET_FOR_KAFKA_CONSUMER_FROM_KEYCLOAK_CONSOLE>
export PASSWORD=truststorepassword
export KAFKA_OPTS=" \
  -Djavax.net.ssl.trustStore=/opt/kafka/certificates/kafka-client-truststore.p12 \
  -Djavax.net.ssl.trustStorePassword=$PASSWORD \
  -Djavax.net.ssl.trustStoreType=PKCS12"

bin/kafka-console-consumer.sh --bootstrap-server \
  my-cluster-kafka-bootstrap.kafka:9093 --topic my-topic --from-beginning \
  --consumer-property 'security.protocol=SASL_SSL' \
  --consumer-property 'sasl.mechanism=OAUTHBEARER' \
  --consumer-property 'sasl.jaas.config=org.apache.kafka.common.security.oauthbearer.OAuthBearerLoginModule required;' \
  --consumer-property 'sasl.login.callback.handler.class=io.strimzi.kafka.oauth.client.JaasClientOauthLoginCallbackHandler'
Now, all should work as expected. Our client should receive all the messages in the topic, and if we keep it running would receive any additional produced messages.
Conclusion
OAuth 2.0 token-based authentication allows you to use central management of users and security policies by way of an external security server, and is relatively easy to setup.
What we have implemented thus far is initial support for authentication. For next steps, we are looking at roles-based authorization, which could be used instead of the default ACL based authorization to centrally manage not only user identities, but also the permissions they have on Kafka resources.
OAuth2 support is part of Strimzi 0.14, and you can use it with Strimzi brokers, Kafka Mirror Maker, Kafka Connect, Kafka Bridge, and with your custom Kafka client applications. Give it a try, and let us know what you think.
If you like Strimzi, star us on GitHub and follow us on Twitter to make sure you don’t miss any of our future blog posts!
Share this:
![]()
![]()
![]()
![]()
![]()