In this blog, we will go over how to ingest data into Azure Data Explorer using the open source Kafka Connect Sink connector for Azure Data Explorer running on Kubernetes using Strimzi. Kafka Connect is a tool for scalably and reliably streaming data between Apache Kafka and other systems using source and sink connectors and Strimzi provides a “Kubernetes-native” way of running Kafka clusters as well as Kafka Connect workers.
Azure Data Explorer is a fast and scalable data exploration service that lets you collect, store, and analyze large volumes of data from any diverse sources, such as websites, applications, IoT devices, and more. It has a rich connector ecosystem that supports ingestion into Azure Data Explorer as detailed here. One of the supported sources is Apache Kafka and the sink connector allows you to move data from Kafka topics into Azure Data Explorer tables which you can later query and analyze. The best part is that you can do so in a scalable and fault tolerant way using just configuration!
Here is an overview of the scenario depicted in this blog post:
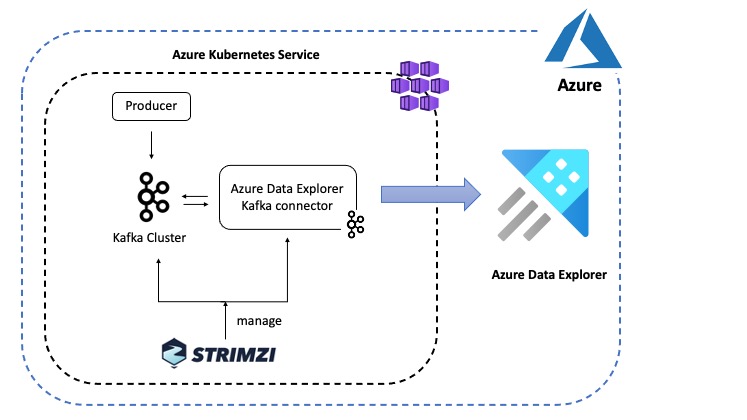
The Azure Data Explorer Kafka Connector picks up data from the configured Kafka topic and queues up ingestion processes (in batches) which eventually write data to a table in Azure Data Explorer. Behind the scenes, the connector leverages the Java SDK for Azure Data Explorer.
Resources for this blog post are available on GitHub
Prerequisites
You will need an Azure account along with Azure CLI or Azure Cloud Shell.
Here are some quick pointers to setting up a Azure Data Explorer cluster and a managed Kubernetes service on Azure. I recommend installing the below services as a part of a single Azure Resource Group which makes it easy to manage these services
Azure Data Explorer
You can setup an Azure Data Explorer cluster and database using Azure Portal, Azure CLI or any of the client SDKs such as Python. Once that’s done, create a table (named Storms) and respective mapping (named Storms_CSV_Mapping) using below queries:
.create table Storms (StartTime: datetime, EndTime: datetime, EventId: int, State: string, EventType: string, Source: string)

.create table Storms ingestion csv mapping 'Storms_CSV_Mapping' '[{"Name":"StartTime","datatype":"datetime","Ordinal":0}, {"Name":"EndTime","datatype":"datetime","Ordinal":1},{"Name":"EventId","datatype":"int","Ordinal":2},{"Name":"State","datatype":"string","Ordinal":3},{"Name":"EventType","datatype":"string","Ordinal":4},{"Name":"Source","datatype":"string","Ordinal":5}]'
Azure Kubernetes Service (optional)
I have used Azure Kubernetes Service (AKS) but the instructions in this blog post should work for other options as well (e.g. with a local minikube cluster on your laptop). You can setup an AKS cluster using Azure CLI, Azure portal or ARM template
Base installation
Start by installing the Strimzi Operator and use it to spin up a single-node Kafka Cluster on Kubernetes. Installing Strimzi using Helm is pretty easy:
helm repo add strimzi https://strimzi.io/charts/
helm install strimzi-kafka strimzi/strimzi-kafka-operator
To confirm successful installation:
kubectl get pods -l=name=strimzi-cluster-operator
You should see the cluster operator Pod in Running status
NAME                                        READY   STATUS    RESTARTS   AGE
strimzi-cluster-operator-5c66f679d5-69rgk   1/1     Running   0          43s
To deploy a single-node kafka cluster (along with Zookeeper):
kubectl apply -f https://github.com/abhirockzz/kusto-kafka-connect-strimzi/raw/master/deploy/kafka.yaml
Wait for the cluster to start:
kubectl get pod my-kafka-cluster-kafka-0 -w
The Kafka Pod should transition to Running status and both the containers should be in READY state
NAME                       READY   STATUS    RESTARTS   AGE
my-kafka-cluster-kafka-0   2/2     Running   0          1m
Kafka Connect cluster setup
The Strimzi container images for Kafka Connect include two built-in file connectors - FileStreamSourceConnector and FileStreamSinkConnector. For the purposes of this blog, a custom Docker image seeded with Azure Data Explorer connector (version 1.0.1) is available on Docker Hub and it is referenced in the KafkaConnect resource definition (image: abhirockzz/adx-connector-strimzi:1.0.1):
apiVersion: kafka.strimzi.io/v1beta1
kind: KafkaConnect
metadata:
  name: my-connect-cluster
spec:
  image: abhirockzz/adx-connector-strimzi:1.0.1
  version: 2.4.0
....
If you want to build your own Docker image, use the Strimzi Kafka Docker image as a base and add the Azure Data Explorer connector JAR top to the plugin path. Start by downloading the connector JAR file:
export KUSTO_KAFKA_SINK_VERSION=1.0.1
mkdir connector && cd connector
curl -L -O https://github.com/Azure/kafka-sink-azure-kusto/releases/download/v$KUSTO_KAFKA_SINK_VERSION/kafka-sink-azure-kusto-$KUSTO_KAFKA_SINK_VERSION-jar-with-dependencies.jar
Then, you can use this Dockerfile to build the Docker image:
FROM strimzi/kafka:0.19.0-kafka-2.4.0
USER root:root
COPY ./connector/ /opt/kafka/plugins/
RUN ls -lrt /opt/kafka/plugins/
USER 1001
This technique has been illustrated in the Strimzi documentation
Authentication
Before installing the connector, we need to create an Azure Service Principal in order for the connector to authenticate and connect to Azure Data Explorer service. You can use the az ad sp create-for-rbac command:
az ad sp create-for-rbac -n "kusto-sp"
You will get a JSON response as below - please note down the appId, password and tenant as you will be using them in subsequent steps
{
  "appId": "fe7280c7-5705-4789-b17f-71a472340429",
  "displayName": "kusto-sp",
  "name": "http://kusto-sp",
  "password": "29c719dd-f2b3-46de-b71c-4004fb6116ee",
  "tenant": "42f988bf-86f1-42af-91ab-2d7cd011db42"
}
Add permissions to your database
Provide an appropriate role to the Service principal you just created. To assign the admin role, follow this guide to use the Azure portal or use the following command in your Data Explorer cluster
.add database <database name> admins ('aadapp=<service principal AppID>;<service principal TenantID>') 'AAD App'
We will seed the auth related config as a Kubernetes Secret - later on you will see where this Secret is referenced.
Create a file called adx-auth.yaml with the below contents.
apiVersion: v1
kind: Secret
metadata:
  name: adx-auth
type: Opaque
stringData:
  adx-auth.properties: |-
    kustoURL: <replace ADX Ingest URL>
    tenantID: <enter service principal tenant ID>
    appID: <enter service principal app ID>
    password: <enter service principal tenant password>
Replace values for the following:
kustoURL: Azure Data Explorer ingestion URL e.g.https://ingest-[cluster name].[region].kusto.windows.nettenantID- service principal tenant IDappID- service principal application IDpassword- service principal password
Install Kafka Connect
Create the Secret and initiate the Kafka Cluster creation:
kubectl apply -f adx-auth.yaml

kubectl apply -f https://github.com/abhirockzz/kusto-kafka-connect-strimzi/raw/master/deploy/kafka-connect.yaml
While you wait for the Kafka Connect cluster to start, take a look at this snippet of the KafkaConnect cluster resource definition. Notice the externalConfiguration attribute that points to the secret we had just created. It is loaded into the Kafka Connect Pod as a Volume and the Kafka FileConfigProvider is used to access them.
apiVersion: kafka.strimzi.io/v1beta1
kind: KafkaConnect
metadata:
  name: my-connect-cluster
spec:
  image: abhirockzz/adx-connector-strimzi:1.0.1
  config:
    ...
    config.providers: file
    config.providers.file.class: org.apache.kafka.common.config.provider.FileConfigProvider
  externalConfiguration:
    volumes:
      - name: adx-auth-config
        secret:
          secretName: adx-auth
To check Kafka Connect cluster status:
kubectl get pod -l=strimzi.io/cluster=my-connect-cluster -w
Wait for the Kafka Connect Pod to transition into Running state.
NAME                                          READY   STATUS    RESTARTS   AGE
my-connect-cluster-connect-5bf9db5d9f-9ttg4   1/1     Running   0          1m
Create the topic and install connector
You can use the Strimzi Entity Operator to create the storm-events topic. Here is the Topic definition:
apiVersion: kafka.strimzi.io/v1beta1
kind: KafkaTopic
metadata:
  name: storm-events
  labels:
    strimzi.io/cluster: my-kafka-cluster
spec:
  partitions: 3
  replicas: 1
To create:
kubectl apply -f https://github.com/abhirockzz/kusto-kafka-connect-strimzi/raw/master/deploy/topic.yaml
Use kubectl get kafkatopic to see the topic you just created as well as internal Kafka topics
NAME                                                          PARTITIONS   REPLICATION FACTOR
consumer-offsets---84e7a678d08f4bd226872e5cdd4eb527fadc1c6a   50           1
storm-events                                                  3            1
strimzi-connect-cluster-configs                               1            1
strimzi-connect-cluster-offsets                               25           1
strimzi-connect-cluster-status                                5            1
Here is snippet of the connector (KafkaConnector) definition - it’s just a way to capture configuration and metadata for the connector you want to install.
apiVersion: kafka.strimzi.io/v1alpha1
kind: KafkaConnector
metadata:
  name: adx-sink-connector
  labels:
    strimzi.io/cluster: my-connect-cluster
spec:
  class: com.microsoft.azure.kusto.kafka.connect.sink.KustoSinkConnector
  tasksMax: 3
  config:
    topics: storm-events
    flush.size.bytes: 10000
    flush.interval.ms: 50000
    kusto.tables.topics.mapping: "[{'topic': 'storm-events','db': '[REPLACE DATABASE NAME]', 'table': 'Storms','format': 'csv', 'mapping':'Storms_CSV_Mapping'}]"
    kusto.url: ${file:/opt/kafka/external-configuration/adx-auth-config/adx-auth.properties:kustoURL}
    aad.auth.authority: ${file:/opt/kafka/external-configuration/adx-auth-config/adx-auth.properties:tenantID}
    aad.auth.appid: ${file:/opt/kafka/external-configuration/adx-auth-config/adx-auth.properties:appID}
    aad.auth.appkey: ${file:/opt/kafka/external-configuration/adx-auth-config/adx-auth.properties:password}
    key.converter: "org.apache.kafka.connect.storage.StringConverter"
    value.converter: "org.apache.kafka.connect.storage.StringConverter"
The
flush.size.bytesandflush.interval.msattributes work in tandem with each other and serve as a performance knob for batching. Please refer to the connector GitHub repo for details on these and other configuration parameters
Notice how the individual properties (from the Secret) are actually referenced. For example to reference the Service Principal application ID, we used this:
aad.auth.appid: ${file:/opt/kafka/external-configuration/adx-auth-config/adx-auth.properties:appID}
/opt/kafka/external-configurationis a fixed path inside the containeradx-auth-configis the name of the volume in theKafkaConnectdefinitionadx-auth.propertiesis the name of the file as defined in theSecretappIDis the name of key
The direct attribute name has been used to define non-sensitive connector configs (e.g.
topics: storm-events). Alternatively, can encapsulate these in aConfigMap, load them as aVolumeand reference them (just like the sensitive attributes using aSecret).
Copy the above definition for the KafkaConnector to local file adx-connect-config.yaml. Make sure you replace the correct database name in the kusto.tables.topics.mapping attribute. To create:
kubectl apply -f adx-connect-config.yaml
Check the kafka connect logs kubectl logs -l=strimzi.io/cluster=my-connect-cluster. If everything is working fine, you should see logs similar to this:
....
INFO [Consumer clientId=connector-consumer-adx-sink-connector-1, groupId=connect-adx-sink-connector] Resetting offset for partition storm-events-1 to offset 0. (org.apache.kafka.clients.consumer.internals.SubscriptionState) [task-thread-adx-sink-connector-1]

INFO [Consumer clientId=connector-consumer-adx-sink-connector-2, groupId=connect-adx-sink-connector] Resetting offset for partition storm-events-2 to offset 0. (org.apache.kafka.clients.consumer.internals.SubscriptionState) [task-thread-adx-sink-connector-2]
Data ingestion in action
So, we have everything setup. All we need is events to be sent to the Kafka topic, so that we can see the connector in action and ingest data into Azure Data Explorer.
You can use this handy event generator application (available in Docker Hub) and deploy it to your Kubernetes cluster - the Dockerfile is available in the GitHub repo in case you want to reference it.
Kubernetes Deployment snippet:
apiVersion: apps/v1
kind: Deployment
metadata:
  name: adx-event-producer
spec:
  replicas: 1
  ....
    spec:
      containers:
        - name: adx-event-producer
          image: abhirockzz/adx-event-producer
          imagePullPolicy: Always
          env:
            - name: KAFKA_BOOTSTRAP_SERVER
              value: my-kafka-cluster-kafka-bootstrap:9092
            - name: KAFKA_TOPIC
              value: storm-events
            - name: SOURCE_FILE
              value: StormEvents.csv
To deploy the producer application:
kubectl apply -f https://github.com/abhirockzz/kusto-kafka-connect-strimzi/raw/master/deploy/producer.yaml
The application picks up records from the StormEvents.csv file and sends them to a Kafka topic. Each event is a CSV record that represent data for a Storm occurence (start and end time, state, type etc.), for example: 2007-01-01 00:00:00.0000000,2007-01-01 05:00:00.0000000,23357,WISCONSIN,Winter Storm,COOP Observer.
The producer application waits for 3 seconds between subsequent produce operations to Kafka. This is intentional so that you can monitor the Kafka Connect logs and make sense of what’s going on. The
StormEvents.csvfile contains more than 50,000 records, so it might take a while for all of them to be batched and ingested to Azure Data Explorer
You can track the application logs using: kubectl logs -f -l app=adx-event-producer. If all is well, you should see something similar to this:
...
sent message to partition 0 offset 0
event  2007-01-01 00:00:00.0000000,2007-01-01 00:00:00.0000000,13208,NORTH CAROLINA,Thunderstorm Wind,Public

sent message to partition 0 offset 1
event  2007-01-01 00:00:00.0000000,2007-01-01 05:00:00.0000000,23358,WISCONSIN,Winter Storm,COOP Observer

sent message to partition 0 offset 2
event  2007-01-01 00:00:00.0000000,2007-01-01 05:00:00.0000000,23357,WISCONSIN,Winter Storm,COOP Observer
The storm-events topic will now start getting events and these will be picked up by the sink connector. If you were to track the connector logs:
kubectl logs -f -l strimzi.io/cluster=my-connect-cluster
… you should see logs similar to this:
....
INFO Kusto ingestion: file (/tmp/kusto-sink-connector-17d03941-f8ca-498e-bc52-68ced036dc69/kafka_storm-events_0_0.csv.gz) of size (1722) at current offset (16) (com.microsoft.azure.kusto.kafka.connect.sink.TopicPartitionWriter) [Timer-6]

INFO WorkerSinkTask{id=adx-sink-connector-0} Committing offsets asynchronously using sequence number 17: {storm-events-0=OffsetAndMetadata{offset=17, leaderEpoch=null, metadata=''}} (org.apache.kafka.connect.runtime.WorkerSinkTask) [task-thread-adx-sink-connector-0]

INFO Kusto ingestion: file (/tmp/kusto-sink-connector-17d03941-f8ca-498e-bc52-68ced036dc69/kafka_storm-events_0_17.csv.gz) of size (1666) at current offset (33) (com.microsoft.azure.kusto.kafka.connect.sink.TopicPartitionWriter) [Timer-7]
....
Query Azure Data Explorer
Wait for sometime before data ends up in the Storms table. To confirm, check the row count and confirm that there are no failures in the ingestion process:
Storms | count

. show ingestion failures
Once there is some data, try out a few queries. To see all the records:
Storms
Use where and project to filter specific data
Storms
| where EventType == 'Drought' and State == 'TEXAS'
| project StartTime, EndTime, Source, EventId
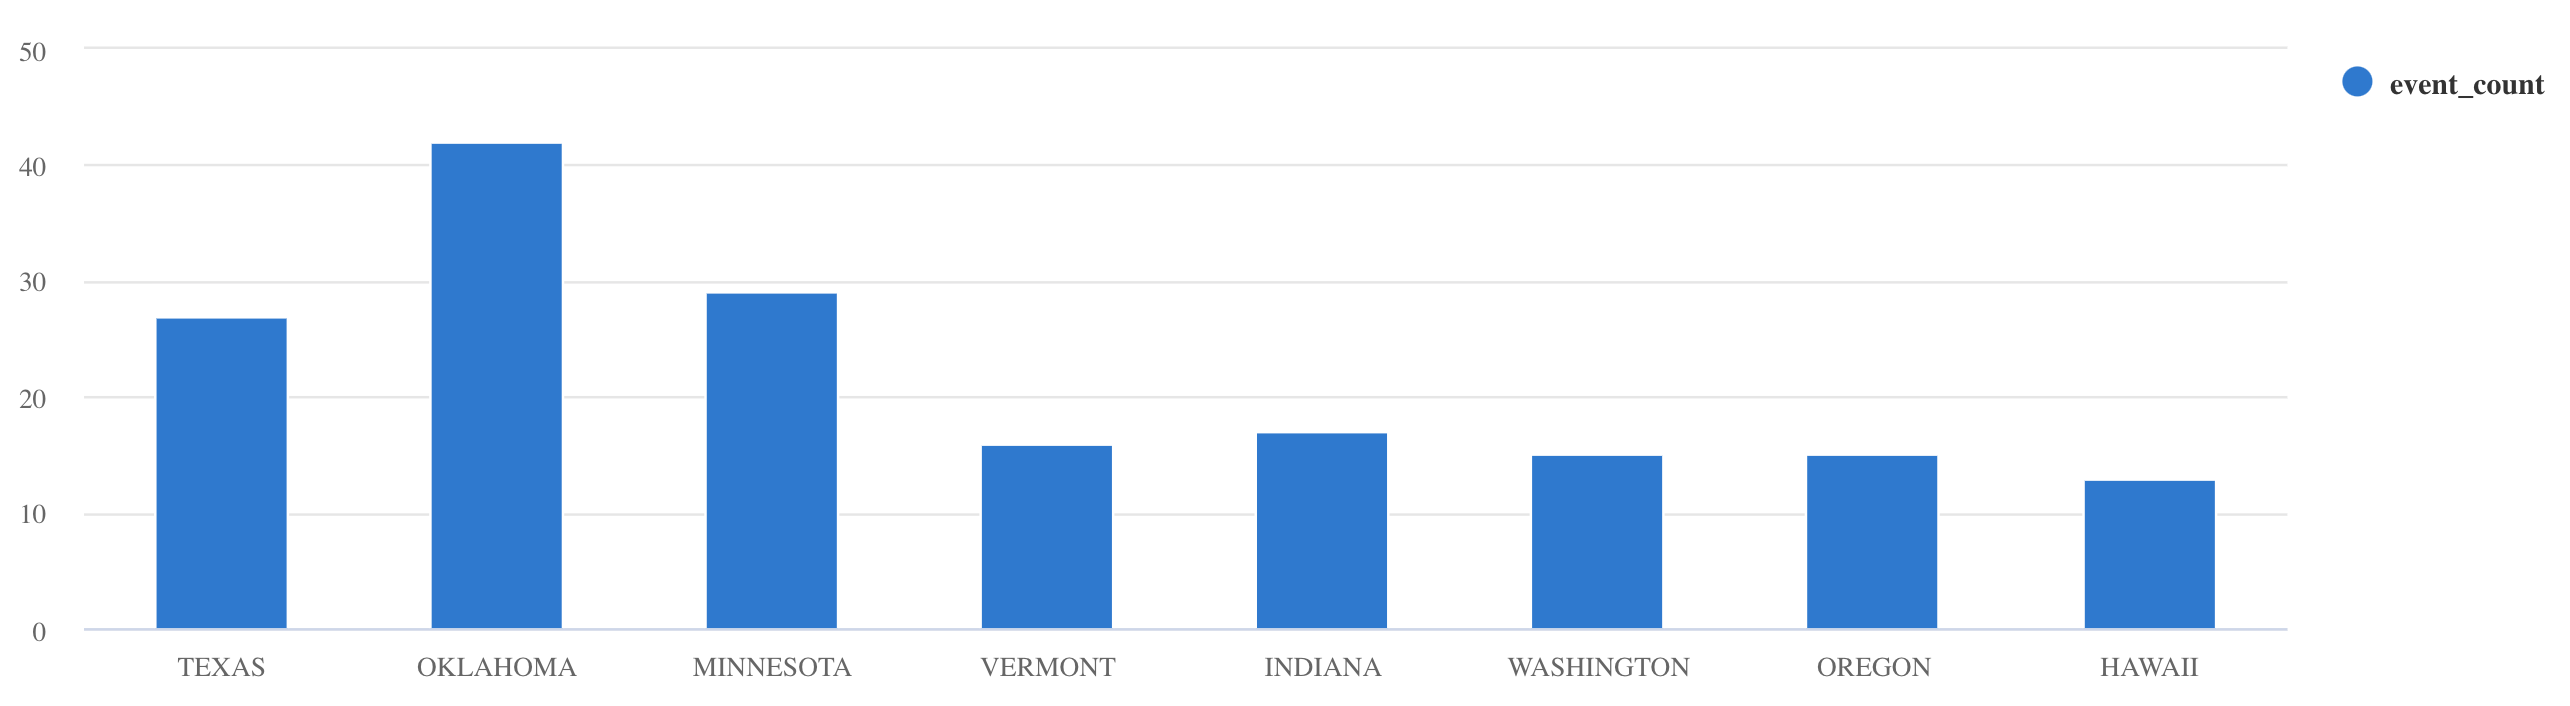
Use the summarize operator
Storms
| summarize event_count=count() by State
| where event_count > 10
| project State, event_count
| render columnchart
These are just few examples. Please take a look at the Kusto Query Language documentation or explore tutorials about how to ingest JSON formatted sample data into Azure Data Explorer, using scalar operators, timecharts etc.
Clean up resources
To delete the connector and/or Kafka cluster:
kubectl delete kafkaconnect/my-connect-cluster
kubectl delete kafka/my-kafka-cluster
To delete the AKS and Azure Data Explorer clusters, simply delete the resource group:
az group delete --name <AZURE_RESOURCE_GROUP> --yes --no-wait
Conclusion
That’s all for this blog post and I hope you found it useful! Please note that, this is not the only way to ingest data into Azure Data Explorer. You’re welcome to refer to the documentation and explore other techniques such as One-click Ingestion, using Event Grid, IoT Hub etc.
Please consider exploring the following topics as additional learning resources:
Resources
- Configuring Kafka Connect cluster using Strimzi
- Strimzi KafkaConnect schema reference
- Strimzi KafkaConnector schema reference
- Just Enough Azure Data Explorer for Cloud Architects
- What’s new in Azure Data Explorer connector 1.x
- Kusto Query Language (quick reference)
Share this:
![]()
![]()
![]()
![]()
![]()