Bridging between Apache Kafka and HTTP is something Kafka users are often asking for. That is why in Strimzi we have our own HTTP Bridge which does exactly that. You can easily deploy the bridge using the Strimzi Cluster Operator. The HTTP Bridge does not directly support any security features such as authentication or encryption. For securing it and exposing it to the outside of your Kubernetes cluster, you can use any API Gateway or reverse proxy. But there are also other ways how you can use it - for example, as a Kubernetes sidecar.
Kubernetes Sidecar Pattern
The sidecar pattern is one of the most common patterns used to run applications on Kubernetes. When using the sidecar pattern, your Pods will consist of multiple containers running in parallel. The main container with your application will share the Pod with one or more sidecar containers. The sidecar containers typically give the main application some additional features. The containers running inside the same Pod are always scheduled together on the same node and share networking or storage. They typically communicate with each other either using a shared volume or using local network connections. Typical sidecar use cases include different proxies or file loaders.

Strimzi HTTP Bridge as a Sidecar
The Strimzi HTTP Bridge can be used as a sidecar as well. This could be useful if your application isn’t able to use Kafka clients directly. For example, because it already supports HTTP and adding a Kafka client would be too complicated. Or because the programming language you use doesn’t have good Kafka support.
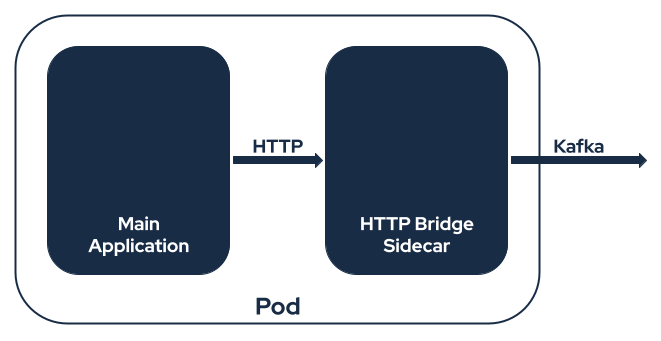
The bridge will connect to the Kafka cluster. And the main application can use it to send and receive Kafka messages using HTTP. And since both containers are in the same Pod and share the same network, they can use localhost for communication. So you do not need to open the bridge to the outside of the Pod and instead keep it available only internally. That also means less worries about securing the HTTP interface of the bridge.
Example Deployment
So, how do you use the Strimzi HTTP Bridge as a sidecar? Let’s have a look at an example which will use TLS encryption and client authentication between the bridge and the Kafka cluster. You can of course modify it to our needs and use different configurations as well.
Preparation
This example uses a Kafka cluster deployed with the Strimzi Cluster Operator. Before we deploy the application with the bridge sidecar, we have to install the Strimzi Cluster Operator and deploy the Kafka cluster. You can install the Cluster Operator with the installation method you prefer. And then deploy the Kafka cluster with the TLS client authentication enabled on port 9093 and authorization also enabled:
apiVersion: kafka.strimzi.io/v1beta2
kind: Kafka
metadata:
  name: my-cluster
spec:
  kafka:
    replicas: 3
    listeners:
      - name: tls
        port: 9093
        type: internal
        tls: true
        authentication:
          type: tls
    authorization:
      type: simple
    config:
      offsets.topic.replication.factor: 3
      transaction.state.log.replication.factor: 3
      transaction.state.log.min.isr: 2
    storage:
      type: jbod
      volumes:
      - id: 0
        type: persistent-claim
        size: 100Gi
        deleteClaim: true
  zookeeper:
    replicas: 3
    storage:
      type: persistent-claim
      size: 100Gi
      deleteClaim: true
  entityOperator:
    topicOperator: {}
    userOperator: {}
Once the cluster is running, we will need a user which will be used by the bridge sidecar.
We configure the user for TLS client authentication and configure authorization to allow it to send and receive examples from a topic named my-topic:
apiVersion: kafka.strimzi.io/v1beta2
kind: KafkaUser
metadata:
  name: bridge
  labels:
    strimzi.io/cluster: my-cluster
spec:
  authentication:
    type: tls
  authorization:
    type: simple
    acls:
      # Consume from topic my-topic using consumer group my-group
      - resource:
          type: topic
          name: my-topic
          patternType: literal
        operation: Read
        host: "*"
      - resource:
          type: group
          name: my-group
          patternType: literal
        operation: Read
        host: "*"
      # Producer messages to topic my-topic
      - resource:
          type: topic
          name: my-topic
          patternType: literal
        operation: Write
        host: "*"
And create the topic where we will send and receive the messages:
apiVersion: kafka.strimzi.io/v1beta2
kind: KafkaTopic
metadata:
  name: my-topic
  labels:
    strimzi.io/cluster: my-cluster
spec:
  partitions: 1
  replicas: 1
Configuring the bridge
When you deploy the Strimzi HTTP Bridge using the Cluster Operator, you just have to create the KafkaBridge custom resource and the operator takes care of the rest.
It generates the bridge configuration and creates the deployment.
But for running as a sidecar, the operator will not help us and we have to do this on our own.
The way we will do it in this blog post is to create a ConfigMap with the bridge configuration, mount it as a file into the Pod and use it to start the bridge.
The bridge configuration file is a simple properties file.
We will use Apache Kafka configuration providers to inject into it some additional values, such as the TLS certificates.
First, we will specify the bridge.id which will be used to identify our bridge instance:
bridge.id=bridge-sidecar
Next, we have to enable and configure the HTTP part of the bridge.
Its configuration options always start with the http. prefix.
We have to enable the HTTP bridge by setting http.enabled to true.
And we also need to configure the host and port on which the HTTP bridge will listen.
Since we want the bridge to be available only to the other containers running in the same Pod, we will tell it to listen only on the local interface by setting http.host to 127.0.0.1.
And we set the port on which it will listen to 8080.
This port has to be unique within the whole Pod.
So if your main application already uses the same port, you can just change the bridge to listen on some other port.
http.enabled=true
http.host=127.0.0.1
http.port=8080
Last, we also need to configure the Kafka part of the bridge.
The bridge uses 3 different Apache Kafka APIs to communicate with Kafka: the Consumer API, Producer API, and the Admin API.
Each one has its own purpose.
In the bridge configuration files, you can configure these together or separately.
General options which will be applied to all three Apache Kafka APIs should be prefixed with kafka..
We will use this to configure the configuration providers, bootstrap servers, authentication and other API options.
First, we will initialize the Strimzi EnvVar Configuration Provider which we will use to load values from environment variables.
It is already part of the Strimzi container image, so we do not need to modify the container image.
We just need to initialize it.
When customizing the example configuration for your own use cases, you can of course also use the other configuration providers such as the FileConfigProvider or DirectoryConfigProvider which are part of Apache Kafka or the Strimzi Kubernetes Configuration Provider which is also already included in the container image.
But this example uses only the EnvVar provider:
kafka.config.providers=env
kafka.config.providers.env.class=io.strimzi.kafka.EnvVarConfigProvider
Next, we will configure the Kafka clients to connect to our Kafka cluster and authenticate.
The cluster and user certificates will be mapped from their Secrets to environment variables.
And the configuration provider will use the values from the environment variables.
We will also configure the bootstrap.servers option through environment variables to make it easier to change where the bridge connects.
kafka.bootstrap.servers=${env:BOOTSTRAP_SERVERS}
kafka.security.protocol=SSL
kafka.ssl.keystore.type=PEM
kafka.ssl.keystore.certificate.chain=${env:USER_CRT}
kafka.ssl.keystore.key=${env:USER_KEY}
kafka.ssl.truststore.type=PEM
kafka.ssl.truststore.certificates=${env:CA_CRT}
kafka.ssl.endpoint.identification.algorithm=HTTPS
In addition to the options with the kafka. prefix, we can also add options with the prefixes kafka.consumer., kafka.producer., and kafka.admin.
These prefixes can be used to pass specific options that apply only to the Consumer API, Producer API, or Admin API clients.
For example, we can configure the acks mode for producers or auto.offset.reset for consumers:
kafka.producer.acks=1
kafka.consumer.auto.offset.reset=earliest
The ConfigMap with the complete configuration file should look like this:
apiVersion: v1
kind: ConfigMap
metadata:
  name: bridge-configuration
data:
  bridge.properties: |
    bridge.id=bridge-sidecar

    # HTTP related settings
    http.enabled=true
    http.host=127.0.0.1
    http.port=8080

    # Configuration Providers
    kafka.config.providers=env
    kafka.config.providers.env.class=io.strimzi.kafka.EnvVarConfigProvider

    # General Kafka settings
    kafka.bootstrap.servers=${env:BOOTSTRAP_SERVERS}
    kafka.security.protocol=SSL
    kafka.ssl.keystore.type=PEM
    kafka.ssl.keystore.certificate.chain=${env:USER_CRT}
    kafka.ssl.keystore.key=${env:USER_KEY}
    kafka.ssl.truststore.type=PEM
    kafka.ssl.truststore.certificates=${env:CA_CRT}
    kafka.ssl.endpoint.identification.algorithm=HTTPS

    # Kafka Producer options
    kafka.producer.acks=1

    # Kafka Consumer options
    kafka.consumer.auto.offset.reset=earliest
Deploying the Sidecar
Now we will deploy a Pod with two containers.
The main container will run CentOS 7 and it will be configured to just sleep.
Later, we will exec into it and use curl to send and receive messages through the bridge.
The second container will be our sidecar with the bridge.
We will mount the ConfigMap with the bridge sidecar as a volume and map the certificates to the environment variables.
And we will also set the BOOTSTRAP_SERVERS environment variable to my-cluster-kafka-bootstrap:9093.
Below is the full YAML for our Pod:
apiVersion: v1
kind: Pod
metadata:
  name: bridge-sidecar
spec:
  containers:
    - name: main
      image: centos:7
      command: ["sh", "-c", "sleep 3600"]
    - name: bridge
      image: quay.io/strimzi/kafka-bridge:0.20.2
      command: ["/opt/strimzi/bin/kafka_bridge_run.sh", "--config-file", "/etc/strimzi-bridge/bridge.properties"]
      env:
        - name: BOOTSTRAP_SERVERS
          value: my-cluster-kafka-bootstrap:9093
        - name: USER_CRT
          valueFrom:
            secretKeyRef:
              name: bridge
              key: user.crt
        - name: USER_KEY
          valueFrom:
            secretKeyRef:
              name: bridge
              key: user.key
        - name: CA_CRT
          valueFrom:
            secretKeyRef:
              name: my-cluster-cluster-ca-cert
              key: ca.crt
      volumeMounts:
        - name: bridge-configuration
          mountPath: /etc/strimzi-bridge
  volumes:
    - name: bridge-configuration
      configMap:
        name: bridge-configuration
  restartPolicy: Never
Using the sidecar
Once the pod is up and running, we can try to use the sidecar. We will exec into the main container:
kubectl exec -ti bridge-sidecar -c main -- bash
And we can try to send some messages from it using curl to localhost:8080:
curl -X POST http://localhost:8080/topics/my-topic \
     -H 'Content-Type: application/vnd.kafka.json.v2+json' \
     -d '{ "records": [ { "value": "Hello World!" } ] }'
When the message is sent, we should get as response confirmation like this, which tells us into which partition the message was sent and at which offset it is stored:
{"offsets":[{"partition":0,"offset":0}]}
Next, we can try to receive the message.
First, we have to create the consumer with the consumer group my-group:
curl -X POST http://localhost:8080/consumers/my-group \
     -H 'Content-Type: application/vnd.kafka.v2+json' \
     -d '{
           "name": "my-consumer",
           "auto.offset.reset": "earliest",
           "format": "json",
           "enable.auto.commit": true,
           "fetch.min.bytes": 512,
           "consumer.request.timeout.ms": 30000
         }'
Then we subscribe to the topic my-topic:
curl -X POST http://localhost:8080/consumers/my-group/instances/my-consumer/subscription \
     -H 'Content-Type: application/vnd.kafka.v2+json' \
     -d '{
           "topics": [
             "my-topic"
           ]
         }'
And then we can just consume the messages:
curl -X GET http://localhost:8080/consumers/my-group/instances/my-consumer/records \
     -H 'Accept: application/vnd.kafka.json.v2+json'
You might need to call this command multiple times while the consumer initializes. But eventually you should get the message that was sent before:
[{"topic":"my-topic","key":null,"value":"Hello World!","partition":0,"offset":0}]
And that’s it.
We have now working pod with the HTTP bridge as a sidecar.
For more details about the curl commands and how to use the bridge, you can check the HTTP Bridge documentation and its API reference.
More complex example
The previous example with manually executed curl commands shows how to deploy and use the bridge sidecar.
But it is of course rather simple.
If you are interested in something more complex, we have another example for you.
It uses our example HTTP clients coupled with the bridge sidecar.
It creates two deployments - one for producing and one for consuming messages.
The full YAML of this example can be found here.
When to use a Kafka Bridge sidecar
This blog post shows an alternative way how to use the Strimzi HTTP Bridge. When running as a sidecar, a separate instance of the bridge runs with every instance of your application. That way, it might consume more resources compared to using a single central instance of the bridge deployed by the operator.
But running it as a sidecar has also some advantages. Since the bridge is used only locally, you have less worries about securing it. You do not need any API Gateway or reverse proxy to secure it. You have also less worries about scaling the bridge. Each instance of your application will have its own bridge instance and will behave exactly as if it used a built-in Kafka client. Even when using it to consume messages, it will have exactly the same properties as a native Kafka client including message ordering or partitions assignments.
Using a Kafka client directly in your application will still give you better performance and should still be the preferred approach. But if you for some reason cannot do it, the bridge sidecar is a real option to consider.
Beyond Kubernetes
The sidecar pattern is a well known Kubernetes pattern. But you can easily replicate it also outside of Kubernetes. For example when running your application in virtual machines, you can deploy the bridge as a second service in each VM. So it is not limited to Kubernetes only.
Share this:
![]()
![]()
![]()
![]()
![]()