sed -i 's/namespace: .*/namespace: my-namespace/' install/cluster-operator/*RoleBinding*.yamlStrimzi Documentation (0.11.0)
Strimzi Documentation (0.11.0)
Table of Contents
- 1. Overview of Strimzi
- 2. Getting started with Strimzi
- 2.1. Installing Strimzi and deploying components
- 2.2. Cluster Operator
- 2.2.1. Overview of the Cluster Operator component
- 2.2.2. Deploying the Cluster Operator to Kubernetes
- 2.2.3. Deploying the Cluster Operator to OpenShift
- 2.2.4. Deploying the Cluster Operator to watch multiple namespaces
- 2.2.5. Deploying the Cluster Operator to watch all namespaces
- 2.2.6. Deploying the Cluster Operator using Helm Chart
- 2.3. Kafka cluster
- 2.4. Kafka Connect
- 2.5. Kafka Mirror Maker
- 2.6. Deploying example clients
- 2.7. Topic Operator
- 2.8. User Operator
- 2.9. Strimzi Administrators
- 3. Deployment configuration
- 3.1. Kafka cluster configuration
- 3.1.1. Kafka and Zookeeper storage
- 3.1.2. Kafka broker replicas
- 3.1.3. Kafka broker configuration
- 3.1.4. Kafka broker listeners
- 3.1.5. Authentication and Authorization
- 3.1.6. Zookeeper replicas
- 3.1.7. Zookeeper configuration
- 3.1.8. Entity Operator
- 3.1.9. CPU and memory resources
- 3.1.10. Logging
- 3.1.11. Kafka rack awareness
- 3.1.12. Healthchecks
- 3.1.13. Prometheus metrics
- 3.1.14. JVM Options
- 3.1.15. Container images
- 3.1.16. TLS sidecar
- 3.1.17. Configuring pod scheduling
- 3.1.18. Performing a rolling update of a Kafka cluster
- 3.1.19. Performing a rolling update of a Zookeeper cluster
- 3.1.20. Scaling clusters
- 3.1.21. Deleting Kafka nodes manually
- 3.1.22. Deleting Zookeeper nodes manually
- 3.1.23. Maintenance time windows for rolling updates
- 3.1.24. List of resources created as part of Kafka cluster
- 3.2. Kafka Connect cluster configuration
- 3.2.1. Replicas
- 3.2.2. Bootstrap servers
- 3.2.3. Connecting to Kafka brokers using TLS
- 3.2.4. Connecting to Kafka brokers with Authentication
- 3.2.5. Kafka Connect configuration
- 3.2.6. CPU and memory resources
- 3.2.7. Logging
- 3.2.8. Healthchecks
- 3.2.9. Prometheus metrics
- 3.2.10. JVM Options
- 3.2.11. Container images
- 3.2.12. Configuring pod scheduling
- 3.2.13. Using external configuration and secrets
- 3.2.14. List of resources created as part of Kafka Connect cluster
- 3.3. Kafka Connect cluster with Source2Image support
- 3.3.1. Replicas
- 3.3.2. Bootstrap servers
- 3.3.3. Connecting to Kafka brokers using TLS
- 3.3.4. Connecting to Kafka brokers with Authentication
- 3.3.5. Kafka Connect configuration
- 3.3.6. CPU and memory resources
- 3.3.7. Logging
- 3.3.8. Healthchecks
- 3.3.9. Prometheus metrics
- 3.3.10. JVM Options
- 3.3.11. Container images
- 3.3.12. Configuring pod scheduling
- 3.3.13. Using external configuration and secrets
- 3.3.14. List of resources created as part of Kafka Connect cluster with Source2Image support
- 3.3.15. Creating a container image using OpenShift builds and Source-to-Image
- 3.4. Kafka Mirror Maker configuration
- 3.4.1. Replicas
- 3.4.2. Bootstrap servers
- 3.4.3. Whitelist
- 3.4.4. Consumer group identifier
- 3.4.5. Number of consumer streams
- 3.4.6. Connecting to Kafka brokers using TLS
- 3.4.7. Connecting to Kafka brokers with Authentication
- 3.4.8. Kafka Mirror Maker configuration
- 3.4.9. CPU and memory resources
- 3.4.10. Logging
- 3.4.11. Prometheus metrics
- 3.4.12. JVM Options
- 3.4.13. Container images
- 3.4.14. Configuring pod scheduling
- 3.4.15. List of resources created as part of Kafka Mirror Maker
- 3.5. Customizing deployments
- 3.1. Kafka cluster configuration
- 4. Operators
- 4.1. Cluster Operator
- 4.1.1. Overview of the Cluster Operator component
- 4.1.2. Deploying the Cluster Operator to Kubernetes
- 4.1.3. Deploying the Cluster Operator to OpenShift
- 4.1.4. Deploying the Cluster Operator to watch multiple namespaces
- 4.1.5. Deploying the Cluster Operator to watch all namespaces
- 4.1.6. Deploying the Cluster Operator using Helm Chart
- 4.1.7. Reconciliation
- 4.1.8. Cluster Operator Configuration
- 4.1.9. Role-Based Access Control (RBAC)
- 4.2. Topic Operator
- 4.2.1. Overview of the Topic Operator component
- 4.2.2. Understanding the Topic Operator
- 4.2.3. Deploying the Topic Operator using the Cluster Operator
- 4.2.4. Configuring the Topic Operator with resource requests and limits
- 4.2.5. Deploying the standalone Topic Operator
- 4.2.6. Topic Operator environment
- 4.3. User Operator
- 4.1. Cluster Operator
- 5. Using the Topic Operator
- 6. Using the User Operator
- 6.1. Overview of the User Operator component
- 6.2. Mutual TLS authentication for clients
- 6.3. Creating a Kafka user with mutual TLS authentication
- 6.4. SCRAM-SHA authentication
- 6.5. Creating a Kafka user with SCRAM SHA authentication
- 6.6. Editing a Kafka user
- 6.7. Deleting a Kafka user
- 6.8. Kafka User resource
- 7. Security
- 8. Strimzi and Kafka upgrades
- Appendix A: Frequently Asked Questions
- A.1. Cluster Operator
- A.1.1. Why do I need cluster admin privileges to install Strimzi?
- A.1.2. Why does the Cluster Operator require the ability to create
ClusterRoleBindings? Is that not a security risk? - A.1.3. Why can standard OpenShift or Kubernetes users not create the custom resource (
Kafka,KafkaTopic, and so on)? - A.1.4. Log contains warnings about failing to acquire lock
- A.1.5. Hostname verification fails when connecting to NodePorts using TLS
- A.1. Cluster Operator
- Appendix B: Installing OpenShift or Kubernetes cluster
- Appendix C: Metrics
- Appendix D: Custom Resource API Reference
- D.1.
Kafkaschema reference - D.2.
KafkaSpecschema reference - D.3.
KafkaClusterSpecschema reference - D.4.
EphemeralStorageschema reference - D.5.
PersistentClaimStorageschema reference - D.6.
JbodStorageschema reference - D.7.
KafkaListenersschema reference - D.8.
KafkaListenerPlainschema reference - D.9.
KafkaListenerAuthenticationTlsschema reference - D.10.
KafkaListenerAuthenticationScramSha512schema reference - D.11.
KafkaListenerTlsschema reference - D.12.
KafkaListenerExternalRouteschema reference - D.13.
RouteListenerOverrideschema reference - D.14.
RouteListenerBootstrapOverrideschema reference - D.15.
RouteListenerBrokerOverrideschema reference - D.16.
KafkaListenerExternalLoadBalancerschema reference - D.17.
LoadBalancerListenerOverrideschema reference - D.18.
LoadBalancerListenerBootstrapOverrideschema reference - D.19.
LoadBalancerListenerBrokerOverrideschema reference - D.20.
KafkaListenerExternalNodePortschema reference - D.21.
NodePortListenerOverrideschema reference - D.22.
NodePortListenerBootstrapOverrideschema reference - D.23.
NodePortListenerBrokerOverrideschema reference - D.24.
KafkaAuthorizationSimpleschema reference - D.25.
Rackschema reference - D.26.
Probeschema reference - D.27.
JvmOptionsschema reference - D.28.
Resourcesschema reference - D.29.
CpuMemoryschema reference - D.30.
InlineLoggingschema reference - D.31.
ExternalLoggingschema reference - D.32.
TlsSidecarschema reference - D.33.
KafkaClusterTemplateschema reference - D.34.
ResourceTemplateschema reference - D.35.
MetadataTemplateschema reference - D.36.
PodTemplateschema reference - D.37.
PodDisruptionBudgetTemplateschema reference - D.38.
ZookeeperClusterSpecschema reference - D.39.
ZookeeperClusterTemplateschema reference - D.40.
TopicOperatorSpecschema reference - D.41.
EntityOperatorJvmOptionsschema reference - D.42.
EntityOperatorSpecschema reference - D.43.
EntityTopicOperatorSpecschema reference - D.44.
EntityUserOperatorSpecschema reference - D.45.
EntityOperatorTemplateschema reference - D.46.
CertificateAuthorityschema reference - D.47.
KafkaConnectschema reference - D.48.
KafkaConnectSpecschema reference - D.49.
KafkaConnectTemplateschema reference - D.50.
KafkaConnectAuthenticationTlsschema reference - D.51.
CertAndKeySecretSourceschema reference - D.52.
KafkaConnectAuthenticationScramSha512schema reference - D.53.
PasswordSecretSourceschema reference - D.54.
ExternalConfigurationschema reference - D.55.
ExternalConfigurationEnvschema reference - D.56.
ExternalConfigurationEnvVarSourceschema reference - D.57.
ExternalConfigurationVolumeSourceschema reference - D.58.
KafkaConnectTlsschema reference - D.59.
CertSecretSourceschema reference - D.60.
KafkaConnectS2Ischema reference - D.61.
KafkaConnectS2ISpecschema reference - D.62.
KafkaTopicschema reference - D.63.
KafkaTopicSpecschema reference - D.64.
KafkaUserschema reference - D.65.
KafkaUserSpecschema reference - D.66.
KafkaUserTlsClientAuthenticationschema reference - D.67.
KafkaUserScramSha512ClientAuthenticationschema reference - D.68.
KafkaUserAuthorizationSimpleschema reference - D.69.
AclRuleschema reference - D.70.
AclRuleTopicResourceschema reference - D.71.
AclRuleGroupResourceschema reference - D.72.
AclRuleClusterResourceschema reference - D.73.
AclRuleTransactionalIdResourceschema reference - D.74.
KafkaMirrorMakerschema reference - D.75.
KafkaMirrorMakerSpecschema reference - D.76.
KafkaMirrorMakerConsumerSpecschema reference - D.77.
KafkaMirrorMakerAuthenticationTlsschema reference - D.78.
KafkaMirrorMakerAuthenticationScramSha512schema reference - D.79.
KafkaMirrorMakerTlsschema reference - D.80.
KafkaMirrorMakerProducerSpecschema reference - D.81.
KafkaMirrorMakerTemplateschema reference
- D.1.
1. Overview of Strimzi
Strimzi makes it easy to run Apache Kafka on OpenShift or Kubernetes. Apache Kafka is a popular platform for streaming data delivery and processing. For more information about Apache Kafka, see the Apache Kafka website.
Strimzi is based on Apache Kafka 2.0.1 and consists of three main components:
- Cluster Operator
-
Responsible for deploying and managing Apache Kafka clusters within OpenShift or Kubernetes cluster.
- Topic Operator
-
Responsible for managing Kafka topics within a Kafka cluster running within OpenShift or Kubernetes cluster.
- User Operator
-
Responsible for managing Kafka users within a Kafka cluster running within OpenShift or Kubernetes cluster.
This guide describes how to install and use Strimzi.
1.1. Kafka Key Features
-
Scalability and performance
-
Designed for horizontal scalability
-
-
Message ordering guarantee
-
At partition level
-
-
Message rewind/replay
-
"Long term" storage
-
Allows to reconstruct application state by replaying the messages
-
Combined with compacted topics allows to use Kafka as key-value store
-
1.2. Document Conventions
Replaceables
In this document, replaceable text is styled in monospace and italics.
For example, in the following code, you will want to replace my-namespace with the name of your namespace:
2. Getting started with Strimzi
Strimzi works on all types of clusters, from public and private clouds on to local deployments intended for development.
This guide expects that an OpenShift or Kubernetes cluster is available and the
kubectl and
oc command-line tools are installed and configured to connect to the running cluster.
When no existing OpenShift or Kubernetes cluster is available, Minikube or Minishift can be used to create a local
cluster. More details can be found in Installing Kubernetes and OpenShift clusters.
|
Note
|
To run the commands in this guide, your Kubernetes and OpenShift Origin user must have the rights to manage role-based access control (RBAC). |
For more information about OpenShift and setting up OpenShift cluster, see OpenShift documentation.
2.1. Installing Strimzi and deploying components
To install Strimzi, download the release artefacts from GitHub.
The folder contains several YAML files to help you deploy the components of Strimzi to OpenShift or Kubernetes, perform common operations, and configure your Kafka cluster. The YAML files are referenced throughout this documentation.
Additionally, a Helm Chart is provided for deploying the Cluster Operator using Helm. The container images are available through the Docker Hub.
The remainder of this chapter provides an overview of each component and instructions for deploying the components to OpenShift or Kubernetes using the YAML files provided.
|
Note
|
Although container images for Strimzi are available in the Docker Hub, we recommend that you use the YAML files provided instead. |
2.2. Cluster Operator
Strimzi uses the Cluster Operator to deploy and manage Kafka (including Zookeeper) and Kafka Connect clusters.
The Cluster Operator is deployed inside of the
Kubernetes or
OpenShift cluster.
To deploy a Kafka cluster, a Kafka resource with the cluster configuration has to be created within the
Kubernetes or
OpenShift cluster.
Based on what is declared inside of the Kafka resource, the Cluster Operator deploys a corresponding Kafka cluster.
For more information about the different configuration options supported by the Kafka resource, see Kafka cluster configuration
|
Note
|
Strimzi contains example YAML files, which make deploying a Cluster Operator easier. |
2.2.1. Overview of the Cluster Operator component
The Cluster Operator is in charge of deploying a Kafka cluster alongside a Zookeeper ensemble.
As part of the Kafka cluster, it can also deploy the topic operator which provides operator-style topic management via KafkaTopic custom resources.
The Cluster Operator is also able to deploy a Kafka Connect cluster which connects to an existing Kafka cluster.
On OpenShift such a cluster can be deployed using the Source2Image feature, providing an easy way of including more connectors.
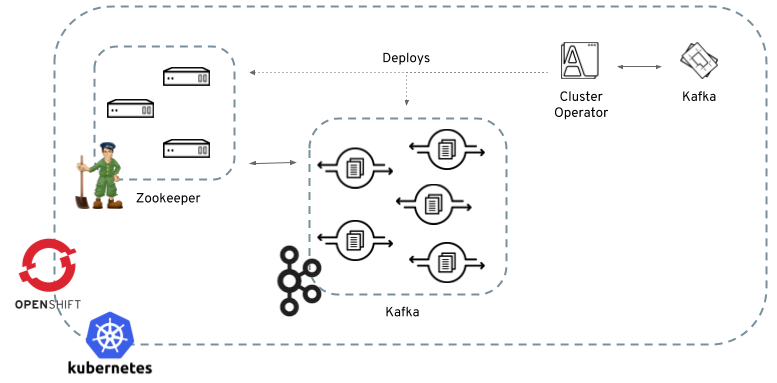
Figure 1. Example Architecture diagram of the Cluster Operator.
When the Cluster Operator is up, it starts to watch for certain OpenShift or Kubernetes resources containing the desired Kafka, Kafka Connect, or Kafka Mirror Maker cluster configuration. By default, it watches only in the same namespace or project where it is installed. The Cluster Operator can be configured to watch for more OpenShift projects or Kubernetes namespaces. Cluster Operator watches the following resources:
-
A
Kafkaresource for the Kafka cluster. -
A
KafkaConnectresource for the Kafka Connect cluster. -
A
KafkaConnectS2Iresource for the Kafka Connect cluster with Source2Image support. -
A
KafkaMirrorMakerresource for the Kafka Mirror Maker instance.
When a new Kafka, KafkaConnect, KafkaConnectS2I, or Kafka Mirror Maker resource is created in the OpenShift or Kubernetes cluster, the operator gets the cluster description from the desired resource and starts creating a new Kafka, Kafka Connect, or Kafka Mirror Maker cluster by creating the necessary other OpenShift or Kubernetes resources, such as StatefulSets, Services, ConfigMaps, and so on.
Every time the desired resource is updated by the user, the operator performs corresponding updates on the OpenShift or Kubernetes resources which make up the Kafka, Kafka Connect, or Kafka Mirror Maker cluster. Resources are either patched or deleted and then re-created in order to make the Kafka, Kafka Connect, or Kafka Mirror Maker cluster reflect the state of the desired cluster resource. This might cause a rolling update which might lead to service disruption.
Finally, when the desired resource is deleted, the operator starts to undeploy the cluster and delete all the related OpenShift or Kubernetes resources.
2.2.2. Deploying the Cluster Operator to Kubernetes
Prerequisites
-
Modify the installation files according to the namespace the Cluster Operator is going to be installed in.
On Linux, use:
sed -i 's/namespace: .*/namespace: my-namespace/' install/cluster-operator/*RoleBinding*.yamlOn MacOS, use:
sed -i '' 's/namespace: .*/namespace: my-namespace/' install/cluster-operator/*RoleBinding*.yaml
Procedure
-
Deploy the Cluster Operator
kubectl apply -f install/cluster-operator -n _my-namespace_
2.2.3. Deploying the Cluster Operator to OpenShift
Prerequisites
-
A user with
cluster-adminrole needs to be used, for example,system:admin. -
Modify the installation files according to the namespace the Cluster Operator is going to be installed in.
On Linux, use:
sed -i 's/namespace: .*/namespace: my-project/' install/cluster-operator/*RoleBinding*.yamlOn MacOS, use:
sed -i '' 's/namespace: .*/namespace: my-project/' install/cluster-operator/*RoleBinding*.yaml
Procedure
-
Deploy the Cluster Operator
oc apply -f install/cluster-operator -n _my-project_
oc apply -f examples/templates/cluster-operator -n _my-project_
2.2.4. Deploying the Cluster Operator to watch multiple namespaces
Prerequisites
-
Edit the installation files according to the OpenShift project or Kubernetes namespace the Cluster Operator is going to be installed in.
On Linux, use:
sed -i 's/namespace: .*/namespace: my-namespace/' install/cluster-operator/*RoleBinding*.yamlOn MacOS, use:
sed -i '' 's/namespace: .*/namespace: my-namespace/' install/cluster-operator/*RoleBinding*.yaml
Procedure
-
Edit the file
install/cluster-operator/050-Deployment-strimzi-cluster-operator.yamland in the environment variableSTRIMZI_NAMESPACElist all the OpenShift projects or Kubernetes namespaces where Cluster Operator should watch for resources. For example:apiVersion: extensions/v1beta1 kind: Deployment spec: template: spec: serviceAccountName: strimzi-cluster-operator containers: - name: strimzi-cluster-operator image: strimzi/cluster-operator:latest imagePullPolicy: IfNotPresent env: - name: STRIMZI_NAMESPACE value: myproject,myproject2,myproject3 -
For all namespaces or projects which should be watched by the Cluster Operator, install the
RoleBindings. Replace themy-namespaceormy-projectwith the OpenShift project or Kubernetes namespace used in the previous step.On Kubernetes this can be done using
kubectl apply:kubectl apply -f install/cluster-operator/020-RoleBinding-strimzi-cluster-operator.yaml -n my-namespace kubectl apply -f install/cluster-operator/031-RoleBinding-strimzi-cluster-operator-entity-operator-delegation.yaml -n my-namespace kubectl apply -f install/cluster-operator/032-RoleBinding-strimzi-cluster-operator-topic-operator-delegation.yaml -n my-namespaceOn OpenShift this can be done using
oc apply:oc apply -f install/cluster-operator/020-RoleBinding-strimzi-cluster-operator.yaml -n my-project oc apply -f install/cluster-operator/031-RoleBinding-strimzi-cluster-operator-entity-operator-delegation.yaml -n my-project oc apply -f install/cluster-operator/032-RoleBinding-strimzi-cluster-operator-topic-operator-delegation.yaml -n my-project -
Deploy the Cluster Operator
On Kubernetes this can be done using
kubectl apply:kubectl apply -f install/cluster-operator -n my-namespaceOn OpenShift this can be done using
oc apply:oc apply -f install/cluster-operator -n my-project
2.2.5. Deploying the Cluster Operator to watch all namespaces
You can configure the Cluster Operator to watch Strimzi resources across all OpenShift projects or Kubernetes namespaces in your OpenShift or Kubernetes cluster. When running in this mode, the Cluster Operator automatically manages clusters in any new projects or namespaces that are created.
Prerequisites
-
Your OpenShift or Kubernetes cluster is running.
Procedure
-
Configure the Cluster Operator to watch all namespaces:
-
Edit the
050-Deployment-strimzi-cluster-operator.yamlfile. -
Set the value of the
STRIMZI_NAMESPACEenvironment variable to*.apiVersion: extensions/v1beta1 kind: Deployment spec: template: spec: # ... serviceAccountName: strimzi-cluster-operator containers: - name: strimzi-cluster-operator image: strimzi/cluster-operator:latest imagePullPolicy: IfNotPresent env: - name: STRIMZI_NAMESPACE value: "*" # ...
-
-
Create
ClusterRoleBindingsthat grant cluster-wide access to all OpenShift projects or Kubernetes namespaces to the Cluster Operator.On OpenShift, use the
oc adm policycommand:oc adm policy add-cluster-role-to-user strimzi-cluster-operator-namespaced --serviceaccount strimzi-cluster-operator -n my-project oc adm policy add-cluster-role-to-user strimzi-entity-operator --serviceaccount strimzi-cluster-operator -n my-project oc adm policy add-cluster-role-to-user strimzi-topic-operator --serviceaccount strimzi-cluster-operator -n my-projectReplace
my-projectwith the project in which you want to install the Cluster Operator.On Kubernetes, use the
kubectl createcommand:kubectl create clusterrolebinding strimzi-cluster-operator-namespaced --clusterrole=strimzi-cluster-operator-namespaced --serviceaccount my-namespace:strimzi-cluster-operator kubectl create clusterrolebinding strimzi-cluster-operator-entity-operator-delegation --clusterrole=strimzi-entity-operator --serviceaccount my-namespace:strimzi-cluster-operator kubectl create clusterrolebinding strimzi-cluster-operator-topic-operator-delegation --clusterrole=strimzi-topic-operator --serviceaccount my-namespace:strimzi-cluster-operatorReplace
my-namespacewith the namespace in which you want to install the Cluster Operator. -
Deploy the Cluster Operator to your OpenShift or Kubernetes cluster.
On OpenShift, use the
oc applycommand:oc apply -f install/cluster-operator -n my-projectOn Kubernetes, use the
kubectl applycommand:kubectl apply -f install/cluster-operator -n my-namespace
2.2.6. Deploying the Cluster Operator using Helm Chart
Prerequisites
-
Helm client has to be installed on the local machine.
-
Helm has to be installed in the OpenShift or Kubernetes cluster.
Procedure
-
Add the Strimzi Helm Chart repository:
helm repo add strimzi https://strimzi.io/charts/ -
Deploy the Cluster Operator using the Helm command line tool:
helm install strimzi/strimzi-kafka-operator -
Verify whether the Cluster Operator has been deployed successfully using the Helm command line tool:
helm ls
Additional resources
-
For more information about Helm, see the Helm website.
2.3. Kafka cluster
You can use Strimzi to deploy an ephemeral or persistent Kafka cluster to OpenShift or Kubernetes. When installing Kafka, Strimzi also installs a Zookeeper cluster and adds the necessary configuration to connect Kafka with Zookeeper.
- Ephemeral cluster
-
In general, an ephemeral (that is, temporary) Kafka cluster is suitable for development and testing purposes, not for production. This deployment uses
emptyDirvolumes for storing broker information (for Zookeeper) and topics or partitions (for Kafka). Using anemptyDirvolume means that its content is strictly related to the pod life cycle and is deleted when the pod goes down. - Persistent cluster
-
A persistent Kafka cluster uses
PersistentVolumesto store Zookeeper and Kafka data. ThePersistentVolumeis acquired using aPersistentVolumeClaimto make it independent of the actual type of thePersistentVolume. For example, it can use HostPath volumes on Minikube or Amazon EBS volumes in Amazon AWS deployments without any changes in the YAML files. ThePersistentVolumeClaimcan use aStorageClassto trigger automatic volume provisioning.
Strimzi includes two templates for deploying a Kafka cluster:
-
kafka-ephemeral.yamldeploys an ephemeral cluster, namedmy-clusterby default. -
kafka-persistent.yamldeploys a persistent cluster, namedmy-clusterby default.
The cluster name is defined by the name of the resource and cannot be changed after the cluster has been deployed. To change the cluster name before you deploy the cluster, edit the Kafka.metadata.name property of the resource in the relevant YAML file.
apiVersion: kafka.strimzi.io/v1alpha1
kind: Kafka
metadata:
  name: my-cluster
# ...
2.3.1. Deploying the Kafka cluster to Kubernetes
The following procedure describes how to deploy an ephemeral or persistent Kafka cluster to Kubernetes on the command line.
Prerequisites
-
The Cluster Operator is deployed.
Procedure
-
If you plan to use the cluster for development or testing purposes, you can create and deploy an ephemeral cluster using
kubectl apply.kubectl apply -f examples/kafka/kafka-ephemeral.yaml -
If you plan to use the cluster in production, create and deploy a persistent cluster using
kubectl apply.kubectl apply -f examples/kafka/kafka-persistent.yaml
Additional resources
-
For more information on deploying the Cluster Operator, see Cluster Operator.
-
For more information on the different configuration options supported by the
Kafkaresource, see Kafka cluster configuration.
2.3.2. Deploying the Kafka cluster to OpenShift
The following procedure describes how to deploy an ephemeral or persistent Kafka cluster to OpenShift on the command line. You can also deploy clusters in the OpenShift console.
Prerequisites
-
The Cluster Operator is deployed.
Procedure
-
If you plan to use the cluster for development or testing purposes, create and deploy an ephemeral cluster using
oc apply.oc apply -f examples/kafka/kafka-ephemeral.yaml -
If you plan to use the cluster in production, create and deploy a persistent cluster using
oc apply.oc apply -f examples/kafka/kafka-persistent.yaml
Additional resources
-
For more information on deploying the Cluster Operator, see Cluster Operator. For more information on the different configuration options supported by the
Kafkaresource, see Kafka cluster configuration.
2.4. Kafka Connect
Kafka Connect is a tool for streaming data between Apache Kafka and external systems. It provides a framework for moving large amounts of data into and out of your Kafka cluster while maintaining scalability and reliability. Kafka Connect is typically used to integrate Kafka with external databases and storage and messaging systems.
You can use Kafka Connect to:
-
Build connector plug-ins (as JAR files) for your Kafka cluster
-
Run connectors
Kafka Connect includes the following built-in connectors for moving file-based data into and out of your Kafka cluster.
| File Connector | Description |
|---|---|
|
Transfers data to your Kafka cluster from a file (the source). |
|
Transfers data from your Kafka cluster to a file (the sink). |
In Strimzi, you can use the Cluster Operator to deploy a Kafka Connect or Kafka Connect Source-2-Image (S2I) cluster to your OpenShift or Kubernetes cluster.
A Kafka Connect cluster is implemented as a Deployment with a configurable number of workers. The Kafka Connect REST API is available on port 8083, as the <connect-cluster-name>-connect-api service.
For more information on deploying a Kafka Connect S2I cluster, see Creating a container image using OpenShift builds and Source-to-Image.
2.4.1. Deploying Kafka Connect to your Kubernetes cluster
You can deploy a Kafka Connect cluster to your Kubernetes cluster by using the Cluster Operator.
Prerequisites
Procedure
-
Use the
kubectl applycommand to create aKafkaConnectresource based on thekafka-connect.yamlfile:kubectl apply -f examples/kafka-connect/kafka-connect.yaml
Additional resources
2.4.2. Deploying Kafka Connect to your OpenShift cluster
You can deploy a Kafka Connect cluster to your OpenShift cluster by using the Cluster Operator. Kafka Connect is provided as an OpenShift template that you can deploy from the command line or the OpenShift console.
Prerequisites
Procedure
-
Use the
oc applycommand to create aKafkaConnectresource based on thekafka-connect.yamlfile:oc apply -f examples/kafka-connect/kafka-connect.yaml
Additional resources
2.4.3. Extending Kafka Connect with plug-ins
The Strimzi container images for Kafka Connect include the two built-in file connectors: FileStreamSourceConnector and FileStreamSinkConnector. You can add your own connectors by using one of the following methods:
-
Create a Docker image from the Kafka Connect base image.
-
Create a container image using OpenShift builds and Source-to-Image (S2I).
Creating a Docker image from the Kafka Connect base image
A container image for running Kafka Connect using Strimzi is available on Docker Hub as strimzi/kafka-connect:0.11.0-kafka-2.1.0. You can use this as a base image for creating your own custom image with additional connector plug-ins.
The following procedure explains how to create your custom image and add it to the /opt/kafka/plugins directory. At startup, the AMQ Streams version of Kafka Connect loads any third-party connector plug-ins contained in the /opt/kafka/plugins directory.
Prerequisites
Procedure
-
Create a new
Dockerfileusingstrimzi/kafka-connect:0.11.0-kafka-2.1.0as the base image:FROM strimzi/kafka-connect:0.11.0-kafka-2.1.0 USER root:root COPY ./my-plugins/ /opt/kafka/plugins/ USER kafka:kafka -
Build the container image.
-
Push your custom image to your container registry.
-
Edit the
KafkaConnect.spec.imageproperty of theKafkaConnectcustom resource to point to the new container image. If set, this property overrides theSTRIMZI_DEFAULT_KAFKA_CONNECT_IMAGEvariable referred to in the next step.apiVersion: kafka.strimzi.io/v1alpha1 kind: KafkaConnect metadata: name: my-connect-cluster spec: #... image: my-new-container-image -
In the
install/cluster-operator/050-Deployment-strimzi-cluster-operator.yamlfile, edit theSTRIMZI_DEFAULT_KAFKA_CONNECT_IMAGEvariable to point to the new container image.
Additional resources
-
For more information on the
KafkaConnect.spec.image property, see Container images. -
For more information on the
STRIMZI_DEFAULT_KAFKA_CONNECT_IMAGEvariable, see Cluster Operator Configuration.
Creating a container image using OpenShift builds and Source-to-Image
You can use OpenShift builds and the Source-to-Image (S2I) framework to create new container images. An OpenShift build takes a builder image with S2I support, together with source code and binaries provided by the user, and uses them to build a new container image. Once built, container images are stored in OpenShift’s local container image repository and are available for use in deployments.
A Kafka Connect builder image with S2I support is provided by Strimzi on the Docker Hub as strimzi/kafka-connect-s2i:0.11.0-kafka-2.1.0. This S2I image takes your binaries (with plug-ins and connectors) and stores them in the /tmp/kafka-plugins/s2i directory. It creates a new Kafka Connect image from this directory, which can then be used with the Kafka Connect deployment. When started using the enhanced image, Kafka Connect loads any third-party plug-ins from the /tmp/kafka-plugins/s2i directory.
Procedure
-
On the command line, use the
oc applycommand to create and deploy a Kafka Connect S2I cluster:oc apply -f examples/kafka-connect/kafka-connect-s2i.yaml -
Create a directory with Kafka Connect plug-ins:
$ tree ./my-plugins/ ./my-plugins/ ├── debezium-connector-mongodb │ ├── bson-3.4.2.jar │ ├── CHANGELOG.md │ ├── CONTRIBUTE.md │ ├── COPYRIGHT.txt │ ├── debezium-connector-mongodb-0.7.1.jar │ ├── debezium-core-0.7.1.jar │ ├── LICENSE.txt │ ├── mongodb-driver-3.4.2.jar │ ├── mongodb-driver-core-3.4.2.jar │ └── README.md ├── debezium-connector-mysql │ ├── CHANGELOG.md │ ├── CONTRIBUTE.md │ ├── COPYRIGHT.txt │ ├── debezium-connector-mysql-0.7.1.jar │ ├── debezium-core-0.7.1.jar │ ├── LICENSE.txt │ ├── mysql-binlog-connector-java-0.13.0.jar │ ├── mysql-connector-java-5.1.40.jar │ ├── README.md │ └── wkb-1.0.2.jar └── debezium-connector-postgres ├── CHANGELOG.md ├── CONTRIBUTE.md ├── COPYRIGHT.txt ├── debezium-connector-postgres-0.7.1.jar ├── debezium-core-0.7.1.jar ├── LICENSE.txt ├── postgresql-42.0.0.jar ├── protobuf-java-2.6.1.jar └── README.md -
Use the
oc start-buildcommand to start a new build of the image using the prepared directory:oc start-build my-connect-cluster-connect --from-dir ./my-plugins/NoteThe name of the build is the same as the name of the deployed Kafka Connect cluster. -
Once the build has finished, the new image is used automatically by the Kafka Connect deployment.
2.5. Kafka Mirror Maker
The Cluster Operator deploys one or more Kafka Mirror Maker replicas to replicate data between Kafka clusters. This process is called mirroring to avoid confusion with the Kafka partitions replication concept. The Mirror Maker consumes messages from the source cluster and republishes those messages to the target cluster.
For information about example resources and the format for deploying Kafka Mirror Maker, see Kafka Mirror Maker configuration.
2.5.1. Deploying Kafka Mirror Maker to Kubernetes
Prerequisites
-
Before deploying Kafka Mirror Maker, the Cluster Operator must be deployed.
Procedure
-
Deploy Kafka Mirror Maker on Kubernetes by creating the corresponding
KafkaMirrorMakerresource.kubectl apply -f examples/kafka-mirror-maker/kafka-mirror-maker.yaml
Additional resources
-
For more information about deploying the Cluster Operator, see Cluster Operator
2.5.2. Deploying Kafka Mirror Maker to OpenShift
On OpenShift, Kafka Mirror Maker is provided in the form of a template. It can be deployed from the template using the command-line or through the OpenShift console.
Prerequisites
-
Before deploying Kafka Mirror Maker, the Cluster Operator must be deployed.
Procedure
-
Create a Kafka Mirror Maker cluster from the command-line:
oc apply -f examples/kafka-mirror-maker/kafka-mirror-maker.yaml
Additional resources
-
For more information about deploying the Cluster Operator, see Cluster Operator
2.6. Deploying example clients
Prerequisites
-
An existing Kafka cluster for the client to connect to.
Procedure
-
Deploy the producer.
On Kubernetes, use
kubectl run:kubectl run kafka-producer -ti --image=strimzi/kafka:0.11.0-kafka-2.1.0 --rm=true --restart=Never -- bin/kafka-console-producer.sh --broker-list cluster-name-kafka-bootstrap:9092 --topic my-topicOn OpenShift, use
oc run:oc run kafka-producer -ti --image=strimzi/kafka:0.11.0-kafka-2.1.0 --rm=true --restart=Never -- bin/kafka-console-producer.sh --broker-list cluster-name-kafka-bootstrap:9092 --topic my-topic -
Type your message into the console where the producer is running.
-
Press Enter to send the message.
-
Deploy the consumer.
On Kubernetes, use
kubectl run:kubectl run kafka-consumer -ti --image=strimzi/kafka:0.11.0-kafka-2.1.0 --rm=true --restart=Never -- bin/kafka-console-consumer.sh --bootstrap-server cluster-name-kafka-bootstrap:9092 --topic my-topic --from-beginningOn OpenShift, use
oc run:oc run kafka-consumer -ti --image=strimzi/kafka:0.11.0-kafka-2.1.0 --rm=true --restart=Never -- bin/kafka-console-consumer.sh --bootstrap-server cluster-name-kafka-bootstrap:9092 --topic my-topic --from-beginning -
Confirm that you see the incoming messages in the consumer console.
2.7. Topic Operator
2.7.1. Overview of the Topic Operator component
The Topic Operator provides a way of managing topics in a Kafka cluster via OpenShift or Kubernetes resources.
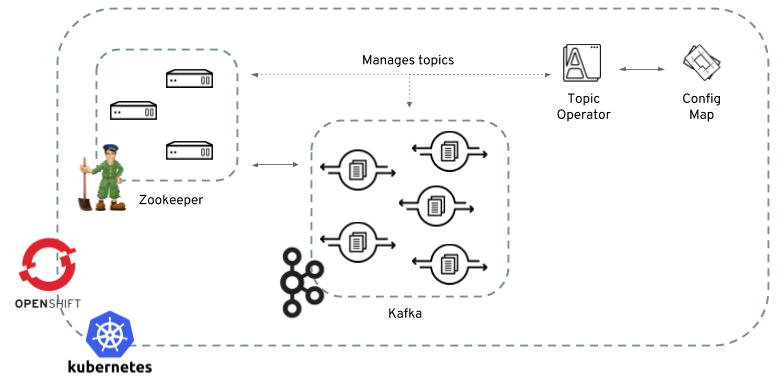
The role of the Topic Operator is to keep a set of KafkaTopic OpenShift or Kubernetes resources describing Kafka topics in-sync with corresponding Kafka topics.
Specifically:
-
if a
KafkaTopicis created, the operator will create the topic it describes -
if a
KafkaTopicis deleted, the operator will delete the topic it describes -
if a
KafkaTopicis changed, the operator will update the topic it describes
And also, in the other direction:
-
if a topic is created within the Kafka cluster, the operator will create a
KafkaTopicdescribing it -
if a topic is deleted from the Kafka cluster, the operator will delete the
KafkaTopicdescribing it -
if a topic in the Kafka cluster is changed, the operator will update the
KafkaTopicdescribing it
This allows you to declare a KafkaTopic as part of your application’s deployment and the Topic Operator will take care of creating the topic for you.
Your application just needs to deal with producing or consuming from the necessary topics.
If the topic be reconfigured or reassigned to different Kafka nodes, the KafkaTopic will always be up to date.
For more details about creating, modifying and deleting topics, see Using the Topic Operator.
2.7.2. Deploying the Topic Operator using the Cluster Operator
This procedure describes how to deploy the Topic Operator using the Cluster Operator. If you want to use the Topic Operator with a Kafka cluster that is not managed by Strimzi, you must deploy the Topic Operator as a standalone component. For more information, see Deploying the standalone Topic Operator.
Prerequisites
-
A running Cluster Operator
-
A
Kafkaresource to be created or updated
Procedure
-
Ensure that the
Kafka.spec.entityOperatorobject exists in theKafkaresource. This configures the Entity Operator.apiVersion: kafka.strimzi.io/v1alpha1 kind: Kafka metadata: name: my-cluster spec: #... entityOperator: topicOperator: {} userOperator: {} -
Configure the Topic Operator using the fields described in
EntityTopicOperatorSpecschema reference. -
Create or update the Kafka resource in OpenShift or Kubernetes.
On Kubernetes, use
kubectl apply:kubectl apply -f your-fileOn OpenShift, use
oc apply:oc apply -f your-file
Additional resources
-
For more information about deploying the Cluster Operator, see Cluster Operator.
-
For more information about deploying the Entity Operator, see Entity Operator.
-
For more information about the
Kafka.spec.entityOperatorobject used to configure the Topic Operator when deployed by the Cluster Operator, seeEntityOperatorSpecschema reference.
2.8. User Operator
The User Operator provides a way of managing Kafka users via OpenShift or Kubernetes resources.
2.8.1. Overview of the User Operator component
The User Operator manages Kafka users for a Kafka cluster by watching for KafkaUser OpenShift or Kubernetes resources that describe Kafka users and ensuring that they are configured properly in the Kafka cluster.
For example:
-
if a
KafkaUseris created, the User Operator will create the user it describes -
if a
KafkaUseris deleted, the User Operator will delete the user it describes -
if a
KafkaUseris changed, the User Operator will update the user it describes
Unlike the Topic Operator, the User Operator does not sync any changes from the Kafka cluster with the OpenShift or Kubernetes resources. Unlike the Kafka topics which might be created by applications directly in Kafka, it is not expected that the users will be managed directly in the Kafka cluster in parallel with the User Operator, so this should not be needed.
The User Operator allows you to declare a KafkaUser as part of your application’s deployment.
When the user is created, the credentials will be created in a Secret.
Your application needs to use the user and its credentials for authentication and to produce or consume messages.
In addition to managing credentials for authentication, the User Operator also manages authorization rules by including a description of the user’s rights in the KafkaUser declaration.
2.8.2. Deploying the User Operator using the Cluster Operator
Prerequisites
-
A running Cluster Operator
-
A
Kafkaresource to be created or updated.
Procedure
-
Edit the
Kafkaresource ensuring it has aKafka.spec.entityOperator.userOperatorobject that configures the User Operator how you want. -
Create or update the Kafka resource in OpenShift or Kubernetes.
On Kubernetes this can be done using
kubectl apply:kubectl apply -f your-fileOn OpenShift this can be done using
oc apply:oc apply -f your-file
Additional resources
-
For more information about deploying the Cluster Operator, see Cluster Operator.
-
For more information about the
Kafka.spec.entityOperatorobject used to configure the User Operator when deployed by the Cluster Operator, seeEntityOperatorSpecschema reference.
2.9. Strimzi Administrators
Strimzi includes several custom resources. By default, permission to create, edit, and delete these resources is limited to OpenShift or Kubernetes cluster administrators. If you want to allow non-cluster administators to manage Strimzi resources, you must assign them the Strimzi Administrator role.
2.9.1. Designating Strimzi Administrators
Prerequisites
-
Strimzi
CustomResourceDefinitionsare installed.
Procedure
-
Create the
strimzi-admincluster role in OpenShift or Kubernetes.On Kubernetes, use
kubectl apply:kubectl apply -f install/strimzi-adminOn OpenShift, use
oc apply:oc apply -f install/strimzi-admin -
Assign the
strimzi-adminClusterRoleto one or more existing users in the OpenShift or Kubernetes cluster.On Kubernetes, use
kubectl create:kubectl create clusterrolebinding strimzi-admin --clusterrole=strimzi-admin --user=user1 --user=user2On OpenShift, use
oc adm:oc adm policy add-cluster-role-to-user strimzi-admin user1 user2
3. Deployment configuration
This chapter describes how to configure different aspects of the supported deployments:
-
Kafka clusters
-
Kafka Connect clusters
-
Kafka Connect clusters with Source2Image support
-
Kafka Mirror Maker
3.1. Kafka cluster configuration
The full schema of the Kafka resource is described in the Kafka schema reference.
All labels that are applied to the desired Kafka resource will also be applied to the OpenShift or Kubernetes resources making up the Kafka cluster.
This provides a convenient mechanism for those resources to be labelled in whatever way the user requires.
3.1.1. Kafka and Zookeeper storage
As stateful applications, Kafka and Zookeeper need to store data on disk. Strimzi supports three different types of storage for this data: ephemeral, persistent, and JBOD (Just a Bunch of Disks) storage.
|
Note
|
JBOD storage is only supported for Kafka, not for Zookeeper. |
When configuring a Kafka resource, you can specify the type of storage used by the Kafka broker and its corresponding Zookeeper node. You configure the storage type using the storage property in the following resources:
-
Kafka.spec.kafka -
Kafka.spec.zookeeper
The storage type is configured in the type field.
|
Warning
|
The storage type cannot be changed after a Kafka cluster is deployed. |
Ephemeral storage
Ephemeral storage uses the `emptyDir` volumes to store data.
To use ephemeral storage, the type field should be set to ephemeral.
|
Important
|
EmptyDir volumes are not persistent and the data stored in them will be lost when the Pod is restarted.
After the new pod is started, it has to recover all data from other nodes of the cluster.
Ephemeral storage is not suitable for use with single node Zookeeper clusters and for Kafka topics with replication factor 1, because it will lead to data loss.
|
An example of Ephemeral storage
apiVersion: kafka.strimzi.io/v1alpha1
kind: Kafka
metadata:
  name: my-cluster
spec:
  kafka:
    # ...
    storage:
      type: ephemeral
    # ...
  zookeeper:
    # ...
    storage:
      type: ephemeral
    # ...
Persistent storage
Persistent storage uses Persistent Volume Claims to provision persistent volumes for storing data. Persistent Volume Claims can be used to provision volumes of many different types, depending on the Storage Class which will provision the volume. The data types which can be used with persistent volume claims include many types of SAN storage as well as Local persistent volumes.
To use persistent storage, the type has to be set to persistent-claim.
Persistent storage supports additional configuration options:
id(optional)-
Storage identification number. This option is mandatory for storage volumes defined in a JBOD storage declaration. Default is
0. size(required)-
Defines the size of the persistent volume claim, for example, "1000Gi".
class(optional)-
The OpenShift or Kubernetes Storage Class to use for dynamic volume provisioning.
selector(optional)-
Allows selecting a specific persistent volume to use. It contains key:value pairs representing labels for selecting such a volume.
deleteClaim(optional)-
Boolean value which specifies if the Persistent Volume Claim has to be deleted when the cluster is undeployed. Default is
false.
|
Warning
|
Resizing persistent storage for existing Strimzi clusters is not currently supported. You must decide the necessary storage size before deploying the cluster. |
Example fragment of persistent storage configuration with 1000Gi
size# ...
storage:
type: persistent-claim
size: 1000Gi
# ...The following example demonstrates the use of a storage class.
Example fragment of persistent storage configuration with specific Storage Class
# ...
storage:
  type: persistent-claim
  size: 1Gi
  class: my-storage-class
# ...
Finally, a selector can be used to select a specific labeled persistent volume to provide needed features such as an SSD.
Example fragment of persistent storage configuration with selector
# ...
storage:
  type: persistent-claim
  size: 1Gi
  selector:
    hdd-type: ssd
  deleteClaim: true
# ...
Persistent Volume Claim naming
When the persistent storage is used, it will create Persistent Volume Claims with the following names:
data-cluster-name-kafka-idx-
Persistent Volume Claim for the volume used for storing data for the Kafka broker pod
idx. data-cluster-name-zookeeper-idx-
Persistent Volume Claim for the volume used for storing data for the Zookeeper node pod
idx.
JBOD storage overview
You can configure Strimzi to use JBOD, a data storage configuration in which multiple disks are combined to create a single logical disk, or volume. JBOD is one approach to providing increased data storage for Kafka brokers. It can also improve performance.
A JBOD configuration is described by one or more volumes, each of which can be either ephemeral or persistent. The rules and constraints for JBOD volume declarations are the same as those for ephemeral and persistent storage. For example, you cannot change the size of a persistent storage volume after it has been provisioned.
JBOD configuration
To use JBOD with Strimzi, the storage type must be set to jbod. The volumes property allows you to describe the disks that make up your JBOD storage array or configuration. The following fragment shows an example JBOD configuration:
# ...
storage:
  type: jbod
  volumes:
  - id: 0
    type: persistent-claim
    size: 100Gi
    deleteClaim: false
  - id: 1
    type: persistent-claim
    size: 100Gi
    deleteClaim: false
# ...
The ids cannot be changed once the JBOD volumes are created.
|
Note
|
Adding and removing volumes from a JBOD configuration is not currently supported. |
JBOD and Persistent Volume Claims
When persistent storage is used to declare JBOD volumes, the naming scheme of the resulting Persistent Volume Claims is as follows:
data-id-cluster-name-kafka-idx-
Where
idis the ID of the volume used for storing data for Kafka broker podidx.
Additional resources
-
For more information about ephemeral storage, see ephemeral storage schema reference.
-
For more information about persistent storage, see persistent storage schema reference.
-
For more information about JBOD storage, see JBOD schema reference.
-
For more information about the schema for
Kafka, seeKafkaschema reference.
3.1.2. Kafka broker replicas
A Kafka cluster can run with many brokers.
You can configure the number of brokers used for the Kafka cluster in Kafka.spec.kafka.replicas.
The best number of brokers for your cluster has to be determined based on your specific use case.
Configuring the number of broker nodes
This procedure describes how to configure the number of Kafka broker nodes in a new cluster. It only applies to new clusters, with no partitions. If your cluster already has topics defined you should see Scaling clusters.
Prerequisites
-
An OpenShift or Kubernetes cluster
-
A running Cluster Operator
-
A Kafka cluster with no topics defined yet
Procedure
-
Edit the
replicasproperty in theKafkaresource. For example:apiVersion: kafka.strimzi.io/v1alpha1 kind: Kafka metadata: name: my-cluster spec: kafka: # ... replicas: 3 # ... zookeeper: # ... -
Create or update the resource.
On Kubernetes this can be done using
kubectl apply:kubectl apply -f your-fileOn OpenShift this can be done using
oc apply:oc apply -f your-file
Additional resources
If your cluster already has topics defined see Scaling clusters.
3.1.3. Kafka broker configuration
Strimzi allows you to customize the configuration of Apache Kafka brokers. You can specify and configure most of the options listed in Apache Kafka documentation.
The only options which cannot be configured are those related to the following areas:
-
Security (Encryption, Authentication, and Authorization)
-
Listener configuration
-
Broker ID configuration
-
Configuration of log data directories
-
Inter-broker communication
-
Zookeeper connectivity
These options are automatically configured by Strimzi.
Kafka broker configuration
Kafka broker can be configured using the config property in Kafka.spec.kafka.
This property should contain the Kafka broker configuration options as keys. The values could be in one of the following JSON types:
-
String
-
Number
-
Boolean
Users can specify and configure the options listed in Apache Kafka documentation with the exception of those options which are managed directly by Strimzi. Specifically, all configuration options with keys equal to or starting with one of the following strings are forbidden:
-
listeners -
advertised. -
broker. -
listener. -
host.name -
port -
inter.broker.listener.name -
sasl. -
ssl. -
security. -
password. -
principal.builder.class -
log.dir -
zookeeper.connect -
zookeeper.set.acl -
authorizer. -
super.user
When one of the forbidden options is present in the config property, it will be ignored and a warning message will be printed to the Cluster Operator log file.
All other options will be passed to Kafka.
|
Important
|
The Cluster Operator does not validate keys or values in the provided config object.
When invalid configuration is provided, the Kafka cluster might not start or might become unstable.
In such cases, the configuration in the Kafka.spec.kafka.config object should be fixed and the cluster operator will roll out the new configuration to all Kafka brokers.
|
An example showing Kafka broker configuration
apiVersion: kafka.strimzi.io/v1alpha1
kind: Kafka
metadata:
  name: my-cluster
spec:
  kafka:
    # ...
    config:
      num.partitions: 1
      num.recovery.threads.per.data.dir: 1
      default.replication.factor: 3
      offsets.topic.replication.factor: 3
      transaction.state.log.replication.factor: 3
      transaction.state.log.min.isr: 1
      log.retention.hours: 168
      log.segment.bytes: 1073741824
      log.retention.check.interval.ms: 300000
      num.network.threads: 3
      num.io.threads: 8
      socket.send.buffer.bytes: 102400
      socket.receive.buffer.bytes: 102400
      socket.request.max.bytes: 104857600
      group.initial.rebalance.delay.ms: 0
    # ...
Configuring Kafka brokers
Prerequisites
-
An OpenShift or Kubernetes cluster
-
A running Cluster Operator
Procedure
-
Edit the
configproperty in theKafkaresource specifying the cluster deployment. For example:apiVersion: kafka.strimzi.io/v1alpha1 kind: Kafka spec: kafka: # ... config: default.replication.factor: 3 offsets.topic.replication.factor: 3 transaction.state.log.replication.factor: 3 transaction.state.log.min.isr: 1 # ... zookeeper: # ... -
Create or update the resource.
On Kubernetes this can be done using
kubectl apply:kubectl apply -f your-fileOn OpenShift this can be done using
oc apply:oc apply -f your-file
3.1.4. Kafka broker listeners
Strimzi allows users to configure the listeners which will be enabled in Kafka brokers. Two types of listeners are supported:
-
Plain listener on port 9092 (without encryption)
-
TLS listener on port 9093 (with encryption)
Mutual TLS authentication for clients
Mutual TLS authentication
Mutual authentication or two-way authentication is when both the server and the client present certificates. Strimzi can configure Kafka to use TLS (Transport Layer Security) to provide encrypted communication between Kafka brokers and clients either with or without mutual authentication. When you configure mutual authentication, the broker authenticates the client and the client authenticates the broker. Mutual TLS authentication is always used for the communication between Kafka brokers and Zookeeper pods.
|
Note
|
In many common uses of TLS (such as the HTTPS protocol used between a web browser and a web server) the authentication is not mutual: Only one party to the communication gets proof of the identity of the other party. |
TLS authentication is more commonly one-way, where only one party authenticates to another. For example, when the HTTPS protocol is used between a web browser and a web server, the authentication is not usually mutual and only the server gets proof of the identity of the browser.
When to use mutual TLS authentication for clients
Mutual TLS authentication is recommended for authenticating Kafka clients when:
-
The client supports authentication using mutual TLS authentication
-
It is necessary to use the TLS certificates rather than passwords
-
You can reconfigure and restart client applications periodically so that they do not use expired certificates.
SCRAM-SHA authentication
SCRAM (Salted Challenge Response Authentication Mechanism) is an authentication protocol that can establish mutual authentication using passwords. Strimzi can configure Kafka to use SASL SCRAM-SHA-512 to provide authentication on both unencrypted and TLS-encrypted client connections. TLS authentication is always used internally between Kafka brokers and Zookeeper nodes. When used with a TLS client connection, the TLS protocol provides encryption, but is not used for authentication.
The following properties of SCRAM make it safe to use SCRAM-SHA even on unencrypted connections:
-
The passwords are not sent in the clear over the communication channel. Instead the client and the server are each challenged by the other to offer proof that they know the password of the authenticating user.
-
The server and client each generate a new challenge one each authentication exchange. This means that the exchange is resilient against replay attacks.
Supported SCRAM credentials
Strimzi supports SCRAM-SHA-512 only.
When a KafkaUser.spec.authentication.type is configured with scram-sha-512 the User Operator will generate a random 12 character password consisting of upper and lowercase ASCII letters and numbers.
When to use SCRAM-SHA authentication for clients
SCRAM-SHA is recommended for authenticating Kafka clients when:
-
The client supports authentication using SCRAM-SHA-512
-
It is necessary to use passwords rather than the TLS certificates
-
When you want to have authentication for unencrypted communication
Kafka listeners
You can configure Kafka broker listeners using the listeners property in the Kafka.spec.kafka resource.
The listeners property contains three sub-properties:
-
plain -
tls -
external
When none of these properties are defined, the listener will be disabled.
An example of
listeners property with all listeners enabled# ...
listeners:
plain: {}
tls: {}
# ...An example of
listeners property with only the plain listener enabled# ...
listeners:
plain: {}
# ...External listener
The external listener is used to connect to a Kafka cluster from outside of an OpenShift or Kubernetes environment. Strimzi supports three types of external listeners:
-
route -
loadbalancer -
nodeport
Exposing Kafka using OpenShift Routes
An external listener of type route exposes Kafka by using OpenShift Routes and the HAProxy router.
A dedicated Route is created for every Kafka broker pod.
An additional Route is created to serve as a Kafka bootstrap address.
Kafka clients can use these Routes to connect to Kafka on port 443.
|
Note
|
Routes are available only on OpenShift. External listeners of type route cannot be used on Kubernetes.
|
When exposing Kafka using OpenShift Routes, TLS encryption is always used.
By default, the route hosts are automatically assigned by OpenShift.
However, you can override the assigned route hosts by specifying the requested hosts in the overrides property.
Strimzi will not perform any validation that the requested hosts are available; you must ensure that they are free and can be used.
Example of an external listener of type
routes configured with overrides for OpenShift route hosts# ...
listeners:
external:
type: routes
authentication:
type: tls
overrides:
bootstrap:
host: bootstrap.myrouter.com
brokers:
- broker: 0
host: broker-0.myrouter.com
- broker: 1
host: broker-1.myrouter.com
- broker: 2
host: broker-2.myrouter.com
# ...For more information on using Routes to access Kafka, see Accessing Kafka using OpenShift routes.
Exposing Kafka using loadbalancers
External listeners of type loadbalancer expose Kafka by using Loadbalancer type Services.
A new loadbalancer service is created for every Kafka broker pod.
An additional loadbalancer is created to serve as a Kafka bootstrap address.
Loadbalancers listen to connections on port 9094.
By default, TLS encryption is enabled.
To disable it, set the tls field to false.
For more information on using loadbalancers to access Kafka, see Accessing Kafka using loadbalancers.
Exposing Kafka using node ports
External listeners of type nodeport expose Kafka by using NodePort type Services.
When exposing Kafka in this way, Kafka clients connect directly to the nodes of OpenShift or Kubernetes.
You must enable access to the ports on the OpenShift or Kubernetes nodes for each client (for example, in firewalls or security groups).
Each Kafka broker pod is then accessible on a separate port.
Additional NodePort type Service is created to serve as a Kafka bootstrap address.
When configuring the advertised addresses for the Kafka broker pods, Strimzi uses the address of the node on which the given pod is running. When selecting the node address, the different address types are used with the following priority:
-
ExternalDNS
-
ExternalIP
-
Hostname
-
InternalDNS
-
InternalIP
By default, TLS encryption is enabled.
To disable it, set the tls field to false.
|
Note
|
TLS hostname verification is not currently supported when exposing Kafka clusters using node ports. |
By default, the port numbers used for the bootstrap and broker services are automatically assigned by OpenShift or Kubernetes.
However, you can override the assigned node ports by specifying the requested port numbers in the overrides property.
Strimzi does not perform any validation on the requested ports; you must ensure that they are free and available for use.
Example of an external listener configured with overrides for node ports
# ...
listeners:
external:
type: nodeport
tls: true
authentication:
type: tls
overrides:
bootstrap:
nodePort: 32100
brokers:
- broker: 0
nodePort: 32000
- broker: 1
nodePort: 32001
- broker: 2
nodePort: 32002
# ...For more information on using node ports to access Kafka, see Accessing Kafka using node ports routes.
Customizing advertised addresses on external listeners
By default, Strimzi tries to automatically determine the hostnames and ports that your Kafka cluster advertises to its clients.
This is not sufficient in all situations, because the infrastructure on which Strimzi is running might not provide the right hostname or port through which Kafka can be accessed.
You can customize the advertised hostname and port in the overrides property of the external listener.
Strimzi will then automatically configure the advertised address in the Kafka brokers and add it to the broker certificates so it can be used for TLS hostname verification.
Overriding the advertised host and ports is available for all types of external listeners.
Example of an external listener configured with overrides for advertised addresses
# ...
listeners:
external:
type: routes
authentication:
type: tls
overrides:
brokers:
- broker: 0
advertisedHost: example.hostname.0
advertisedPort: 12340
- broker: 1
advertisedHost: example.hostname.1
advertisedPort: 12341
- broker: 2
advertisedHost: example.hostname.2
advertisedPort: 12342
# ...Additionally, you can specify the name of the bootstrap service. This name will be added to the broker certificates and can be used for TLS hostname verification. Adding the additional bootstrap address is available for all types of external listeners.
Example of an external listener configured with an additional bootstrap address
# ...
listeners:
external:
type: routes
authentication:
type: tls
overrides:
bootstrap:
address: example.hostname
# ...Listener authentication
The listener sub-properties can also contain additional configuration.
Both listeners support the authentication property. This is used to specify an authentication mechanism specific to that listener:
-
mutual TLS authentication (only on the listeners with TLS encryption)
-
SCRAM-SHA authentication
If no authentication property is specified then the listener does not authenticate clients which connect though that listener.
An example where the plain listener is configured for SCRAM-SHA authentication and the
tls listener with mutual TLS authentication# ...
listeners:
plain:
authentication:
type: scram-sha-512
tls:
authentication:
type: tls
external:
type: loadbalancer
tls: true
authentication:
type: tls
# ...Authentication must be configured when using the User Operator to manage KafkaUsers.
Network policies
Strimzi automatically creates a NetworkPolicy resource for every listener that is enabled on a Kafka broker.
By default, a NetworkPolicy grants access to a listener to all applications and namespaces.
If you want to restrict access to a listener to only selected applications or namespaces, use the networkPolicyPeers field.
Each listener can have a different networkPolicyPeers configuration.
The following example shows a networkPolicyPeers configuration for a plain and a tls listener:
# ...
listeners:
plain:
authentication:
type: scram-sha-512
networkPolicyPeers:
- podSelector:
matchLabels:
app: kafka-sasl-consumer
- podSelector:
matchLabels:
app: kafka-sasl-producer
tls:
authentication:
type: tls
networkPolicyPeers:
- namespaceSelector:
matchLabels:
project: myproject
- namespaceSelector:
matchLabels:
project: myproject2
# ...In the above example:
-
Only application pods matching the labels
app: kafka-sasl-consumerandapp: kafka-sasl-producercan connect to theplainlistener. The application pods must be running in the same namespace as the Kafka broker. -
Only application pods running in namespaces matching the labels
project: myprojectandproject: myproject2can connect to thetlslistener.
The syntax of the networkPolicyPeers field is the same as the from field in the NetworkPolicy resource in Kubernetes.
For more information about the schema, see NetworkPolicyPeer API reference and the KafkaListeners schema reference.
|
Note
|
Your configuration of OpenShift or Kubernetes must support Ingress NetworkPolicies in order to use network policies in Strimzi. |
Configuring Kafka listeners
Prerequisites
-
An OpenShift or Kubernetes cluster
-
A running Cluster Operator
Procedure
-
Edit the
listenersproperty in theKafka.spec.kafkaresource.
An example configuration of the plain (unencrypted) listener without authentication:
+
apiVersion: kafka.strimzi.io/v1alpha1
kind: Kafka
spec:
kafka:
# ...
listeners:
  plain: {}
# ...
zookeeper:
# ...-
Create or update the resource.
On Kubernetes this can be done using
kubectl apply:kubectl apply -f your-fileOn OpenShift this can be done using
oc apply:oc apply -f your-file
Additional resources
-
For more information about the schema, see
KafkaListenersschema reference.
Accessing Kafka using OpenShift routes
Prerequisites
-
An OpenShift cluster
-
A running Cluster Operator
Procedure
-
Deploy Kafka cluster with an external listener enabled and configured to the type
route.An example configuration with an external listener configured to use
Routes:apiVersion: kafka.strimzi.io/v1alpha1 kind: Kafka spec: kafka: # ... listeners: external: type: route # ... # ... zookeeper: # ... -
Create or update the resource.
oc apply -f your-file -
Find the address of the bootstrap
Route.oc get routes _cluster-name_-kafka-bootstrap -o=jsonpath='{.status.ingress[0].host}{"\n"}'Use the address together with port 443 in your Kafka client as the bootstrap address.
-
Extract the public certificate of the broker certification authority
oc extract secret/_cluster-name_-cluster-ca-cert --keys=ca.crt --to=- > ca.crtUse the extracted certificate in your Kafka client to configure TLS connection. If you enabled any authentication, you will also need to configure SASL or TLS authentication.
Additional resources
-
For more information about the schema, see
KafkaListenersschema reference.
Accessing Kafka using loadbalancers
Prerequisites
-
An OpenShift or Kubernetes cluster
-
A running Cluster Operator
Procedure
-
Deploy Kafka cluster with an external listener enabled and configured to the type
loadbalancer.An example configuration with an external listener configured to use loadbalancers:
apiVersion: kafka.strimzi.io/v1alpha1 kind: Kafka spec: kafka: # ... listeners: external: type: loadbalancer tls: true # ... # ... zookeeper: # ... -
Create or update the resource.
On Kubernetes this can be done using
kubectl apply:kubectl apply -f your-fileOn OpenShift this can be done using
oc apply:oc apply -f your-file -
Find the hostname of the bootstrap loadbalancer.
On Kubernetes this can be done using
kubectl get:kubectl get service cluster-name-kafka-external-bootstrap -o=jsonpath='{.status.loadBalancer.ingress[0].hostname}{"\n"}'On OpenShift this can be done using
oc get:oc get service cluster-name-kafka-external-bootstrap -o=jsonpath='{.status.loadBalancer.ingress[0].hostname}{"\n"}'If no hostname was found (nothing was returned by the command), use the loadbalancer IP address.
On Kubernetes this can be done using
kubectl get:kubectl get service cluster-name-kafka-external-bootstrap -o=jsonpath='{.status.loadBalancer.ingress[0].ip}{"\n"}'On OpenShift this can be done using
oc get:oc get service cluster-name-kafka-external-bootstrap -o=jsonpath='{.status.loadBalancer.ingress[0].ip}{"\n"}'Use the hostname or IP address together with port 9094 in your Kafka client as the bootstrap address.
-
Unless TLS encryption was disabled, extract the public certificate of the broker certification authority.
On Kubernetes this can be done using
kubectl get:kubectl get secret cluster-name-cluster-ca-cert -o jsonpath='{.data.ca\.crt}' | base64 -d > ca.crtOn OpenShift this can be done using
oc extract:oc extract secret/cluster-name-cluster-ca-cert --keys=ca.crt --to=- > ca.crtUse the extracted certificate in your Kafka client to configure TLS connection. If you enabled any authentication, you will also need to configure SASL or TLS authentication.
Additional resources
-
For more information about the schema, see
KafkaListenersschema reference.
Accessing Kafka using node ports routes
Prerequisites
-
An OpenShift or Kubernetes cluster
-
A running Cluster Operator
Procedure
-
Deploy Kafka cluster with an external listener enabled and configured to the type
nodeport.An example configuration with an external listener configured to use node ports:
apiVersion: kafka.strimzi.io/v1alpha1 kind: Kafka spec: kafka: # ... listeners: external: type: nodeport tls: true # ... # ... zookeeper: # ... -
Create or update the resource.
On Kubernetes this can be done using
kubectl apply:kubectl apply -f your-fileOn OpenShift this can be done using
oc apply:oc apply -f your-file -
Find the port number of the bootstrap service.
On Kubernetes this can be done using
kubectl get:kubectl get service cluster-name-kafka-external-bootstrap -o=jsonpath='{.spec.ports[0].nodePort}{"\n"}'On OpenShift this can be done using
oc get:oc get service cluster-name-kafka-external-bootstrap -o=jsonpath='{.spec.ports[0].nodePort}{"\n"}'The port should be used in the Kafka bootstrap address.
-
Find the address of the OpenShift or Kubernetes node.
On Kubernetes this can be done using
kubectl get:kubectl get node node-name -o=jsonpath='{range .status.addresses[*]}{.type}{"\t"}{.address}{"\n"}'On OpenShift this can be done using
oc get:oc get node node-name -o=jsonpath='{range .status.addresses[*]}{.type}{"\t"}{.address}{"\n"}'If several different addresses are returned, select the address type you want based on the following order:
-
ExternalDNS
-
ExternalIP
-
Hostname
-
InternalDNS
-
InternalIP
Use the address with the port found in the previous step in the Kafka bootstrap address.
-
-
Unless TLS encryption was disabled, extract the public certificate of the broker certification authority.
On Kubernetes this can be done using
kubectl get:kubectl get secret cluster-name-cluster-ca-cert -o jsonpath='{.data.ca\.crt}' | base64 -d > ca.crtOn OpenShift this can be done using
oc extract:oc extract secret/cluster-name-cluster-ca-cert --keys=ca.crt --to=- > ca.crtUse the extracted certificate in your Kafka client to configure TLS connection. If you enabled any authentication, you will also need to configure SASL or TLS authentication.
Additional resources
-
For more information about the schema, see
KafkaListenersschema reference.
Restricting access to Kafka listeners using networkPolicyPeers
You can restrict access to a listener to only selected applications by using the networkPolicyPeers field.
Prerequisites
-
An OpenShift or Kubernetes cluster with support for Ingress NetworkPolicies.
-
The Cluster Operator is running.
Procedure
-
Open the
Kafkaresource. -
In the
networkPolicyPeersfield, define the application pods or namespaces that will be allowed to access the Kafka cluster.For example, to configure a
tlslistener to allow connections only from application pods with the labelappset tokafka-client:apiVersion: kafka.strimzi.io/v1alpha1 kind: Kafka spec: kafka: # ... listeners: tls: networkPolicyPeers: - podSelector: matchLabels: app: kafka-client # ... zookeeper: # ... -
Create or update the resource.
On Kubernetes use
kubectl apply:kubectl apply -f your-fileOn OpenShift use
oc apply:oc apply -f your-file
Additional resources
-
For more information about the schema, see NetworkPolicyPeer API reference and the
KafkaListenersschema reference.
3.1.5. Authentication and Authorization
Strimzi supports authentication and authorization. Authentication can be configured independently for each listener. Authorization is always configured for the whole Kafka cluster.
Authentication
Authentication is configured as part of the listener configuration in the authentication property.
When the authentication property is missing, no authentication will be enabled on given listener.
The authentication mechanism which will be used is defined by the type field.
The supported authentication mechanisms are:
-
TLS client authentication
-
SASL SCRAM-SHA-512
TLS client authentication
TLS Client authentication can be enabled by specifying the type as tls.
The TLS client authentication is supported only on the tls listener.
An example of
authentication with type tls# ...
authentication:
type: tls
# ...Configuring authentication in Kafka brokers
Prerequisites
-
An OpenShift or Kubernetes cluster
-
A running Cluster Operator
Procedure
-
Edit the
listenersproperty in theKafka.spec.kafkaresource. Add theauthenticationfield to the listeners where you want to enable authentication. For example:apiVersion: kafka.strimzi.io/v1alpha1 kind: Kafka spec: kafka: # ... listeners: tls: authentication: type: tls # ... zookeeper: # ... -
Create or update the resource.
On Kubernetes this can be done using
kubectl apply:kubectl apply -f your-fileOn OpenShift this can be done using
oc apply:oc apply -f your-file
Additional resources
-
For more information about the supported authentication mechanisms, see authentication reference.
-
For more information about the schema for
Kafka, seeKafkaschema reference.
Authorization
Authorization can be configured using the authorization property in the Kafka.spec.kafka resource.
When the authorization property is missing, no authorization will be enabled.
When authorization is enabled it will be applied for all enabled listeners.
The authorization method is defined by the type field.
Currently, the only supported authorization method is the Simple authorization.
Simple authorization
Simple authorization is using the SimpleAclAuthorizer plugin.
SimpleAclAuthorizer is the default authorization plugin which is part of Apache Kafka.
To enable simple authorization, the type field should be set to simple.
An example of Simple authorization
# ...
authorization:
  type: simple
# ...
Configuring authorization in Kafka brokers
Prerequisites
-
An OpenShift or Kubernetes cluster
-
A running Cluster Operator
Procedure
-
Add or edit the
authorizationproperty in theKafka.spec.kafkaresource. For example:apiVersion: kafka.strimzi.io/v1alpha1 kind: Kafka spec: kafka: # ... authorization: type: simple # ... zookeeper: # ... -
Create or update the resource.
On Kubernetes this can be done using
kubectl apply:kubectl apply -f your-fileOn OpenShift this can be done using
oc apply:oc apply -f your-file
Additional resources
-
For more information about the supported authorization methods, see authorization reference.
-
For more information about the schema for
Kafka, seeKafkaschema reference.
3.1.6. Zookeeper replicas
Zookeeper clusters or ensembles usually run with an odd number of nodes and always requires the majority of the nodes to be available in order to maintain a quorum. Maintaining a quorum is important because when the Zookeeper cluster loses a quorum, it will stop responding to clients. As a result, a Zookeeper cluster without a quorum will cause the Kafka brokers to stop working as well. This is why having a stable and highly available Zookeeper cluster is very important for Strimzi.
A Zookeeper cluster is usually deployed with three, five, or seven nodes.
- Three nodes
-
Zookeeper cluster consisting of three nodes requires at least two nodes to be up and running in order to maintain the quorum. It can tolerate only one node being unavailable.
- Five nodes
-
Zookeeper cluster consisting of five nodes requires at least three nodes to be up and running in order to maintain the quorum. It can tolerate two nodes being unavailable.
- Seven nodes
-
Zookeeper cluster consisting of seven nodes requires at least four nodes to be up and running in order to maintain the quorum. It can tolerate three nodes being unavailable.
|
Note
|
For development purposes, it is also possible to run Zookeeper with a single node. |
Having more nodes does not necessarily mean better performance, as the costs to maintain the quorum will rise with the number of nodes in the cluster. Depending on your availability requirements, you can decide for the number of nodes to use.
Number of Zookeeper nodes
The number of Zookeeper nodes can be configured using the replicas property in Kafka.spec.zookeeper.
An example showing replicas configuration
apiVersion: kafka.strimzi.io/v1alpha1
kind: Kafka
metadata:
  name: my-cluster
spec:
  kafka:
    # ...
  zookeeper:
    # ...
    replicas: 3
    # ...
Changing number of replicas
Prerequisites
-
An OpenShift or Kubernetes cluster
-
A running Cluster Operator
Procedure
-
Edit the
replicasproperty in theKafkaresource. For example:apiVersion: kafka.strimzi.io/v1alpha1 kind: Kafka metadata: name: my-cluster spec: kafka: # ... zookeeper: # ... replicas: 3 # ... -
Create or update the resource.
On Kubernetes this can be done using
kubectl apply:kubectl apply -f your-fileOn OpenShift this can be done using
oc apply:oc apply -f your-file
3.1.7. Zookeeper configuration
Strimzi allows you to customize the configuration of Apache Zookeeper nodes. You can specify and configure most of the options listed in Zookeeper documentation.
The only options which cannot be configured are those related to the following areas:
-
Security (Encryption, Authentication, and Authorization)
-
Listener configuration
-
Configuration of data directories
-
Zookeeper cluster composition
These options are automatically configured by Strimzi.
Zookeeper configuration
Zookeeper nodes can be configured using the config property in Kafka.spec.zookeeper.
This property should contain the Zookeeper configuration options as keys.
The values could be in one of the following JSON types:
-
String
-
Number
-
Boolean
Users can specify and configure the options listed in Zookeeper documentation with the exception of those options which are managed directly by Strimzi. Specifically, all configuration options with keys equal to or starting with one of the following strings are forbidden:
-
server. -
dataDir -
dataLogDir -
clientPort -
authProvider -
quorum.auth -
requireClientAuthScheme
When one of the forbidden options is present in the config property, it will be ignored and a warning message will be printed to the Custer Operator log file.
All other options will be passed to Zookeeper.
|
Important
|
The Cluster Operator does not validate keys or values in the provided config object.
When invalid configuration is provided, the Zookeeper cluster might not start or might become unstable.
In such cases, the configuration in the Kafka.spec.zookeeper.config object should be fixed and the cluster operator will roll out the new configuration to all Zookeeper nodes.
|
Selected options have default values:
-
timeTickwith default value2000 -
initLimitwith default value5 -
syncLimitwith default value2 -
autopurge.purgeIntervalwith default value1
These options will be automatically configured when they are not present in the Kafka.spec.zookeeper.config property.
An example showing Zookeeper configuration
apiVersion: kafka.strimzi.io/v1alpha1
kind: Kafka
spec:
  kafka:
    # ...
  zookeeper:
    # ...
    config:
      autopurge.snapRetainCount: 3
      autopurge.purgeInterval: 1
    # ...
Configuring Zookeeper
Prerequisites
-
An OpenShift or Kubernetes cluster
-
A running Cluster Operator
Procedure
-
Edit the
configproperty in theKafkaresource specifying the cluster deployment. For example:apiVersion: kafka.strimzi.io/v1alpha1 kind: Kafka spec: kafka: # ... zookeeper: # ... config: autopurge.snapRetainCount: 3 autopurge.purgeInterval: 1 # ... -
Create or update the resource.
On Kubernetes this can be done using
kubectl apply:kubectl apply -f your-fileOn OpenShift this can be done using
oc apply:oc apply -f your-file
3.1.8. Entity Operator
The Entity Operator is responsible for managing different entities in a running Kafka cluster. The currently supported entities are:
- Kafka topics
-
managed by the Topic Operator.
- Kafka users
-
managed by the User Operator
Both Topic and User Operators can be deployed on their own. But the easiest way to deploy them is together with the Kafka cluster as part of the Entity Operator. The Entity Operator can include either one or both of them depending on the configuration. They will be automatically configured to manage the topics and users of the Kafka cluster with which they are deployed.
For more information about Topic Operator, see Topic Operator. For more information about how to use Topic Operator to create or delete topics, see Using the Topic Operator.
Configuration
The Entity Operator can be configured using the entityOperator property in Kafka.spec
The entityOperator property supports several sub-properties:
-
tlsSidecar -
affinity -
tolerations -
topicOperator -
userOperator
The tlsSidecar property can be used to configure the TLS sidecar container which is used to communicate with Zookeeper.
For more details about configuring the TLS sidecar, see TLS sidecar.
The affinity and tolerations properties can be used to configure how OpenShift or Kubernetes schedules the Entity Operator pod.
For more details about pod scheduling, see Configuring pod scheduling.
The topicOperator property contains the configuration of the Topic Operator.
When this option is missing, the Entity Operator will be deployed without the Topic Operator.
The userOperator property contains the configuration of the User Operator.
When this option is missing, the Entity Operator will be deployed without the User Operator.
Example of basic configuration enabling both operators
apiVersion: kafka.strimzi.io/v1alpha1
kind: Kafka
metadata:
  name: my-cluster
spec:
  kafka:
    # ...
  zookeeper:
    # ...
  entityOperator:
    topicOperator: {}
    userOperator: {}
When both topicOperator and userOperator properties are missing, the Entity Operator will be not deployed.
Topic Operator
Topic Operator deployment can be configured using additional options inside the topicOperator object.
Following options are supported:
watchedNamespace-
The OpenShift or Kubernetes namespace in which the topic operator watches for
KafkaTopics. Default is the namespace where the Kafka cluster is deployed. reconciliationIntervalSeconds-
The interval between periodic reconciliations in seconds. Default is 90.
zookeeperSessionTimeoutSeconds-
The Zookeeper session timeout in seconds. Default is 20 seconds.
topicMetadataMaxAttempts-
The number of attempts for getting topics metadata from Kafka. The time between each attempt is defined as an exponential back-off. You might want to increase this value when topic creation could take more time due to its many partitions or replicas. Default is
6. image-
The
imageproperty can be used to configure the container image which will be used. For more details about configuring custom container images, see Container images. resources-
The
resourcesproperty configures the amount of resources allocated to the Topic Operator For more details about resource request and limit configuration, see CPU and memory resources. logging-
The
loggingproperty configures the logging of the Topic Operator For more details about logging configuration, see Logging.
Example of Topic Operator configuration
apiVersion: kafka.strimzi.io/v1alpha1
kind: Kafka
metadata:
  name: my-cluster
spec:
  kafka:
    # ...
  zookeeper:
    # ...
  entityOperator:
    # ...
    topicOperator:
      watchedNamespace: my-topic-namespace
      reconciliationIntervalSeconds: 60
    # ...
User Operator
User Operator deployment can be configured using additional options inside the userOperator object.
Following options are supported:
watchedNamespace-
The OpenShift or Kubernetes namespace in which the topic operator watches for
KafkaUsers. Default is the namespace where the Kafka cluster is deployed. reconciliationIntervalSeconds-
The interval between periodic reconciliations in seconds. Default is 120.
zookeeperSessionTimeoutSeconds-
The Zookeeper session timeout in seconds. Default is 6 seconds.
image-
The
imageproperty can be used to configure the container image which will be used. For more details about configuring custom container images, see Container images. resources-
The
resourcesproperty configures the amount of resources allocated to the User Operator. For more details about resource request and limit configuration, see CPU and memory resources. logging-
The
loggingproperty configures the logging of the User Operator. For more details about logging configuration, see Logging.
Example of Topic Operator configuration
apiVersion: kafka.strimzi.io/v1alpha1
kind: Kafka
metadata:
  name: my-cluster
spec:
  kafka:
    # ...
  zookeeper:
    # ...
  entityOperator:
    # ...
    userOperator:
      watchedNamespace: my-user-namespace
      reconciliationIntervalSeconds: 60
    # ...
Configuring Entity Operator
Prerequisites
-
An OpenShift or Kubernetes cluster
-
A running Cluster Operator
Procedure
-
Edit the
entityOperatorproperty in theKafkaresource. For example:apiVersion: kafka.strimzi.io/v1alpha1 kind: Kafka metadata: name: my-cluster spec: kafka: # ... zookeeper: # ... entityOperator: topicOperator: watchedNamespace: my-topic-namespace reconciliationIntervalSeconds: 60 userOperator: watchedNamespace: my-user-namespace reconciliationIntervalSeconds: 60 -
Create or update the resource.
On Kubernetes this can be done using
kubectl apply:kubectl apply -f your-fileOn OpenShift this can be done using
oc apply:oc apply -f your-file
3.1.9. CPU and memory resources
For every deployed container, Strimzi allows you to specify the resources which should be reserved for it and the maximum resources that can be consumed by it. Strimzi supports two types of resources:
-
Memory
-
CPU
Strimzi is using the OpenShift or Kubernetes syntax for specifying CPU and memory resources.
Resource limits and requests
Resource limits and requests can be configured using the resources property in following resources:
-
Kafka.spec.kafka -
Kafka.spec.kafka.tlsSidecar -
Kafka.spec.zookeeper -
Kafka.spec.zookeeper.tlsSidecar -
Kafka.spec.entityOperator.topicOperator -
Kafka.spec.entityOperator.userOperator -
Kafka.spec.entityOperator.tlsSidecar -
KafkaConnect.spec -
KafkaConnectS2I.spec
Resource requests
Requests specify the resources that will be reserved for a given container. Reserving the resources will ensure that they are always available.
|
Important
|
If the resource request is for more than the available free resources in the OpenShift or Kubernetes cluster, the pod will not be scheduled. |
Resource requests can be specified in the request property.
The resource requests currently supported by Strimzi are memory and CPU.
Memory is specified under the property memory.
CPU is specified under the property cpu.
An example showing resource request configuration
# ...
resources:
  requests:
    cpu: 12
    memory: 64Gi
# ...
It is also possible to specify a resource request just for one of the resources:
An example showing resource request configuration with memory request only
# ...
resources:
  requests:
    memory: 64Gi
# ...
Or:
An example showing resource request configuration with CPU request only
# ...
resources:
  requests:
    cpu: 12
# ...
Resource limits
Limits specify the maximum resources that can be consumed by a given container. The limit is not reserved and might not be always available. The container can use the resources up to the limit only when they are available. The resource limits should be always higher than the resource requests.
Resource limits can be specified in the limits property.
The resource limits currently supported by Strimzi are memory and CPU.
Memory is specified under the property memory.
CPU is specified under the property cpu.
An example showing resource limits configuration
# ...
resources:
  limits:
    cpu: 12
    memory: 64Gi
# ...
It is also possible to specify the resource limit just for one of the resources:
An example showing resource limit configuration with memory request only
# ...
resources:
  limits:
    memory: 64Gi
# ...
Or:
An example showing resource limits configuration with CPU request only
# ...
resources:
  requests:
    cpu: 12
# ...
Supported CPU formats
CPU requests and limits are supported in the following formats:
-
Number of CPU cores as integer (
5CPU core) or decimal (2.5CPU core). -
Number or millicpus / millicores (
100m) where 1000 millicores is the same1CPU core.
An example of using different CPU units
# ...
resources:
  requests:
    cpu: 500m
  limits:
    cpu: 2.5
# ...|
Note
|
The amount of computing power of 1 CPU core might differ depending on the platform where the OpenShift or Kubernetes is deployed. |
For more details about the CPU specification, see the Meaning of CPU website.
Supported memory formats
Memory requests and limits are specified in megabytes, gigabytes, mebibytes, and gibibytes.
-
To specify memory in megabytes, use the
Msuffix. For example1000M. -
To specify memory in gigabytes, use the
Gsuffix. For example1G. -
To specify memory in mebibytes, use the
Misuffix. For example1000Mi. -
To specify memory in gibibytes, use the
Gisuffix. For example1Gi.
An example of using different memory units
# ...
resources:
  requests:
    memory: 512Mi
  limits:
    memory: 2Gi
# ...
For more details about the memory specification and additional supported units, see the Meaning of memory website.
Additional resources
-
For more information about managing computing resources on OpenShift or Kubernetes, see Managing Compute Resources for Containers.
Configuring resource requests and limits
Prerequisites
-
An OpenShift or Kubernetes cluster
-
A running Cluster Operator
Procedure
-
Edit the
resourcesproperty in the resource specifying the cluster deployment. For example:apiVersion: kafka.strimzi.io/v1alpha1 kind: Kafka spec: kafka: # ... resources: requests: cpu: "8" memory: 64Gi limits: cpu: "12" memory: 128Gi # ... zookeeper: # ... -
Create or update the resource.
On Kubernetes this can be done using
kubectl apply:kubectl apply -f your-fileOn OpenShift this can be done using
oc apply:oc apply -f your-file
Additional resources
-
For more information about the schema, see
Resourcesschema reference.
3.1.10. Logging
Logging enables you to diagnose error and performance issues of Strimzi.
For the logging, various logger implementations are used.
Kafka and Zookeeper use log4j logger and Topic Operator, User Operator, and other components use log4j2 logger.
This section provides information about different loggers and describes how to configure log levels.
You can set the log levels by specifying the loggers and their levels directly (inline) or by using a custom (external) config map.
Using inline logging setting
Procedure
-
Edit the YAML file to specify the loggers and their level for the required components. For example:
apiVersion: {KafkaApiVersion}
kind: Kafka
spec:
  kafka:
    # ...
    logging:
      type: inline
      loggers:
       logger.name: "INFO"
    # ...
In the above example, the log level is set to INFO. You can set the log level to INFO, ERROR, WARN, TRACE, DEBUG, FATAL or OFF. For more information about the log levels, see log4j manual.
-
Create or update the Kafka resource in OpenShift or Kubernetes.
On Kubernetes this can be done using
kubectl apply:kubectl apply -f your-fileOn OpenShift this can be done using
oc apply:oc apply -f your-file
Using external ConfigMap for logging setting
Procedure
-
Edit the YAML file to specify the name of the
ConfigMapwhich should be used for the required components. For example:apiVersion: {KafkaApiVersion} kind: Kafka spec: kafka: # ... logging: type: external name: customConfigMap # ...Remember to place your custom ConfigMap under
log4j.propertieseventuallylog4j2.propertieskey. -
Create or update the Kafka resource in OpenShift or Kubernetes.
On Kubernetes this can be done using
kubectl apply:kubectl apply -f your-fileOn OpenShift this can be done using
oc apply:oc apply -f your-file
Loggers
Strimzi consists of several components. Each component has its own loggers and is configurable. This section provides information about loggers of various components.
Components and their loggers are listed below.
-
Kafka
-
kafka.root.logger.level -
log4j.logger.org.I0Itec.zkclient.ZkClient -
log4j.logger.org.apache.zookeeper -
log4j.logger.kafka -
log4j.logger.org.apache.kafka -
log4j.logger.kafka.request.logger -
log4j.logger.kafka.network.Processor -
log4j.logger.kafka.server.KafkaApis -
log4j.logger.kafka.network.RequestChannel$ -
log4j.logger.kafka.controller -
log4j.logger.kafka.log.LogCleaner -
log4j.logger.state.change.logger -
log4j.logger.kafka.authorizer.logger
-
-
Zookeeper
-
zookeeper.root.logger
-
-
Kafka Connect and Kafka Connect with Source2Image support
-
connect.root.logger.level -
log4j.logger.org.apache.zookeeper -
log4j.logger.org.I0Itec.zkclient -
log4j.logger.org.reflections
-
-
Kafka Mirror Maker
-
mirrormaker.root.logger
-
-
Topic Operator
-
rootLogger.level
-
-
User Operator
-
rootLogger.level
-
3.1.11. Kafka rack awareness
The rack awareness feature in Strimzi helps to spread the Kafka broker pods and Kafka topic replicas across different racks. Enabling rack awareness helps to improve availability of Kafka brokers and the topics they are hosting.
|
Note
|
"Rack" might represent an availability zone, data center, or an actual rack in your data center. |
Configuring rack awareness in Kafka brokers
Kafka rack awareness can be configured in the rack property of Kafka.spec.kafka.
The rack object has one mandatory field named topologyKey.
This key needs to match one of the labels assigned to the OpenShift or Kubernetes cluster nodes.
The label is used by OpenShift or Kubernetes when scheduling the Kafka broker pods to nodes.
If the OpenShift or Kubernetes cluster is running on a cloud provider platform, that label should represent the availability zone where the node is running.
Usually, the nodes are labeled with failure-domain.beta.kubernetes.io/zone that can be easily used as the topologyKey value.
This has the effect of spreading the broker pods across zones, and also setting the brokers' broker.rack configuration parameter inside Kafka broker.
Prerequisites
-
An OpenShift or Kubernetes cluster
-
A running Cluster Operator
Procedure
-
Consult your OpenShift or Kubernetes administrator regarding the node label that represent the zone / rack into which the node is deployed.
-
Edit the
rackproperty in theKafkaresource using the label as the topology key.apiVersion: kafka.strimzi.io/v1alpha1 kind: Kafka metadata: name: my-cluster spec: kafka: # ... rack: topologyKey: failure-domain.beta.kubernetes.io/zone # ... -
Create or update the resource.
On Kubernetes this can be done using
kubectl apply:kubectl apply -f your-fileOn OpenShift this can be done using
oc apply:oc apply -f your-file
Additional Resources
-
For information about Configuring init container image for Kafka rack awareness, see Container images.
3.1.12. Healthchecks
Healthchecks are periodical tests which verify that the application’s health. When the Healthcheck fails, OpenShift or Kubernetes can assume that the application is not healthy and attempt to fix it. OpenShift or Kubernetes supports two types of Healthcheck probes:
-
Liveness probes
-
Readiness probes
For more details about the probes, see Configure Liveness and Readiness Probes. Both types of probes are used in Strimzi components.
Users can configure selected options for liveness and readiness probes
Healthcheck configurations
Liveness and readiness probes can be configured using the livenessProbe and readinessProbe properties in following resources:
-
Kafka.spec.kafka -
Kafka.spec.kafka.tlsSidecar -
Kafka.spec.zookeeper -
Kafka.spec.zookeeper.tlsSidecar -
Kafka.spec.entityOperator.tlsSidecar -
KafkaConnect.spec -
KafkaConnectS2I.spec
Both livenessProbe and readinessProbe support two additional options:
-
initialDelaySeconds -
timeoutSeconds
The initialDelaySeconds property defines the initial delay before the probe is tried for the first time.
Default is 15 seconds.
The timeoutSeconds property defines timeout of the probe.
Default is 5 seconds.
An example of liveness and readiness probe configuration
# ...
readinessProbe:
  initialDelaySeconds: 15
  timeoutSeconds: 5
livenessProbe:
  initialDelaySeconds: 15
  timeoutSeconds: 5
# ...
Configuring healthchecks
Prerequisites
-
An OpenShift or Kubernetes cluster
-
A running Cluster Operator
Procedure
-
Edit the
livenessProbeorreadinessProbeproperty in theKafka,KafkaConnectorKafkaConnectS2Iresource. For example:apiVersion: kafka.strimzi.io/v1alpha1 kind: Kafka metadata: name: my-cluster spec: kafka: # ... readinessProbe: initialDelaySeconds: 15 timeoutSeconds: 5 livenessProbe: initialDelaySeconds: 15 timeoutSeconds: 5 # ... zookeeper: # ... -
Create or update the resource.
On Kubernetes this can be done using
kubectl apply:kubectl apply -f your-fileOn OpenShift this can be done using
oc apply:oc apply -f your-file
3.1.13. Prometheus metrics
Strimzi supports Prometheus metrics using Prometheus JMX exporter to convert the JMX metrics supported by Apache Kafka and Zookeeper to Prometheus metrics. When metrics are enabled, they are exposed on port 9404.
For more information about configuring Prometheus and Grafana, see Metrics.
Metrics configuration
Prometheus metrics can be enabled by configuring the metrics property in following resources:
-
Kafka.spec.kafka -
Kafka.spec.zookeeper -
KafkaConnect.spec -
KafkaConnectS2I.spec
When the metrics property is not defined in the resource, the Prometheus metrics will be disabled.
To enable Prometheus metrics export without any further configuration, you can set it to an empty object ({}).
Example of enabling metrics without any further configuration
apiVersion: kafka.strimzi.io/v1alpha1
kind: Kafka
metadata:
  name: my-cluster
spec:
  kafka:
    # ...
    metrics: {}
    # ...
  zookeeper:
    # ...
The metrics property might contain additional configuration for the Prometheus JMX exporter.
Example of enabling metrics with additional Prometheus JMX Exporter configuration
apiVersion: kafka.strimzi.io/v1alpha1
kind: Kafka
metadata:
  name: my-cluster
spec:
  kafka:
    # ...
    metrics:
      lowercaseOutputName: true
      rules:
        - pattern: "kafka.server<type=(.+), name=(.+)PerSec\\w*><>Count"
          name: "kafka_server_$1_$2_total"
        - pattern: "kafka.server<type=(.+), name=(.+)PerSec\\w*, topic=(.+)><>Count"
          name: "kafka_server_$1_$2_total"
          labels:
            topic: "$3"
    # ...
  zookeeper:
    # ...
Configuring Prometheus metrics
Prerequisites
-
An OpenShift or Kubernetes cluster
-
A running Cluster Operator
Procedure
-
Edit the
metricsproperty in theKafka,KafkaConnectorKafkaConnectS2Iresource. For example:apiVersion: kafka.strimzi.io/v1alpha1 kind: Kafka metadata: name: my-cluster spec: kafka: # ... zookeeper: # ... metrics: lowercaseOutputName: true # ... -
Create or update the resource.
On Kubernetes this can be done using
kubectl apply:kubectl apply -f your-fileOn OpenShift this can be done using
oc apply:oc apply -f your-file
3.1.14. JVM Options
Apache Kafka and Apache Zookeeper are running inside of a Java Virtual Machine (JVM). JVM has many configuration options to optimize the performance for different platforms and architectures. Strimzi allows configuring some of these options.
JVM configuration
JVM options can be configured using the jvmOptions property in following resources:
-
Kafka.spec.kafka -
Kafka.spec.zookeeper -
KafkaConnect.spec -
KafkaConnectS2I.spec
Only a selected subset of available JVM options can be configured. The following options are supported:
-Xms and -Xmx
-Xms configures the minimum initial allocation heap size when the JVM starts.
-Xmx configures the maximum heap size.
|
Note
|
The units accepted by JVM settings such as -Xmx and -Xms are those accepted by the JDK java binary in the corresponding image.
Accordingly, 1g or 1G means 1,073,741,824 bytes, and Gi is not a valid unit suffix.
This is in contrast to the units used for memory requests and limits, which follow the OpenShift or Kubernetes convention where 1G means 1,000,000,000 bytes, and 1Gi means 1,073,741,824 bytes
|
The default values used for -Xms and -Xmx depends on whether there is a memory request limit configured for the container:
-
If there is a memory limit then the JVM’s minimum and maximum memory will be set to a value corresponding to the limit.
-
If there is no memory limit then the JVM’s minimum memory will be set to
128Mand the JVM’s maximum memory will not be defined. This allows for the JVM’s memory to grow as-needed, which is ideal for single node environments in test and development.
|
Important
|
Setting
|
When setting -Xmx explicitly, it is recommended to:
-
set the memory request and the memory limit to the same value,
-
use a memory request that is at least 4.5 × the
-Xmx, -
consider setting
-Xmsto the same value as-Xms.
|
Important
|
Containers doing lots of disk I/O (such as Kafka broker containers) will need to leave some memory available for use as operating system page cache. On such containers, the requested memory should be significantly higher than the memory used by the JVM. |
Example fragment configuring
-Xmx and -Xms# ...
jvmOptions:
"-Xmx": "2g"
"-Xms": "2g"
# ...In the above example, the JVM will use 2 GiB (=2,147,483,648 bytes) for its heap. Its total memory usage will be approximately 8GiB.
Setting the same value for initial (-Xms) and maximum (-Xmx) heap sizes avoids the JVM having to allocate memory after startup, at the cost of possibly allocating more heap than is really needed.
For Kafka and Zookeeper pods such allocation could cause unwanted latency.
For Kafka Connect avoiding over allocation may be the most important concern, especially in distributed mode where the effects of over-allocation will be multiplied by the number of consumers.
-server
-server enables the server JVM. This option can be set to true or false.
Example fragment configuring
-server# ...
jvmOptions:
"-server": true
# ...|
Note
|
When neither of the two options (-server and -XX) is specified, the default Apache Kafka configuration of KAFKA_JVM_PERFORMANCE_OPTS will be used.
|
-XX
-XX object can be used for configuring advanced runtime options of a JVM.
The -server and -XX options are used to configure the KAFKA_JVM_PERFORMANCE_OPTS option of Apache Kafka.
Example showing the use of the
-XX objectjvmOptions:
"-XX":
"UseG1GC": true,
"MaxGCPauseMillis": 20,
"InitiatingHeapOccupancyPercent": 35,
"ExplicitGCInvokesConcurrent": true,
"UseParNewGC": falseThe example configuration above will result in the following JVM options:
-XX:+UseG1GC -XX:MaxGCPauseMillis=20 -XX:InitiatingHeapOccupancyPercent=35 -XX:+ExplicitGCInvokesConcurrent -XX:-UseParNewGC|
Note
|
When neither of the two options (-server and -XX) is specified, the default Apache Kafka configuration of KAFKA_JVM_PERFORMANCE_OPTS will be used.
|
Configuring JVM options
Prerequisites
-
An OpenShift or Kubernetes cluster
-
A running Cluster Operator
Procedure
-
Edit the
jvmOptionsproperty in theKafka,KafkaConnectorKafkaConnectS2Iresource. For example:apiVersion: kafka.strimzi.io/v1alpha1 kind: Kafka metadata: name: my-cluster spec: kafka: # ... jvmOptions: "-Xmx": "8g" "-Xms": "8g" # ... zookeeper: # ... -
Create or update the resource.
On Kubernetes this can be done using
kubectl apply:kubectl apply -f your-fileOn OpenShift this can be done using
oc apply:oc apply -f your-file
3.1.15. Container images
Strimzi allows you to configure container images which will be used for its components. Overriding container images is recommended only in special situations, where you need to use a different container registry. For example, because your network does not allow access to the container repository used by Strimzi. In such a case, you should either copy the Strimzi images or build them from the source. If the configured image is not compatible with Strimzi images, it might not work properly.
Container image configurations
Container image which should be used for given components can be specified using the image property in:
-
Kafka.spec.kafka -
Kafka.spec.kafka.tlsSidecar -
Kafka.spec.zookeeper -
Kafka.spec.zookeeper.tlsSidecar -
Kafka.spec.entityOperator.topicOperator -
Kafka.spec.entityOperator.userOperator -
Kafka.spec.entityOperator.tlsSidecar -
KafkaConnect.spec -
KafkaConnectS2I.spec
Configuring the Kafka.spec.kafka.image property
The Kafka.spec.kafka.image property functions differently from the others, because Strimzi supports multiple versions of Kafka, each requiring the own image.
The STRIMZI_KAFKA_IMAGES environment variable of the Cluster Operator configuration is used to provide a mapping between Kafka versions and the corresponding images.
This is used in combination with the Kafka.spec.kafka.image and Kafka.spec.kafka.version properties as follows:
-
If neither
Kafka.spec.kafka.imagenorKafka.spec.kafka.versionare given in the custom resource then theversionwill default to the Cluster Operator’s default Kafka version, and the image will be the one corresponding to this version in theSTRIMZI_KAFKA_IMAGES. -
If
Kafka.spec.kafka.imageis given butKafka.spec.kafka.versionis not then the given image will be used and theversionwill be assumed to be the Cluster Operator’s default Kafka version. -
If
Kafka.spec.kafka.versionis given butKafka.spec.kafka.imageis not then image will be the one corresponding to this version in theSTRIMZI_KAFKA_IMAGES. -
Both
Kafka.spec.kafka.versionandKafka.spec.kafka.imageare given the given image will be used, and it will be assumed to contain a Kafka broker with the given version.
|
Warning
|
It is best to provide just Kafka.spec.kafka.version and leave the Kafka.spec.kafka.image property unspecified.
This reduces the chances of making a mistake in configuring the Kafka resource. If you need to change the images used for different versions of Kafka, it is better to configure the Cluster Operator’s STRIMZI_KAFKA_IMAGES environment variable.
|
Configuring the image property in other resources
For the image property in the other custom resources, the given value will be used during deployment.
If the image property is missing, the image specified in the Cluster Operator configuration will be used.
If the image name is not defined in the Cluster Operator configuration, then the default value will be used.
-
For Kafka broker TLS sidecar:
-
Container image specified in the
STRIMZI_DEFAULT_TLS_SIDECAR_KAFKA_IMAGEenvironment variable from the Cluster Operator configuration. -
strimzi/kafka-stunnel:latestcontainer image.
-
-
For Zookeeper nodes:
-
Container image specified in the
STRIMZI_DEFAULT_ZOOKEEPER_IMAGEenvironment variable from the Cluster Operator configuration. -
strimzi/zookeeper:latestcontainer image.
-
-
For Zookeeper node TLS sidecar:
-
Container image specified in the
STRIMZI_DEFAULT_TLS_SIDECAR_ZOOKEEPER_IMAGEenvironment variable from the Cluster Operator configuration. -
strimzi/zookeeper-stunnel:latestcontainer image.
-
-
For Topic Operator:
-
Container image specified in the
STRIMZI_DEFAULT_TOPIC_OPERATOR_IMAGEenvironment variable from the Cluster Operator configuration. .**strimzi/topic-operator:latestcontainer image.
-
-
For User Operator:
-
Container image specified in the
STRIMZI_DEFAULT_USER_OPERATOR_IMAGEenvironment variable from the Cluster Operator configuration. -
strimzi/user-operator:latestcontainer image.
-
-
For Entity Operator TLS sidecar:
-
Container image specified in the
STRIMZI_DEFAULT_TLS_SIDECAR_ENTITY_OPERATOR_IMAGEenvironment variable from the Cluster Operator configuration. -
strimzi/entity-operator-stunnel:latestcontainer image.
-
-
For Kafka Connect:
-
Container image specified in the
STRIMZI_DEFAULT_KAFKA_CONNECT_IMAGEenvironment variable from the Cluster Operator configuration. -
strimzi/kafka-connect:latestcontainer image.
-
-
For Kafka Connect with Source2image support:
-
Container image specified in the
STRIMZI_DEFAULT_KAFKA_CONNECT_S2I_IMAGEenvironment variable from the Cluster Operator configuration. -
strimzi/kafka-connect-s2i:latestcontainer image.
-
|
Warning
|
Overriding container images is recommended only in special situations, where you need to use a different container registry. For example, because your network does not allow access to the container repository used by Strimzi. In such case, you should either copy the Strimzi images or build them from source. In case the configured image is not compatible with Strimzi images, it might not work properly. |
Example of container image configuration
apiVersion: kafka.strimzi.io/v1alpha1
kind: Kafka
metadata:
  name: my-cluster
spec:
  kafka:
    # ...
    image: my-org/my-image:latest
    # ...
  zookeeper:
    # ...
Configuring container images
Prerequisites
-
An OpenShift or Kubernetes cluster
-
A running Cluster Operator
Procedure
-
Edit the
imageproperty in theKafka,KafkaConnectorKafkaConnectS2Iresource. For example:apiVersion: kafka.strimzi.io/v1alpha1 kind: Kafka metadata: name: my-cluster spec: kafka: # ... image: my-org/my-image:latest # ... zookeeper: # ... -
Create or update the resource.
On Kubernetes this can be done using
kubectl apply:kubectl apply -f your-fileOn OpenShift this can be done using
oc apply:oc apply -f your-file
3.1.16. TLS sidecar
A sidecar is a container that runs in a pod but serves a supporting purpose. In Strimzi, the TLS sidecar uses TLS to encrypt and decrypt all communication between the various components and Zookeeper. Zookeeper does not have native TLS support.
The TLS sidecar is used in:
-
Kafka brokers
-
Zookeeper nodes
-
Entity Operator
TLS sidecar configuration
The TLS sidecar can be configured using the tlsSidecar property in:
-
Kafka.spec.kafka -
Kafka.spec.zookeeper -
Kafka.spec.entityOperator
The TLS sidecar supports the following additional options:
-
image -
resources -
logLevel -
readinessProbe -
livenessProbe
The resources property can be used to specify the memory and CPU resources allocated for the TLS sidecar.
The image property can be used to configure the container image which will be used.
For more details about configuring custom container images, see Container images.
The logLevel property is used to specify the logging level.
Following logging levels are supported:
-
emerg
-
alert
-
crit
-
err
-
warning
-
notice
-
info
-
debug
The default value is notice.
For more information about configuring the readinessProbe and livenessProbe properties for the healthchecks, see Healthcheck configurations.
Example of TLS sidecar configuration
apiVersion: kafka.strimzi.io/v1alpha1
kind: Kafka
metadata:
name: my-cluster
spec:
kafka:
# ...
tlsSidecar:
image: my-org/my-image:latest
resources:
requests:
cpu: 200m
memory: 64Mi
limits:
cpu: 500m
memory: 128Mi
logLevel: debug
readinessProbe:
initialDelaySeconds: 15
timeoutSeconds: 5
livenessProbe:
initialDelaySeconds: 15
timeoutSeconds: 5
# ...
zookeeper:
# ...Configuring TLS sidecar
Prerequisites
-
An OpenShift or Kubernetes cluster
-
A running Cluster Operator
Procedure
-
Edit the
tlsSidecarproperty in theKafkaresource. For example:apiVersion: kafka.strimzi.io/v1alpha1 kind: Kafka metadata: name: my-cluster spec: kafka: # ... tlsSidecar: resources: requests: cpu: 200m memory: 64Mi limits: cpu: 500m memory: 128Mi # ... zookeeper: # ... -
Create or update the resource.
On Kubernetes this can be done using
kubectl apply:kubectl apply -f your-fileOn OpenShift this can be done using
oc apply:oc apply -f your-file
3.1.17. Configuring pod scheduling
|
Important
|
When two application are scheduled to the same OpenShift or Kubernetes node, both applications might use the same resources like disk I/O and impact performance. That can lead to performance degradation. Scheduling Kafka pods in a way that avoids sharing nodes with other critical workloads, using the right nodes or dedicated a set of nodes only for Kafka are the best ways how to avoid such problems. |
Scheduling pods based on other applications
Avoid critical applications to share the node
Pod anti-affinity can be used to ensure that critical applications are never scheduled on the same disk. When running Kafka cluster, it is recommended to use pod anti-affinity to ensure that the Kafka brokers do not share the nodes with other workloads like databases.
Affinity
Affinity can be configured using the affinity property in following resources:
-
Kafka.spec.kafka -
Kafka.spec.zookeeper -
Kafka.spec.entityOperator -
KafkaConnect.spec -
KafkaConnectS2I.spec
The affinity configuration can include different types of affinity:
-
Pod affinity and anti-affinity
-
Node affinity
The format of the affinity property follows the OpenShift or Kubernetes specification.
For more details, see the Kubernetes node and pod affinity documentation.
Configuring pod anti-affinity in Kafka components
Prerequisites
-
An OpenShift or Kubernetes cluster
-
A running Cluster Operator
Procedure
-
Edit the
affinityproperty in the resource specifying the cluster deployment. Use labels to specify the pods which should not be scheduled on the same nodes. ThetopologyKeyshould be set tokubernetes.io/hostnameto specify that the selected pods should not be scheduled on nodes with the same hostname. For example:apiVersion: kafka.strimzi.io/v1alpha1 kind: Kafka spec: kafka: # ... affinity: podAntiAffinity: requiredDuringSchedulingIgnoredDuringExecution: - labelSelector: matchExpressions: - key: application operator: In values: - postgresql - mongodb topologyKey: "kubernetes.io/hostname" # ... zookeeper: # ... -
Create or update the resource.
On Kubernetes this can be done using
kubectl apply:kubectl apply -f your-fileOn OpenShift this can be done using
oc apply:oc apply -f your-file
Scheduling pods to specific nodes
Node scheduling
The OpenShift or Kubernetes cluster usually consists of many different types of worker nodes. Some are optimized for CPU heavy workloads, some for memory, while other might be optimized for storage (fast local SSDs) or network. Using different nodes helps to optimize both costs and performance. To achieve the best possible performance, it is important to allow scheduling of Strimzi components to use the right nodes.
OpenShift or Kubernetes uses node affinity to schedule workloads onto specific nodes.
Node affinity allows you to create a scheduling constraint for the node on which the pod will be scheduled.
The constraint is specified as a label selector.
You can specify the label using either the built-in node label like beta.kubernetes.io/instance-type or custom labels to select the right node.
Affinity
Affinity can be configured using the affinity property in following resources:
-
Kafka.spec.kafka -
Kafka.spec.zookeeper -
Kafka.spec.entityOperator -
KafkaConnect.spec -
KafkaConnectS2I.spec
The affinity configuration can include different types of affinity:
-
Pod affinity and anti-affinity
-
Node affinity
The format of the affinity property follows the OpenShift or Kubernetes specification.
For more details, see the Kubernetes node and pod affinity documentation.
Configuring node affinity in Kafka components
Prerequisites
-
An OpenShift or Kubernetes cluster
-
A running Cluster Operator
Procedure
-
Label the nodes where Strimzi components should be scheduled.
On Kubernetes this can be done using
kubectl label:kubectl label node your-node node-type=fast-networkOn OpenShift this can be done using
oc label:oc label node your-node node-type=fast-networkAlternatively, some of the existing labels might be reused.
-
Edit the
affinityproperty in the resource specifying the cluster deployment. For example:apiVersion: kafka.strimzi.io/v1alpha1 kind: Kafka spec: kafka: # ... affinity: nodeAffinity: requiredDuringSchedulingIgnoredDuringExecution: nodeSelectorTerms: - matchExpressions: - key: node-type operator: In values: - fast-network # ... zookeeper: # ... -
Create or update the resource.
On Kubernetes this can be done using
kubectl apply:kubectl apply -f your-fileOn OpenShift this can be done using
oc apply:oc apply -f your-file
Using dedicated nodes
Dedicated nodes
Cluster administrators can mark selected OpenShift or Kubernetes nodes as tainted. Nodes with taints are excluded from regular scheduling and normal pods will not be scheduled to run on them. Only services which can tolerate the taint set on the node can be scheduled on it. The only other services running on such nodes will be system services such as log collectors or software defined networks.
Taints can be used to create dedicated nodes. Running Kafka and its components on dedicated nodes can have many advantages. There will be no other applications running on the same nodes which could cause disturbance or consume the resources needed for Kafka. That can lead to improved performance and stability.
To schedule Kafka pods on the dedicated nodes, configure node affinity and tolerations.
Affinity
Affinity can be configured using the affinity property in following resources:
-
Kafka.spec.kafka -
Kafka.spec.zookeeper -
Kafka.spec.entityOperator -
KafkaConnect.spec -
KafkaConnectS2I.spec
The affinity configuration can include different types of affinity:
-
Pod affinity and anti-affinity
-
Node affinity
The format of the affinity property follows the OpenShift or Kubernetes specification.
For more details, see the Kubernetes node and pod affinity documentation.
Tolerations
Tolerations ca be configured using the tolerations property in following resources:
-
Kafka.spec.kafka -
Kafka.spec.zookeeper -
Kafka.spec.entityOperator -
KafkaConnect.spec -
KafkaConnectS2I.spec
The format of the tolerations property follows the OpenShift or Kubernetes specification.
For more details, see the Kubernetes taints and tolerations.
Setting up dedicated nodes and scheduling pods on them
Prerequisites
-
An OpenShift or Kubernetes cluster
-
A running Cluster Operator
Procedure
-
Select the nodes which should be used as dedicated
-
Make sure there are no workloads scheduled on these nodes
-
Set the taints on the selected nodes
On Kubernetes this can be done using
kubectl taint:kubectl taint node your-node dedicated=Kafka:NoScheduleOn OpenShift this can be done using
oc adm taint:oc adm taint node your-node dedicated=Kafka:NoSchedule -
Additionally, add a label to the selected nodes as well.
On Kubernetes this can be done using
kubectl label:kubectl label node your-node dedicated=KafkaOn OpenShift this can be done using
oc label:oc label node your-node dedicated=Kafka -
Edit the
affinityandtolerationsproperties in the resource specifying the cluster deployment. For example:apiVersion: kafka.strimzi.io/v1alpha1 kind: Kafka spec: kafka: # ... tolerations: - key: "dedicated" operator: "Equal" value: "Kafka" effect: "NoSchedule" affinity: nodeAffinity: requiredDuringSchedulingIgnoredDuringExecution: nodeSelectorTerms: - matchExpressions: - key: dedicated operator: In values: - Kafka # ... zookeeper: # ... -
Create or update the resource.
On Kubernetes this can be done using
kubectl apply:kubectl apply -f your-fileOn OpenShift this can be done using
oc apply:oc apply -f your-file
3.1.18. Performing a rolling update of a Kafka cluster
This procedure describes how to manually trigger a rolling update of an existing Kafka cluster by using an OpenShift or Kubernetes annotation.
Prerequisites
-
A running Kafka cluster.
-
A running Cluster Operator.
Procedure
-
Find the name of the
StatefulSetthat controls the Kafka pods you want to manually update.For example, if your Kafka cluster is named my-cluster, the corresponding
StatefulSetis named my-cluster-kafka. -
Annotate a
StatefulSetresource in OpenShift or Kubernetes.On Kubernetes, use
kubectl annotate:kubectl annotate statefulset cluster-name-kafka strimzi.io/manual-rolling-update=trueOn OpenShift, use
oc annotate:oc annotate statefulset cluster-name-kafka strimzi.io/manual-rolling-update=true -
Wait for the next reconciliation to occur (every two minutes by default). A rolling update of all pods within the annotated
StatefulSetis triggered, as long as the annotation was detected by the reconciliation process. Once the rolling update of all the pods is complete, the annotation is removed from theStatefulSet.
Additional resources
-
For more information about deploying the Cluster Operator, see Cluster Operator.
-
For more information about deploying the Kafka cluster on OpenShift, see Deploying the Kafka cluster to OpenShift.
-
For more information about deploying the Kafka cluster on Kubernetes, see Deploying the Kafka cluster to Kubernetes.
3.1.19. Performing a rolling update of a Zookeeper cluster
This procedure describes how to manually trigger a rolling update of an existing Zookeeper cluster by using an OpenShift or Kubernetes annotation.
Prerequisites
-
A running Zookeeper cluster.
-
A running Cluster Operator.
Procedure
-
Find the name of the
StatefulSetthat controls the Zookeeper pods you want to manually update.For example, if your Kafka cluster is named my-cluster, the corresponding
StatefulSetis named my-cluster-zookeeper. -
Annotate a
StatefulSetresource in OpenShift or Kubernetes.On Kubernetes, use
kubectl annotate:kubectl annotate statefulset cluster-name-zookeeper strimzi.io/manual-rolling-update=trueOn OpenShift, use
oc annotate:oc annotate statefulset cluster-name-zookeeper strimzi.io/manual-rolling-update=true -
Wait for the next reconciliation to occur (every two minutes by default). A rolling update of all pods within the annotated
StatefulSetis triggered, as long as the annotation was detected by the reconciliation process. Once the rolling update of all the pods is complete, the annotation is removed from theStatefulSet.
Additional resources
-
For more information about deploying the Cluster Operator, see Cluster Operator.
-
For more information about deploying the Zookeeper cluster, see Deploying the Kafka cluster to OpenShift.
3.1.20. Scaling clusters
Scaling Kafka clusters
Adding brokers to a cluster
The primary way of increasing throughput for a topic is to increase the number of partitions for that topic. That works because the extra partitions allow the load of the topic to be shared between the different brokers in the cluster. However, in situations where every broker is constrained by a particular resource (typically I/O) using more partitions will not result in increased throughput. Instead, you need to add brokers to the cluster.
When you add an extra broker to the cluster, Kafka does not assign any partitions to it automatically. You must decide which partitions to move from the existing brokers to the new broker.
Once the partitions have been redistributed between all the brokers, the resource utilization of each broker should be reduced.
Removing brokers from a cluster
Because Strimzi uses StatefulSets to manage broker pods, you cannot remove any pod from the cluster.
You can only remove one or more of the highest numbered pods from the cluster.
For example, in a cluster of 12 brokers the pods are named cluster-name-kafka-0 up to cluster-name-kafka-11.
If you decide to scale down by one broker, the cluster-name-kafka-11 will be removed.
Before you remove a broker from a cluster, ensure that it is not assigned to any partitions. You should also decide which of the remaining brokers will be responsible for each of the partitions on the broker being decommissioned. Once the broker has no assigned partitions, you can scale the cluster down safely.
Partition reassignment
The Topic Operator does not currently support reassigning replicas to different brokers, so it is necessary to connect directly to broker pods to reassign replicas to brokers.
Within a broker pod, the kafka-reassign-partitions.sh utility allows you to reassign partitions to different brokers.
It has three different modes:
--generate-
Takes a set of topics and brokers and generates a reassignment JSON file which will result in the partitions of those topics being assigned to those brokers. Because this operates on whole topics, it cannot be used when you just need to reassign some of the partitions of some topics.
--execute-
Takes a reassignment JSON file and applies it to the partitions and brokers in the cluster. Brokers that gain partitions as a result become followers of the partition leader. For a given partition, once the new broker has caught up and joined the ISR (in-sync replicas) the old broker will stop being a follower and will delete its replica.
--verify-
Using the same reassignment JSON file as the
--executestep,--verifychecks whether all of the partitions in the file have been moved to their intended brokers. If the reassignment is complete, --verify also removes any throttles that are in effect. Unless removed, throttles will continue to affect the cluster even after the reassignment has finished.
It is only possible to have one reassignment running in a cluster at any given time, and it is not possible to cancel a running reassignment.
If you need to cancel a reassignment, wait for it to complete and then perform another reassignment to revert the effects of the first reassignment.
The kafka-reassign-partitions.sh will print the reassignment JSON for this reversion as part of its output.
Very large reassignments should be broken down into a number of smaller reassignments in case there is a need to stop in-progress reassignment.
Reassignment JSON file
The reassignment JSON file has a specific structure:
{
"version": 1,
"partitions": [
<PartitionObjects>
]
}Where <PartitionObjects> is a comma-separated list of objects like:
{
"topic": <TopicName>,
"partition": <Partition>,
"replicas": [ <AssignedBrokerIds> ]
}|
Note
|
Although Kafka also supports a "log_dirs" property this should not be used in Strimzi.
|
The following is an example reassignment JSON file that assigns topic topic-a, partition 4 to brokers 2, 4 and 7, and topic topic-b partition 2 to brokers 1, 5 and 7:
{
"version": 1,
"partitions": [
{
"topic": "topic-a",
"partition": 4,
"replicas": [2,4,7]
},
{
"topic": "topic-b",
"partition": 2,
"replicas": [1,5,7]
}
]
}Partitions not included in the JSON are not changed.
Generating reassignment JSON files
This procedure describes how to generate a reassignment JSON file that reassigns all the partitions for a given set of topics using the kafka-reassign-partitions.sh tool.
Prerequisites
-
A running Cluster Operator
-
A
Kafkaresource -
A set of topics to reassign the partitions of
Procedure
-
Prepare a JSON file named
topics.jsonthat lists the topics to move. It must have the following structure:{ "version": 1, "topics": [ <TopicObjects> ] }where <TopicObjects> is a comma-separated list of objects like:
{ "topic": <TopicName> }For example if you want to reassign all the partitions of
topic-aandtopic-b, you would need to prepare atopics.jsonfile like this:{ "version": 1, "topics": [ { "topic": "topic-a"}, { "topic": "topic-b"} ] } -
Copy the
topics.jsonfile to one of the broker pods:On Kubernetes:
cat topics.json | kubectl exec -c kafka <BrokerPod> -i -- \ /bin/bash -c \ 'cat > /tmp/topics.json'On OpenShift:
cat topics.json | oc rsh -c kafka <BrokerPod> /bin/bash -c \ 'cat > /tmp/topics.json' -
Use the
kafka-reassign-partitions.sh`command to generate the reassignment JSON.On Kubernetes:
kubectl exec <BrokerPod> -c kafka -it -- \ bin/kafka-reassign-partitions.sh --zookeeper localhost:2181 \ --topics-to-move-json-file /tmp/topics.json \ --broker-list <BrokerList> \ --generateOn OpenShift:
oc rsh -c kafka <BrokerPod> \ bin/kafka-reassign-partitions.sh --zookeeper localhost:2181 \ --topics-to-move-json-file /tmp/topics.json \ --broker-list <BrokerList> \ --generateFor example, to move all the partitions of
topic-aandtopic-bto brokers4and7oc rsh -c kafka _<BrokerPod>_ \ bin/kafka-reassign-partitions.sh --zookeeper localhost:2181 \ --topics-to-move-json-file /tmp/topics.json \ --broker-list 4,7 \ --generate
Creating reassignment JSON files manually
You can manually create the reassignment JSON file if you want to move specific partitions.
Reassignment throttles
Partition reassignment can be a slow process because it involves transferring large amounts of data between brokers. To avoid a detrimental impact on clients, you can throttle the reassignment process. This might cause the reassignment to take longer to complete.
-
If the throttle is too low then the newly assigned brokers will not be able to keep up with records being published and the reassignment will never complete.
-
If the throttle is too high then clients will be impacted.
For example, for producers, this could manifest as higher than normal latency waiting for acknowledgement. For consumers, this could manifest as a drop in throughput caused by higher latency between polls.
Scaling up a Kafka cluster
This procedure describes how to increase the number of brokers in a Kafka cluster.
Prerequisites
-
An existing Kafka cluster.
-
A reassignment JSON file named
reassignment.jsonthat describes how partitions should be reassigned to brokers in the enlarged cluster.
Procedure
-
Add as many new brokers as you need by increasing the
Kafka.spec.kafka.replicasconfiguration option. -
Verify that the new broker pods have started.
-
Copy the
reassignment.jsonfile to the broker pod on which you will later execute the commands:On Kubernetes:
cat reassignment.json | \ kubectl exec broker-pod -c kafka -i -- /bin/bash -c \ 'cat > /tmp/reassignment.json'On OpenShift:
cat reassignment.json | \ oc rsh -c kafka broker-pod /bin/bash -c \ 'cat > /tmp/reassignment.json'For example:
cat reassignment.json | \ oc rsh -c kafka my-cluster-kafka-0 /bin/bash -c \ 'cat > /tmp/reassignment.json' -
Execute the partition reassignment using the
kafka-reassign-partitions.shcommand line tool from the same broker pod.On Kubernetes:
kubectl exec broker-pod -c kafka -it -- \ bin/kafka-reassign-partitions.sh --zookeeper localhost:2181 \ --reassignment-json-file /tmp/reassignment.json \ --executeOn OpenShift:
oc rsh -c kafka broker-pod \ bin/kafka-reassign-partitions.sh --zookeeper localhost:2181 \ --reassignment-json-file /tmp/reassignment.json \ --executeIf you are going to throttle replication you can also pass the
--throttleoption with an inter-broker throttled rate in bytes per second. For example:On Kubernetes:
kubectl exec my-cluster-kafka-0 -c kafka -it -- \ bin/kafka-reassign-partitions.sh --zookeeper localhost:2181 \ --reassignment-json-file /tmp/reassignment.json \ --throttle 5000000 \ --executeOn OpenShift:
oc rsh -c kafka my-cluster-kafka-0 \ bin/kafka-reassign-partitions.sh --zookeeper localhost:2181 \ --reassignment-json-file /tmp/reassignment.json \ --throttle 5000000 \ --executeThis command will print out two reassignment JSON objects. The first records the current assignment for the partitions being moved. You should save this to a local file (not a file in the pod) in case you need to revert the reassignment later on. The second JSON object is the target reassignment you have passed in your reassignment JSON file.
-
If you need to change the throttle during reassignment you can use the same command line with a different throttled rate. For example:
On Kubernetes,
kubectl exec my-cluster-kafka-0 -c kafka -it -- \ bin/kafka-reassign-partitions.sh --zookeeper localhost:2181 \ --reassignment-json-file /tmp/reassignment.json \ --throttle 10000000 \ --executeOn OpenShift:
oc rsh -c kafka my-cluster-kafka-0 \ bin/kafka-reassign-partitions.sh --zookeeper localhost:2181 \ --reassignment-json-file /tmp/reassignment.json \ --throttle 10000000 \ --execute -
Periodically verify whether the reassignment has completed using the
kafka-reassign-partitions.shcommand line tool from any of the broker pods. This is the same command as the previous step but with the--verifyoption instead of the--executeoption.On Kubernetes:
kubectl exec broker-pod -c kafka -it -- \ bin/kafka-reassign-partitions.sh --zookeeper localhost:2181 \ --reassignment-json-file /tmp/reassignment.json \ --verifyOn OpenShift:
oc rsh -c kafka broker-pod \ bin/kafka-reassign-partitions.sh --zookeeper localhost:2181 \ --reassignment-json-file /tmp/reassignment.json \ --verifyFor example, on Kubernetes,
kubectl exec my-cluster-kafka-0 -c kafka -it -- \ bin/kafka-reassign-partitions.sh --zookeeper localhost:2181 \ --reassignment-json-file /tmp/reassignment.json \ --verifyFor example, on {OpenShift},
oc rsh -c kafka my-cluster-kafka-0 \ bin/kafka-reassign-partitions.sh --zookeeper localhost:2181 \ --reassignment-json-file /tmp/reassignment.json \ --verify -
The reassignment has finished when the
--verifycommand reports each of the partitions being moved as completed successfully. This final--verifywill also have the effect of removing any reassignment throttles. You can now delete the revert file if you saved the JSON for reverting the assignment to their original brokers.
Scaling down a Kafka cluster
Additional resources
This procedure describes how to decrease the number of brokers in a Kafka cluster.
Prerequisites
-
An existing Kafka cluster.
-
A reassignment JSON file named
reassignment.jsondescribing how partitions should be reassigned to brokers in the cluster once the broker(s) in the highest numberedPod(s)have been removed.
Procedure
-
Copy the
reassignment.jsonfile to the broker pod on which you will later execute the commands:On Kubernetes:
cat reassignment.json | \ kubectl exec broker-pod -c kafka -i -- /bin/bash -c \ 'cat > /tmp/reassignment.json'On OpenShift:
cat reassignment.json | \ oc rsh -c kafka broker-pod /bin/bash -c \ 'cat > /tmp/reassignment.json'For example:
cat reassignment.json | \ oc rsh -c kafka my-cluster-kafka-0 /bin/bash -c \ 'cat > /tmp/reassignment.json' -
Execute the partition reassignment using the
kafka-reassign-partitions.shcommand line tool from the same broker pod.On Kubernetes:
kubectl exec broker-pod -c kafka -it -- \ bin/kafka-reassign-partitions.sh --zookeeper localhost:2181 \ --reassignment-json-file /tmp/reassignment.json \ --executeOn OpenShift:
oc rsh -c kafka broker-pod \ bin/kafka-reassign-partitions.sh --zookeeper localhost:2181 \ --reassignment-json-file /tmp/reassignment.json \ --executeIf you are going to throttle replication you can also pass the
--throttleoption with an inter-broker throttled rate in bytes per second. For example:On Kubernetes:
kubectl exec my-cluster-kafka-0 -c kafka -it -- \ bin/kafka-reassign-partitions.sh --zookeeper localhost:2181 \ --reassignment-json-file /tmp/reassignment.json \ --throttle 5000000 \ --executeOn OpenShift:
oc rsh -c kafka my-cluster-kafka-0 \ bin/kafka-reassign-partitions.sh --zookeeper localhost:2181 \ --reassignment-json-file /tmp/reassignment.json \ --throttle 5000000 \ --executeThis command will print out two reassignment JSON objects. The first records the current assignment for the partitions being moved. You should save this to a local file (not a file in the pod) in case you need to revert the reassignment later on. The second JSON object is the target reassignment you have passed in your reassignment JSON file.
-
If you need to change the throttle during reassignment you can use the same command line with a different throttled rate. For example:
On Kubernetes,
kubectl exec my-cluster-kafka-0 -c kafka -it -- \ bin/kafka-reassign-partitions.sh --zookeeper localhost:2181 \ --reassignment-json-file /tmp/reassignment.json \ --throttle 10000000 \ --executeOn OpenShift:
oc rsh -c kafka my-cluster-kafka-0 \ bin/kafka-reassign-partitions.sh --zookeeper localhost:2181 \ --reassignment-json-file /tmp/reassignment.json \ --throttle 10000000 \ --execute -
Periodically verify whether the reassignment has completed using the
kafka-reassign-partitions.shcommand line tool from any of the broker pods. This is the same command as the previous step but with the--verifyoption instead of the--executeoption.On Kubernetes:
kubectl exec broker-pod -c kafka -it -- \ bin/kafka-reassign-partitions.sh --zookeeper localhost:2181 \ --reassignment-json-file /tmp/reassignment.json \ --verifyOn OpenShift:
oc rsh -c kafka broker-pod \ bin/kafka-reassign-partitions.sh --zookeeper localhost:2181 \ --reassignment-json-file /tmp/reassignment.json \ --verifyFor example, on Kubernetes,
kubectl exec my-cluster-kafka-0 -c kafka -it -- \ bin/kafka-reassign-partitions.sh --zookeeper localhost:2181 \ --reassignment-json-file /tmp/reassignment.json \ --verifyFor example, on {OpenShift},
oc rsh -c kafka my-cluster-kafka-0 \ bin/kafka-reassign-partitions.sh --zookeeper localhost:2181 \ --reassignment-json-file /tmp/reassignment.json \ --verify -
The reassignment has finished when the
--verifycommand reports each of the partitions being moved as completed successfully. This final--verifywill also have the effect of removing any reassignment throttles. You can now delete the revert file if you saved the JSON for reverting the assignment to their original brokers. -
Once all the partition reassignments have finished, the broker(s) being removed should not have responsibility for any of the partitions in the cluster. You can verify this by checking that the broker’s data log directory does not contain any live partition logs. If the log directory on the broker contains a directory that does not match the extended regular expression
[a-zA-Z0-9.-]+\.[a-z0-9]+-delete$then the broker still has live partitions and it should not be stopped.You can check this by executing the command:
oc rsh <BrokerN> -c kafka /bin/bash -c \ "ls -l /var/lib/kafka/kafka-log_<N>_ | grep -E '^d' | grep -vE '[a-zA-Z0-9.-]+\.[a-z0-9]+-delete$'"where N is the number of the
Pod(s)being deleted.If the above command prints any output then the broker still has live partitions. In this case, either the reassignment has not finished, or the reassignment JSON file was incorrect.
-
Once you have confirmed that the broker has no live partitions you can edit the
Kafka.spec.kafka.replicasof yourKafkaresource, which will scale down theStatefulSet, deleting the highest numbered brokerPod(s).
3.1.21. Deleting Kafka nodes manually
Additional resources
This procedure describes how to delete an existing Kafka node by using an OpenShift or Kubernetes annotation.
Deleting a Kafka node consists of deleting both the Pod on which the Kafka broker is running and the related PersistentVolumeClaim (if the cluster was deployed with persistent storage).
After deletion, the Pod and its related PersistentVolumeClaim are recreated automatically.
|
Warning
|
Deleting a PersistentVolumeClaim can cause permanent data loss. The following procedure should only be performed if you have encountered storage issues.
|
Prerequisites
-
A running Kafka cluster.
-
A running Cluster Operator.
Procedure
-
Find the name of the
Podthat you want to delete.
For example, if the cluster is named cluster-name, the pods are named cluster-name-kafka-index, where index starts at zero and ends at the total number of replicas.
-
Annotate the
Podresource in OpenShift or Kubernetes.On Kubernetes use
kubectl annotate:kubectl annotate pod cluster-name-kafka-index strimzi.io/delete-pod-and-pvc=trueOn OpenShift use
oc annotate:oc annotate pod cluster-name-kafka-index strimzi.io/delete-pod-and-pvc=true -
Wait for the next reconciliation, when the annotated pod with the underlying persistent volume claim will be deleted and then recreated.
Additional resources
-
For more information about deploying the Cluster Operator, see Cluster Operator.
-
For more information about deploying the Kafka cluster on OpenShift, see Deploying the Kafka cluster to OpenShift.
-
For more information about deploying the Kafka cluster on Kubernetes, see Deploying the Kafka cluster to Kubernetes.
3.1.22. Deleting Zookeeper nodes manually
This procedure describes how to delete an existing Zookeeper node by using an OpenShift or Kubernetes annotation.
Deleting a Zookeeper node consists of deleting both the Pod on which Zookeeper is running and the related PersistentVolumeClaim (if the cluster was deployed with persistent storage).
After deletion, the Pod and its related PersistentVolumeClaim are recreated automatically.
|
Warning
|
Deleting a PersistentVolumeClaim can cause permanent data loss. The following procedure should only be performed if you have encountered storage issues.
|
Prerequisites
-
A running Zookeeper cluster.
-
A running Cluster Operator.
Procedure
-
Find the name of the
Podthat you want to delete.
For example, if the cluster is named cluster-name, the pods are named cluster-name-zookeeper-index, where index starts at zero and ends at the total number of replicas.
-
Annotate the
Podresource in OpenShift or Kubernetes.On Kubernetes use
kubectl annotate:kubectl annotate pod cluster-name-zookeeper-index strimzi.io/delete-pod-and-pvc=trueOn OpenShift use
oc annotate:oc annotate pod cluster-name-zookeeper-index strimzi.io/delete-pod-and-pvc=true -
Wait for the next reconciliation, when the annotated pod with the underlying persistent volume claim will be deleted and then recreated.
Additional resources
-
For more information about deploying the Cluster Operator, see Cluster Operator.
-
For more information about deploying the Zookeeper cluster on OpenShift, see Deploying the Kafka cluster to OpenShift.
-
For more information about deploying the Zookeeper cluster on Kubernetes, see Deploying the Kafka cluster to Kubernetes.
3.1.23. Maintenance time windows for rolling updates
Maintenance time windows allow you to schedule certain rolling updates of your Kafka and Zookeeper clusters to start at a convenient time.
Maintenance time windows overview
In most cases, the Cluster Operator only updates your Kafka or Zookeeper clusters in response to changes to the corresponding Kafka resource.
This enables you to plan when to apply changes to a Kafka resource to minimize the impact on Kafka client applications.
However, some updates to your Kafka and Zookeeper clusters can happen without any corresponding change to the Kafka resource.
For example, the Cluster Operator will need to perform a rolling restart if a CA (Certificate Authority) certificate that it manages is close to expiry.
While a rolling restart of the pods should not affect availability of the service (assuming correct broker and topic configurations), it could affect performance of the Kafka client applications. Maintenance time windows allow you to schedule such spontaneous rolling updates of your Kafka and Zookeeper clusters to start at a convenient time. If maintenance time windows are not configured for a cluster then it is possible that such spontaneous rolling updates will happen at an inconvenient time, such as during a predictable period of high load.
Maintenance time window definition
You configure maintenance time windows by entering an array of strings in the Kafka.spec.maintenanceTimeWindows property.
Each string is a cron expression interpreted as being in UTC (Coordinated Universal Time, which for practical purposes is the same as Greenwich Mean Time).
The following example configures a single maintenance time window that starts at midnight and ends at 01:59am (UTC), on Sundays, Mondays, Tuesdays, Wednesdays, and Thursdays:
# ...
maintenanceTimeWindows:
- "* * 0-1 ? * SUN,MON,TUE,WED,THU *"
# ...In practice, maintenance windows should be set in conjunction with the Kafka.spec.clusterCa.renewalDays and Kafka.spec.clientsCa.renewalDays properties of the Kafka resource, to ensure that the necessary CA certificate renewal can be completed in the configured maintenance time windows.
|
Note
|
Strimzi does not schedule maintenance operations exactly according to the given windows. Instead, for each reconciliation, it checks whether a maintenance window is currently "open". This means that the start of maintenance operations within a given time window can be delayed by up to the Cluster Operator reconciliation interval. Maintenance time windows must therefore be at least this long. |
Additional resources
-
For more information about the Cluster Operator configuration, see Cluster Operator Configuration.
Configuring a maintenance time window
You can configure a maintenance time window for rolling updates triggered by supported processes.
Prerequisites
-
An OpenShift or Kubernetes cluster.
-
The Cluster Operator is running.
Procedure
-
Add or edit the
maintenanceTimeWindowsproperty in theKafkaresource. For example to allow maintenance between 0800 and 1059 and between 1400 and 1559 you would set themaintenanceTimeWindowsas shown below:apiVersion: kafka.strimzi.io/v1alpha1 kind: Kafka metadata: name: my-cluster spec: kafka: # ... zookeeper: # ... maintenanceTimeWindows: - "* * 8-10 * * ?" - "* * 14-15 * * ?" -
Create or update the resource.
On Kubernetes this can be done using
kubectl apply:kubectl apply -f your-fileOn OpenShift, use
oc apply:oc apply -f your-file
Additional resources
-
Performing a rolling update of a Kafka cluster, see Performing a rolling update of a Kafka cluster
-
Performing a rolling update of a Zookeeper cluster, see Performing a rolling update of a Zookeeper cluster
3.1.24. List of resources created as part of Kafka cluster
The following resources will created by the Cluster Operator in the OpenShift or Kubernetes cluster:
cluster-name-kafka-
StatefulSet which is in charge of managing the Kafka broker pods.
cluster-name-kafka-brokers-
Service needed to have DNS resolve the Kafka broker pods IP addresses directly.
cluster-name-kafka-bootstrap-
Service can be used as bootstrap servers for Kafka clients.
cluster-name-kafka-external-bootstrap-
Bootstrap service for clients connecting from outside of the OpenShift or Kubernetes cluster. This resource will be created only when external listener is enabled.
cluster-name-kafka-pod-id-
Service used to route traffic from outside of the OpenShift or Kubernetes cluster to individual pods. This resource will be created only when external listener is enabled.
cluster-name-kafka-external-bootstrap-
Bootstrap route for clients connecting from outside of the OpenShift or Kubernetes cluster. This resource will be created only when external listener is enabled and set to type
route. cluster-name-kafka-pod-id-
Route for traffic from outside of the OpenShift or Kubernetes cluster to individual pods. This resource will be created only when external listener is enabled and set to type
route. cluster-name-kafka-config-
ConfigMap which contains the Kafka ancillary configuration and is mounted as a volume by the Kafka broker pods.
cluster-name-kafka-brokers-
Secret with Kafka broker keys.
cluster-name-kafka-
Service account used by the Kafka brokers.
cluster-name-kafka-
Pod Disruption Budget configured for the Kafka brokers.
strimzi-namespace-name-cluster-name-kafka-init-
Cluster role binding used by the Kafka brokers.
cluster-name-zookeeper-
StatefulSet which is in charge of managing the Zookeeper node pods.
cluster-name-zookeeper-nodes-
Service needed to have DNS resolve the Zookeeper pods IP addresses directly.
cluster-name-zookeeper-client-
Service used by Kafka brokers to connect to Zookeeper nodes as clients.
cluster-name-zookeeper-config-
ConfigMap which contains the Zookeeper ancillary configuration and is mounted as a volume by the Zookeeper node pods.
cluster-name-zookeeper-nodes-
Secret with Zookeeper node keys.
cluster-name-zookeeper-
Pod Disruption Budget configured for the Zookeeper nodes.
cluster-name-entity-operator-
Deployment with Topic and User Operators. This resource will be created only if Cluster Operator deployed Entity Operator.
cluster-name-entity-topic-operator-config-
Configmap with ancillary configuration for Topic Operators. This resource will be created only if Cluster Operator deployed Entity Operator.
cluster-name-entity-user-operator-config-
Configmap with ancillary configuration for User Operators. This resource will be created only if Cluster Operator deployed Entity Operator.
cluster-name-entity-operator-certs-
Secret with Entitiy operators keys for communication with Kafka and Zookeeper. This resource will be created only if Cluster Operator deployed Entity Operator.
cluster-name-entity-operator-
Service account used by the Entity Operator.
strimzi-cluster-name-topic-operator-
Role binding used by the Entity Operator.
strimzi-cluster-name-user-operator-
Role binding used by the Entity Operator.
cluster-name-cluster-ca-
Secret with the Cluster CA used to encrypt the cluster communication.
cluster-name-cluster-ca-cert-
Secret with the Cluster CA public key. This key can be used to verify the identity of the Kafka brokers.
cluster-name-clients-ca-
Secret with the Clients CA used to encrypt the communication between Kafka brokers and Kafka clients.
cluster-name-clients-ca-cert-
Secret with the Clients CA public key. This key can be used to verify the identity of the Kafka brokers.
cluster-name-cluster-operator-certs-
Secret with Cluster operators keys for communication with Kafka and Zookeeper.
data-cluster-name-kafka-idx-
Persistent Volume Claim for the volume used for storing data for the Kafka broker pod
idx. This resource will be created only if persistent storage is selected for provisioning persistent volumes to store data. data-id-cluster-name-kafka-idx-
Persistent Volume Claim for the volume
idused for storing data for the Kafka broker podidx. This resource is only created if persistent storage is selected for JBOD volumes when provisioning persistent volumes to store data. data-cluster-name-zookeeper-idx-
Persistent Volume Claim for the volume used for storing data for the Zookeeper node pod
idx. This resource will be created only if persistent storage is selected for provisioning persistent volumes to store data.
3.2. Kafka Connect cluster configuration
The full schema of the KafkaConnect resource is described in the KafkaConnect schema reference.
All labels that are applied to the desired KafkaConnect resource will also be applied to the OpenShift or Kubernetes resources making up the Kafka Connect cluster.
This provides a convenient mechanism for those resources to be labelled in whatever way the user requires.
3.2.1. Replicas
Kafka Connect clusters can run with a different number of nodes.
The number of nodes is defined in the KafkaConnect and KafkaConnectS2I resources.
Running Kafka Connect cluster with multiple nodes can provide better availability and scalability.
However, when running Kafka Connect on OpenShift or Kubernetes it is not absolutely necessary to run multiple nodes of Kafka Connect for high availability.
When the node where Kafka Connect is deployed to crashes, OpenShift or Kubernetes will automatically take care of rescheduling the Kafka Connect pod to a different node.
However, running Kafka Connect with multiple nodes can provide faster failover times, because the other nodes will be already up and running.
Configuring the number of nodes
Number of Kafka Connect nodes can be configured using the replicas property in KafkaConnect.spec and KafkaConnectS2I.spec.
Prerequisites
-
An OpenShift or Kubernetes cluster
-
A running Cluster Operator
Procedure
-
Edit the
replicasproperty in theKafkaConnectorKafkaConnectS2Iresource. For example:apiVersion: kafka.strimzi.io/v1alpha1 kind: KafkaConnectS2I metadata: name: my-cluster spec: # ... replicas: 3 # ... -
Create or update the resource.
On Kubernetes this can be done using
kubectl apply:kubectl apply -f your-fileOn OpenShift this can be done using
oc apply:oc apply -f your-file
3.2.2. Bootstrap servers
Kafka Connect cluster always works together with a Kafka cluster.
The Kafka cluster is specified in the form of a list of bootstrap servers.
On OpenShift or Kubernetes, the list must ideally contain the Kafka cluster bootstrap service which is named cluster-name-kafka-bootstrap and a port of 9092 for plain traffic or 9093 for encrypted traffic.
The list of bootstrap servers can be configured in the bootstrapServers property in KafkaConnect.spec and KafkaConnectS2I.spec. The servers should be a comma-separated list containing one or more Kafka brokers or a service pointing to Kafka brokers specified as a hostname:_port_ pairs.
When using Kafka Connect with a Kafka cluster not managed by Strimzi, you can specify the bootstrap servers list according to the configuration of a given cluster.
Configuring bootstrap servers
Prerequisites
-
An OpenShift or Kubernetes cluster
-
A running Cluster Operator
Procedure
-
Edit the
bootstrapServersproperty in theKafkaConnectorKafkaConnectS2Iresource. For example:apiVersion: kafka.strimzi.io/v1alpha1 kind: KafkaConnect metadata: name: my-cluster spec: # ... bootstrapServers: my-cluster-kafka-bootstrap:9092 # ... -
Create or update the resource.
On Kubernetes this can be done using
kubectl apply:kubectl apply -f your-fileOn OpenShift this can be done using
oc apply:oc apply -f your-file
3.2.3. Connecting to Kafka brokers using TLS
By default, Kafka Connect will try to connect to Kafka brokers using a plain text connection. If you would prefer to use TLS additional configuration will be necessary.
TLS support in Kafka Connect
TLS support is configured in the tls property in KafkaConnect.spec and KafkaConnectS2I.spec.
The tls property contains a list of secrets with key names under which the certificates are stored.
The certificates should be stored in X509 format.
An example showing TLS configuration with multiple certificates
apiVersion: kafka.strimzi.io/v1alpha1
kind: KafkaConnect
metadata:
name: my-cluster
spec:
# ...
tls:
trustedCertificates:
- secretName: my-secret
certificate: ca.crt
- secretName: my-other-secret
certificate: certificate.crt
# ...When multiple certificates are stored in the same secret, it can be listed multiple times.
An example showing TLS configuration with multiple certificates from the same secret
apiVersion: kafka.strimzi.io/v1alpha1
kind: KafkaConnectS2I
metadata:
name: my-cluster
spec:
# ...
tls:
trustedCertificates:
- secretName: my-secret
certificate: ca.crt
- secretName: my-secret
certificate: ca2.crt
# ...Configuring TLS in Kafka Connect
Prerequisites
-
An OpenShift or Kubernetes cluster
-
A running Cluster Operator
Procedure
-
Find out the name of the secret with the certificate which should be used for TLS Server Authentication and the key under which the certificate is stored in the secret. If such secret does not exist yet, prepare the certificate in a file and create the secret.
On Kubernetes this can be done using
kubectl create:kubectl create secret generic my-secret --from-file=my-file.crtOn OpenShift this can be done using
oc create:oc create secret generic my-secret --from-file=my-file.crt -
Edit the
tlsproperty in theKafkaConnectorKafkaConnectS2Iresource. For example:apiVersion: kafka.strimzi.io/v1alpha1 kind: KafkaConnect metadata: name: my-connect spec: # ... tls: trustedCertificates: - secretName: my-cluster-cluster-cert certificate: ca.crt # ... -
Create or update the resource.
On Kubernetes this can be done using
kubectl apply:kubectl apply -f your-fileOn OpenShift this can be done using
oc apply:oc apply -f your-file
3.2.4. Connecting to Kafka brokers with Authentication
By default, Kafka Connect will try to connect to Kafka brokers without any authentication.
Authentication can be enabled in the KafkaConnect and KafkaConnectS2I resources.
Authentication support in Kafka Connect
Authentication can be configured in the authentication property in KafkaConnect.spec and KafkaConnectS2I.spec.
The authentication property specifies the type of the authentication mechanisms which should be used and additional configuration details depending on the mechanism.
The currently supported authentication types are:
-
TLS client authentication
-
SASL based authentication using SCRAM-SHA-512 mechanism
TLS Client Authentication
To use the TLS client authentication, set the type property to the value tls.
TLS client authentication is using TLS certificate to authenticate.
The certificate has to be specified in the certificateAndKey property.
It is always loaded from an OpenShift or Kubernetes secret.
Inside the secret, it has to be stored in the X509 format under two different keys: for public and private keys.
|
Note
|
TLS client authentication can be used only with TLS connections. For more details about TLS configuration in Kafka Connect see Connecting to Kafka brokers using TLS. |
An example showing TLS client authentication configuration
apiVersion: kafka.strimzi.io/v1alpha1
kind: KafkaConnect
metadata:
name: my-cluster
spec:
# ...
authentication:
type: tls
certificateAndKey:
secretName: my-secret
certificate: public.crt
key: private.key
# ...SCRAM-SHA-512 authentication
To configure Kafka Connect to use SCRAM-SHA-512 authentication, set the type property to scram-sha-512.
This authentication mechanism requires a username and password.
-
Specify the username in the
usernameproperty. -
In the
passwordSecretproperty, specify a link to aSecretcontaining the password. ThesecretNameproperty contains the name of such aSecretand thepasswordproperty contains the name of the key under which the password is stored inside theSecret.
|
Warning
|
Do not specify the actual password in the password field.
|
An example showing SCRAM-SHA-512 client authentication configuration
apiVersion: kafka.strimzi.io/v1alpha1
kind: KafkaConnect
metadata:
name: my-cluster
spec:
# ...
authentication:
type: scram-sha-512
username: my-connect-user
passwordSecret:
secretName: my-connect-user
password: my-connect-password-key
# ...Configuring TLS client authentication in Kafka Connect
Prerequisites
-
An OpenShift or Kubernetes cluster
-
A running Cluster Operator
Procedure
-
Find out the name of the
Secretwith the public and private keys which should be used for TLS Client Authentication and the keys under which they are stored in theSecret. If such aSecretdoes not exist yet, prepare the keys in a file and create theSecret.On Kubernetes this can be done using
kubectl create:kubectl create secret generic my-secret --from-file=my-public.crt --from-file=my-private.keyOn OpenShift this can be done using
oc create:oc create secret generic my-secret --from-file=my-public.crt --from-file=my-private.key -
Edit the
authenticationproperty in theKafkaConnectorKafkaConnectS2Iresource. For example:apiVersion: kafka.strimzi.io/v1alpha1 kind: KafkaConnect metadata: name: my-connect spec: # ... authentication: type: tls certificateAndKey: secretName: my-secret certificate: my-public.crt key: my-private.key # ... -
Create or update the resource.
On Kubernetes this can be done using
kubectl apply:kubectl apply -f your-fileOn OpenShift this can be done using
oc apply:oc apply -f your-file
Configuring SCRAM-SHA-512 authentication in Kafka Connect
Prerequisites
-
An OpenShift or Kubernetes cluster
-
A running Cluster Operator
-
Username of the user which should be used for authentication
Procedure
-
Find out the name of the
Secretwith the password which should be used for authentication and the key under which the password is stored in theSecret. If such aSecretdoes not exist yet, prepare a file with the password and create theSecret.On Kubernetes this can be done using
kubectl create:echo -n '<password>' > <my-password.txt> kubectl create secret generic <my-secret> --from-file=<my-password.txt>On OpenShift this can be done using
oc create:echo -n '1f2d1e2e67df' > <my-password>.txt oc create secret generic <my-secret> --from-file=<my-password.txt> -
Edit the
authenticationproperty in theKafkaConnectorKafkaConnectS2Iresource. For example:apiVersion: kafka.strimzi.io/v1alpha1 kind: KafkaConnect metadata: name: my-connect spec: # ... authentication: type: scram-sha-512 username: _<my-username>_ passwordSecret: secretName: _<my-secret>_ password: _<my-password.txt>_ # ... -
Create or update the resource.
On Kubernetes this can be done using
kubectl apply:kubectl apply -f your-fileOn OpenShift this can be done using
oc apply:oc apply -f your-file
3.2.5. Kafka Connect configuration
Strimzi allows you to customize the configuration of Apache Kafka Connect nodes by editing most of the options listed in Apache Kafka documentation.
The only options which cannot be configured are those related to the following areas:
-
Kafka cluster bootstrap address
-
Security (Encryption, Authentication, and Authorization)
-
Listener / REST interface configuration
-
Plugin path configuration
These options are automatically configured by Strimzi.
Kafka Connect configuration
Kafka Connect can be configured using the config property in KafkaConnect.spec and KafkaConnectS2I.spec.
This property should contain the Kafka Connect configuration options as keys.
The values could be in one of the following JSON types:
-
String
-
Number
-
Boolean
Users can specify and configure the options listed in the Apache Kafka documentation with the exception of those options which are managed directly by Strimzi. Specifically, all configuration options with keys equal to or starting with one of the following strings are forbidden:
-
ssl. -
sasl. -
security. -
listeners -
plugin.path -
rest. -
bootstrap.servers
When one of the forbidden options is present in the config property, it will be ignored and a warning message will be printed to the Custer Operator log file.
All other options will be passed to Kafka Connect.
|
Important
|
The Cluster Operator does not validate keys or values in the provided config object.
When an invalid configuration is provided, the Kafka Connect cluster might not start or might become unstable.
In such cases, the configuration in the KafkaConnect.spec.config or KafkaConnectS2I.spec.config object should be fixed and the cluster operator will roll out the new configuration to all Kafka Connect nodes.
|
Selected options have default values:
-
group.idwith default valueconnect-cluster -
offset.storage.topicwith default valueconnect-cluster-offsets -
config.storage.topicwith default valueconnect-cluster-configs -
status.storage.topicwith default valueconnect-cluster-status -
key.converterwith default valueorg.apache.kafka.connect.json.JsonConverter -
value.converterwith default valueorg.apache.kafka.connect.json.JsonConverter
These options will be automatically configured in case they are not present in the KafkaConnect.spec.config or KafkaConnectS2I.spec.config properties.
An example showing Kafka Connect configuration
apiVersion: kafka.strimzi.io/v1alpha1
kind: KafkaConnect
metadata:
name: my-connect
spec:
# ...
config:
group.id: my-connect-cluster
offset.storage.topic: my-connect-cluster-offsets
config.storage.topic: my-connect-cluster-configs
status.storage.topic: my-connect-cluster-status
key.converter: org.apache.kafka.connect.json.JsonConverter
value.converter: org.apache.kafka.connect.json.JsonConverter
key.converter.schemas.enable: true
value.converter.schemas.enable: true
config.storage.replication.factor: 3
offset.storage.replication.factor: 3
status.storage.replication.factor: 3
# ...Configuring Kafka Connect
Prerequisites
-
An OpenShift or Kubernetes cluster
-
A running Cluster Operator
Procedure
-
Edit the
configproperty in theKafkaConnectorKafkaConnectS2Iresource. For example:apiVersion: kafka.strimzi.io/v1alpha1 kind: KafkaConnect metadata: name: my-connect spec: # ... config: group.id: my-connect-cluster offset.storage.topic: my-connect-cluster-offsets config.storage.topic: my-connect-cluster-configs status.storage.topic: my-connect-cluster-status key.converter: org.apache.kafka.connect.json.JsonConverter value.converter: org.apache.kafka.connect.json.JsonConverter key.converter.schemas.enable: true value.converter.schemas.enable: true config.storage.replication.factor: 3 offset.storage.replication.factor: 3 status.storage.replication.factor: 3 # ... -
Create or update the resource.
On Kubernetes this can be done using
kubectl apply:kubectl apply -f your-fileOn OpenShift this can be done using
oc apply:oc apply -f your-file
3.2.6. CPU and memory resources
For every deployed container, Strimzi allows you to specify the resources which should be reserved for it and the maximum resources that can be consumed by it. Strimzi supports two types of resources:
-
Memory
-
CPU
Strimzi is using the OpenShift or Kubernetes syntax for specifying CPU and memory resources.
Resource limits and requests
Resource limits and requests can be configured using the resources property in following resources:
-
Kafka.spec.kafka -
Kafka.spec.kafka.tlsSidecar -
Kafka.spec.zookeeper -
Kafka.spec.zookeeper.tlsSidecar -
Kafka.spec.entityOperator.topicOperator -
Kafka.spec.entityOperator.userOperator -
Kafka.spec.entityOperator.tlsSidecar -
KafkaConnect.spec -
KafkaConnectS2I.spec
Resource requests
Requests specify the resources that will be reserved for a given container. Reserving the resources will ensure that they are always available.
|
Important
|
If the resource request is for more than the available free resources in the OpenShift or Kubernetes cluster, the pod will not be scheduled. |
Resource requests can be specified in the request property.
The resource requests currently supported by Strimzi are memory and CPU.
Memory is specified under the property memory.
CPU is specified under the property cpu.
An example showing resource request configuration
# ...
resources:
requests:
cpu: 12
memory: 64Gi
# ...It is also possible to specify a resource request just for one of the resources:
An example showing resource request configuration with memory request only
# ...
resources:
requests:
memory: 64Gi
# ...Or:
An example showing resource request configuration with CPU request only
# ...
resources:
requests:
cpu: 12
# ...Resource limits
Limits specify the maximum resources that can be consumed by a given container. The limit is not reserved and might not be always available. The container can use the resources up to the limit only when they are available. The resource limits should be always higher than the resource requests.
Resource limits can be specified in the limits property.
The resource limits currently supported by Strimzi are memory and CPU.
Memory is specified under the property memory.
CPU is specified under the property cpu.
An example showing resource limits configuration
# ...
resources:
limits:
cpu: 12
memory: 64Gi
# ...It is also possible to specify the resource limit just for one of the resources:
An example showing resource limit configuration with memory request only
# ...
resources:
limits:
memory: 64Gi
# ...Or:
An example showing resource limits configuration with CPU request only
# ...
resources:
requests:
cpu: 12
# ...Supported CPU formats
CPU requests and limits are supported in the following formats:
-
Number of CPU cores as integer (
5CPU core) or decimal (2.5CPU core). -
Number or millicpus / millicores (
100m) where 1000 millicores is the same1CPU core.
An example of using different CPU units
# ...
resources:
requests:
cpu: 500m
limits:
cpu: 2.5
# ...|
Note
|
The amount of computing power of 1 CPU core might differ depending on the platform where the OpenShift or Kubernetes is deployed. |
For more details about the CPU specification, see the Meaning of CPU website.
Supported memory formats
Memory requests and limits are specified in megabytes, gigabytes, mebibytes, and gibibytes.
-
To specify memory in megabytes, use the
Msuffix. For example1000M. -
To specify memory in gigabytes, use the
Gsuffix. For example1G. -
To specify memory in mebibytes, use the
Misuffix. For example1000Mi. -
To specify memory in gibibytes, use the
Gisuffix. For example1Gi.
An example of using different memory units
# ...
resources:
requests:
memory: 512Mi
limits:
memory: 2Gi
# ...For more details about the memory specification and additional supported units, see the Meaning of memory website.
Additional resources
-
For more information about managing computing resources on OpenShift or Kubernetes, see Managing Compute Resources for Containers.
Configuring resource requests and limits
Prerequisites
-
An OpenShift or Kubernetes cluster
-
A running Cluster Operator
Procedure
-
Edit the
resourcesproperty in the resource specifying the cluster deployment. For example:apiVersion: kafka.strimzi.io/v1alpha1 kind: Kafka spec: kafka: # ... resources: requests: cpu: "8" memory: 64Gi limits: cpu: "12" memory: 128Gi # ... zookeeper: # ... -
Create or update the resource.
On Kubernetes this can be done using
kubectl apply:kubectl apply -f your-fileOn OpenShift this can be done using
oc apply:oc apply -f your-file
Additional resources
-
For more information about the schema, see
Resourcesschema reference.
3.2.7. Logging
Logging enables you to diagnose error and performance issues of Strimzi.
For the logging, various logger implementations are used.
Kafka and Zookeeper use log4j logger and Topic Operator, User Operator, and other components use log4j2 logger.
This section provides information about different loggers and describes how to configure log levels.
You can set the log levels by specifying the loggers and their levels directly (inline) or by using a custom (external) config map.
Using inline logging setting
Procedure
-
Edit the YAML file to specify the loggers and their level for the required components. For example:
apiVersion: {KafkaApiVersion} kind: Kafka spec: kafka: # ... logging: type: inline loggers: logger.name: "INFO" # ...In the above example, the log level is set to INFO. You can set the log level to INFO, ERROR, WARN, TRACE, DEBUG, FATAL or OFF. For more information about the log levels, see log4j manual.
-
Create or update the Kafka resource in OpenShift or Kubernetes.
On Kubernetes this can be done using
kubectl apply:kubectl apply -f your-fileOn OpenShift this can be done using
oc apply:oc apply -f your-file
Using external ConfigMap for logging setting
Procedure
-
Edit the YAML file to specify the name of the
ConfigMapwhich should be used for the required components. For example:apiVersion: {KafkaApiVersion} kind: Kafka spec: kafka: # ... logging: type: external name: customConfigMap # ...Remember to place your custom ConfigMap under
log4j.propertieseventuallylog4j2.propertieskey. -
Create or update the Kafka resource in OpenShift or Kubernetes.
On Kubernetes this can be done using
kubectl apply:kubectl apply -f your-fileOn OpenShift this can be done using
oc apply:oc apply -f your-file
Loggers
Strimzi consists of several components. Each component has its own loggers and is configurable. This section provides information about loggers of various components.
Components and their loggers are listed below.
-
Kafka
-
kafka.root.logger.level -
log4j.logger.org.I0Itec.zkclient.ZkClient -
log4j.logger.org.apache.zookeeper -
log4j.logger.kafka -
log4j.logger.org.apache.kafka -
log4j.logger.kafka.request.logger -
log4j.logger.kafka.network.Processor -
log4j.logger.kafka.server.KafkaApis -
log4j.logger.kafka.network.RequestChannel$ -
log4j.logger.kafka.controller -
log4j.logger.kafka.log.LogCleaner -
log4j.logger.state.change.logger -
log4j.logger.kafka.authorizer.logger
-
-
Zookeeper
-
zookeeper.root.logger
-
-
Kafka Connect and Kafka Connect with Source2Image support
-
connect.root.logger.level -
log4j.logger.org.apache.zookeeper -
log4j.logger.org.I0Itec.zkclient -
log4j.logger.org.reflections
-
-
Kafka Mirror Maker
-
mirrormaker.root.logger
-
-
Topic Operator
-
rootLogger.level
-
-
User Operator
-
rootLogger.level
-
3.2.8. Healthchecks
Healthchecks are periodical tests which verify that the application’s health. When the Healthcheck fails, OpenShift or Kubernetes can assume that the application is not healthy and attempt to fix it. OpenShift or Kubernetes supports two types of Healthcheck probes:
-
Liveness probes
-
Readiness probes
For more details about the probes, see Configure Liveness and Readiness Probes. Both types of probes are used in Strimzi components.
Users can configure selected options for liveness and readiness probes
Healthcheck configurations
Liveness and readiness probes can be configured using the livenessProbe and readinessProbe properties in following resources:
-
Kafka.spec.kafka -
Kafka.spec.kafka.tlsSidecar -
Kafka.spec.zookeeper -
Kafka.spec.zookeeper.tlsSidecar -
Kafka.spec.entityOperator.tlsSidecar -
KafkaConnect.spec -
KafkaConnectS2I.spec
Both livenessProbe and readinessProbe support two additional options:
-
initialDelaySeconds -
timeoutSeconds
The initialDelaySeconds property defines the initial delay before the probe is tried for the first time.
Default is 15 seconds.
The timeoutSeconds property defines timeout of the probe.
Default is 5 seconds.
An example of liveness and readiness probe configuration
# ...
readinessProbe:
initialDelaySeconds: 15
timeoutSeconds: 5
livenessProbe:
initialDelaySeconds: 15
timeoutSeconds: 5
# ...Configuring healthchecks
Prerequisites
-
An OpenShift or Kubernetes cluster
-
A running Cluster Operator
Procedure
-
Edit the
livenessProbeorreadinessProbeproperty in theKafka,KafkaConnectorKafkaConnectS2Iresource. For example:apiVersion: kafka.strimzi.io/v1alpha1 kind: Kafka metadata: name: my-cluster spec: kafka: # ... readinessProbe: initialDelaySeconds: 15 timeoutSeconds: 5 livenessProbe: initialDelaySeconds: 15 timeoutSeconds: 5 # ... zookeeper: # ... -
Create or update the resource.
On Kubernetes this can be done using
kubectl apply:kubectl apply -f your-fileOn OpenShift this can be done using
oc apply:oc apply -f your-file
3.2.9. Prometheus metrics
Strimzi supports Prometheus metrics using Prometheus JMX exporter to convert the JMX metrics supported by Apache Kafka and Zookeeper to Prometheus metrics. When metrics are enabled, they are exposed on port 9404.
For more information about configuring Prometheus and Grafana, see Metrics.
Metrics configuration
Prometheus metrics can be enabled by configuring the metrics property in following resources:
-
Kafka.spec.kafka -
Kafka.spec.zookeeper -
KafkaConnect.spec -
KafkaConnectS2I.spec
When the metrics property is not defined in the resource, the Prometheus metrics will be disabled.
To enable Prometheus metrics export without any further configuration, you can set it to an empty object ({}).
Example of enabling metrics without any further configuration
apiVersion: kafka.strimzi.io/v1alpha1
kind: Kafka
metadata:
name: my-cluster
spec:
kafka:
# ...
metrics: {}
# ...
zookeeper:
# ...The metrics property might contain additional configuration for the Prometheus JMX exporter.
Example of enabling metrics with additional Prometheus JMX Exporter configuration
apiVersion: kafka.strimzi.io/v1alpha1
kind: Kafka
metadata:
name: my-cluster
spec:
kafka:
# ...
metrics:
lowercaseOutputName: true
rules:
- pattern: "kafka.server<type=(.+), name=(.+)PerSec\\w*><>Count"
name: "kafka_server_$1_$2_total"
- pattern: "kafka.server<type=(.+), name=(.+)PerSec\\w*, topic=(.+)><>Count"
name: "kafka_server_$1_$2_total"
labels:
topic: "$3"
# ...
zookeeper:
# ...Configuring Prometheus metrics
Prerequisites
-
An OpenShift or Kubernetes cluster
-
A running Cluster Operator
Procedure
-
Edit the
metricsproperty in theKafka,KafkaConnectorKafkaConnectS2Iresource. For example:apiVersion: kafka.strimzi.io/v1alpha1 kind: Kafka metadata: name: my-cluster spec: kafka: # ... zookeeper: # ... metrics: lowercaseOutputName: true # ... -
Create or update the resource.
On Kubernetes this can be done using
kubectl apply:kubectl apply -f your-fileOn OpenShift this can be done using
oc apply:oc apply -f your-file
3.2.10. JVM Options
Apache Kafka and Apache Zookeeper are running inside of a Java Virtual Machine (JVM). JVM has many configuration options to optimize the performance for different platforms and architectures. Strimzi allows configuring some of these options.
JVM configuration
JVM options can be configured using the jvmOptions property in following resources:
-
Kafka.spec.kafka -
Kafka.spec.zookeeper -
KafkaConnect.spec -
KafkaConnectS2I.spec
Only a selected subset of available JVM options can be configured. The following options are supported:
-Xms and -Xmx
-Xms configures the minimum initial allocation heap size when the JVM starts.
-Xmx configures the maximum heap size.
|
Note
|
The units accepted by JVM settings such as -Xmx and -Xms are those accepted by the JDK java binary in the corresponding image.
Accordingly, 1g or 1G means 1,073,741,824 bytes, and Gi is not a valid unit suffix.
This is in contrast to the units used for memory requests and limits, which follow the OpenShift or Kubernetes convention where 1G means 1,000,000,000 bytes, and 1Gi means 1,073,741,824 bytes
|
The default values used for -Xms and -Xmx depends on whether there is a memory request limit configured for the container:
-
If there is a memory limit then the JVM’s minimum and maximum memory will be set to a value corresponding to the limit.
-
If there is no memory limit then the JVM’s minimum memory will be set to
128Mand the JVM’s maximum memory will not be defined. This allows for the JVM’s memory to grow as-needed, which is ideal for single node environments in test and development.
|
Important
|
Setting
|
When setting -Xmx explicitly, it is recommended to:
-
set the memory request and the memory limit to the same value,
-
use a memory request that is at least 4.5 × the
-Xmx, -
consider setting
-Xmsto the same value as-Xms.
|
Important
|
Containers doing lots of disk I/O (such as Kafka broker containers) will need to leave some memory available for use as operating system page cache. On such containers, the requested memory should be significantly higher than the memory used by the JVM. |
Example fragment configuring
-Xmx and -Xms# ...
jvmOptions:
"-Xmx": "2g"
"-Xms": "2g"
# ...In the above example, the JVM will use 2 GiB (=2,147,483,648 bytes) for its heap. Its total memory usage will be approximately 8GiB.
Setting the same value for initial (-Xms) and maximum (-Xmx) heap sizes avoids the JVM having to allocate memory after startup, at the cost of possibly allocating more heap than is really needed.
For Kafka and Zookeeper pods such allocation could cause unwanted latency.
For Kafka Connect avoiding over allocation may be the most important concern, especially in distributed mode where the effects of over-allocation will be multiplied by the number of consumers.
-server
-server enables the server JVM. This option can be set to true or false.
Example fragment configuring
-server# ...
jvmOptions:
"-server": true
# ...|
Note
|
When neither of the two options (-server and -XX) is specified, the default Apache Kafka configuration of KAFKA_JVM_PERFORMANCE_OPTS will be used.
|
-XX
-XX object can be used for configuring advanced runtime options of a JVM.
The -server and -XX options are used to configure the KAFKA_JVM_PERFORMANCE_OPTS option of Apache Kafka.
Example showing the use of the
-XX objectjvmOptions:
"-XX":
"UseG1GC": true,
"MaxGCPauseMillis": 20,
"InitiatingHeapOccupancyPercent": 35,
"ExplicitGCInvokesConcurrent": true,
"UseParNewGC": falseThe example configuration above will result in the following JVM options:
-XX:+UseG1GC -XX:MaxGCPauseMillis=20 -XX:InitiatingHeapOccupancyPercent=35 -XX:+ExplicitGCInvokesConcurrent -XX:-UseParNewGC|
Note
|
When neither of the two options (-server and -XX) is specified, the default Apache Kafka configuration of KAFKA_JVM_PERFORMANCE_OPTS will be used.
|
Configuring JVM options
Prerequisites
-
An OpenShift or Kubernetes cluster
-
A running Cluster Operator
Procedure
-
Edit the
jvmOptionsproperty in theKafka,KafkaConnectorKafkaConnectS2Iresource. For example:apiVersion: kafka.strimzi.io/v1alpha1 kind: Kafka metadata: name: my-cluster spec: kafka: # ... jvmOptions: "-Xmx": "8g" "-Xms": "8g" # ... zookeeper: # ... -
Create or update the resource.
On Kubernetes this can be done using
kubectl apply:kubectl apply -f your-fileOn OpenShift this can be done using
oc apply:oc apply -f your-file
3.2.11. Container images
Strimzi allows you to configure container images which will be used for its components. Overriding container images is recommended only in special situations, where you need to use a different container registry. For example, because your network does not allow access to the container repository used by Strimzi. In such a case, you should either copy the Strimzi images or build them from the source. If the configured image is not compatible with Strimzi images, it might not work properly.
Container image configurations
Container image which should be used for given components can be specified using the image property in:
-
Kafka.spec.kafka -
Kafka.spec.kafka.tlsSidecar -
Kafka.spec.zookeeper -
Kafka.spec.zookeeper.tlsSidecar -
Kafka.spec.entityOperator.topicOperator -
Kafka.spec.entityOperator.userOperator -
Kafka.spec.entityOperator.tlsSidecar -
KafkaConnect.spec -
KafkaConnectS2I.spec
Configuring the Kafka.spec.kafka.image property
The Kafka.spec.kafka.image property functions differently from the others, because Strimzi supports multiple versions of Kafka, each requiring the own image.
The STRIMZI_KAFKA_IMAGES environment variable of the Cluster Operator configuration is used to provide a mapping between Kafka versions and the corresponding images.
This is used in combination with the Kafka.spec.kafka.image and Kafka.spec.kafka.version properties as follows:
-
If neither
Kafka.spec.kafka.imagenorKafka.spec.kafka.versionare given in the custom resource then theversionwill default to the Cluster Operator’s default Kafka version, and the image will be the one corresponding to this version in theSTRIMZI_KAFKA_IMAGES. -
If
Kafka.spec.kafka.imageis given butKafka.spec.kafka.versionis not then the given image will be used and theversionwill be assumed to be the Cluster Operator’s default Kafka version. -
If
Kafka.spec.kafka.versionis given butKafka.spec.kafka.imageis not then image will be the one corresponding to this version in theSTRIMZI_KAFKA_IMAGES. -
Both
Kafka.spec.kafka.versionandKafka.spec.kafka.imageare given the given image will be used, and it will be assumed to contain a Kafka broker with the given version.
|
Warning
|
It is best to provide just Kafka.spec.kafka.version and leave the Kafka.spec.kafka.image property unspecified.
This reduces the chances of making a mistake in configuring the Kafka resource. If you need to change the images used for different versions of Kafka, it is better to configure the Cluster Operator’s STRIMZI_KAFKA_IMAGES environment variable.
|
Configuring the image property in other resources
For the image property in the other custom resources, the given value will be used during deployment.
If the image property is missing, the image specified in the Cluster Operator configuration will be used.
If the image name is not defined in the Cluster Operator configuration, then the default value will be used.
-
For Kafka broker TLS sidecar:
-
Container image specified in the
STRIMZI_DEFAULT_TLS_SIDECAR_KAFKA_IMAGEenvironment variable from the Cluster Operator configuration. -
strimzi/kafka-stunnel:latestcontainer image.
-
-
For Zookeeper nodes:
-
Container image specified in the
STRIMZI_DEFAULT_ZOOKEEPER_IMAGEenvironment variable from the Cluster Operator configuration. -
strimzi/zookeeper:latestcontainer image.
-
-
For Zookeeper node TLS sidecar:
-
Container image specified in the
STRIMZI_DEFAULT_TLS_SIDECAR_ZOOKEEPER_IMAGEenvironment variable from the Cluster Operator configuration. -
strimzi/zookeeper-stunnel:latestcontainer image.
-
-
For Topic Operator:
-
Container image specified in the
STRIMZI_DEFAULT_TOPIC_OPERATOR_IMAGEenvironment variable from the Cluster Operator configuration. .**strimzi/topic-operator:latestcontainer image.
-
-
For User Operator:
-
Container image specified in the
STRIMZI_DEFAULT_USER_OPERATOR_IMAGEenvironment variable from the Cluster Operator configuration. -
strimzi/user-operator:latestcontainer image.
-
-
For Entity Operator TLS sidecar:
-
Container image specified in the
STRIMZI_DEFAULT_TLS_SIDECAR_ENTITY_OPERATOR_IMAGEenvironment variable from the Cluster Operator configuration. -
strimzi/entity-operator-stunnel:latestcontainer image.
-
-
For Kafka Connect:
-
Container image specified in the
STRIMZI_DEFAULT_KAFKA_CONNECT_IMAGEenvironment variable from the Cluster Operator configuration. -
strimzi/kafka-connect:latestcontainer image.
-
-
For Kafka Connect with Source2image support:
-
Container image specified in the
STRIMZI_DEFAULT_KAFKA_CONNECT_S2I_IMAGEenvironment variable from the Cluster Operator configuration. -
strimzi/kafka-connect-s2i:latestcontainer image.
-
|
Warning
|
Overriding container images is recommended only in special situations, where you need to use a different container registry. For example, because your network does not allow access to the container repository used by Strimzi. In such case, you should either copy the Strimzi images or build them from source. In case the configured image is not compatible with Strimzi images, it might not work properly. |
Example of container image configuration
apiVersion: kafka.strimzi.io/v1alpha1
kind: Kafka
metadata:
  name: my-cluster
spec:
  kafka:
    # ...
    image: my-org/my-image:latest
    # ...
  zookeeper:
# ...Configuring container images
Prerequisites
-
An OpenShift or Kubernetes cluster
-
A running Cluster Operator
Procedure
-
Edit the
imageproperty in theKafka,KafkaConnectorKafkaConnectS2Iresource. For example:apiVersion: kafka.strimzi.io/v1alpha1 kind: Kafka metadata: name: my-cluster spec: kafka: # ... image: my-org/my-image:latest # ... zookeeper: # ... -
Create or update the resource.
On Kubernetes this can be done using
kubectl apply:kubectl apply -f your-fileOn OpenShift this can be done using
oc apply:oc apply -f your-file
3.2.12. Configuring pod scheduling
|
Important
|
When two application are scheduled to the same OpenShift or Kubernetes node, both applications might use the same resources like disk I/O and impact performance. That can lead to performance degradation. Scheduling Kafka pods in a way that avoids sharing nodes with other critical workloads, using the right nodes or dedicated a set of nodes only for Kafka are the best ways how to avoid such problems. |
Scheduling pods based on other applications
Avoid critical applications to share the node
Pod anti-affinity can be used to ensure that critical applications are never scheduled on the same disk. When running Kafka cluster, it is recommended to use pod anti-affinity to ensure that the Kafka brokers do not share the nodes with other workloads like databases.
Affinity
Affinity can be configured using the affinity property in following resources:
-
Kafka.spec.kafka -
Kafka.spec.zookeeper -
Kafka.spec.entityOperator -
KafkaConnect.spec -
KafkaConnectS2I.spec
The affinity configuration can include different types of affinity:
-
Pod affinity and anti-affinity
-
Node affinity
The format of the affinity property follows the OpenShift or Kubernetes specification.
For more details, see the Kubernetes node and pod affinity documentation.
Configuring pod anti-affinity in Kafka components
Prerequisites
-
An OpenShift or Kubernetes cluster
-
A running Cluster Operator
Procedure
-
Edit the
affinityproperty in the resource specifying the cluster deployment. Use labels to specify the pods which should not be scheduled on the same nodes. ThetopologyKeyshould be set tokubernetes.io/hostnameto specify that the selected pods should not be scheduled on nodes with the same hostname. For example:apiVersion: kafka.strimzi.io/v1alpha1 kind: Kafka spec: kafka: # ... affinity: podAntiAffinity: requiredDuringSchedulingIgnoredDuringExecution: - labelSelector: matchExpressions: - key: application operator: In values: - postgresql - mongodb topologyKey: "kubernetes.io/hostname" # ... zookeeper: # ... -
Create or update the resource.
On Kubernetes this can be done using
kubectl apply:kubectl apply -f your-fileOn OpenShift this can be done using
oc apply:oc apply -f your-file
Scheduling pods to specific nodes
Node scheduling
The OpenShift or Kubernetes cluster usually consists of many different types of worker nodes. Some are optimized for CPU heavy workloads, some for memory, while other might be optimized for storage (fast local SSDs) or network. Using different nodes helps to optimize both costs and performance. To achieve the best possible performance, it is important to allow scheduling of Strimzi components to use the right nodes.
OpenShift or Kubernetes uses node affinity to schedule workloads onto specific nodes.
Node affinity allows you to create a scheduling constraint for the node on which the pod will be scheduled.
The constraint is specified as a label selector.
You can specify the label using either the built-in node label like beta.kubernetes.io/instance-type or custom labels to select the right node.
Affinity
Affinity can be configured using the affinity property in following resources:
-
Kafka.spec.kafka -
Kafka.spec.zookeeper -
Kafka.spec.entityOperator -
KafkaConnect.spec -
KafkaConnectS2I.spec
The affinity configuration can include different types of affinity:
-
Pod affinity and anti-affinity
-
Node affinity
The format of the affinity property follows the OpenShift or Kubernetes specification.
For more details, see the Kubernetes node and pod affinity documentation.
Configuring node affinity in Kafka components
Prerequisites
-
An OpenShift or Kubernetes cluster
-
A running Cluster Operator
Procedure
-
Label the nodes where Strimzi components should be scheduled.
On Kubernetes this can be done using
kubectl label:kubectl label node your-node node-type=fast-networkOn OpenShift this can be done using
oc label:oc label node your-node node-type=fast-networkAlternatively, some of the existing labels might be reused.
-
Edit the
affinityproperty in the resource specifying the cluster deployment. For example:apiVersion: kafka.strimzi.io/v1alpha1 kind: Kafka spec: kafka: # ... affinity: nodeAffinity: requiredDuringSchedulingIgnoredDuringExecution: nodeSelectorTerms: - matchExpressions: - key: node-type operator: In values: - fast-network # ... zookeeper: # ... -
Create or update the resource.
On Kubernetes this can be done using
kubectl apply:kubectl apply -f your-fileOn OpenShift this can be done using
oc apply:oc apply -f your-file
Using dedicated nodes
Dedicated nodes
Cluster administrators can mark selected OpenShift or Kubernetes nodes as tainted. Nodes with taints are excluded from regular scheduling and normal pods will not be scheduled to run on them. Only services which can tolerate the taint set on the node can be scheduled on it. The only other services running on such nodes will be system services such as log collectors or software defined networks.
Taints can be used to create dedicated nodes. Running Kafka and its components on dedicated nodes can have many advantages. There will be no other applications running on the same nodes which could cause disturbance or consume the resources needed for Kafka. That can lead to improved performance and stability.
To schedule Kafka pods on the dedicated nodes, configure node affinity and tolerations.
Affinity
Affinity can be configured using the affinity property in following resources:
-
Kafka.spec.kafka -
Kafka.spec.zookeeper -
Kafka.spec.entityOperator -
KafkaConnect.spec -
KafkaConnectS2I.spec
The affinity configuration can include different types of affinity:
-
Pod affinity and anti-affinity
-
Node affinity
The format of the affinity property follows the OpenShift or Kubernetes specification.
For more details, see the Kubernetes node and pod affinity documentation.
Tolerations
Tolerations ca be configured using the tolerations property in following resources:
-
Kafka.spec.kafka -
Kafka.spec.zookeeper -
Kafka.spec.entityOperator -
KafkaConnect.spec -
KafkaConnectS2I.spec
The format of the tolerations property follows the OpenShift or Kubernetes specification.
For more details, see the Kubernetes taints and tolerations.
Setting up dedicated nodes and scheduling pods on them
Prerequisites
-
An OpenShift or Kubernetes cluster
-
A running Cluster Operator
Procedure
-
Select the nodes which should be used as dedicated
-
Make sure there are no workloads scheduled on these nodes
-
Set the taints on the selected nodes
On Kubernetes this can be done using
kubectl taint:kubectl taint node your-node dedicated=Kafka:NoScheduleOn OpenShift this can be done using
oc adm taint:oc adm taint node your-node dedicated=Kafka:NoSchedule -
Additionally, add a label to the selected nodes as well.
On Kubernetes this can be done using
kubectl label:kubectl label node your-node dedicated=KafkaOn OpenShift this can be done using
oc label:oc label node your-node dedicated=Kafka -
Edit the
affinityandtolerationsproperties in the resource specifying the cluster deployment. For example:apiVersion: kafka.strimzi.io/v1alpha1 kind: Kafka spec: kafka: # ... tolerations: - key: "dedicated" operator: "Equal" value: "Kafka" effect: "NoSchedule" affinity: nodeAffinity: requiredDuringSchedulingIgnoredDuringExecution: nodeSelectorTerms: - matchExpressions: - key: dedicated operator: In values: - Kafka # ... zookeeper: # ... -
Create or update the resource.
On Kubernetes this can be done using
kubectl apply:kubectl apply -f your-fileOn OpenShift this can be done using
oc apply:oc apply -f your-file
3.2.13. Using external configuration and secrets
Kafka Connect connectors are configured using an HTTP REST interface. The connector configuration is passed to Kafka Connect as part of an HTTP request and stored within Kafka itself.
Some parts of the configuration of a Kafka Connect connector can be externalized using ConfigMaps or Secrets. You can then reference the configuration values in HTTP REST commands (this keeps the configuration separate and more secure, if needed). This method applies especially to confidential data, such as usernames, passwords, or certificates.
ConfigMaps and Secrets are standard OpenShift or Kubernetes resources used for storing of configurations and confidential data.
Storing connector configurations externally
You can mount ConfigMaps or Secrets into a Kafka Connect pod as volumes or environment variables.
Volumes and environment variables are configured in the externalConfiguration property in KafkaConnect.spec and KafkaConnectS2I.spec.
External configuration as environment variables
The env property is used to specify one or more environment variables.
These variables can contain a value from either a ConfigMap or a Secret.
|
Note
|
The names of user-defined environment variables cannot start with KAFKA_ or STRIMZI_.
|
To mount a value from a Secret to an environment variable, use the valueFrom property and the secretKeyRef as shown in the following example.
Example of an environment variable set to a value from a Secret
apiVersion: kafka.strimzi.io/v1alpha1
kind: KafkaConnect
metadata:
name: my-connect
spec:
# ...
externalConfiguration:
env:
- name: MY_ENVIRONMENT_VARIABLE
valueFrom:
secretKeyRef:
name: my-secret
key: my-keyA common use case for mounting Secrets to environment variables is when your connector needs to communicate with Amazon AWS and needs to read the AWS_ACCESS_KEY_ID and AWS_SECRET_ACCESS_KEY environment variables with credentials.
To mount a value from a ConfigMap to an environment variable, use configMapKeyRef in the valueFrom property as shown in the following example.
Example of an environment variable set to a value from a ConfigMap
apiVersion: kafka.strimzi.io/v1alpha1
kind: KafkaConnect
metadata:
name: my-connect
spec:
# ...
externalConfiguration:
env:
- name: MY_ENVIRONMENT_VARIABLE
valueFrom:
configMapKeyRef:
name: my-config-map
key: my-keyExternal configuration as volumes
You can also mount ConfigMaps or Secrets to a Kafka Connect pod as volumes. Using volumes instead of environment variables is useful in the following scenarios:
-
Mounting truststores or keystores with TLS certificates
-
Mounting a properties file that is used to configure Kafka Connect connectors
In the volumes property of the externalConfiguration resource, list the ConfigMaps or Secrets that will be mounted as volumes.
Each volume must specify a name in the name property and a reference to ConfigMap or Secret.
Example of volumes with external configuration
apiVersion: kafka.strimzi.io/v1alpha1
kind: KafkaConnect
metadata:
name: my-connect
spec:
# ...
externalConfiguration:
volumes:
- name: connector1
configMap:
name: connector1-configuration
- name: connector1-certificates
secret:
secretName: connector1-certificatesThe volumes will be mounted inside the Kafka Connect containers in the path /opt/kafka/external-configuration/<volume-name>.
For example, the files from a volume named connector1 would appear in the directory /opt/kafka/external-configuration/connector1.
The FileConfigProvider has to be used to read the values from the mounted properties files in connector configurations.
Mounting Secrets as environment variables
You can create an OpenShift or Kubernetes Secret and mount it to Kafka Connect as an environment variable.
Prerequisites
-
A running Cluster Operator.
Procedure
-
Create a secret containing the information that will be mounted as an environment variable. For example:
apiVersion: v1 kind: Secret metadata: name: aws-creds type: Opaque data: awsAccessKey: QUtJQVhYWFhYWFhYWFhYWFg= awsSecretAccessKey: Ylhsd1lYTnpkMjl5WkE= -
Create or edit the Kafka Connect resource. Configure the
externalConfigurationsection of theKafkaConnectorKafkaConnectS2Icustom resource to reference the secret. For example:apiVersion: kafka.strimzi.io/v1alpha1 kind: KafkaConnect metadata: name: my-connect spec: # ... externalConfiguration: env: - name: AWS_ACCESS_KEY_ID valueFrom: secretKeyRef: name: aws-creds key: awsAccessKey - name: AWS_SECRET_ACCESS_KEY valueFrom: secretKeyRef: name: aws-creds key: awsSecretAccessKey -
Apply the changes to your Kafka Connect deployment.
On Kubernetes use
kubectl apply:kubectl apply -f your-fileOn OpenShift use
oc apply:oc apply -f your-file
The environment variables are now available for use when developing your connectors.
Additional resources
-
For more information about external configuration in Kafka Connect, see
ExternalConfigurationschema reference.
Mounting Secrets as volumes
You can create an OpenShift or Kubernetes Secret, mount it as a volume to Kafka Connect, and then use it to configure a Kafka Connect connector.
Prerequisites
-
A running Cluster Operator.
Procedure
-
Create a secret containing a properties file that defines the configuration options for your connector configuration. For example:
apiVersion: v1 kind: Secret metadata: name: mysecret type: Opaque stringData: connector.properties: |- dbUsername: my-user dbPassword: my-password -
Create or edit the Kafka Connect resource. Configure the
FileConfigProviderin theconfigsection and theexternalConfigurationsection of theKafkaConnectorKafkaConnectS2Icustom resource to reference the secret. For example:apiVersion: kafka.strimzi.io/v1alpha1 kind: KafkaConnect metadata: name: my-connect spec: # ... config: config.providers: file config.providers.file.class: org.apache.kafka.common.config.provider.FileConfigProvider #... externalConfiguration: volumes: - name: connector-config secret: secretName: mysecret -
Apply the changes to your Kafka Connect deployment.
On Kubernetes use
kubectl apply:kubectl apply -f your-fileOn OpenShift use
oc apply:oc apply -f your-file -
Use the values from the mounted properties file in your JSON payload with connector configuration. For example:
{ "name":"my-connector", "config":{ "connector.class":"MyDbConnector", "tasks.max":"3", "database": "my-postgresql:5432" "username":"${file:/opt/kafka/external-configuration/connector-config/connector.properties:dbUsername}", "password":"${file:/opt/kafka/external-configuration/connector-config/connector.properties:dbPassword}", # ... } }
Additional resources
-
For more information about external configuration in Kafka Connect, see
ExternalConfigurationschema reference.
3.2.14. List of resources created as part of Kafka Connect cluster
The following resources will created by the Cluster Operator in the OpenShift or Kubernetes cluster:
- connect-cluster-name-connect
-
Deployment which is in charge to create the Kafka Connect worker node pods.
- connect-cluster-name-connect-api
-
Service which exposes the REST interface for managing the Kafka Connect cluster.
- connect-cluster-name-config
-
ConfigMap which contains the Kafka Connect ancillary configuration and is mounted as a volume by the Kafka broker pods.
- connect-cluster-name-connect
-
Pod Disruption Budget configured for the Kafka Connect worker nodes.
3.3. Kafka Connect cluster with Source2Image support
The full schema of the KafkaConnectS2I resource is described in the KafkaConnectS2I schema reference.
All labels that are applied to the desired KafkaConnectS2I resource will also be applied to the OpenShift or Kubernetes resources making up the Kafka Connect cluster with Source2Image support.
This provides a convenient mechanism for those resources to be labelled in whatever way the user requires.
3.3.1. Replicas
Kafka Connect clusters can run with a different number of nodes.
The number of nodes is defined in the KafkaConnect and KafkaConnectS2I resources.
Running Kafka Connect cluster with multiple nodes can provide better availability and scalability.
However, when running Kafka Connect on OpenShift or Kubernetes it is not absolutely necessary to run multiple nodes of Kafka Connect for high availability.
When the node where Kafka Connect is deployed to crashes, OpenShift or Kubernetes will automatically take care of rescheduling the Kafka Connect pod to a different node.
However, running Kafka Connect with multiple nodes can provide faster failover times, because the other nodes will be already up and running.
Configuring the number of nodes
Number of Kafka Connect nodes can be configured using the replicas property in KafkaConnect.spec and KafkaConnectS2I.spec.
Prerequisites
-
An OpenShift or Kubernetes cluster
-
A running Cluster Operator
Procedure
-
Edit the
replicasproperty in theKafkaConnectorKafkaConnectS2Iresource. For example:apiVersion: kafka.strimzi.io/v1alpha1 kind: KafkaConnectS2I metadata: name: my-cluster spec: # ... replicas: 3 # ... -
Create or update the resource.
On Kubernetes this can be done using
kubectl apply:kubectl apply -f your-fileOn OpenShift this can be done using
oc apply:oc apply -f your-file
3.3.2. Bootstrap servers
Kafka Connect cluster always works together with a Kafka cluster.
The Kafka cluster is specified in the form of a list of bootstrap servers.
On OpenShift or Kubernetes, the list must ideally contain the Kafka cluster bootstrap service which is named cluster-name-kafka-bootstrap and a port of 9092 for plain traffic or 9093 for encrypted traffic.
The list of bootstrap servers can be configured in the bootstrapServers property in KafkaConnect.spec and KafkaConnectS2I.spec. The servers should be a comma-separated list containing one or more Kafka brokers or a service pointing to Kafka brokers specified as a hostname:_port_ pairs.
When using Kafka Connect with a Kafka cluster not managed by Strimzi, you can specify the bootstrap servers list according to the configuration of a given cluster.
Configuring bootstrap servers
Prerequisites
-
An OpenShift or Kubernetes cluster
-
A running Cluster Operator
Procedure
-
Edit the
bootstrapServersproperty in theKafkaConnectorKafkaConnectS2Iresource. For example:apiVersion: kafka.strimzi.io/v1alpha1 kind: KafkaConnect metadata: name: my-cluster spec: # ... bootstrapServers: my-cluster-kafka-bootstrap:9092 # ... -
Create or update the resource.
On Kubernetes this can be done using
kubectl apply:kubectl apply -f your-fileOn OpenShift this can be done using
oc apply:oc apply -f your-file
3.3.3. Connecting to Kafka brokers using TLS
By default, Kafka Connect will try to connect to Kafka brokers using a plain text connection. If you would prefer to use TLS additional configuration will be necessary.
TLS support in Kafka Connect
TLS support is configured in the tls property in KafkaConnect.spec and KafkaConnectS2I.spec.
The tls property contains a list of secrets with key names under which the certificates are stored.
The certificates should be stored in X509 format.
An example showing TLS configuration with multiple certificates
apiVersion: kafka.strimzi.io/v1alpha1
kind: KafkaConnect
metadata:
  name: my-cluster
spec:
  # ...
  tls:
    trustedCertificates:
      - secretName: my-secret
        certificate: ca.crt
      - secretName: my-other-secret
        certificate: certificate.crt
  # ...
When multiple certificates are stored in the same secret, it can be listed multiple times.
An example showing TLS configuration with multiple certificates from the same secret
apiVersion: kafka.strimzi.io/v1alpha1
kind: KafkaConnectS2I
metadata:
  name: my-cluster
spec:
  # ...
  tls:
    trustedCertificates:
      - secretName: my-secret
        certificate: ca.crt
      - secretName: my-secret
        certificate: ca2.crt
  # ...
Configuring TLS in Kafka Connect
Prerequisites
-
An OpenShift or Kubernetes cluster
-
A running Cluster Operator
Procedure
-
Find out the name of the secret with the certificate which should be used for TLS Server Authentication and the key under which the certificate is stored in the secret. If such secret does not exist yet, prepare the certificate in a file and create the secret.
On Kubernetes this can be done using
kubectl create:kubectl create secret generic my-secret --from-file=my-file.crtOn OpenShift this can be done using
oc create:oc create secret generic my-secret --from-file=my-file.crt -
Edit the
tlsproperty in theKafkaConnectorKafkaConnectS2Iresource. For example:apiVersion: kafka.strimzi.io/v1alpha1 kind: KafkaConnect metadata: name: my-connect spec: # ... tls: trustedCertificates: - secretName: my-cluster-cluster-cert certificate: ca.crt # ... -
Create or update the resource.
On Kubernetes this can be done using
kubectl apply:kubectl apply -f your-fileOn OpenShift this can be done using
oc apply:oc apply -f your-file
3.3.4. Connecting to Kafka brokers with Authentication
By default, Kafka Connect will try to connect to Kafka brokers without any authentication.
Authentication can be enabled in the KafkaConnect and KafkaConnectS2I resources.
Authentication support in Kafka Connect
Authentication can be configured in the authentication property in KafkaConnect.spec and KafkaConnectS2I.spec.
The authentication property specifies the type of the authentication mechanisms which should be used and additional configuration details depending on the mechanism.
The currently supported authentication types are:
-
TLS client authentication
-
SASL based authentication using SCRAM-SHA-512 mechanism
TLS Client Authentication
To use the TLS client authentication, set the type property to the value tls.
TLS client authentication is using TLS certificate to authenticate.
The certificate has to be specified in the certificateAndKey property.
It is always loaded from an OpenShift or Kubernetes secret.
Inside the secret, it has to be stored in the X509 format under two different keys: for public and private keys.
|
Note
|
TLS client authentication can be used only with TLS connections. For more details about TLS configuration in Kafka Connect see Connecting to Kafka brokers using TLS. |
An example showing TLS client authentication configuration
apiVersion: kafka.strimzi.io/v1alpha1
kind: KafkaConnect
metadata:
  name: my-cluster
spec:
  # ...
  authentication:
    type: tls
    certificateAndKey:
      secretName: my-secret
      certificate: public.crt
      key: private.key
  # ...
SCRAM-SHA-512 authentication
To configure Kafka Connect to use SCRAM-SHA-512 authentication, set the type property to scram-sha-512.
This authentication mechanism requires a username and password.
-
Specify the username in the
usernameproperty. -
In the
passwordSecretproperty, specify a link to aSecretcontaining the password. ThesecretNameproperty contains the name of such aSecretand thepasswordproperty contains the name of the key under which the password is stored inside theSecret.
|
Warning
|
Do not specify the actual password in the password field.
|
An example showing SCRAM-SHA-512 client authentication configuration
apiVersion: kafka.strimzi.io/v1alpha1
kind: KafkaConnect
metadata:
  name: my-cluster
spec:
  # ...
  authentication:
    type: scram-sha-512
    username: my-connect-user
    passwordSecret:
      secretName: my-connect-user
      password: my-connect-password-key
  # ...
Configuring TLS client authentication in Kafka Connect
Prerequisites
-
An OpenShift or Kubernetes cluster
-
A running Cluster Operator
Procedure
-
Find out the name of the
Secretwith the public and private keys which should be used for TLS Client Authentication and the keys under which they are stored in theSecret. If such aSecretdoes not exist yet, prepare the keys in a file and create theSecret.On Kubernetes this can be done using
kubectl create:kubectl create secret generic my-secret --from-file=my-public.crt --from-file=my-private.keyOn OpenShift this can be done using
oc create:oc create secret generic my-secret --from-file=my-public.crt --from-file=my-private.key -
Edit the
authenticationproperty in theKafkaConnectorKafkaConnectS2Iresource. For example:apiVersion: kafka.strimzi.io/v1alpha1 kind: KafkaConnect metadata: name: my-connect spec: # ... authentication: type: tls certificateAndKey: secretName: my-secret certificate: my-public.crt key: my-private.key # ... -
Create or update the resource.
On Kubernetes this can be done using
kubectl apply:kubectl apply -f your-fileOn OpenShift this can be done using
oc apply:oc apply -f your-file
Configuring SCRAM-SHA-512 authentication in Kafka Connect
Prerequisites
-
An OpenShift or Kubernetes cluster
-
A running Cluster Operator
-
Username of the user which should be used for authentication
Procedure
-
Find out the name of the
Secretwith the password which should be used for authentication and the key under which the password is stored in theSecret. If such aSecretdoes not exist yet, prepare a file with the password and create theSecret.On Kubernetes this can be done using
kubectl create:echo -n '<password>' > <my-password.txt> kubectl create secret generic <my-secret> --from-file=<my-password.txt>On OpenShift this can be done using
oc create:echo -n '1f2d1e2e67df' > <my-password>.txt oc create secret generic <my-secret> --from-file=<my-password.txt> -
Edit the
authenticationproperty in theKafkaConnectorKafkaConnectS2Iresource. For example:apiVersion: kafka.strimzi.io/v1alpha1 kind: KafkaConnect metadata: name: my-connect spec: # ... authentication: type: scram-sha-512 username: _<my-username>_ passwordSecret: secretName: _<my-secret>_ password: _<my-password.txt>_ # ... -
Create or update the resource.
On Kubernetes this can be done using
kubectl apply:kubectl apply -f your-fileOn OpenShift this can be done using
oc apply:oc apply -f your-file
3.3.5. Kafka Connect configuration
Strimzi allows you to customize the configuration of Apache Kafka Connect nodes by editing most of the options listed in Apache Kafka documentation.
The only options which cannot be configured are those related to the following areas:
-
Kafka cluster bootstrap address
-
Security (Encryption, Authentication, and Authorization)
-
Listener / REST interface configuration
-
Plugin path configuration
These options are automatically configured by Strimzi.
Kafka Connect configuration
Kafka Connect can be configured using the config property in KafkaConnect.spec and KafkaConnectS2I.spec.
This property should contain the Kafka Connect configuration options as keys.
The values could be in one of the following JSON types:
-
String
-
Number
-
Boolean
Users can specify and configure the options listed in the Apache Kafka documentation with the exception of those options which are managed directly by Strimzi. Specifically, all configuration options with keys equal to or starting with one of the following strings are forbidden:
-
ssl. -
sasl. -
security. -
listeners -
plugin.path -
rest. -
bootstrap.servers
When one of the forbidden options is present in the config property, it will be ignored and a warning message will be printed to the Custer Operator log file.
All other options will be passed to Kafka Connect.
|
Important
|
The Cluster Operator does not validate keys or values in the provided config object.
When an invalid configuration is provided, the Kafka Connect cluster might not start or might become unstable.
In such cases, the configuration in the KafkaConnect.spec.config or KafkaConnectS2I.spec.config object should be fixed and the cluster operator will roll out the new configuration to all Kafka Connect nodes.
|
Selected options have default values:
-
group.idwith default valueconnect-cluster -
offset.storage.topicwith default valueconnect-cluster-offsets -
config.storage.topicwith default valueconnect-cluster-configs -
status.storage.topicwith default valueconnect-cluster-status -
key.converterwith default valueorg.apache.kafka.connect.json.JsonConverter -
value.converterwith default valueorg.apache.kafka.connect.json.JsonConverter
These options will be automatically configured in case they are not present in the KafkaConnect.spec.config or KafkaConnectS2I.spec.config properties.
An example showing Kafka Connect configuration
apiVersion: kafka.strimzi.io/v1alpha1
kind: KafkaConnect
metadata:
  name: my-connect
spec:
  # ...
  config:
    group.id: my-connect-cluster
    offset.storage.topic: my-connect-cluster-offsets
    config.storage.topic: my-connect-cluster-configs
    status.storage.topic: my-connect-cluster-status
    key.converter: org.apache.kafka.connect.json.JsonConverter
    value.converter: org.apache.kafka.connect.json.JsonConverter
    key.converter.schemas.enable: true
    value.converter.schemas.enable: true
    config.storage.replication.factor: 3
    offset.storage.replication.factor: 3
    status.storage.replication.factor: 3
  # ...
Configuring Kafka Connect
Prerequisites
-
An OpenShift or Kubernetes cluster
-
A running Cluster Operator
Procedure
-
Edit the
configproperty in theKafkaConnectorKafkaConnectS2Iresource. For example:apiVersion: kafka.strimzi.io/v1alpha1 kind: KafkaConnect metadata: name: my-connect spec: # ... config: group.id: my-connect-cluster offset.storage.topic: my-connect-cluster-offsets config.storage.topic: my-connect-cluster-configs status.storage.topic: my-connect-cluster-status key.converter: org.apache.kafka.connect.json.JsonConverter value.converter: org.apache.kafka.connect.json.JsonConverter key.converter.schemas.enable: true value.converter.schemas.enable: true config.storage.replication.factor: 3 offset.storage.replication.factor: 3 status.storage.replication.factor: 3 # ... -
Create or update the resource.
On Kubernetes this can be done using
kubectl apply:kubectl apply -f your-fileOn OpenShift this can be done using
oc apply:oc apply -f your-file
3.3.6. CPU and memory resources
For every deployed container, Strimzi allows you to specify the resources which should be reserved for it and the maximum resources that can be consumed by it. Strimzi supports two types of resources:
-
Memory
-
CPU
Strimzi is using the OpenShift or Kubernetes syntax for specifying CPU and memory resources.
Resource limits and requests
Resource limits and requests can be configured using the resources property in following resources:
-
Kafka.spec.kafka -
Kafka.spec.kafka.tlsSidecar -
Kafka.spec.zookeeper -
Kafka.spec.zookeeper.tlsSidecar -
Kafka.spec.entityOperator.topicOperator -
Kafka.spec.entityOperator.userOperator -
Kafka.spec.entityOperator.tlsSidecar -
KafkaConnect.spec -
KafkaConnectS2I.spec
Resource requests
Requests specify the resources that will be reserved for a given container. Reserving the resources will ensure that they are always available.
|
Important
|
If the resource request is for more than the available free resources in the OpenShift or Kubernetes cluster, the pod will not be scheduled. |
Resource requests can be specified in the request property.
The resource requests currently supported by Strimzi are memory and CPU.
Memory is specified under the property memory.
CPU is specified under the property cpu.
An example showing resource request configuration
# ...
resources:
  requests:
    cpu: 12
    memory: 64Gi
# ...
It is also possible to specify a resource request just for one of the resources:
An example showing resource request configuration with memory request only
# ...
resources:
  requests:
    memory: 64Gi
# ...
Or:
An example showing resource request configuration with CPU request only
# ...
resources:
  requests:
    cpu: 12
# ...
Resource limits
Limits specify the maximum resources that can be consumed by a given container. The limit is not reserved and might not be always available. The container can use the resources up to the limit only when they are available. The resource limits should be always higher than the resource requests.
Resource limits can be specified in the limits property.
The resource limits currently supported by Strimzi are memory and CPU.
Memory is specified under the property memory.
CPU is specified under the property cpu.
An example showing resource limits configuration
# ...
resources:
  limits:
    cpu: 12
    memory: 64Gi
# ...
It is also possible to specify the resource limit just for one of the resources:
An example showing resource limit configuration with memory request only
# ...
resources:
  limits:
    memory: 64Gi
# ...
Or:
An example showing resource limits configuration with CPU request only
# ...
resources:
  requests:
    cpu: 12
# ...
Supported CPU formats
CPU requests and limits are supported in the following formats:
-
Number of CPU cores as integer (
5CPU core) or decimal (2.5CPU core). -
Number or millicpus / millicores (
100m) where 1000 millicores is the same1CPU core.
An example of using different CPU units
# ...
resources:
  requests:
    cpu: 500m
  limits:
    cpu: 2.5
# ...|
Note
|
The amount of computing power of 1 CPU core might differ depending on the platform where the OpenShift or Kubernetes is deployed. |
For more details about the CPU specification, see the Meaning of CPU website.
Supported memory formats
Memory requests and limits are specified in megabytes, gigabytes, mebibytes, and gibibytes.
-
To specify memory in megabytes, use the
Msuffix. For example1000M. -
To specify memory in gigabytes, use the
Gsuffix. For example1G. -
To specify memory in mebibytes, use the
Misuffix. For example1000Mi. -
To specify memory in gibibytes, use the
Gisuffix. For example1Gi.
An example of using different memory units
# ...
resources:
  requests:
    memory: 512Mi
  limits:
    memory: 2Gi
# ...
For more details about the memory specification and additional supported units, see the Meaning of memory website.
Additional resources
-
For more information about managing computing resources on OpenShift or Kubernetes, see Managing Compute Resources for Containers.
Configuring resource requests and limits
Prerequisites
-
An OpenShift or Kubernetes cluster
-
A running Cluster Operator
Procedure
-
Edit the
resourcesproperty in the resource specifying the cluster deployment. For example:apiVersion: kafka.strimzi.io/v1alpha1 kind: Kafka spec: kafka: # ... resources: requests: cpu: "8" memory: 64Gi limits: cpu: "12" memory: 128Gi # ... zookeeper: # ... -
Create or update the resource.
On Kubernetes this can be done using
kubectl apply:kubectl apply -f your-fileOn OpenShift this can be done using
oc apply:oc apply -f your-file
Additional resources
-
For more information about the schema, see
Resourcesschema reference.
3.3.7. Logging
Logging enables you to diagnose error and performance issues of Strimzi.
For the logging, various logger implementations are used.
Kafka and Zookeeper use log4j logger and Topic Operator, User Operator, and other components use log4j2 logger.
This section provides information about different loggers and describes how to configure log levels.
You can set the log levels by specifying the loggers and their levels directly (inline) or by using a custom (external) config map.
Using inline logging setting
Procedure
-
Edit the YAML file to specify the loggers and their level for the required components. For example:
apiVersion: {KafkaApiVersion}
kind: Kafka
spec:
  kafka:
    # ...
    logging:
      type: inline
      loggers:
       logger.name: "INFO"
    # ...
In the above example, the log level is set to INFO. You can set the log level to INFO, ERROR, WARN, TRACE, DEBUG, FATAL or OFF. For more information about the log levels, see log4j manual.
-
Create or update the Kafka resource in OpenShift or Kubernetes.
On Kubernetes this can be done using
kubectl apply:kubectl apply -f your-fileOn OpenShift this can be done using
oc apply:oc apply -f your-file
Using external ConfigMap for logging setting
Procedure
-
Edit the YAML file to specify the name of the
ConfigMapwhich should be used for the required components. For example:apiVersion: {KafkaApiVersion} kind: Kafka spec: kafka: # ... logging: type: external name: customConfigMap # ...Remember to place your custom ConfigMap under
log4j.propertieseventuallylog4j2.propertieskey. -
Create or update the Kafka resource in OpenShift or Kubernetes.
On Kubernetes this can be done using
kubectl apply:kubectl apply -f your-fileOn OpenShift this can be done using
oc apply:oc apply -f your-file
Loggers
Strimzi consists of several components. Each component has its own loggers and is configurable. This section provides information about loggers of various components.
Components and their loggers are listed below.
-
Kafka
-
kafka.root.logger.level -
log4j.logger.org.I0Itec.zkclient.ZkClient -
log4j.logger.org.apache.zookeeper -
log4j.logger.kafka -
log4j.logger.org.apache.kafka -
log4j.logger.kafka.request.logger -
log4j.logger.kafka.network.Processor -
log4j.logger.kafka.server.KafkaApis -
log4j.logger.kafka.network.RequestChannel$ -
log4j.logger.kafka.controller -
log4j.logger.kafka.log.LogCleaner -
log4j.logger.state.change.logger -
log4j.logger.kafka.authorizer.logger
-
-
Zookeeper
-
zookeeper.root.logger
-
-
Kafka Connect and Kafka Connect with Source2Image support
-
connect.root.logger.level -
log4j.logger.org.apache.zookeeper -
log4j.logger.org.I0Itec.zkclient -
log4j.logger.org.reflections
-
-
Kafka Mirror Maker
-
mirrormaker.root.logger
-
-
Topic Operator
-
rootLogger.level
-
-
User Operator
-
rootLogger.level
-
3.3.8. Healthchecks
Healthchecks are periodical tests which verify that the application’s health. When the Healthcheck fails, OpenShift or Kubernetes can assume that the application is not healthy and attempt to fix it. OpenShift or Kubernetes supports two types of Healthcheck probes:
-
Liveness probes
-
Readiness probes
For more details about the probes, see Configure Liveness and Readiness Probes. Both types of probes are used in Strimzi components.
Users can configure selected options for liveness and readiness probes
Healthcheck configurations
Liveness and readiness probes can be configured using the livenessProbe and readinessProbe properties in following resources:
-
Kafka.spec.kafka -
Kafka.spec.kafka.tlsSidecar -
Kafka.spec.zookeeper -
Kafka.spec.zookeeper.tlsSidecar -
Kafka.spec.entityOperator.tlsSidecar -
KafkaConnect.spec -
KafkaConnectS2I.spec
Both livenessProbe and readinessProbe support two additional options:
-
initialDelaySeconds -
timeoutSeconds
The initialDelaySeconds property defines the initial delay before the probe is tried for the first time.
Default is 15 seconds.
The timeoutSeconds property defines timeout of the probe.
Default is 5 seconds.
An example of liveness and readiness probe configuration
# ...
readinessProbe:
  initialDelaySeconds: 15
  timeoutSeconds: 5
livenessProbe:
  initialDelaySeconds: 15
  timeoutSeconds: 5
# ...
Configuring healthchecks
Prerequisites
-
An OpenShift or Kubernetes cluster
-
A running Cluster Operator
Procedure
-
Edit the
livenessProbeorreadinessProbeproperty in theKafka,KafkaConnectorKafkaConnectS2Iresource. For example:apiVersion: kafka.strimzi.io/v1alpha1 kind: Kafka metadata: name: my-cluster spec: kafka: # ... readinessProbe: initialDelaySeconds: 15 timeoutSeconds: 5 livenessProbe: initialDelaySeconds: 15 timeoutSeconds: 5 # ... zookeeper: # ... -
Create or update the resource.
On Kubernetes this can be done using
kubectl apply:kubectl apply -f your-fileOn OpenShift this can be done using
oc apply:oc apply -f your-file
3.3.9. Prometheus metrics
Strimzi supports Prometheus metrics using Prometheus JMX exporter to convert the JMX metrics supported by Apache Kafka and Zookeeper to Prometheus metrics. When metrics are enabled, they are exposed on port 9404.
For more information about configuring Prometheus and Grafana, see Metrics.
Metrics configuration
Prometheus metrics can be enabled by configuring the metrics property in following resources:
-
Kafka.spec.kafka -
Kafka.spec.zookeeper -
KafkaConnect.spec -
KafkaConnectS2I.spec
When the metrics property is not defined in the resource, the Prometheus metrics will be disabled.
To enable Prometheus metrics export without any further configuration, you can set it to an empty object ({}).
Example of enabling metrics without any further configuration
apiVersion: kafka.strimzi.io/v1alpha1
kind: Kafka
metadata:
  name: my-cluster
spec:
  kafka:
    # ...
    metrics: {}
    # ...
  zookeeper:
    # ...
The metrics property might contain additional configuration for the Prometheus JMX exporter.
Example of enabling metrics with additional Prometheus JMX Exporter configuration
apiVersion: kafka.strimzi.io/v1alpha1
kind: Kafka
metadata:
  name: my-cluster
spec:
  kafka:
    # ...
    metrics:
      lowercaseOutputName: true
      rules:
        - pattern: "kafka.server<type=(.+), name=(.+)PerSec\\w*><>Count"
          name: "kafka_server_$1_$2_total"
        - pattern: "kafka.server<type=(.+), name=(.+)PerSec\\w*, topic=(.+)><>Count"
          name: "kafka_server_$1_$2_total"
          labels:
            topic: "$3"
    # ...
  zookeeper:
    # ...
Configuring Prometheus metrics
Prerequisites
-
An OpenShift or Kubernetes cluster
-
A running Cluster Operator
Procedure
-
Edit the
metricsproperty in theKafka,KafkaConnectorKafkaConnectS2Iresource. For example:apiVersion: kafka.strimzi.io/v1alpha1 kind: Kafka metadata: name: my-cluster spec: kafka: # ... zookeeper: # ... metrics: lowercaseOutputName: true # ... -
Create or update the resource.
On Kubernetes this can be done using
kubectl apply:kubectl apply -f your-fileOn OpenShift this can be done using
oc apply:oc apply -f your-file
3.3.10. JVM Options
Apache Kafka and Apache Zookeeper are running inside of a Java Virtual Machine (JVM). JVM has many configuration options to optimize the performance for different platforms and architectures. Strimzi allows configuring some of these options.
JVM configuration
JVM options can be configured using the jvmOptions property in following resources:
-
Kafka.spec.kafka -
Kafka.spec.zookeeper -
KafkaConnect.spec -
KafkaConnectS2I.spec
Only a selected subset of available JVM options can be configured. The following options are supported:
-Xms and -Xmx
-Xms configures the minimum initial allocation heap size when the JVM starts.
-Xmx configures the maximum heap size.
|
Note
|
The units accepted by JVM settings such as -Xmx and -Xms are those accepted by the JDK java binary in the corresponding image.
Accordingly, 1g or 1G means 1,073,741,824 bytes, and Gi is not a valid unit suffix.
This is in contrast to the units used for memory requests and limits, which follow the OpenShift or Kubernetes convention where 1G means 1,000,000,000 bytes, and 1Gi means 1,073,741,824 bytes
|
The default values used for -Xms and -Xmx depends on whether there is a memory request limit configured for the container:
-
If there is a memory limit then the JVM’s minimum and maximum memory will be set to a value corresponding to the limit.
-
If there is no memory limit then the JVM’s minimum memory will be set to
128Mand the JVM’s maximum memory will not be defined. This allows for the JVM’s memory to grow as-needed, which is ideal for single node environments in test and development.
|
Important
|
Setting
|
When setting -Xmx explicitly, it is recommended to:
-
set the memory request and the memory limit to the same value,
-
use a memory request that is at least 4.5 × the
-Xmx, -
consider setting
-Xmsto the same value as-Xms.
|
Important
|
Containers doing lots of disk I/O (such as Kafka broker containers) will need to leave some memory available for use as operating system page cache. On such containers, the requested memory should be significantly higher than the memory used by the JVM. |
Example fragment configuring
-Xmx and -Xms# ...
jvmOptions:
"-Xmx": "2g"
"-Xms": "2g"
# ...In the above example, the JVM will use 2 GiB (=2,147,483,648 bytes) for its heap. Its total memory usage will be approximately 8GiB.
Setting the same value for initial (-Xms) and maximum (-Xmx) heap sizes avoids the JVM having to allocate memory after startup, at the cost of possibly allocating more heap than is really needed.
For Kafka and Zookeeper pods such allocation could cause unwanted latency.
For Kafka Connect avoiding over allocation may be the most important concern, especially in distributed mode where the effects of over-allocation will be multiplied by the number of consumers.
-server
-server enables the server JVM. This option can be set to true or false.
Example fragment configuring
-server# ...
jvmOptions:
"-server": true
# ...|
Note
|
When neither of the two options (-server and -XX) is specified, the default Apache Kafka configuration of KAFKA_JVM_PERFORMANCE_OPTS will be used.
|
-XX
-XX object can be used for configuring advanced runtime options of a JVM.
The -server and -XX options are used to configure the KAFKA_JVM_PERFORMANCE_OPTS option of Apache Kafka.
Example showing the use of the
-XX objectjvmOptions:
"-XX":
"UseG1GC": true,
"MaxGCPauseMillis": 20,
"InitiatingHeapOccupancyPercent": 35,
"ExplicitGCInvokesConcurrent": true,
"UseParNewGC": falseThe example configuration above will result in the following JVM options:
-XX:+UseG1GC -XX:MaxGCPauseMillis=20 -XX:InitiatingHeapOccupancyPercent=35 -XX:+ExplicitGCInvokesConcurrent -XX:-UseParNewGC|
Note
|
When neither of the two options (-server and -XX) is specified, the default Apache Kafka configuration of KAFKA_JVM_PERFORMANCE_OPTS will be used.
|
Configuring JVM options
Prerequisites
-
An OpenShift or Kubernetes cluster
-
A running Cluster Operator
Procedure
-
Edit the
jvmOptionsproperty in theKafka,KafkaConnectorKafkaConnectS2Iresource. For example:apiVersion: kafka.strimzi.io/v1alpha1 kind: Kafka metadata: name: my-cluster spec: kafka: # ... jvmOptions: "-Xmx": "8g" "-Xms": "8g" # ... zookeeper: # ... -
Create or update the resource.
On Kubernetes this can be done using
kubectl apply:kubectl apply -f your-fileOn OpenShift this can be done using
oc apply:oc apply -f your-file
3.3.11. Container images
Strimzi allows you to configure container images which will be used for its components. Overriding container images is recommended only in special situations, where you need to use a different container registry. For example, because your network does not allow access to the container repository used by Strimzi. In such a case, you should either copy the Strimzi images or build them from the source. If the configured image is not compatible with Strimzi images, it might not work properly.
Container image configurations
Container image which should be used for given components can be specified using the image property in:
-
Kafka.spec.kafka -
Kafka.spec.kafka.tlsSidecar -
Kafka.spec.zookeeper -
Kafka.spec.zookeeper.tlsSidecar -
Kafka.spec.entityOperator.topicOperator -
Kafka.spec.entityOperator.userOperator -
Kafka.spec.entityOperator.tlsSidecar -
KafkaConnect.spec -
KafkaConnectS2I.spec
Configuring the Kafka.spec.kafka.image property
The Kafka.spec.kafka.image property functions differently from the others, because Strimzi supports multiple versions of Kafka, each requiring the own image.
The STRIMZI_KAFKA_IMAGES environment variable of the Cluster Operator configuration is used to provide a mapping between Kafka versions and the corresponding images.
This is used in combination with the Kafka.spec.kafka.image and Kafka.spec.kafka.version properties as follows:
-
If neither
Kafka.spec.kafka.imagenorKafka.spec.kafka.versionare given in the custom resource then theversionwill default to the Cluster Operator’s default Kafka version, and the image will be the one corresponding to this version in theSTRIMZI_KAFKA_IMAGES. -
If
Kafka.spec.kafka.imageis given butKafka.spec.kafka.versionis not then the given image will be used and theversionwill be assumed to be the Cluster Operator’s default Kafka version. -
If
Kafka.spec.kafka.versionis given butKafka.spec.kafka.imageis not then image will be the one corresponding to this version in theSTRIMZI_KAFKA_IMAGES. -
Both
Kafka.spec.kafka.versionandKafka.spec.kafka.imageare given the given image will be used, and it will be assumed to contain a Kafka broker with the given version.
|
Warning
|
It is best to provide just Kafka.spec.kafka.version and leave the Kafka.spec.kafka.image property unspecified.
This reduces the chances of making a mistake in configuring the Kafka resource. If you need to change the images used for different versions of Kafka, it is better to configure the Cluster Operator’s STRIMZI_KAFKA_IMAGES environment variable.
|
Configuring the image property in other resources
For the image property in the other custom resources, the given value will be used during deployment.
If the image property is missing, the image specified in the Cluster Operator configuration will be used.
If the image name is not defined in the Cluster Operator configuration, then the default value will be used.
-
For Kafka broker TLS sidecar:
-
Container image specified in the
STRIMZI_DEFAULT_TLS_SIDECAR_KAFKA_IMAGEenvironment variable from the Cluster Operator configuration. -
strimzi/kafka-stunnel:latestcontainer image.
-
-
For Zookeeper nodes:
-
Container image specified in the
STRIMZI_DEFAULT_ZOOKEEPER_IMAGEenvironment variable from the Cluster Operator configuration. -
strimzi/zookeeper:latestcontainer image.
-
-
For Zookeeper node TLS sidecar:
-
Container image specified in the
STRIMZI_DEFAULT_TLS_SIDECAR_ZOOKEEPER_IMAGEenvironment variable from the Cluster Operator configuration. -
strimzi/zookeeper-stunnel:latestcontainer image.
-
-
For Topic Operator:
-
Container image specified in the
STRIMZI_DEFAULT_TOPIC_OPERATOR_IMAGEenvironment variable from the Cluster Operator configuration. .**strimzi/topic-operator:latestcontainer image.
-
-
For User Operator:
-
Container image specified in the
STRIMZI_DEFAULT_USER_OPERATOR_IMAGEenvironment variable from the Cluster Operator configuration. -
strimzi/user-operator:latestcontainer image.
-
-
For Entity Operator TLS sidecar:
-
Container image specified in the
STRIMZI_DEFAULT_TLS_SIDECAR_ENTITY_OPERATOR_IMAGEenvironment variable from the Cluster Operator configuration. -
strimzi/entity-operator-stunnel:latestcontainer image.
-
-
For Kafka Connect:
-
Container image specified in the
STRIMZI_DEFAULT_KAFKA_CONNECT_IMAGEenvironment variable from the Cluster Operator configuration. -
strimzi/kafka-connect:latestcontainer image.
-
-
For Kafka Connect with Source2image support:
-
Container image specified in the
STRIMZI_DEFAULT_KAFKA_CONNECT_S2I_IMAGEenvironment variable from the Cluster Operator configuration. -
strimzi/kafka-connect-s2i:latestcontainer image.
-
|
Warning
|
Overriding container images is recommended only in special situations, where you need to use a different container registry. For example, because your network does not allow access to the container repository used by Strimzi. In such case, you should either copy the Strimzi images or build them from source. In case the configured image is not compatible with Strimzi images, it might not work properly. |
Example of container image configuration
apiVersion: kafka.strimzi.io/v1alpha1
kind: Kafka
metadata:
  name: my-cluster
spec:
  kafka:
    # ...
    image: my-org/my-image:latest
    # ...
  zookeeper:
    # ...
Configuring container images
Prerequisites
-
An OpenShift or Kubernetes cluster
-
A running Cluster Operator
Procedure
-
Edit the
imageproperty in theKafka,KafkaConnectorKafkaConnectS2Iresource. For example:apiVersion: kafka.strimzi.io/v1alpha1 kind: Kafka metadata: name: my-cluster spec: kafka: # ... image: my-org/my-image:latest # ... zookeeper: # ... -
Create or update the resource.
On Kubernetes this can be done using
kubectl apply:kubectl apply -f your-fileOn OpenShift this can be done using
oc apply:oc apply -f your-file
3.3.12. Configuring pod scheduling
|
Important
|
When two application are scheduled to the same OpenShift or Kubernetes node, both applications might use the same resources like disk I/O and impact performance. That can lead to performance degradation. Scheduling Kafka pods in a way that avoids sharing nodes with other critical workloads, using the right nodes or dedicated a set of nodes only for Kafka are the best ways how to avoid such problems. |
Scheduling pods based on other applications
Avoid critical applications to share the node
Pod anti-affinity can be used to ensure that critical applications are never scheduled on the same disk. When running Kafka cluster, it is recommended to use pod anti-affinity to ensure that the Kafka brokers do not share the nodes with other workloads like databases.
Affinity
Affinity can be configured using the affinity property in following resources:
-
Kafka.spec.kafka -
Kafka.spec.zookeeper -
Kafka.spec.entityOperator -
KafkaConnect.spec -
KafkaConnectS2I.spec
The affinity configuration can include different types of affinity:
-
Pod affinity and anti-affinity
-
Node affinity
The format of the affinity property follows the OpenShift or Kubernetes specification.
For more details, see the Kubernetes node and pod affinity documentation.
Configuring pod anti-affinity in Kafka components
Prerequisites
-
An OpenShift or Kubernetes cluster
-
A running Cluster Operator
Procedure
-
Edit the
affinityproperty in the resource specifying the cluster deployment. Use labels to specify the pods which should not be scheduled on the same nodes. ThetopologyKeyshould be set tokubernetes.io/hostnameto specify that the selected pods should not be scheduled on nodes with the same hostname. For example:apiVersion: kafka.strimzi.io/v1alpha1 kind: Kafka spec: kafka: # ... affinity: podAntiAffinity: requiredDuringSchedulingIgnoredDuringExecution: - labelSelector: matchExpressions: - key: application operator: In values: - postgresql - mongodb topologyKey: "kubernetes.io/hostname" # ... zookeeper: # ... -
Create or update the resource.
On Kubernetes this can be done using
kubectl apply:kubectl apply -f your-fileOn OpenShift this can be done using
oc apply:oc apply -f your-file
Scheduling pods to specific nodes
Node scheduling
The OpenShift or Kubernetes cluster usually consists of many different types of worker nodes. Some are optimized for CPU heavy workloads, some for memory, while other might be optimized for storage (fast local SSDs) or network. Using different nodes helps to optimize both costs and performance. To achieve the best possible performance, it is important to allow scheduling of Strimzi components to use the right nodes.
OpenShift or Kubernetes uses node affinity to schedule workloads onto specific nodes.
Node affinity allows you to create a scheduling constraint for the node on which the pod will be scheduled.
The constraint is specified as a label selector.
You can specify the label using either the built-in node label like beta.kubernetes.io/instance-type or custom labels to select the right node.
Affinity
Affinity can be configured using the affinity property in following resources:
-
Kafka.spec.kafka -
Kafka.spec.zookeeper -
Kafka.spec.entityOperator -
KafkaConnect.spec -
KafkaConnectS2I.spec
The affinity configuration can include different types of affinity:
-
Pod affinity and anti-affinity
-
Node affinity
The format of the affinity property follows the OpenShift or Kubernetes specification.
For more details, see the Kubernetes node and pod affinity documentation.
Configuring node affinity in Kafka components
Prerequisites
-
An OpenShift or Kubernetes cluster
-
A running Cluster Operator
Procedure
-
Label the nodes where Strimzi components should be scheduled.
On Kubernetes this can be done using
kubectl label:kubectl label node your-node node-type=fast-networkOn OpenShift this can be done using
oc label:oc label node your-node node-type=fast-networkAlternatively, some of the existing labels might be reused.
-
Edit the
affinityproperty in the resource specifying the cluster deployment. For example:apiVersion: kafka.strimzi.io/v1alpha1 kind: Kafka spec: kafka: # ... affinity: nodeAffinity: requiredDuringSchedulingIgnoredDuringExecution: nodeSelectorTerms: - matchExpressions: - key: node-type operator: In values: - fast-network # ... zookeeper: # ... -
Create or update the resource.
On Kubernetes this can be done using
kubectl apply:kubectl apply -f your-fileOn OpenShift this can be done using
oc apply:oc apply -f your-file
Using dedicated nodes
Dedicated nodes
Cluster administrators can mark selected OpenShift or Kubernetes nodes as tainted. Nodes with taints are excluded from regular scheduling and normal pods will not be scheduled to run on them. Only services which can tolerate the taint set on the node can be scheduled on it. The only other services running on such nodes will be system services such as log collectors or software defined networks.
Taints can be used to create dedicated nodes. Running Kafka and its components on dedicated nodes can have many advantages. There will be no other applications running on the same nodes which could cause disturbance or consume the resources needed for Kafka. That can lead to improved performance and stability.
To schedule Kafka pods on the dedicated nodes, configure node affinity and tolerations.
Affinity
Affinity can be configured using the affinity property in following resources:
-
Kafka.spec.kafka -
Kafka.spec.zookeeper -
Kafka.spec.entityOperator -
KafkaConnect.spec -
KafkaConnectS2I.spec
The affinity configuration can include different types of affinity:
-
Pod affinity and anti-affinity
-
Node affinity
The format of the affinity property follows the OpenShift or Kubernetes specification.
For more details, see the Kubernetes node and pod affinity documentation.
Tolerations
Tolerations ca be configured using the tolerations property in following resources:
-
Kafka.spec.kafka -
Kafka.spec.zookeeper -
Kafka.spec.entityOperator -
KafkaConnect.spec -
KafkaConnectS2I.spec
The format of the tolerations property follows the OpenShift or Kubernetes specification.
For more details, see the Kubernetes taints and tolerations.
Setting up dedicated nodes and scheduling pods on them
Prerequisites
-
An OpenShift or Kubernetes cluster
-
A running Cluster Operator
Procedure
-
Select the nodes which should be used as dedicated
-
Make sure there are no workloads scheduled on these nodes
-
Set the taints on the selected nodes
On Kubernetes this can be done using
kubectl taint:kubectl taint node your-node dedicated=Kafka:NoScheduleOn OpenShift this can be done using
oc adm taint:oc adm taint node your-node dedicated=Kafka:NoSchedule -
Additionally, add a label to the selected nodes as well.
On Kubernetes this can be done using
kubectl label:kubectl label node your-node dedicated=KafkaOn OpenShift this can be done using
oc label:oc label node your-node dedicated=Kafka -
Edit the
affinityandtolerationsproperties in the resource specifying the cluster deployment. For example:apiVersion: kafka.strimzi.io/v1alpha1 kind: Kafka spec: kafka: # ... tolerations: - key: "dedicated" operator: "Equal" value: "Kafka" effect: "NoSchedule" affinity: nodeAffinity: requiredDuringSchedulingIgnoredDuringExecution: nodeSelectorTerms: - matchExpressions: - key: dedicated operator: In values: - Kafka # ... zookeeper: # ... -
Create or update the resource.
On Kubernetes this can be done using
kubectl apply:kubectl apply -f your-fileOn OpenShift this can be done using
oc apply:oc apply -f your-file
3.3.13. Using external configuration and secrets
Kafka Connect connectors are configured using an HTTP REST interface. The connector configuration is passed to Kafka Connect as part of an HTTP request and stored within Kafka itself.
Some parts of the configuration of a Kafka Connect connector can be externalized using ConfigMaps or Secrets. You can then reference the configuration values in HTTP REST commands (this keeps the configuration separate and more secure, if needed). This method applies especially to confidential data, such as usernames, passwords, or certificates.
ConfigMaps and Secrets are standard OpenShift or Kubernetes resources used for storing of configurations and confidential data.
Storing connector configurations externally
You can mount ConfigMaps or Secrets into a Kafka Connect pod as volumes or environment variables.
Volumes and environment variables are configured in the externalConfiguration property in KafkaConnect.spec and KafkaConnectS2I.spec.
External configuration as environment variables
The env property is used to specify one or more environment variables.
These variables can contain a value from either a ConfigMap or a Secret.
|
Note
|
The names of user-defined environment variables cannot start with KAFKA_ or STRIMZI_.
|
To mount a value from a Secret to an environment variable, use the valueFrom property and the secretKeyRef as shown in the following example.
Example of an environment variable set to a value from a Secret
apiVersion: kafka.strimzi.io/v1alpha1
kind: KafkaConnect
metadata:
name: my-connect
spec:
# ...
externalConfiguration:
env:
- name: MY_ENVIRONMENT_VARIABLE
valueFrom:
secretKeyRef:
name: my-secret
key: my-keyA common use case for mounting Secrets to environment variables is when your connector needs to communicate with Amazon AWS and needs to read the AWS_ACCESS_KEY_ID and AWS_SECRET_ACCESS_KEY environment variables with credentials.
To mount a value from a ConfigMap to an environment variable, use configMapKeyRef in the valueFrom property as shown in the following example.
Example of an environment variable set to a value from a ConfigMap
apiVersion: kafka.strimzi.io/v1alpha1
kind: KafkaConnect
metadata:
name: my-connect
spec:
# ...
externalConfiguration:
env:
- name: MY_ENVIRONMENT_VARIABLE
valueFrom:
configMapKeyRef:
name: my-config-map
key: my-keyExternal configuration as volumes
You can also mount ConfigMaps or Secrets to a Kafka Connect pod as volumes. Using volumes instead of environment variables is useful in the following scenarios:
-
Mounting truststores or keystores with TLS certificates
-
Mounting a properties file that is used to configure Kafka Connect connectors
In the volumes property of the externalConfiguration resource, list the ConfigMaps or Secrets that will be mounted as volumes.
Each volume must specify a name in the name property and a reference to ConfigMap or Secret.
Example of volumes with external configuration
apiVersion: kafka.strimzi.io/v1alpha1
kind: KafkaConnect
metadata:
name: my-connect
spec:
# ...
externalConfiguration:
volumes:
- name: connector1
configMap:
name: connector1-configuration
- name: connector1-certificates
secret:
secretName: connector1-certificatesThe volumes will be mounted inside the Kafka Connect containers in the path /opt/kafka/external-configuration/<volume-name>.
For example, the files from a volume named connector1 would appear in the directory /opt/kafka/external-configuration/connector1.
The FileConfigProvider has to be used to read the values from the mounted properties files in connector configurations.
Mounting Secrets as environment variables
You can create an OpenShift or Kubernetes Secret and mount it to Kafka Connect as an environment variable.
Prerequisites
-
A running Cluster Operator.
Procedure
-
Create a secret containing the information that will be mounted as an environment variable. For example:
apiVersion: v1 kind: Secret metadata: name: aws-creds type: Opaque data: awsAccessKey: QUtJQVhYWFhYWFhYWFhYWFg= awsSecretAccessKey: Ylhsd1lYTnpkMjl5WkE= -
Create or edit the Kafka Connect resource. Configure the
externalConfigurationsection of theKafkaConnectorKafkaConnectS2Icustom resource to reference the secret. For example:apiVersion: kafka.strimzi.io/v1alpha1 kind: KafkaConnect metadata: name: my-connect spec: # ... externalConfiguration: env: - name: AWS_ACCESS_KEY_ID valueFrom: secretKeyRef: name: aws-creds key: awsAccessKey - name: AWS_SECRET_ACCESS_KEY valueFrom: secretKeyRef: name: aws-creds key: awsSecretAccessKey -
Apply the changes to your Kafka Connect deployment.
On Kubernetes use
kubectl apply:kubectl apply -f your-fileOn OpenShift use
oc apply:oc apply -f your-file
The environment variables are now available for use when developing your connectors.
Additional resources
-
For more information about external configuration in Kafka Connect, see
ExternalConfigurationschema reference.
Mounting Secrets as volumes
You can create an OpenShift or Kubernetes Secret, mount it as a volume to Kafka Connect, and then use it to configure a Kafka Connect connector.
Prerequisites
-
A running Cluster Operator.
Procedure
-
Create a secret containing a properties file that defines the configuration options for your connector configuration. For example:
apiVersion: v1 kind: Secret metadata: name: mysecret type: Opaque stringData: connector.properties: |- dbUsername: my-user dbPassword: my-password -
Create or edit the Kafka Connect resource. Configure the
FileConfigProviderin theconfigsection and theexternalConfigurationsection of theKafkaConnectorKafkaConnectS2Icustom resource to reference the secret. For example:apiVersion: kafka.strimzi.io/v1alpha1 kind: KafkaConnect metadata: name: my-connect spec: # ... config: config.providers: file config.providers.file.class: org.apache.kafka.common.config.provider.FileConfigProvider #... externalConfiguration: volumes: - name: connector-config secret: secretName: mysecret -
Apply the changes to your Kafka Connect deployment.
On Kubernetes use
kubectl apply:kubectl apply -f your-fileOn OpenShift use
oc apply:oc apply -f your-file -
Use the values from the mounted properties file in your JSON payload with connector configuration. For example:
{ "name":"my-connector", "config":{ "connector.class":"MyDbConnector", "tasks.max":"3", "database": "my-postgresql:5432" "username":"${file:/opt/kafka/external-configuration/connector-config/connector.properties:dbUsername}", "password":"${file:/opt/kafka/external-configuration/connector-config/connector.properties:dbPassword}", # ... } }
Additional resources
-
For more information about external configuration in Kafka Connect, see
ExternalConfigurationschema reference.
3.3.14. List of resources created as part of Kafka Connect cluster with Source2Image support
The following resources will created by the Cluster Operator in the OpenShift or Kubernetes cluster:
- connect-cluster-name-connect-source
-
ImageStream which is used as the base image for the newly-built Docker images.
- connect-cluster-name-connect
-
BuildConfig which is responsible for building the new Kafka Connect Docker images.
- connect-cluster-name-connect
-
ImageStream where the newly built Docker images will be pushed.
- connect-cluster-name-connect
-
DeploymentConfig which is in charge of creating the Kafka Connect worker node pods.
- connect-cluster-name-connect-api
-
Service which exposes the REST interface for managing the Kafka Connect cluster.
- connect-cluster-name-config
-
ConfigMap which contains the Kafka Connect ancillary configuration and is mounted as a volume by the Kafka broker pods.
- connect-cluster-name-connect
-
Pod Disruption Budget configured for the Kafka Connect worker nodes.
3.3.15. Creating a container image using OpenShift builds and Source-to-Image
You can use OpenShift builds and the Source-to-Image (S2I) framework to create new container images. An OpenShift build takes a builder image with S2I support, together with source code and binaries provided by the user, and uses them to build a new container image. Once built, container images are stored in OpenShift’s local container image repository and are available for use in deployments.
A Kafka Connect builder image with S2I support is provided by Strimzi on the Docker Hub as strimzi/kafka-connect-s2i:0.11.0-kafka-2.1.0. This S2I image takes your binaries (with plug-ins and connectors) and stores them in the /tmp/kafka-plugins/s2i directory. It creates a new Kafka Connect image from this directory, which can then be used with the Kafka Connect deployment. When started using the enhanced image, Kafka Connect loads any third-party plug-ins from the /tmp/kafka-plugins/s2i directory.
Procedure
-
On the command line, use the
oc applycommand to create and deploy a Kafka Connect S2I cluster:oc apply -f examples/kafka-connect/kafka-connect-s2i.yaml -
Create a directory with Kafka Connect plug-ins:
$ tree ./my-plugins/ ./my-plugins/ ├── debezium-connector-mongodb │ ├── bson-3.4.2.jar │ ├── CHANGELOG.md │ ├── CONTRIBUTE.md │ ├── COPYRIGHT.txt │ ├── debezium-connector-mongodb-0.7.1.jar │ ├── debezium-core-0.7.1.jar │ ├── LICENSE.txt │ ├── mongodb-driver-3.4.2.jar │ ├── mongodb-driver-core-3.4.2.jar │ └── README.md ├── debezium-connector-mysql │ ├── CHANGELOG.md │ ├── CONTRIBUTE.md │ ├── COPYRIGHT.txt │ ├── debezium-connector-mysql-0.7.1.jar │ ├── debezium-core-0.7.1.jar │ ├── LICENSE.txt │ ├── mysql-binlog-connector-java-0.13.0.jar │ ├── mysql-connector-java-5.1.40.jar │ ├── README.md │ └── wkb-1.0.2.jar └── debezium-connector-postgres ├── CHANGELOG.md ├── CONTRIBUTE.md ├── COPYRIGHT.txt ├── debezium-connector-postgres-0.7.1.jar ├── debezium-core-0.7.1.jar ├── LICENSE.txt ├── postgresql-42.0.0.jar ├── protobuf-java-2.6.1.jar └── README.md -
Use the
oc start-buildcommand to start a new build of the image using the prepared directory:oc start-build my-connect-cluster-connect --from-dir ./my-plugins/NoteThe name of the build is the same as the name of the deployed Kafka Connect cluster. -
Once the build has finished, the new image is used automatically by the Kafka Connect deployment.
3.4. Kafka Mirror Maker configuration
The full schema of the KafkaMirrorMaker resource is described in the KafkaMirrorMaker schema reference.
All labels that apply to the desired KafkaMirrorMaker resource will also be applied to the OpenShift or Kubernetes resources making up Mirror Maker.
This provides a convenient mechanism for those resources to be labelled in whatever way the user requires.
3.4.1. Replicas
It is possible to run multiple Mirror Maker replicas.
The number of replicas is defined in the KafkaMirrorMaker resource.
You can run multiple Mirror Maker replicas to provide better availability and scalability.
However, when running Kafka Mirror Maker on OpenShift or Kubernetes it is not absolutely necessary to run multiple replicas of the Kafka Mirror Maker for high availability.
When the node where the Kafka Mirror Maker has deployed crashes, OpenShift or Kubernetes will automatically reschedule the Kafka Mirror Maker pod to a different node.
However, running Kafka Mirror Maker with multiple replicas can provide faster failover times as the other nodes will be up and running.
Configuring the number of replicas
The number of Kafka Mirror Maker replicas can be configured using the replicas property in KafkaMirrorMaker.spec.
Prerequisites
-
An OpenShift or Kubernetes cluster
-
A running Cluster Operator
Procedure
-
Edit the
replicasproperty in theKafkaMirrorMakerresource. For example:apiVersion: kafka.strimzi.io/v1alpha1 kind: KafkaMirrorMaker metadata: name: my-mirror-maker spec: # ... replicas: 3 # ... -
Create or update the resource.
On Kubernetes this can be done using
kubectl apply:kubectl apply -f <your-file>On OpenShift this can be done using
oc apply:oc apply -f <your-file>
3.4.2. Bootstrap servers
Kafka Mirror Maker always works together with two Kafka clusters (source and target).
The source and the target Kafka clusters are specified in the form of two lists of comma-separated list of <hostname>:<port> pairs.
The bootstrap server lists can refer to Kafka clusters which do not need to be deployed in the same OpenShift or Kubernetes cluster.
They can even refer to any Kafka cluster not deployed by Strimzi or even deployed by Strimzi but on a different OpenShift or Kubernetes cluster and accessible from outside.
If on the same OpenShift or Kubernetes cluster, each list must ideally contain the Kafka cluster bootstrap service which is named <cluster-name>-kafka-bootstrap and a port of 9092 for plain traffic or 9093 for encrypted traffic.
If deployed by Strimzi but on different OpenShift or Kubernetes clusters, the list content depends on the way used for exposing the clusters (routes, nodeports or loadbalancers).
The list of bootstrap servers can be configured in the KafkaMirrorMaker.spec.consumer.bootstrapServers and KafkaMirrorMaker.spec.producer.bootstrapServers properties. The servers should be a comma-separated list containing one or more Kafka brokers or a Service pointing to Kafka brokers specified as a <hostname>:<port> pairs.
When using Kafka Mirror Maker with a Kafka cluster not managed by Strimzi, you can specify the bootstrap servers list according to the configuration of the given cluster.
Configuring bootstrap servers
Prerequisites
-
An OpenShift or Kubernetes cluster
-
A running Cluster Operator
Procedure
-
Edit the
KafkaMirrorMaker.spec.consumer.bootstrapServersandKafkaMirrorMaker.spec.producer.bootstrapServersproperties. For example:apiVersion: kafka.strimzi.io/v1alpha1 kind: KafkaMirrorMaker metadata: name: my-mirror-maker spec: # ... consumer: bootstrapServers: my-source-cluster-kafka-bootstrap:9092 # ... producer: bootstrapServers: my-target-cluster-kafka-bootstrap:9092 -
Create or update the resource.
On Kubernetes this can be done using
kubectl apply:kubectl apply -f <your-file>On OpenShift this can be done using
oc apply:oc apply -f <your-file>
3.4.3. Whitelist
You specify the list topics that the Kafka Mirror Maker has to mirror from the source to the target Kafka cluster in the KafkaMirrorMaker resource using the whitelist option. It allows any regular expression from the simplest case with a single topic name to complex patterns. For example, you can mirror topics A and B using "A|B" or all topics using "*". You can also pass multiple regular expressions separated by commas to the Kafka Mirror Maker.
Configuring the topics whitelist
Specify the list topics that have to be mirrored by the Kafka Mirror Maker from source to target Kafka cluster using the whitelist property in KafkaMirrorMaker.spec.
Prerequisites
-
An OpenShift or Kubernetes cluster
-
A running Cluster Operator
Procedure
-
Edit the
whitelistproperty in theKafkaMirrorMakerresource. For example:apiVersion: kafka.strimzi.io/v1alpha1 kind: KafkaMirrorMaker metadata: name: my-mirror-maker spec: # ... whitelist: "my-topic|other-topic" # ... -
Create or update the resource.
On Kubernetes this can be done using
kubectl apply:kubectl apply -f <your-file>On OpenShift this can be done using
oc apply:oc apply -f <your-file>
3.4.4. Consumer group identifier
The Kafka Mirror Maker uses Kafka consumer to consume messages and it behaves like any other Kafka consumer client. It is in charge to consume the messages from the source Kafka cluster which will be mirrored to the target Kafka cluster. The consumer needs to be part of a consumer group for being assigned partitions.
Configuring the consumer group identifier
The consumer group identifier can be configured in the KafkaMirrorMaker.spec.consumer.groupId property.
Prerequisites
-
An OpenShift or Kubernetes cluster
-
A running Cluster Operator
Procedure
-
Edit the
KafkaMirrorMaker.spec.consumer.groupIdproperty. For example:apiVersion: kafka.strimzi.io/v1alpha1 kind: KafkaMirrorMaker metadata: name: my-mirror-maker spec: # ... consumer: groupId: "my-group" # ... -
Create or update the resource.
On Kubernetes this can be done using
kubectl apply:kubectl apply -f <your-file>On OpenShift this can be done using
oc apply:oc apply -f <your-file>
3.4.5. Number of consumer streams
You can increase the throughput in mirroring topics by increase the number of consumer threads. More consumer threads will belong to the same configured consumer group. The topic partitions will be assigned across these consumer threads which will consume messages in parallel.
Configuring the number of consumer streams
The number of consumer streams can be configured using the KafkaMirrorMaker.spec.consumer.numStreams property.
Prerequisites
-
An OpenShift or Kubernetes cluster
-
A running Cluster Operator
Procedure
-
Edit the
KafkaMirrorMaker.spec.consumer.numStreamsproperty. For example:apiVersion: kafka.strimzi.io/v1alpha1 kind: KafkaMirrorMaker metadata: name: my-mirror-maker spec: # ... consumer: numStreams: 2 # ... -
Create or update the resource.
On Kubernetes this can be done using
kubectl apply:kubectl apply -f <your-file>On OpenShift this can be done using
oc apply:oc apply -f <your-file>
3.4.6. Connecting to Kafka brokers using TLS
By default, Kafka Mirror Maker will try to connect to Kafka brokers, in the source and target clusters, using a plain text connection. You must make additional configurations to use TLS.
TLS support in Kafka Mirror Maker
TLS support is configured in the tls sub-property of consumer and producer properties in KafkaMirrorMaker.spec.
The tls property contains a list of secrets with key names under which the certificates are stored.
The certificates should be stored in X.509 format.
An example showing TLS configuration with multiple certificates
apiVersion: kafka.strimzi.io/v1alpha1
kind: KafkaMirrorMaker
metadata:
name: my-mirror-maker
spec:
# ...
consumer:
tls:
trustedCertificates:
- secretName: my-source-secret
certificate: ca.crt
- secretName: my-other-source-secret
certificate: certificate.crt
# ...
producer:
tls:
trustedCertificates:
- secretName: my-target-secret
certificate: ca.crt
- secretName: my-other-target-secret
certificate: certificate.crt
# ...When multiple certificates are stored in the same secret, it can be listed multiple times.
An example showing TLS configuration with multiple certificates from the same secret
apiVersion: kafka.strimzi.io/v1alpha1
kind: KafkaMirrorMaker
metadata:
name: my-mirror-maker
spec:
# ...
consumer:
tls:
trustedCertificates:
- secretName: my-source-secret
certificate: ca.crt
- secretName: my-source-secret
certificate: ca2.crt
# ...
producer:
tls:
trustedCertificates:
- secretName: my-target-secret
certificate: ca.crt
- secretName: my-target-secret
certificate: ca2.crt
# ...Configuring TLS encryption in Kafka Mirror Maker
Prerequisites
-
An OpenShift or Kubernetes cluster
-
A running Cluster Operator
Procedure
As the Kafka Mirror Maker connects to two Kafka clusters (source and target), you can choose to configure TLS for one or both the clusters. The following steps describe how to configure TLS on the consumer side for connecting to the source Kafka cluster:
-
Find out the name of the secret with the certificate which should be used for TLS Server Authentication and the key under which the certificate is stored in the secret. If such secret does not exist yet, prepare the certificate in a file and create the secret.
On Kubernetes this can be done using
kubectl create:kubectl create secret generic <my-secret> --from-file=<my-file.crt>On OpenShift this can be done using
oc create:oc create secret generic <my-secret> --from-file=<my-file.crt> -
Edit the
KafkaMirrorMaker.spec.consumer.tlsproperty. For example:apiVersion: kafka.strimzi.io/v1alpha1 kind: KafkaMirrorMaker metadata: name: my-mirror-maker spec: # ... consumer: tls: trustedCertificates: - secretName: my-cluster-cluster-cert certificate: ca.crt # ... -
Create or update the resource.
On Kubernetes this can be done using
kubectl apply:kubectl apply -f <your-file>On OpenShift this can be done using
oc apply:oc apply -f <your-file>
Repeat the above steps for configuring TLS on the target Kafka cluster.
In this case, the secret containing the certificate has to be configured in the KafkaMirrorMaker.spec.producer.tls property.
3.4.7. Connecting to Kafka brokers with Authentication
By default, Kafka Mirror Maker will try to connect to Kafka brokers without any authentication.
Authentication can be enabled in the KafkaMirrorMaker resource.
Authentication support in Kafka Mirror Maker
Authentication can be configured in the KafkaMirrorMaker.spec.consumer.authentication and KafkaMirrorMaker.spec.producer.authentication properties.
The authentication property specifies the type of the authentication method which should be used and additional configuration details depending on the mechanism.
The currently supported authentication types are:
-
TLS client authentication
-
SASL based authentication using SCRAM-SHA-512 mechanism
TLS Client Authentication
To use the TLS client authentication, set the type property to the value tls.
The TLS client authentication uses TLS certificate to authenticate.
The certificate has to be specified in the certificateAndKey property.
It is always loaded from an OpenShift or Kubernetes secret.
Inside the secret, it has to be stored in the X.509 format separately as public and private keys.
|
Note
|
TLS client authentication can be used only with TLS connections. For more details about TLS configuration in Kafka Mirror Maker see Connecting to Kafka brokers using TLS. |
An example showing TLS client authentication configuration
apiVersion: kafka.strimzi.io/v1alpha1
kind: KafkaMirrorMaker
metadata:
name: my-mirror-maker
spec:
# ...
consumer:
authentication:
type: tls
certificateAndKey:
secretName: my-source-secret
certificate: public.crt
key: private.key
# ...
producer:
authentication:
type: tls
certificateAndKey:
secretName: my-target-secret
certificate: public.crt
key: private.key
# ...SCRAM-SHA-512 authentication
To configure Kafka Mirror Maker to use SCRAM-SHA-512 authentication, set the type property to scram-sha-512.
The broker listener to which clients are connecting must also be configured to use SCRAM-SHA-512 SASL authentication.
This authentication mechanism requires a username and password.
-
Specify the username in the
usernameproperty. -
In the
passwordSecretproperty, specify a link to aSecretcontaining the password. ThesecretNameproperty contains the name of such aSecretand thepasswordproperty contains the name of the key under which the password is stored inside theSecret.
|
Warning
|
Do not specify the actual password in the password field.
|
An example showing SCRAM-SHA-512 client authentication configuration
apiVersion: kafka.strimzi.io/v1alpha1
kind: KafkaMirrorMaker
metadata:
name: my-mirror-maker
spec:
# ...
consumer:
authentication:
type: scram-sha-512
username: my-source-user
passwordSecret:
secretName: my-source-user
password: my-source-password-key
# ...
producer:
authentication:
type: scram-sha-512
username: my-producer-user
passwordSecret:
secretName: my-producer-user
password: my-producer-password-key
# ...Configuring TLS client authentication in Kafka Mirror Maker
Prerequisites
-
An OpenShift or Kubernetes cluster
-
A running Cluster Operator with a
tlslistener withtlsauthentication enabled
Procedure
As the Kafka Mirror Maker connects to two Kafka clusters (source and target), you can choose to configure TLS client authentication for one or both the clusters. The following steps describe how to configure TLS client authentication on the consumer side for connecting to the source Kafka cluster:
-
Find out the name of the
Secretwith the public and private keys which should be used for TLS Client Authentication and the keys under which they are stored in theSecret. If such aSecretdoes not exist yet, prepare the keys in a file and create theSecret.On Kubernetes this can be done using
kubectl create:kubectl create secret generic <my-secret> --from-file=<my-public.crt> --from-file=<my-private.key>On OpenShift this can be done using
oc create:oc create secret generic <my-secret> --from-file=<my-public.crt> --from-file=<my-private.key> -
Edit the
KafkaMirrorMaker.spec.consumer.authenticationproperty. For example:apiVersion: kafka.strimzi.io/v1alpha1 kind: KafkaMirrorMaker metadata: name: my-mirror-maker spec: # ... consumer: authentication: type: tls certificateAndKey: secretName: my-secret certificate: my-public.crt key: my-private.key # ... -
Create or update the resource.
On Kubernetes this can be done using
kubectl apply:kubectl apply -f <your-file>On OpenShift this can be done using
oc apply:oc apply -f <your-file>
Repeat the above steps for configuring TLS client authentication on the target Kafka cluster.
In this case, the secret containing the certificate has to be configured in the KafkaMirrorMaker.spec.producer.authentication property.
Configuring SCRAM-SHA-512 authentication in Kafka Mirror Maker
Prerequisites
-
An OpenShift or Kubernetes cluster
-
A running Cluster Operator with a
listenerconfigured for SCRAM-SHA-512 authentication -
Username to be used for authentication
Procedure
As the Kafka Mirror Maker connects to two Kafka clusters (source and target), you can choose to configure SCRAM-SHA-512 authentication for one or both the clusters. The following steps describe how to configure SCRAM-SHA-512 authentication on the consumer side for connecting to the source Kafka cluster:
-
Find out the name of the
Secretwith the password which should be used for authentication and the key under which the password is stored in theSecret. If such aSecretdoes not exist yet, prepare a file with the password and create theSecret.On Kubernetes this can be done using
kubectl create:echo -n '<password>' > <my-password.txt> kubectl create secret generic <my-secret> --from-file=<my-password.txt>On OpenShift this can be done using
oc create:echo -n '1f2d1e2e67df' > <my-password.txt> oc create secret generic <my-secret> --from-file=<my-password.txt> -
Edit the
KafkaMirrorMaker.spec.consumer.authenticationproperty. For example:apiVersion: kafka.strimzi.io/v1alpha1 kind: KafkaMirrorMaker metadata: name: my-mirror-maker spec: # ... consumer: authentication: type: scram-sha-512 username: _<my-username>_ passwordSecret: secretName: _<my-secret>_ password: _<my-password.txt>_ # ... -
Create or update the resource.
On Kubernetes this can be done using
kubectl apply:kubectl apply -f <your-file>On OpenShift this can be done using
oc apply:oc apply -f <your-file>
Repeat the above steps for configuring SCRAM-SHA-512 authentication on the target Kafka cluster.
In this case, the secret containing the certificate has to be configured in the KafkaMirrorMaker.spec.producer.authentication property.
3.4.8. Kafka Mirror Maker configuration
Strimzi allows you to customize the configuration of the Kafka Mirror Maker by editing most of the options for the related consumer and producer. Producer options are listed in Apache Kafka documentation. Consumer options are listed in Apache Kafka documentation.
The only options which cannot be configured are those related to the following areas:
-
Kafka cluster bootstrap address
-
Security (Encryption, Authentication, and Authorization)
-
Consumer group identifier
These options are automatically configured by Strimzi.
Kafka Mirror Maker configuration
Kafka Mirror Maker can be configured using the config sub-property in KafkaMirrorMaker.spec.consumer and KafkaMirrorMaker.spec.producer.
This property should contain the Kafka Mirror Maker consumer and producer configuration options as keys.
The values could be in one of the following JSON types:
-
String
-
Number
-
Boolean
Users can specify and configure the options listed in the Apache Kafka documentation and Apache Kafka documentation with the exception of those options which are managed directly by Strimzi. Specifically, all configuration options with keys equal to or starting with one of the following strings are forbidden:
-
ssl. -
sasl. -
security. -
bootstrap.servers -
group.id
When one of the forbidden options is present in the config property, it will be ignored and a warning message will be printed to the Custer Operator log file.
All other options will be passed to Kafka Mirror Maker.
|
Important
|
The Cluster Operator does not validate keys or values in the provided config object.
When an invalid configuration is provided, the Kafka Mirror Maker might not start or might become unstable.
In such cases, the configuration in the KafkaMirrorMaker.spec.consumer.config or KafkaMirrorMaker.spec.producer.config object should be fixed and the cluster operator will roll out the new configuration for Kafka Mirror Maker.
|
An example showing Kafka Mirror Maker configuration
apiVersion: kafka.strimzi.io/v1alpha1
kind: KafkaMirroMaker
metadata:
name: my-mirror-maker
spec:
# ...
consumer:
config:
max.poll.records: 100
receive.buffer.bytes: 32768
producer:
config:
compression.type: gzip
batch.size: 8192
# ...Configuring Kafka Mirror Maker
Prerequisites
-
Two running Kafka clusters (source and target)
-
A running Cluster Operator
Procedure
-
Edit the
KafkaMirrorMaker.spec.consumer.configandKafkaMirrorMaker.spec.producer.configproperties. For example:apiVersion: kafka.strimzi.io/v1alpha1 kind: KafkaMirroMaker metadata: name: my-mirror-maker spec: # ... consumer: config: max.poll.records: 100 receive.buffer.bytes: 32768 producer: config: compression.type: gzip batch.size: 8192 # ... -
Create or update the resource.
On Kubernetes this can be done using
kubectl apply:kubectl apply -f <your-file>On OpenShift this can be done using
oc apply:oc apply -f <your-file>
3.4.9. CPU and memory resources
For every deployed container, Strimzi allows you to specify the resources which should be reserved for it and the maximum resources that can be consumed by it. Strimzi supports two types of resources:
-
Memory
-
CPU
Strimzi is using the OpenShift or Kubernetes syntax for specifying CPU and memory resources.
Resource limits and requests
Resource limits and requests can be configured using the resources property in following resources:
-
Kafka.spec.kafka -
Kafka.spec.kafka.tlsSidecar -
Kafka.spec.zookeeper -
Kafka.spec.zookeeper.tlsSidecar -
Kafka.spec.entityOperator.topicOperator -
Kafka.spec.entityOperator.userOperator -
Kafka.spec.entityOperator.tlsSidecar -
KafkaConnect.spec -
KafkaConnectS2I.spec
Resource requests
Requests specify the resources that will be reserved for a given container. Reserving the resources will ensure that they are always available.
|
Important
|
If the resource request is for more than the available free resources in the OpenShift or Kubernetes cluster, the pod will not be scheduled. |
Resource requests can be specified in the request property.
The resource requests currently supported by Strimzi are memory and CPU.
Memory is specified under the property memory.
CPU is specified under the property cpu.
An example showing resource request configuration
# ...
resources:
requests:
cpu: 12
memory: 64Gi
# ...It is also possible to specify a resource request just for one of the resources:
An example showing resource request configuration with memory request only
# ...
resources:
requests:
memory: 64Gi
# ...Or:
An example showing resource request configuration with CPU request only
# ...
resources:
requests:
cpu: 12
# ...Resource limits
Limits specify the maximum resources that can be consumed by a given container. The limit is not reserved and might not be always available. The container can use the resources up to the limit only when they are available. The resource limits should be always higher than the resource requests.
Resource limits can be specified in the limits property.
The resource limits currently supported by Strimzi are memory and CPU.
Memory is specified under the property memory.
CPU is specified under the property cpu.
An example showing resource limits configuration
# ...
resources:
limits:
cpu: 12
memory: 64Gi
# ...It is also possible to specify the resource limit just for one of the resources:
An example showing resource limit configuration with memory request only
# ...
resources:
limits:
memory: 64Gi
# ...Or:
An example showing resource limits configuration with CPU request only
# ...
resources:
requests:
cpu: 12
# ...Supported CPU formats
CPU requests and limits are supported in the following formats:
-
Number of CPU cores as integer (
5CPU core) or decimal (2.5CPU core). -
Number or millicpus / millicores (
100m) where 1000 millicores is the same1CPU core.
An example of using different CPU units
# ...
resources:
requests:
cpu: 500m
limits:
cpu: 2.5
# ...|
Note
|
The amount of computing power of 1 CPU core might differ depending on the platform where the OpenShift or Kubernetes is deployed. |
For more details about the CPU specification, see the Meaning of CPU website.
Supported memory formats
Memory requests and limits are specified in megabytes, gigabytes, mebibytes, and gibibytes.
-
To specify memory in megabytes, use the
Msuffix. For example1000M. -
To specify memory in gigabytes, use the
Gsuffix. For example1G. -
To specify memory in mebibytes, use the
Misuffix. For example1000Mi. -
To specify memory in gibibytes, use the
Gisuffix. For example1Gi.
An example of using different memory units
# ...
resources:
requests:
memory: 512Mi
limits:
memory: 2Gi
# ...For more details about the memory specification and additional supported units, see the Meaning of memory website.
Additional resources
-
For more information about managing computing resources on OpenShift or Kubernetes, see Managing Compute Resources for Containers.
Configuring resource requests and limits
Prerequisites
-
An OpenShift or Kubernetes cluster
-
A running Cluster Operator
Procedure
-
Edit the
resourcesproperty in the resource specifying the cluster deployment. For example:apiVersion: kafka.strimzi.io/v1alpha1 kind: Kafka spec: kafka: # ... resources: requests: cpu: "8" memory: 64Gi limits: cpu: "12" memory: 128Gi # ... zookeeper: # ... -
Create or update the resource.
On Kubernetes this can be done using
kubectl apply:kubectl apply -f your-fileOn OpenShift this can be done using
oc apply:oc apply -f your-file
Additional resources
-
For more information about the schema, see
Resourcesschema reference.
3.4.10. Logging
Logging enables you to diagnose error and performance issues of Strimzi.
For the logging, various logger implementations are used.
Kafka and Zookeeper use log4j logger and Topic Operator, User Operator, and other components use log4j2 logger.
This section provides information about different loggers and describes how to configure log levels.
You can set the log levels by specifying the loggers and their levels directly (inline) or by using a custom (external) config map.
Using inline logging setting
Procedure
-
Edit the YAML file to specify the loggers and their level for the required components. For example:
apiVersion: {KafkaApiVersion} kind: Kafka spec: kafka: # ... logging: type: inline loggers: logger.name: "INFO" # ...In the above example, the log level is set to INFO. You can set the log level to INFO, ERROR, WARN, TRACE, DEBUG, FATAL or OFF. For more information about the log levels, see log4j manual.
-
Create or update the Kafka resource in OpenShift or Kubernetes.
On Kubernetes this can be done using
kubectl apply:kubectl apply -f your-fileOn OpenShift this can be done using
oc apply:oc apply -f your-file
Using external ConfigMap for logging setting
Procedure
-
Edit the YAML file to specify the name of the
ConfigMapwhich should be used for the required components. For example:apiVersion: {KafkaApiVersion} kind: Kafka spec: kafka: # ... logging: type: external name: customConfigMap # ...Remember to place your custom ConfigMap under
log4j.propertieseventuallylog4j2.propertieskey. -
Create or update the Kafka resource in OpenShift or Kubernetes.
On Kubernetes this can be done using
kubectl apply:kubectl apply -f your-fileOn OpenShift this can be done using
oc apply:oc apply -f your-file
Loggers
Strimzi consists of several components. Each component has its own loggers and is configurable. This section provides information about loggers of various components.
Components and their loggers are listed below.
-
Kafka
-
kafka.root.logger.level -
log4j.logger.org.I0Itec.zkclient.ZkClient -
log4j.logger.org.apache.zookeeper -
log4j.logger.kafka -
log4j.logger.org.apache.kafka -
log4j.logger.kafka.request.logger -
log4j.logger.kafka.network.Processor -
log4j.logger.kafka.server.KafkaApis -
log4j.logger.kafka.network.RequestChannel$ -
log4j.logger.kafka.controller -
log4j.logger.kafka.log.LogCleaner -
log4j.logger.state.change.logger -
log4j.logger.kafka.authorizer.logger
-
-
Zookeeper
-
zookeeper.root.logger
-
-
Kafka Connect and Kafka Connect with Source2Image support
-
connect.root.logger.level -
log4j.logger.org.apache.zookeeper -
log4j.logger.org.I0Itec.zkclient -
log4j.logger.org.reflections
-
-
Kafka Mirror Maker
-
mirrormaker.root.logger
-
-
Topic Operator
-
rootLogger.level
-
-
User Operator
-
rootLogger.level
-
3.4.11. Prometheus metrics
Strimzi supports Prometheus metrics using Prometheus JMX exporter to convert the JMX metrics supported by Apache Kafka and Zookeeper to Prometheus metrics. When metrics are enabled, they are exposed on port 9404.
For more information about configuring Prometheus and Grafana, see Metrics.
Metrics configuration
Prometheus metrics can be enabled by configuring the metrics property in following resources:
-
Kafka.spec.kafka -
Kafka.spec.zookeeper -
KafkaConnect.spec -
KafkaConnectS2I.spec
When the metrics property is not defined in the resource, the Prometheus metrics will be disabled.
To enable Prometheus metrics export without any further configuration, you can set it to an empty object ({}).
Example of enabling metrics without any further configuration
apiVersion: kafka.strimzi.io/v1alpha1
kind: Kafka
metadata:
name: my-cluster
spec:
kafka:
# ...
metrics: {}
# ...
zookeeper:
# ...The metrics property might contain additional configuration for the Prometheus JMX exporter.
Example of enabling metrics with additional Prometheus JMX Exporter configuration
apiVersion: kafka.strimzi.io/v1alpha1
kind: Kafka
metadata:
name: my-cluster
spec:
kafka:
# ...
metrics:
lowercaseOutputName: true
rules:
- pattern: "kafka.server<type=(.+), name=(.+)PerSec\\w*><>Count"
name: "kafka_server_$1_$2_total"
- pattern: "kafka.server<type=(.+), name=(.+)PerSec\\w*, topic=(.+)><>Count"
name: "kafka_server_$1_$2_total"
labels:
topic: "$3"
# ...
zookeeper:
# ...Configuring Prometheus metrics
Prerequisites
-
An OpenShift or Kubernetes cluster
-
A running Cluster Operator
Procedure
-
Edit the
metricsproperty in theKafka,KafkaConnectorKafkaConnectS2Iresource. For example:apiVersion: kafka.strimzi.io/v1alpha1 kind: Kafka metadata: name: my-cluster spec: kafka: # ... zookeeper: # ... metrics: lowercaseOutputName: true # ... -
Create or update the resource.
On Kubernetes this can be done using
kubectl apply:kubectl apply -f your-fileOn OpenShift this can be done using
oc apply:oc apply -f your-file
3.4.12. JVM Options
Apache Kafka and Apache Zookeeper are running inside of a Java Virtual Machine (JVM). JVM has many configuration options to optimize the performance for different platforms and architectures. Strimzi allows configuring some of these options.
JVM configuration
JVM options can be configured using the jvmOptions property in following resources:
-
Kafka.spec.kafka -
Kafka.spec.zookeeper -
KafkaConnect.spec -
KafkaConnectS2I.spec
Only a selected subset of available JVM options can be configured. The following options are supported:
-Xms and -Xmx
-Xms configures the minimum initial allocation heap size when the JVM starts.
-Xmx configures the maximum heap size.
|
Note
|
The units accepted by JVM settings such as -Xmx and -Xms are those accepted by the JDK java binary in the corresponding image.
Accordingly, 1g or 1G means 1,073,741,824 bytes, and Gi is not a valid unit suffix.
This is in contrast to the units used for memory requests and limits, which follow the OpenShift or Kubernetes convention where 1G means 1,000,000,000 bytes, and 1Gi means 1,073,741,824 bytes
|
The default values used for -Xms and -Xmx depends on whether there is a memory request limit configured for the container:
-
If there is a memory limit then the JVM’s minimum and maximum memory will be set to a value corresponding to the limit.
-
If there is no memory limit then the JVM’s minimum memory will be set to
128Mand the JVM’s maximum memory will not be defined. This allows for the JVM’s memory to grow as-needed, which is ideal for single node environments in test and development.
|
Important
|
Setting
|
When setting -Xmx explicitly, it is recommended to:
-
set the memory request and the memory limit to the same value,
-
use a memory request that is at least 4.5 × the
-Xmx, -
consider setting
-Xmsto the same value as-Xms.
|
Important
|
Containers doing lots of disk I/O (such as Kafka broker containers) will need to leave some memory available for use as operating system page cache. On such containers, the requested memory should be significantly higher than the memory used by the JVM. |
Example fragment configuring
-Xmx and -Xms# ...
jvmOptions:
"-Xmx": "2g"
"-Xms": "2g"
# ...In the above example, the JVM will use 2 GiB (=2,147,483,648 bytes) for its heap. Its total memory usage will be approximately 8GiB.
Setting the same value for initial (-Xms) and maximum (-Xmx) heap sizes avoids the JVM having to allocate memory after startup, at the cost of possibly allocating more heap than is really needed.
For Kafka and Zookeeper pods such allocation could cause unwanted latency.
For Kafka Connect avoiding over allocation may be the most important concern, especially in distributed mode where the effects of over-allocation will be multiplied by the number of consumers.
-server
-server enables the server JVM. This option can be set to true or false.
Example fragment configuring
-server# ...
jvmOptions:
"-server": true
# ...|
Note
|
When neither of the two options (-server and -XX) is specified, the default Apache Kafka configuration of KAFKA_JVM_PERFORMANCE_OPTS will be used.
|
-XX
-XX object can be used for configuring advanced runtime options of a JVM.
The -server and -XX options are used to configure the KAFKA_JVM_PERFORMANCE_OPTS option of Apache Kafka.
Example showing the use of the
-XX objectjvmOptions:
"-XX":
"UseG1GC": true,
"MaxGCPauseMillis": 20,
"InitiatingHeapOccupancyPercent": 35,
"ExplicitGCInvokesConcurrent": true,
"UseParNewGC": falseThe example configuration above will result in the following JVM options:
-XX:+UseG1GC -XX:MaxGCPauseMillis=20 -XX:InitiatingHeapOccupancyPercent=35 -XX:+ExplicitGCInvokesConcurrent -XX:-UseParNewGC|
Note
|
When neither of the two options (-server and -XX) is specified, the default Apache Kafka configuration of KAFKA_JVM_PERFORMANCE_OPTS will be used.
|
Configuring JVM options
Prerequisites
-
An OpenShift or Kubernetes cluster
-
A running Cluster Operator
Procedure
-
Edit the
jvmOptionsproperty in theKafka,KafkaConnectorKafkaConnectS2Iresource. For example:apiVersion: kafka.strimzi.io/v1alpha1 kind: Kafka metadata: name: my-cluster spec: kafka: # ... jvmOptions: "-Xmx": "8g" "-Xms": "8g" # ... zookeeper: # ... -
Create or update the resource.
On Kubernetes this can be done using
kubectl apply:kubectl apply -f your-fileOn OpenShift this can be done using
oc apply:oc apply -f your-file
3.4.13. Container images
Strimzi allows you to configure container images which will be used for its components. Overriding container images is recommended only in special situations, where you need to use a different container registry. For example, because your network does not allow access to the container repository used by Strimzi. In such a case, you should either copy the Strimzi images or build them from the source. If the configured image is not compatible with Strimzi images, it might not work properly.
Container image configurations
Container image which should be used for given components can be specified using the image property in:
-
Kafka.spec.kafka -
Kafka.spec.kafka.tlsSidecar -
Kafka.spec.zookeeper -
Kafka.spec.zookeeper.tlsSidecar -
Kafka.spec.entityOperator.topicOperator -
Kafka.spec.entityOperator.userOperator -
Kafka.spec.entityOperator.tlsSidecar -
KafkaConnect.spec -
KafkaConnectS2I.spec
Configuring the Kafka.spec.kafka.image property
The Kafka.spec.kafka.image property functions differently from the others, because Strimzi supports multiple versions of Kafka, each requiring the own image.
The STRIMZI_KAFKA_IMAGES environment variable of the Cluster Operator configuration is used to provide a mapping between Kafka versions and the corresponding images.
This is used in combination with the Kafka.spec.kafka.image and Kafka.spec.kafka.version properties as follows:
-
If neither
Kafka.spec.kafka.imagenorKafka.spec.kafka.versionare given in the custom resource then theversionwill default to the Cluster Operator’s default Kafka version, and the image will be the one corresponding to this version in theSTRIMZI_KAFKA_IMAGES. -
If
Kafka.spec.kafka.imageis given butKafka.spec.kafka.versionis not then the given image will be used and theversionwill be assumed to be the Cluster Operator’s default Kafka version. -
If
Kafka.spec.kafka.versionis given butKafka.spec.kafka.imageis not then image will be the one corresponding to this version in theSTRIMZI_KAFKA_IMAGES. -
Both
Kafka.spec.kafka.versionandKafka.spec.kafka.imageare given the given image will be used, and it will be assumed to contain a Kafka broker with the given version.
|
Warning
|
It is best to provide just Kafka.spec.kafka.version and leave the Kafka.spec.kafka.image property unspecified.
This reduces the chances of making a mistake in configuring the Kafka resource. If you need to change the images used for different versions of Kafka, it is better to configure the Cluster Operator’s STRIMZI_KAFKA_IMAGES environment variable.
|
Configuring the image property in other resources
For the image property in the other custom resources, the given value will be used during deployment.
If the image property is missing, the image specified in the Cluster Operator configuration will be used.
If the image name is not defined in the Cluster Operator configuration, then the default value will be used.
-
For Kafka broker TLS sidecar:
-
Container image specified in the
STRIMZI_DEFAULT_TLS_SIDECAR_KAFKA_IMAGEenvironment variable from the Cluster Operator configuration. -
strimzi/kafka-stunnel:latestcontainer image.
-
-
For Zookeeper nodes:
-
Container image specified in the
STRIMZI_DEFAULT_ZOOKEEPER_IMAGEenvironment variable from the Cluster Operator configuration. -
strimzi/zookeeper:latestcontainer image.
-
-
For Zookeeper node TLS sidecar:
-
Container image specified in the
STRIMZI_DEFAULT_TLS_SIDECAR_ZOOKEEPER_IMAGEenvironment variable from the Cluster Operator configuration. -
strimzi/zookeeper-stunnel:latestcontainer image.
-
-
For Topic Operator:
-
Container image specified in the
STRIMZI_DEFAULT_TOPIC_OPERATOR_IMAGEenvironment variable from the Cluster Operator configuration. .**strimzi/topic-operator:latestcontainer image.
-
-
For User Operator:
-
Container image specified in the
STRIMZI_DEFAULT_USER_OPERATOR_IMAGEenvironment variable from the Cluster Operator configuration. -
strimzi/user-operator:latestcontainer image.
-
-
For Entity Operator TLS sidecar:
-
Container image specified in the
STRIMZI_DEFAULT_TLS_SIDECAR_ENTITY_OPERATOR_IMAGEenvironment variable from the Cluster Operator configuration. -
strimzi/entity-operator-stunnel:latestcontainer image.
-
-
For Kafka Connect:
-
Container image specified in the
STRIMZI_DEFAULT_KAFKA_CONNECT_IMAGEenvironment variable from the Cluster Operator configuration. -
strimzi/kafka-connect:latestcontainer image.
-
-
For Kafka Connect with Source2image support:
-
Container image specified in the
STRIMZI_DEFAULT_KAFKA_CONNECT_S2I_IMAGEenvironment variable from the Cluster Operator configuration. -
strimzi/kafka-connect-s2i:latestcontainer image.
-
|
Warning
|
Overriding container images is recommended only in special situations, where you need to use a different container registry. For example, because your network does not allow access to the container repository used by Strimzi. In such case, you should either copy the Strimzi images or build them from source. In case the configured image is not compatible with Strimzi images, it might not work properly. |
Example of container image configuration
apiVersion: kafka.strimzi.io/v1alpha1
kind: Kafka
metadata:
  name: my-cluster
spec:
  kafka:
    # ...
    image: my-org/my-image:latest
    # ...
  zookeeper:
# ...Configuring container images
Prerequisites
-
An OpenShift or Kubernetes cluster
-
A running Cluster Operator
Procedure
-
Edit the
imageproperty in theKafka,KafkaConnectorKafkaConnectS2Iresource. For example:apiVersion: kafka.strimzi.io/v1alpha1 kind: Kafka metadata: name: my-cluster spec: kafka: # ... image: my-org/my-image:latest # ... zookeeper: # ... -
Create or update the resource.
On Kubernetes this can be done using
kubectl apply:kubectl apply -f your-fileOn OpenShift this can be done using
oc apply:oc apply -f your-file
3.4.14. Configuring pod scheduling
|
Important
|
When two application are scheduled to the same OpenShift or Kubernetes node, both applications might use the same resources like disk I/O and impact performance. That can lead to performance degradation. Scheduling Kafka pods in a way that avoids sharing nodes with other critical workloads, using the right nodes or dedicated a set of nodes only for Kafka are the best ways how to avoid such problems. |
Scheduling pods based on other applications
Avoid critical applications to share the node
Pod anti-affinity can be used to ensure that critical applications are never scheduled on the same disk. When running Kafka cluster, it is recommended to use pod anti-affinity to ensure that the Kafka brokers do not share the nodes with other workloads like databases.
Affinity
Affinity can be configured using the affinity property in following resources:
-
Kafka.spec.kafka -
Kafka.spec.zookeeper -
Kafka.spec.entityOperator -
KafkaConnect.spec -
KafkaConnectS2I.spec
The affinity configuration can include different types of affinity:
-
Pod affinity and anti-affinity
-
Node affinity
The format of the affinity property follows the OpenShift or Kubernetes specification.
For more details, see the Kubernetes node and pod affinity documentation.
Configuring pod anti-affinity in Kafka components
Prerequisites
-
An OpenShift or Kubernetes cluster
-
A running Cluster Operator
Procedure
-
Edit the
affinityproperty in the resource specifying the cluster deployment. Use labels to specify the pods which should not be scheduled on the same nodes. ThetopologyKeyshould be set tokubernetes.io/hostnameto specify that the selected pods should not be scheduled on nodes with the same hostname. For example:apiVersion: kafka.strimzi.io/v1alpha1 kind: Kafka spec: kafka: # ... affinity: podAntiAffinity: requiredDuringSchedulingIgnoredDuringExecution: - labelSelector: matchExpressions: - key: application operator: In values: - postgresql - mongodb topologyKey: "kubernetes.io/hostname" # ... zookeeper: # ... -
Create or update the resource.
On Kubernetes this can be done using
kubectl apply:kubectl apply -f your-fileOn OpenShift this can be done using
oc apply:oc apply -f your-file
Scheduling pods to specific nodes
Node scheduling
The OpenShift or Kubernetes cluster usually consists of many different types of worker nodes. Some are optimized for CPU heavy workloads, some for memory, while other might be optimized for storage (fast local SSDs) or network. Using different nodes helps to optimize both costs and performance. To achieve the best possible performance, it is important to allow scheduling of Strimzi components to use the right nodes.
OpenShift or Kubernetes uses node affinity to schedule workloads onto specific nodes.
Node affinity allows you to create a scheduling constraint for the node on which the pod will be scheduled.
The constraint is specified as a label selector.
You can specify the label using either the built-in node label like beta.kubernetes.io/instance-type or custom labels to select the right node.
Affinity
Affinity can be configured using the affinity property in following resources:
-
Kafka.spec.kafka -
Kafka.spec.zookeeper -
Kafka.spec.entityOperator -
KafkaConnect.spec -
KafkaConnectS2I.spec
The affinity configuration can include different types of affinity:
-
Pod affinity and anti-affinity
-
Node affinity
The format of the affinity property follows the OpenShift or Kubernetes specification.
For more details, see the Kubernetes node and pod affinity documentation.
Configuring node affinity in Kafka components
Prerequisites
-
An OpenShift or Kubernetes cluster
-
A running Cluster Operator
Procedure
-
Label the nodes where Strimzi components should be scheduled.
On Kubernetes this can be done using
kubectl label:kubectl label node your-node node-type=fast-networkOn OpenShift this can be done using
oc label:oc label node your-node node-type=fast-networkAlternatively, some of the existing labels might be reused.
-
Edit the
affinityproperty in the resource specifying the cluster deployment. For example:apiVersion: kafka.strimzi.io/v1alpha1 kind: Kafka spec: kafka: # ... affinity: nodeAffinity: requiredDuringSchedulingIgnoredDuringExecution: nodeSelectorTerms: - matchExpressions: - key: node-type operator: In values: - fast-network # ... zookeeper: # ... -
Create or update the resource.
On Kubernetes this can be done using
kubectl apply:kubectl apply -f your-fileOn OpenShift this can be done using
oc apply:oc apply -f your-file
Using dedicated nodes
Dedicated nodes
Cluster administrators can mark selected OpenShift or Kubernetes nodes as tainted. Nodes with taints are excluded from regular scheduling and normal pods will not be scheduled to run on them. Only services which can tolerate the taint set on the node can be scheduled on it. The only other services running on such nodes will be system services such as log collectors or software defined networks.
Taints can be used to create dedicated nodes. Running Kafka and its components on dedicated nodes can have many advantages. There will be no other applications running on the same nodes which could cause disturbance or consume the resources needed for Kafka. That can lead to improved performance and stability.
To schedule Kafka pods on the dedicated nodes, configure node affinity and tolerations.
Affinity
Affinity can be configured using the affinity property in following resources:
-
Kafka.spec.kafka -
Kafka.spec.zookeeper -
Kafka.spec.entityOperator -
KafkaConnect.spec -
KafkaConnectS2I.spec
The affinity configuration can include different types of affinity:
-
Pod affinity and anti-affinity
-
Node affinity
The format of the affinity property follows the OpenShift or Kubernetes specification.
For more details, see the Kubernetes node and pod affinity documentation.
Tolerations
Tolerations ca be configured using the tolerations property in following resources:
-
Kafka.spec.kafka -
Kafka.spec.zookeeper -
Kafka.spec.entityOperator -
KafkaConnect.spec -
KafkaConnectS2I.spec
The format of the tolerations property follows the OpenShift or Kubernetes specification.
For more details, see the Kubernetes taints and tolerations.
Setting up dedicated nodes and scheduling pods on them
Prerequisites
-
An OpenShift or Kubernetes cluster
-
A running Cluster Operator
Procedure
-
Select the nodes which should be used as dedicated
-
Make sure there are no workloads scheduled on these nodes
-
Set the taints on the selected nodes
On Kubernetes this can be done using
kubectl taint:kubectl taint node your-node dedicated=Kafka:NoScheduleOn OpenShift this can be done using
oc adm taint:oc adm taint node your-node dedicated=Kafka:NoSchedule -
Additionally, add a label to the selected nodes as well.
On Kubernetes this can be done using
kubectl label:kubectl label node your-node dedicated=KafkaOn OpenShift this can be done using
oc label:oc label node your-node dedicated=Kafka -
Edit the
affinityandtolerationsproperties in the resource specifying the cluster deployment. For example:apiVersion: kafka.strimzi.io/v1alpha1 kind: Kafka spec: kafka: # ... tolerations: - key: "dedicated" operator: "Equal" value: "Kafka" effect: "NoSchedule" affinity: nodeAffinity: requiredDuringSchedulingIgnoredDuringExecution: nodeSelectorTerms: - matchExpressions: - key: dedicated operator: In values: - Kafka # ... zookeeper: # ... -
Create or update the resource.
On Kubernetes this can be done using
kubectl apply:kubectl apply -f your-fileOn OpenShift this can be done using
oc apply:oc apply -f your-file
3.4.15. List of resources created as part of Kafka Mirror Maker
The following resources will created by the Cluster Operator in the OpenShift or Kubernetes cluster:
- <mirror-maker-name>-mirror-maker
-
Deployment which is in charge to create the Kafka Mirror Maker pods.
- <mirror-maker-name>-config
-
ConfigMap which contains the Kafka Mirror Maker ancillary configuration and is mounted as a volume by the Kafka broker pods.
- <mirror-maker-name>-mirror-maker
-
Pod Disruption Budget configured for the Kafka Mirror Maker worker nodes.
3.5. Customizing deployments
Strimzi creates several OpenShift or Kubernetes resources, such as Deployments, StatefulSets, Pods, and Services, which are managed by OpenShift or Kubernetes operators.
Only the operator that is responsible for managing a particular OpenShift or Kubernetes resource can change that resource.
If you try to manually change an operator-managed OpenShift or Kubernetes resource, the operator will revert your changes back.
However, changing an operator-managed OpenShift or Kubernetes resource can be useful if you want to perform certain tasks, such as:
-
Adding custom labels or annotations that control how
Podsare treated by Istio or other services; -
Managing how
Loadbalancer-type Services are created by the cluster.
You can make these types of changes using the template property in the Strimzi custom resources.
3.5.1. Template properties
You can use the template property to configure aspects of the resource creation process.
You can include it in the following resources and properties:
-
Kafka.spec.kafka
-
Kafka.spec.zookeeper
-
Kafka.spec.entityOperator
-
KafkaConnect.spec
-
KafkaConnectS2I.spec
-
KafkaMirrorMakerSpec
In the following example, the template property is used to modify the labels in a Kafka broker’s StatefulSet:
apiVersion: kafka.strimzi.io/v1alpha1
kind: Kafka
metadata:
name: my-cluster
labels:
app: my-cluster
spec:
kafka:
# ...
template:
statefulset:
metadata:
labels:
mylabel: myvalue
# ...Supported resources in Kafka cluster
When defined in a Kafka cluster, the template object can have the following fields:
statefulset-
Configures the
StatefulSetused by the Kafka broker. pod-
Configures the Kafka broker
Podscreated by theStatefulSet. bootstrapService-
Configures the bootstrap service used by clients running within OpenShift or Kubernetes to connect to the Kafka broker.
brokersService-
Configures the headless service.
externalBootstrapService-
Configures the bootstrap service used by clients connecting to Kafka brokers from outside of OpenShift or Kubernetes.
perPodService-
Configures the per-Pod services used by clients connecting to the Kafka broker from outside OpenShift or Kubernetes to access individual brokers.
externalBootstrapRoute-
Configures the bootstrap route used by clients connecting to the Kafka brokers from outside of OpenShift using OpenShift
Routes. perPodRoute-
Configures the per-Pod routes used by clients connecting to the Kafka broker from outside OpenShift to access individual brokers using OpenShift
Routes. podDisruptionBudget-
Configures the Pod Disruption Budget for Kafka broker
StatefulSet.
Supported resources in Zookeeper cluster
When defined in a Zookeeper cluster, the template object can have the following fields:
statefulset-
Configures the Zookeeper
StatefulSet. pod-
Configures the Zookeeper
Podscreated by theStatefulSet. clientsService-
Configures the service used by clients to access Zookeeper.
nodesService-
Configures the headless service.
podDisruptionBudget-
Configures the Pod Disruption Budget for Zookeeper
StatefulSet.
Supported resources in Entity Operator
When defined in an Entity Operator , the template object can have the following fields:
deployment-
Configures the Deployment used by the Entity Operator.
pod-
Configures the Entity Operator
Podcreated by theDeployment.
Supported resources in Kafka Connect and Kafka Connect with Source2Image support
When used with Kafka Connect and Kafka Connect with Source2Image support , the template object can have the following fields:
deployment-
Configures the Kafka Connect
Deployment. pod-
Configures the Kafka Connect
Podscreated by theDeployment. apiService-
Configures the service used by the Kafka Connect REST API.
podDisruptionBudget-
Configures the Pod Disruption Budget for Kafka Connect
Deployment.
Supported resource in Kafka Mirror Maker
When used with Kafka Mirror Maker , the template object can have the following fields:
deployment-
Configures the Kafka Mirror Maker
Deployment. pod-
Configures the Kafka Mirror Maker
Podscreated by theDeployment. podDisruptionBudget-
Configures the Pod Disruption Budget for Kafka Mirror Maker
Deployment.
3.5.2. Labels and Annotations
For every resource, you can configure additional Labels and Annotations.
Labels and Annotations are configured in the metadata property.
For example:
# ...
template:
statefulset:
metadata:
labels:
label1: value1
label2: value2
annotations:
annotation1: value1
annotation2: value2
# ...The labels and annotations fields can contain any labels or annotations that do not contain the reserved string strimzi.io.
Labels and annotations containing strimzi.io are used internally by Strimzi and cannot be configured by the user.
3.5.3. Customizing Pods
In addition to Labels and Annotations, you can customize some other fields on Pods. These fields are described in the following table and affect how the Pod is created.
| Field | Description |
|---|---|
|
Defines the period of time, in seconds, by which the Pod must have terminated gracefully.
After the grace period, the Pod and its containers are forcefully terminated (killed).
The default value is NOTE: You might need to increase the grace period for very large Kafka clusters, so that the Kafka brokers have enough time to transfer their work to another broker before they are terminated. |
|
Defines a list of references to OpenShift or Kubernetes Secrets that can be used for pulling container images from private repositories. For more information about how to create a Secret with the credentials, see Pull an Image from a Private Registry. |
|
Configures pod-level security attributes for containers running as part of a given Pod. For more information about configuring SecurityContext, see Configure a Security Context for a Pod or Container. |
These fields are effective on each type of cluster (Kafka and Zookeeper; Kafka Connect and Kafka Connect with S2I support; and Kafka Mirror Maker).
The following example shows these customized fields on a template property:
# ...
template:
pod:
metadata:
labels:
label1: value1
imagePullSecrets:
- name: my-docker-credentials
securityContext:
runAsUser: 1000001
fsGroup: 0
terminationGracePeriodSeconds: 120
# ...Additional resources
-
For more information, see
PodTemplateschema reference.
3.5.4. Customizing the image pull policy
Strimzi allows you to customize the image pull policy for containers in all pods deployed by the Cluster Operator.
The image pull policy is configured using the environment variable STRIMZI_IMAGE_PULL_POLICY in the Cluster Operator deployment.
The STRIMZI_IMAGE_PULL_POLICY environment variable can be set to three different values:
Always-
Container images are pulled from the registry every time the pod is started or restarted.
IfNotPresent-
Container images are pulled from the registry only when they were not pulled before.
Never-
Container images are never pulled from the registry.
The image pull policy can be currently customized only for all Kafka, Kafka Connect, and Kafka Mirror Maker clusters at once. Changing the policy will result in a rolling update of all your Kafka, Kafka Connect, and Kafka Mirror Maker clusters.
Additional resources
-
For more information about Cluster Operator configuration, see Cluster Operator.
-
For more information about Image Pull Policies, see Disruptions.
3.5.5. Customizing Pod Disruption Budgets
Strimzi creates a pod disruption budget for every new StatefulSet or Deployment.
By default, these pod disruption budgets only allow a single pod to be unavailable at a given time by setting the maxUnavailable value in the`PodDisruptionBudget.spec` resource to 1.
You can change the amount of unavailable pods allowed by changing the default value of maxUnavailable in the pod disruption budget template.
This template applies to each type of cluster (Kafka and Zookeeper; Kafka Connect and Kafka Connect with S2I support; and Kafka Mirror Maker).
The following example shows customized podDisruptionBudget fields on a template property:
# ...
template:
podDisruptionBudget:
metadata:
labels:
key1: label1
key2: label2
annotations:
key1: label1
key2: label2
maxUnavailable: 1
# ...Additional resources
-
For more information, see
PodDisruptionBudgetTemplateschema reference. -
The Disruptions chapter of the Kubernetes documentation.
3.5.6. Customizing deployments
This procedure describes how to customize Labels of a Kafka cluster.
Prerequisites
-
An OpenShift or Kubernetes cluster.
-
A running Cluster Operator.
Procedure
-
Edit the
templateproperty in theKafka,KafkaConnect,KafkaConnectS2I, orKafkaMirrorMakerresource. For example, to modify the labels for the Kafka brokerStatefulSet, use:apiVersion: kafka.strimzi.io/v1alpha1 kind: Kafka metadata: name: my-cluster labels: app: my-cluster spec: kafka: # ... template: statefulset: metadata: labels: mylabel: myvalue # ... -
Create or update the resource.
On Kubernetes, use
kubectl apply:kubectl apply -f your-fileAlternatively, use
kubectl edit:kubectl edit Resource ClusterNameOn OpenShift, use
oc apply:oc apply -f your-fileAlternatively, use
oc edit:oc edit Resource ClusterName
4. Operators
4.1. Cluster Operator
4.1.1. Overview of the Cluster Operator component
The Cluster Operator is in charge of deploying a Kafka cluster alongside a Zookeeper ensemble.
As part of the Kafka cluster, it can also deploy the topic operator which provides operator-style topic management via KafkaTopic custom resources.
The Cluster Operator is also able to deploy a Kafka Connect cluster which connects to an existing Kafka cluster.
On OpenShift such a cluster can be deployed using the Source2Image feature, providing an easy way of including more connectors.
Figure 2. Example Architecture diagram of the Cluster Operator.
When the Cluster Operator is up, it starts to watch for certain OpenShift or Kubernetes resources containing the desired Kafka, Kafka Connect, or Kafka Mirror Maker cluster configuration. By default, it watches only in the same namespace or project where it is installed. The Cluster Operator can be configured to watch for more OpenShift projects or Kubernetes namespaces. Cluster Operator watches the following resources:
-
A
Kafkaresource for the Kafka cluster. -
A
KafkaConnectresource for the Kafka Connect cluster. -
A
KafkaConnectS2Iresource for the Kafka Connect cluster with Source2Image support. -
A
KafkaMirrorMakerresource for the Kafka Mirror Maker instance.
When a new Kafka, KafkaConnect, KafkaConnectS2I, or Kafka Mirror Maker resource is created in the OpenShift or Kubernetes cluster, the operator gets the cluster description from the desired resource and starts creating a new Kafka, Kafka Connect, or Kafka Mirror Maker cluster by creating the necessary other OpenShift or Kubernetes resources, such as StatefulSets, Services, ConfigMaps, and so on.
Every time the desired resource is updated by the user, the operator performs corresponding updates on the OpenShift or Kubernetes resources which make up the Kafka, Kafka Connect, or Kafka Mirror Maker cluster. Resources are either patched or deleted and then re-created in order to make the Kafka, Kafka Connect, or Kafka Mirror Maker cluster reflect the state of the desired cluster resource. This might cause a rolling update which might lead to service disruption.
Finally, when the desired resource is deleted, the operator starts to undeploy the cluster and delete all the related OpenShift or Kubernetes resources.
4.1.2. Deploying the Cluster Operator to Kubernetes
Prerequisites
-
Modify the installation files according to the namespace the Cluster Operator is going to be installed in.
On Linux, use:
sed -i 's/namespace: .*/namespace: my-namespace/' install/cluster-operator/*RoleBinding*.yamlOn MacOS, use:
sed -i '' 's/namespace: .*/namespace: my-namespace/' install/cluster-operator/*RoleBinding*.yaml
Procedure
-
Deploy the Cluster Operator
kubectl apply -f install/cluster-operator -n _my-namespace_
4.1.3. Deploying the Cluster Operator to OpenShift
Prerequisites
-
A user with
cluster-adminrole needs to be used, for example,system:admin. -
Modify the installation files according to the namespace the Cluster Operator is going to be installed in.
On Linux, use:
sed -i 's/namespace: .*/namespace: my-project/' install/cluster-operator/*RoleBinding*.yamlOn MacOS, use:
sed -i '' 's/namespace: .*/namespace: my-project/' install/cluster-operator/*RoleBinding*.yaml
Procedure
-
Deploy the Cluster Operator
oc apply -f install/cluster-operator -n _my-project_ oc apply -f examples/templates/cluster-operator -n _my-project_
4.1.4. Deploying the Cluster Operator to watch multiple namespaces
Prerequisites
-
Edit the installation files according to the OpenShift project or Kubernetes namespace the Cluster Operator is going to be installed in.
On Linux, use:
sed -i 's/namespace: .*/namespace: my-namespace/' install/cluster-operator/*RoleBinding*.yamlOn MacOS, use:
sed -i '' 's/namespace: .*/namespace: my-namespace/' install/cluster-operator/*RoleBinding*.yaml
Procedure
-
Edit the file
install/cluster-operator/050-Deployment-strimzi-cluster-operator.yamland in the environment variableSTRIMZI_NAMESPACElist all the OpenShift projects or Kubernetes namespaces where Cluster Operator should watch for resources. For example:apiVersion: extensions/v1beta1 kind: Deployment spec: template: spec: serviceAccountName: strimzi-cluster-operator containers: - name: strimzi-cluster-operator image: strimzi/cluster-operator:latest imagePullPolicy: IfNotPresent env: - name: STRIMZI_NAMESPACE value: myproject,myproject2,myproject3 -
For all namespaces or projects which should be watched by the Cluster Operator, install the
RoleBindings. Replace themy-namespaceormy-projectwith the OpenShift project or Kubernetes namespace used in the previous step.On Kubernetes this can be done using
kubectl apply:kubectl apply -f install/cluster-operator/020-RoleBinding-strimzi-cluster-operator.yaml -n my-namespace kubectl apply -f install/cluster-operator/031-RoleBinding-strimzi-cluster-operator-entity-operator-delegation.yaml -n my-namespace kubectl apply -f install/cluster-operator/032-RoleBinding-strimzi-cluster-operator-topic-operator-delegation.yaml -n my-namespaceOn OpenShift this can be done using
oc apply:oc apply -f install/cluster-operator/020-RoleBinding-strimzi-cluster-operator.yaml -n my-project oc apply -f install/cluster-operator/031-RoleBinding-strimzi-cluster-operator-entity-operator-delegation.yaml -n my-project oc apply -f install/cluster-operator/032-RoleBinding-strimzi-cluster-operator-topic-operator-delegation.yaml -n my-project -
Deploy the Cluster Operator
On Kubernetes this can be done using
kubectl apply:kubectl apply -f install/cluster-operator -n my-namespaceOn OpenShift this can be done using
oc apply:oc apply -f install/cluster-operator -n my-project
4.1.5. Deploying the Cluster Operator to watch all namespaces
You can configure the Cluster Operator to watch Strimzi resources across all OpenShift projects or Kubernetes namespaces in your OpenShift or Kubernetes cluster. When running in this mode, the Cluster Operator automatically manages clusters in any new projects or namespaces that are created.
Prerequisites
-
Your OpenShift or Kubernetes cluster is running.
Procedure
-
Configure the Cluster Operator to watch all namespaces:
-
Edit the
050-Deployment-strimzi-cluster-operator.yamlfile. -
Set the value of the
STRIMZI_NAMESPACEenvironment variable to*.apiVersion: extensions/v1beta1 kind: Deployment spec: template: spec: # ... serviceAccountName: strimzi-cluster-operator containers: - name: strimzi-cluster-operator image: strimzi/cluster-operator:latest imagePullPolicy: IfNotPresent env: - name: STRIMZI_NAMESPACE value: "*" # ...
-
-
Create
ClusterRoleBindingsthat grant cluster-wide access to all OpenShift projects or Kubernetes namespaces to the Cluster Operator.On OpenShift, use the
oc adm policycommand:oc adm policy add-cluster-role-to-user strimzi-cluster-operator-namespaced --serviceaccount strimzi-cluster-operator -n my-project oc adm policy add-cluster-role-to-user strimzi-entity-operator --serviceaccount strimzi-cluster-operator -n my-project oc adm policy add-cluster-role-to-user strimzi-topic-operator --serviceaccount strimzi-cluster-operator -n my-projectReplace
my-projectwith the project in which you want to install the Cluster Operator.On Kubernetes, use the
kubectl createcommand:kubectl create clusterrolebinding strimzi-cluster-operator-namespaced --clusterrole=strimzi-cluster-operator-namespaced --serviceaccount my-namespace:strimzi-cluster-operator kubectl create clusterrolebinding strimzi-cluster-operator-entity-operator-delegation --clusterrole=strimzi-entity-operator --serviceaccount my-namespace:strimzi-cluster-operator kubectl create clusterrolebinding strimzi-cluster-operator-topic-operator-delegation --clusterrole=strimzi-topic-operator --serviceaccount my-namespace:strimzi-cluster-operatorReplace
my-namespacewith the namespace in which you want to install the Cluster Operator. -
Deploy the Cluster Operator to your OpenShift or Kubernetes cluster.
On OpenShift, use the
oc applycommand:oc apply -f install/cluster-operator -n my-projectOn Kubernetes, use the
kubectl applycommand:kubectl apply -f install/cluster-operator -n my-namespace
4.1.6. Deploying the Cluster Operator using Helm Chart
Prerequisites
-
Helm client has to be installed on the local machine.
-
Helm has to be installed in the OpenShift or Kubernetes cluster.
Procedure
-
Add the Strimzi Helm Chart repository:
helm repo add strimzi https://strimzi.io/charts/ -
Deploy the Cluster Operator using the Helm command line tool:
helm install strimzi/strimzi-kafka-operator -
Verify whether the Cluster Operator has been deployed successfully using the Helm command line tool:
helm ls
Additional resources
-
For more information about Helm, see the Helm website.
4.1.7. Reconciliation
Although the operator reacts to all notifications about the desired cluster resources received from the OpenShift or Kubernetes cluster, if the operator is not running, or if a notification is not received for any reason, the desired resources will get out of sync with the state of the running OpenShift or Kubernetes cluster.
In order to handle failovers properly, a periodic reconciliation process is executed by the Cluster Operator so that it can compare the state of the desired resources with the current cluster deployments in order to have a consistent state across all of them.
You can set the time interval for the periodic reconciliations using the STRIMZI_FULL_RECONCILIATION_INTERVAL_MS variable.
4.1.8. Cluster Operator Configuration
The Cluster Operator can be configured through the following supported environment variables:
STRIMZI_NAMESPACE-
A comma-separated list of OpenShift projects or Kubernetes namespaces that the operator should operate in. When not set, set to empty string, or to
*the cluster operator will operate in all OpenShift projects or Kubernetes namespaces. The Cluster Operator deployment might use the Kubernetes Downward API to set this automatically to the namespace the Cluster Operator is deployed in. See the example below:env: - name: STRIMZI_NAMESPACE valueFrom: fieldRef: fieldPath: metadata.namespace -
STRIMZI_FULL_RECONCILIATION_INTERVAL_MS -
Optional, default: 120000 ms. The interval between periodic reconciliations, in milliseconds.
STRIMZI_LOG_LEVEL-
Optional, default
INFO. The level for printing logging messages. The value can be set to:ERROR,WARNING,INFO,DEBUG, andTRACE. STRIMZI_OPERATION_TIMEOUT_MS-
Optional, default: 300000 ms. The timeout for internal operations, in milliseconds. This value should be increased when using Strimzi on clusters where regular OpenShift or Kubernetes operations take longer than usual (because of slow downloading of Docker images, for example).
STRIMZI_KAFKA_IMAGES-
Required. This provides a mapping from Kafka version to the corresponding Docker image containing a Kafka broker of that version. The required syntax is whitespace or comma separated
<version>=<image>pairs. For example2.0.0=strimzi/kafka:latest-kafka-2.0.0, 2.1.0=strimzi/kafka:latest-kafka-2.1.0. This is used when aKafka.spec.kafka.versionproperty is specified but not theKafka.spec.kafka.image, as described in Container images. STRIMZI_DEFAULT_KAFKA_INIT_IMAGE-
Optional, default
strimzi/kafka-init:latest. The image name to use as default for the init container started before the broker for initial configuration work (that is, rack support), if no image is specified as thekafka-init-imagein the Container images. STRIMZI_DEFAULT_TLS_SIDECAR_KAFKA_IMAGE-
Optional, default
strimzi/kafka-stunnel:latest. The image name to use as the default when deploying the sidecar container which provides TLS support for Kafka, if no image is specified as theKafka.spec.kafka.tlsSidecar.imagein the Container images. STRIMZI_DEFAULT_ZOOKEEPER_IMAGE-
Optional, default
strimzi/zookeeper:latest. The image name to use as the default when deploying Zookeeper, if no image is specified as theKafka.spec.zookeeper.imagein the Container images. STRIMZI_DEFAULT_TLS_SIDECAR_ZOOKEEPER_IMAGE-
Optional, default
strimzi/zookeeper-stunnel:latest. The image name to use as the default when deploying the sidecar container which provides TLS support for Zookeeper, if no image is specified as theKafka.spec.zookeeper.tlsSidecar.imagein the Container images. STRIMZI_KAFKA_CONNECT_IMAGES-
Required. This provides a mapping from the Kafka version to the corresponding Docker image containing a Kafka connect of that version. The required syntax is whitespace or comma separated
<version>=<image>pairs. For example2.0.0=strimzi/kafka:latest-kafka-connect-2.0.0, 2.1.0=strimzi/kafka-connect:latest-kafka-2.1.0. This is used when aKafkaConnect.spec.versionproperty is specified but not theKafkaConnect.spec.image, as described in Container images. STRIMZI_KAFKA_CONNECT_S2I_IMAGES-
Required. This provides a mapping from the Kafka version to the corresponding Docker image containing a Kafka connect of that version. The required syntax is whitespace or comma separated
<version>=<image>pairs. For example2.0.0=strimzi/kafka:latest-kafka-connect-s2i-2.0.0, 2.1.0=strimzi/kafka-connect-s2i:latest-kafka-2.1.0. This is used when aKafkaConnectS2I.spec.versionproperty is specified but not theKafkaConnectS2I.spec.image, as described in Container images. STRIMZI_KAFKA_MIRROR_MAKER_IMAGES-
Required. This provides a mapping from the Kafka version to the corresponding Docker image containing a Kafka mirror maker of that version. The required syntax is whitespace or comma separated
<version>=<image>pairs. For example2.0.0=strimzi/kafka-mirror-maker:latest-kafka-2.0.0, 2.1.0=strimzi/kafka-mirror-maker:latest-kafka-2.1.0. This is used when aKafkaMirrorMaker.spec.versionproperty is specified but not theKafkaMirrorMaker.spec.image, as described in Container images. STRIMZI_DEFAULT_TOPIC_OPERATOR_IMAGE-
Optional, default
strimzi/topic-operator:latest. The image name to use as the default when deploying the topic operator, if no image is specified as theKafka.spec.entityOperator.topicOperator.imagein the Container images of theKafkaresource. STRIMZI_DEFAULT_USER_OPERATOR_IMAGE-
Optional, default
strimzi/user-operator:latest. The image name to use as the default when deploying the user operator, if no image is specified as theKafka.spec.entityOperator.userOperator.imagein the Container images of theKafkaresource. STRIMZI_DEFAULT_TLS_SIDECAR_ENTITY_OPERATOR_IMAGE-
Optional, default
strimzi/entity-operator-stunnel:latest. The image name to use as the default when deploying the sidecar container which provides TLS support for the Entity Operator, if no image is specified as theKafka.spec.entityOperator.tlsSidecar.imagein the Container images. STRIMZI_IMAGE_PULL_POLICY-
Optional. The
ImagePullPolicywhich will be applied to containers in all pods managed by Strimzi Cluster Operator. The valid values areAlways,IfNotPresent, andNever. If not specified, the OpenShift or Kubernetes defaults will be used. Changing the policy will result in a rolling update of all your Kafka, Kafka Connect, and Kafka Mirror Maker clusters.
4.1.9. Role-Based Access Control (RBAC)
Provisioning Role-Based Access Control (RBAC) for the Cluster Operator
For the Cluster Operator to function it needs permission within the OpenShift or Kubernetes cluster to interact with resources such as Kafka, KafkaConnect, and so on, as well as the managed resources, such as ConfigMaps, Pods, Deployments, StatefulSets, Services, and so on.
Such permission is described in terms of OpenShift or Kubernetes role-based access control (RBAC) resources:
-
ServiceAccount, -
RoleandClusterRole, -
RoleBindingandClusterRoleBinding.
In addition to running under its own ServiceAccount with a ClusterRoleBinding, the Cluster Operator manages some RBAC resources for the components that need access to OpenShift or Kubernetes resources.
OpenShift or Kubernetes also includes privilege escalation protections that prevent components operating under one ServiceAccount from granting other ServiceAccounts privileges that the granting ServiceAccount does not have.
Because the Cluster Operator must be able to create the ClusterRoleBindings, and RoleBindings needed by resources it manages, the Cluster Operator must also have those same privileges.
Delegated privileges
When the Cluster Operator deploys resources for a desired Kafka resource it also creates ServiceAccounts, RoleBindings, and ClusterRoleBindings, as follows:
-
The Kafka broker pods use a
ServiceAccountcalledcluster-name-kafka-
When the rack feature is used, the
strimzi-cluster-name-kafka-initClusterRoleBindingis used to grant thisServiceAccountaccess to the nodes within the cluster via aClusterRolecalledstrimzi-kafka-broker -
When the rack feature is not used no binding is created.
-
-
The Zookeeper pods use the default
ServiceAccount, as they do not need access to the OpenShift or Kubernetes resources. -
The Topic Operator pod uses a
ServiceAccountcalledcluster-name-topic-operator-
The Topic Operator produces OpenShift or Kubernetes events with status information, so the
ServiceAccountis bound to aClusterRolecalledstrimzi-topic-operatorwhich grants this access via thestrimzi-topic-operator-role-bindingRoleBinding.
-
The pods for KafkaConnect and KafkaConnectS2I resources use the default ServiceAccount, as they do not require access to the OpenShift or Kubernetes resources.
ServiceAccount
The Cluster Operator is best run using a ServiceAccount:
Example
ServiceAccount for the Cluster OperatorapiVersion: v1
kind: ServiceAccount
metadata:
name: strimzi-cluster-operator
labels:
app: strimziThe Deployment of the operator then needs to specify this in its spec.template.spec.serviceAccountName:
Partial example of
Deployment for the Cluster OperatorapiVersion: extensions/v1beta1
kind: Deployment
metadata:
name: strimzi-cluster-operator
labels:
app: strimzi
spec:
replicas: 1
template:
metadata:
labels:
name: strimzi-cluster-operator
spec:
# ...Note line 12, where the the strimzi-cluster-operator ServiceAccount is specified as the serviceAccountName.
ClusterRoles
The Cluster Operator needs to operate using ClusterRoles that gives access to the necessary resources.
Depending on the OpenShift or Kubernetes cluster setup, a cluster administrator might be needed to create the ClusterRoles.
|
Note
|
Cluster administrator rights are only needed for the creation of the ClusterRoles.
The Cluster Operator will not run under the cluster admin account.
|
The ClusterRoles follow the principle of least privilege and contain only those privileges needed by the Cluster Operator to operate Kafka, Kafka Connect, and Zookeeper clusters. The first set of assigned privileges allow the Cluster Operator to manage OpenShift or Kubernetes resources such as StatefulSets, Deployments, Pods, and ConfigMaps.
Cluster Operator uses ClusterRoles to grant permission at the namespace-scoped resources level and cluster-scoped resources level:
ClusterRole with namespaced resources for the Cluster OperatorapiVersion: rbac.authorization.k8s.io/v1beta1
kind: ClusterRole
metadata:
name: strimzi-cluster-operator-namespaced
labels:
app: strimzi
rules:
- apiGroups:
- ""
resources:
- serviceaccounts
verbs:
- get
- create
- delete
- patch
- update
- apiGroups:
- rbac.authorization.k8s.io
resources:
- rolebindings
verbs:
- get
- create
- delete
- patch
- update
- apiGroups:
- ""
resources:
- configmaps
verbs:
- get
- list
- watch
- create
- delete
- patch
- update
- apiGroups:
- kafka.strimzi.io
resources:
- kafkas
- kafkaconnects
- kafkaconnects2is
- kafkamirrormakers
verbs:
- get
- list
- watch
- create
- delete
- patch
- update
- apiGroups:
- ""
resources:
- pods
verbs:
- get
- list
- watch
- delete
- apiGroups:
- ""
resources:
- services
verbs:
- get
- list
- watch
- create
- delete
- patch
- update
- apiGroups:
- ""
resources:
- endpoints
verbs:
- get
- list
- watch
- apiGroups:
- extensions
resources:
- deployments
- deployments/scale
- replicasets
verbs:
- get
- list
- watch
- create
- delete
- patch
- update
- apiGroups:
- apps
resources:
- deployments
- deployments/scale
- deployments/status
- statefulsets
- replicasets
verbs:
- get
- list
- watch
- create
- delete
- patch
- update
- apiGroups:
- ""
resources:
- events
verbs:
- create
- apiGroups:
- extensions
resources:
- replicationcontrollers
verbs:
- get
- list
- watch
- create
- delete
- patch
- update
- apiGroups:
- apps.openshift.io
resources:
- deploymentconfigs
- deploymentconfigs/scale
- deploymentconfigs/status
- deploymentconfigs/finalizers
verbs:
- get
- list
- watch
- create
- delete
- patch
- update
- apiGroups:
- build.openshift.io
resources:
- buildconfigs
- builds
verbs:
- create
- delete
- get
- list
- patch
- watch
- update
- apiGroups:
- image.openshift.io
resources:
- imagestreams
- imagestreams/status
verbs:
- create
- delete
- get
- list
- watch
- patch
- update
- apiGroups:
- ""
resources:
- replicationcontrollers
verbs:
- get
- list
- watch
- create
- delete
- patch
- update
- apiGroups:
- ""
resources:
- secrets
verbs:
- get
- list
- create
- delete
- patch
- update
- apiGroups:
- extensions
resources:
- networkpolicies
verbs:
- get
- list
- watch
- create
- delete
- patch
- update
- apiGroups:
- networking.k8s.io
resources:
- networkpolicies
verbs:
- get
- list
- watch
- create
- delete
- patch
- update
- apiGroups:
- route.openshift.io
resources:
- routes
- routes/custom-host
verbs:
- get
- list
- create
- delete
- patch
- update
- apiGroups:
- ""
resources:
- persistentvolumeclaims
verbs:
- get
- list
- create
- delete
- patch
- update
- apiGroups:
- policy
resources:
- poddisruptionbudgets
verbs:
- get
- list
- watch
- create
- delete
- patch
- updateThe second includes the permissions needed for cluster-scoped resources.
ClusterRole with cluster-scoped resources for the Cluster OperatorapiVersion: rbac.authorization.k8s.io/v1beta1
kind: ClusterRole
metadata:
name: strimzi-cluster-operator-global
labels:
app: strimzi
rules:
- apiGroups:
- rbac.authorization.k8s.io
resources:
- clusterrolebindings
verbs:
- get
- create
- delete
- patch
- updateThe strimzi-kafka-broker ClusterRole represents the access needed by the init container in Kafka pods that is used for the rack feature. As described in the Delegated privileges section, this role is also needed by the Cluster Operator in order to be able to delegate this access.
ClusterRole for the Cluster Operator allowing it to delegate access to OpenShift or Kubernetes nodes to the Kafka broker podsapiVersion: rbac.authorization.k8s.io/v1beta1
kind: ClusterRole
metadata:
name: strimzi-kafka-broker
labels:
app: strimzi
rules:
- apiGroups:
- ""
resources:
- nodes
verbs:
- getThe strimzi-topic-operator ClusterRole represents the access needed by the Topic Operator. As described in the Delegated privileges section, this role is also needed by the Cluster Operator in order to be able to delegate this access.
ClusterRole for the Cluster Operator allowing it to delegate access to events to the Topic OperatorapiVersion: rbac.authorization.k8s.io/v1beta1
kind: ClusterRole
metadata:
name: strimzi-entity-operator
labels:
app: strimzi
rules:
- apiGroups:
- kafka.strimzi.io
resources:
- kafkatopics
verbs:
- get
- list
- watch
- create
- patch
- update
- delete
- apiGroups:
- ""
resources:
- events
verbs:
- create
- apiGroups:
- kafka.strimzi.io
resources:
- kafkausers
verbs:
- get
- list
- watch
- create
- patch
- update
- delete
- apiGroups:
- ""
resources:
- secrets
verbs:
- get
- list
- create
- patch
- update
- deleteClusterRoleBindings
The operator needs ClusterRoleBindings and RoleBindings which associates its ClusterRole with its ServiceAccount:
ClusterRoleBindings are needed for ClusterRoles containing cluster-scoped resources.
Example
ClusterRoleBinding for the Cluster OperatorapiVersion: rbac.authorization.k8s.io/v1beta1
kind: ClusterRoleBinding
metadata:
name: strimzi-cluster-operator
labels:
app: strimzi
subjects:
- kind: ServiceAccount
name: strimzi-cluster-operator
namespace: myproject
roleRef:
kind: ClusterRole
name: strimzi-cluster-operator-global
apiGroup: rbac.authorization.k8s.ioClusterRoleBindings are also needed for the ClusterRoles needed for delegation:
Examples
RoleBinding for the Cluster OperatorapiVersion: rbac.authorization.k8s.io/v1beta1
kind: ClusterRoleBinding
metadata:
name: strimzi-cluster-operator-kafka-broker-delegation
labels:
app: strimzi
subjects:
- kind: ServiceAccount
name: strimzi-cluster-operator
namespace: myproject
roleRef:
kind: ClusterRole
name: strimzi-kafka-broker
apiGroup: rbac.authorization.k8s.ioClusterRoles containing only namespaced resources are bound using RoleBindings only.
apiVersion: rbac.authorization.k8s.io/v1beta1
kind: RoleBinding
metadata:
name: strimzi-cluster-operator
labels:
app: strimzi
subjects:
- kind: ServiceAccount
name: strimzi-cluster-operator
namespace: myproject
roleRef:
kind: ClusterRole
name: strimzi-cluster-operator-namespaced
apiGroup: rbac.authorization.k8s.ioapiVersion: rbac.authorization.k8s.io/v1beta1
kind: RoleBinding
metadata:
name: strimzi-cluster-operator-entity-operator-delegation
labels:
app: strimzi
subjects:
- kind: ServiceAccount
name: strimzi-cluster-operator
namespace: myproject
roleRef:
kind: ClusterRole
name: strimzi-entity-operator
apiGroup: rbac.authorization.k8s.io4.2. Topic Operator
4.2.1. Overview of the Topic Operator component
The Topic Operator provides a way of managing topics in a Kafka cluster via OpenShift or Kubernetes resources.
The role of the Topic Operator is to keep a set of KafkaTopic OpenShift or Kubernetes resources describing Kafka topics in-sync with corresponding Kafka topics.
Specifically:
-
if a
KafkaTopicis created, the operator will create the topic it describes -
if a
KafkaTopicis deleted, the operator will delete the topic it describes -
if a
KafkaTopicis changed, the operator will update the topic it describes
And also, in the other direction:
-
if a topic is created within the Kafka cluster, the operator will create a
KafkaTopicdescribing it -
if a topic is deleted from the Kafka cluster, the operator will delete the
KafkaTopicdescribing it -
if a topic in the Kafka cluster is changed, the operator will update the
KafkaTopicdescribing it
This allows you to declare a KafkaTopic as part of your application’s deployment and the Topic Operator will take care of creating the topic for you.
Your application just needs to deal with producing or consuming from the necessary topics.
If the topic be reconfigured or reassigned to different Kafka nodes, the KafkaTopic will always be up to date.
For more details about creating, modifying and deleting topics, see Using the Topic Operator.
4.2.2. Understanding the Topic Operator
A fundamental problem that the operator has to solve is that there is no single source of truth:
Both the KafkaTopic resource and the topic within Kafka can be modified independently of the operator.
Complicating this, the Topic Operator might not always be able to observe changes at each end in real time (for example, the operator might be down).
To resolve this, the operator maintains its own private copy of the information about each topic. When a change happens either in the Kafka cluster, or in OpenShift or Kubernetes, it looks at both the state of the other system and at its private copy in order to determine what needs to change to keep everything in sync. The same thing happens whenever the operator starts, and periodically while it is running.
For example, suppose the Topic Operator is not running, and a KafkaTopic my-topic gets created.
When the operator starts it will lack a private copy of "my-topic", so it can infer that the KafkaTopic has been created since it was last running.
The operator will create the topic corresponding to "my-topic" and also store a private copy of the metadata for "my-topic".
The private copy allows the operator to cope with scenarios where the topic configuration gets changed both in Kafka and in OpenShift or Kubernetes, so long as the changes are not incompatible (for example, both changing the same topic config key, but to different values).
In the case of incompatible changes, the Kafka configuration wins, and the KafkaTopic will be updated to reflect that.
The private copy is held in the same ZooKeeper ensemble used by Kafka itself. This mitigates availability concerns, because if ZooKeeper is not running then Kafka itself cannot run, so the operator will be no less available than it would even if it was stateless.
4.2.3. Deploying the Topic Operator using the Cluster Operator
This procedure describes how to deploy the Topic Operator using the Cluster Operator. If you want to use the Topic Operator with a Kafka cluster that is not managed by Strimzi, you must deploy the Topic Operator as a standalone component. For more information, see Deploying the standalone Topic Operator.
Prerequisites
-
A running Cluster Operator
-
A
Kafkaresource to be created or updated
Procedure
-
Ensure that the
Kafka.spec.entityOperatorobject exists in theKafkaresource. This configures the Entity Operator.apiVersion: kafka.strimzi.io/v1alpha1 kind: Kafka metadata: name: my-cluster spec: #... entityOperator: topicOperator: {} userOperator: {} -
Configure the Topic Operator using the fields described in
EntityTopicOperatorSpecschema reference. -
Create or update the Kafka resource in OpenShift or Kubernetes.
On Kubernetes, use
kubectl apply:kubectl apply -f your-fileOn OpenShift, use
oc apply:oc apply -f your-file
Additional resources
-
For more information about deploying the Cluster Operator, see Cluster Operator.
-
For more information about deploying the Entity Operator, see Entity Operator.
-
For more information about the
Kafka.spec.entityOperatorobject used to configure the Topic Operator when deployed by the Cluster Operator, seeEntityOperatorSpecschema reference.
4.2.4. Configuring the Topic Operator with resource requests and limits
Prerequisites
-
A running Cluster Operator
Procedure
-
Edit the
Kafkaresource specifying in theKafka.spec.entityOperator.topicOperator.resourcesproperty the resource requests and limits you want the Topic Operator to have.apiVersion: kafka.strimzi.io/v1alpha1 kind: Kafka spec: # kafka and zookeeper sections... topicOperator: resources: request: cpu: "1" memory: 500Mi limit: cpu: "1" memory: 500Mi -
Create or update the
Kafkaresource.On Kubernetes this can be done using
kubectl apply:kubectl apply -f your-fileOn OpenShift this can be done using
oc apply:oc apply -f your-file
Additional resources
-
For more information about the schema of the resources object, see
Resourcesschema reference.
4.2.5. Deploying the standalone Topic Operator
Deploying the Topic Operator as a standalone component is more complicated than installing it using the Cluster Operator, but is more flexible. For instance is can operate with any Kafka cluster, not necessarily one deployed by the Cluster Operator.
Prerequisites
-
An existing Kafka cluster for the Topic Operator to connect to.
Procedure
-
Edit the
install/topic-operator/05-Deployment-strimzi-topic-operator.yamlresource. You will need to change the following-
The
STRIMZI_KAFKA_BOOTSTRAP_SERVERSenvironment variable inDeployment.spec.template.spec.containers[0].envshould be set to a list of bootstrap brokers in your Kafka cluster, given as a comma-separated list ofhostname:portpairs. -
The
STRIMZI_ZOOKEEPER_CONNECTenvironment variable inDeployment.spec.template.spec.containers[0].envshould be set to a list of the Zookeeper nodes, given as a comma-separated list ofhostname:portpairs. This should be the same Zookeeper cluster that your Kafka cluster is using. -
The
STRIMZI_NAMESPACEenvironment variable inDeployment.spec.template.spec.containers[0].envshould be set to the OpenShift or Kubernetes namespace in which you want the operator to watch forKafkaTopicresources.
-
-
Deploy the Cluster Operator.
On Kubernetes this can be done using
kubectl apply:kubectl apply -f install/topic-operatorOn OpenShift this can be done using
oc apply:oc apply -f install/topic-operator -
Verify that the Topic Operator has been deployed successfully.
On Kubernetes this can be done using
kubectl describe:kubectl describe deployment strimzi-topic-operatorOn OpenShift this can be done using
oc describe:oc describe deployment strimzi-topic-operatorThe Topic Operator is deployed once the
Replicas:entry shows1 available.NoteThis could take some time if you have a slow connection to the OpenShift or Kubernetes and the images have not been downloaded before.
Additional resources
-
For more information about the environment variables used to configure the Topic Operator, see Topic Operator environment.
-
For more information about getting the Cluster Operator to deploy the Topic Operator for you, see Deploying the Topic Operator using the Cluster Operator.
4.2.6. Topic Operator environment
When deployed standalone the Topic Operator can be configured using environment variables.
|
Note
|
The Topic Operator should be configured using the Kafka.spec.entityOperator.topicOperator property when deployed by the Cluster Operator.
|
STRIMZI_RESOURCE_LABELS-
The label selector used to identify
KafkaTopicsto be managed by the operator. STRIMZI_ZOOKEEPER_SESSION_TIMEOUT_MS-
The Zookeeper session timeout, in milliseconds. For example,
10000. Default:20000(20 seconds). STRIMZI_KAFKA_BOOTSTRAP_SERVERS-
The list of Kafka bootstrap servers. This variable is mandatory.
STRIMZI_ZOOKEEPER_CONNECT-
The Zookeeper connection information. This variable is mandatory.
STRIMZI_FULL_RECONCILIATION_INTERVAL_MS-
The interval between periodic reconciliations, in milliseconds.
STRIMZI_TOPIC_METADATA_MAX_ATTEMPTS-
The number of attempts for getting topics metadata from Kafka. The time between each attempt is defined as an exponential back-off. You might want to increase this value when topic creation could take more time due to its larger size (that is, many partitions/replicas). Default
6. STRIMZI_LOG_LEVEL-
The level for printing logging messages. The value can be set to:
ERROR,WARNING,INFO,DEBUG, andTRACE. DefaultINFO. STRIMZI_TLS_ENABLED-
For enabling the TLS support so encrypting the communication with Kafka brokers. Default
true. STRIMZI_TRUSTSTORE_LOCATION-
The path to the truststore containing certificates for enabling TLS based communication. This variable is mandatory only if TLS is enabled through
STRIMZI_TLS_ENABLED. STRIMZI_TRUSTSTORE_PASSWORD-
The password for accessing the truststore defined by
STRIMZI_TRUSTSTORE_LOCATION. This variable is mandatory only if TLS is enabled throughSTRIMZI_TLS_ENABLED. STRIMZI_KEYSTORE_LOCATION-
The path to the keystore containing private keys for enabling TLS based communication. This variable is mandatory only if TLS is enabled through
STRIMZI_TLS_ENABLED. STRIMZI_KEYSTORE_PASSWORD-
The password for accessing the keystore defined by
STRIMZI_KEYSTORE_LOCATION. This variable is mandatory only if TLS is enabled throughSTRIMZI_TLS_ENABLED.
4.3. User Operator
The User Operator provides a way of managing Kafka users via OpenShift or Kubernetes resources.
4.3.1. Overview of the User Operator component
The User Operator manages Kafka users for a Kafka cluster by watching for KafkaUser OpenShift or Kubernetes resources that describe Kafka users and ensuring that they are configured properly in the Kafka cluster.
For example:
-
if a
KafkaUseris created, the User Operator will create the user it describes -
if a
KafkaUseris deleted, the User Operator will delete the user it describes -
if a
KafkaUseris changed, the User Operator will update the user it describes
Unlike the Topic Operator, the User Operator does not sync any changes from the Kafka cluster with the OpenShift or Kubernetes resources. Unlike the Kafka topics which might be created by applications directly in Kafka, it is not expected that the users will be managed directly in the Kafka cluster in parallel with the User Operator, so this should not be needed.
The User Operator allows you to declare a KafkaUser as part of your application’s deployment.
When the user is created, the credentials will be created in a Secret.
Your application needs to use the user and its credentials for authentication and to produce or consume messages.
In addition to managing credentials for authentication, the User Operator also manages authorization rules by including a description of the user’s rights in the KafkaUser declaration.
4.3.2. Deploying the User Operator using the Cluster Operator
Prerequisites
-
A running Cluster Operator
-
A
Kafkaresource to be created or updated.
Procedure
-
Edit the
Kafkaresource ensuring it has aKafka.spec.entityOperator.userOperatorobject that configures the User Operator how you want. -
Create or update the Kafka resource in OpenShift or Kubernetes.
On Kubernetes this can be done using
kubectl apply:kubectl apply -f your-fileOn OpenShift this can be done using
oc apply:oc apply -f your-file
Additional resources
-
For more information about deploying the Cluster Operator, see Cluster Operator.
-
For more information about the
Kafka.spec.entityOperatorobject used to configure the User Operator when deployed by the Cluster Operator, seeEntityOperatorSpecschema reference.
4.3.3. Deploying the standalone User Operator
Deploying the User Operator as a standalone component is more complicated than installing it using the Cluster Operator, but is more flexible. For instance it can operate with any Kafka cluster, not only the one deployed by the Cluster Operator.
Prerequisites
-
An existing Kafka cluster for the User Operator to connect to.
Procedure
-
Edit the
install/user-operator/05-Deployment-strimzi-user-operator.yamlresource. You will need to change the following-
The
STRIMZI_CA_CERT_NAMEenvironment variable inDeployment.spec.template.spec.containers[0].envshould be set to point to an OpenShift or KubernetesSecretwhich should contain the public key of the Certificate Authority for signing new user certificates for TLS Client Authentication. TheSecretshould contain the public key of the Certificate Authority under the keyca.crt. -
The
STRIMZI_CA_KEY_NAMEenvironment variable inDeployment.spec.template.spec.containers[0].envshould be set to point to an OpenShift or KubernetesSecretwhich should contain the private key of the Certificate Authority for signing new user certificates for TLS Client Authentication. TheSecretshould contain the private key of the Certificate Authority under the keyca.key. -
The
STRIMZI_ZOOKEEPER_CONNECTenvironment variable inDeployment.spec.template.spec.containers[0].envshould be set to a list of the Zookeeper nodes, given as a comma-separated list ofhostname:portpairs. This should be the same Zookeeper cluster that your Kafka cluster is using. -
The
STRIMZI_NAMESPACEenvironment variable inDeployment.spec.template.spec.containers[0].envshould be set to the OpenShift or Kubernetes namespace in which you want the operator to watch forKafkaUserresources.
-
-
Deploy the Cluster Operator.
On Kubernetes this can be done using
kubectl apply:kubectl apply -f install/user-operatorOn OpenShift this can be done using
oc apply:oc apply -f install/user-operator -
Verify that the User Operator has been deployed successfully.
On Kubernetes this can be done using
kubectl describe:kubectl describe deployment strimzi-user-operatorOn OpenShift this can be done using
oc describe:oc describe deployment strimzi-user-operatorThe User Operator is deployed once the
Replicas:entry shows1 available.NoteThis could take some time if you have a slow connection to the OpenShift or Kubernetes and the images have not been downloaded before.
Additional resources
-
For more information about getting the Cluster Operator to deploy the User Operator for you, see Deploying the User Operator using the Cluster Operator.
5. Using the Topic Operator
5.1. Topic Operator usage recommendations
-
Be consistent and always operate on
KafkaTopicresources or always operate on topics directly. Avoid routinely using both methods for a given topic. -
When creating a
KafkaTopicresource:-
Remember that the name cannot be changed later.
-
Choose a name for the
KafkaTopicresource that reflects the name of the topic it describes. -
Ideally the
KafkaTopic.metadata.nameshould be the same as itsspec.topicName. To do this, the topic name will have to be a valid Kubernetes resource name.
-
-
When creating a topic:
-
Remember that the name cannot be changed later.
-
It is best to use a name that is a valid Kubernetes resource name, otherwise the operator will have to modify the name when creating the corresponding
KafkaTopic.
-
5.2. Creating a topic
This procedure describes how to create a Kafka topic using a KafkaTopic OpenShift or Kubernetes resource.
Prerequisites
-
A running Kafka cluster.
-
A running Topic Operator.
Procedure
-
Prepare a file containing the
KafkaTopicto be createdAn exampleKafkaTopicapiVersion: kafka.strimzi.io/v1alpha1 kind: KafkaTopic metadata: name: orders labels: strimzi.io/cluster: my-cluster spec: partitions: 10 replicas: 2NoteIt is recommended to use a topic name that is a valid OpenShift or Kubernetes resource name. Doing this means that it is not necessary to set the KafkaTopic.spec.topicNameproperty. In any case theKafkaTopic.spec.topicNamecannot be changed after creation.NoteThe KafkaTopic.spec.partitionscannot be decreased. -
Create the
KafkaTopicresource in OpenShift or Kubernetes.On Kubernetes this can be done using
kubectl apply:kubectl apply -f your-fileOn OpenShift this can be done using
oc apply:oc apply -f your-file
Additional resources
-
For more information about the schema for
KafkaTopics, seeKafkaTopicschema reference. -
For more information about deploying a Kafka cluster using the Cluster Operator, see Cluster Operator.
-
For more information about deploying the Topic Operator using the Cluster Operator, see Deploying the Topic Operator using the Cluster Operator.
-
For more information about deploying the standalone Topic Operator, see Deploying the standalone Topic Operator.
5.3. Changing a topic
This procedure describes how to change the configuration of an existing Kafka topic by using a KafkaTopic OpenShift or Kubernetes resource.
Prerequisites
-
A running Kafka cluster.
-
A running Topic Operator.
-
An existing
KafkaTopicto be changed.
Procedure
-
Prepare a file containing the desired
KafkaTopicAn exampleKafkaTopicapiVersion: kafka.strimzi.io/v1alpha1 kind: KafkaTopic metadata: name: orders labels: strimzi.io/cluster: my-cluster spec: partitions: 16 replicas: 2TipYou can get the current version of the resource using oc get kafkatopic orders -o yaml.NoteChanging topic names using the KafkaTopic.spec.topicNamevariable and decreasing partition size using theKafkaTopic.spec.partitionsvariable is not supported by Kafka.CautionIncreasing spec.partitionsfor topics with keys will change how records are partitioned, which can be particularly problematic when the topic uses semantic partitioning. -
Update the
KafkaTopicresource in OpenShift or Kubernetes.On Kubernetes this can be done using
kubectl apply:kubectl apply -f your-fileOn OpenShift this can be done using
oc apply:oc apply -f your-file
Additional resources
-
For more information about the schema for
KafkaTopics, seeKafkaTopicschema reference. -
For more information about deploying a Kafka cluster, see Cluster Operator.
-
For more information about deploying the Topic Operator using the Cluster Operator, see Deploying the Topic Operator using the Cluster Operator.
-
For more information about creating a topic using the Topic Operator, see Creating a topic.
5.4. Deleting a topic
This procedure describes how to delete a Kafka topic using a KafkaTopic OpenShift or Kubernetes resource.
Prerequisites
-
A running Kafka cluster.
-
A running Topic Operator.
-
An existing
KafkaTopicto be deleted.
Procedure
-
Delete the
KafkaTopicresource in OpenShift or Kubernetes.On Kubernetes this can be done using
kubectl:kubectl delete kafkatopic your-topic-nameOn OpenShift this can be done using
oc:oc delete kafkatopic your-topic-nameNoteWhether the topic can actually be deleted depends on the value of the delete.topic.enableKafka broker configuration, specified in theKafka.spec.kafka.configproperty.
Additional resources
-
For more information about deploying a Kafka cluster using the Cluster Operator, see Cluster Operator.
-
For more information about deploying the Topic Operator using the Cluster Operator, see Deploying the Topic Operator using the Cluster Operator.
-
For more information about creating a topic using the Topic Operator, see Creating a topic.
6. Using the User Operator
The User Operator provides a way of managing Kafka users via OpenShift or Kubernetes resources.
6.1. Overview of the User Operator component
The User Operator manages Kafka users for a Kafka cluster by watching for KafkaUser OpenShift or Kubernetes resources that describe Kafka users and ensuring that they are configured properly in the Kafka cluster.
For example:
-
if a
KafkaUseris created, the User Operator will create the user it describes -
if a
KafkaUseris deleted, the User Operator will delete the user it describes -
if a
KafkaUseris changed, the User Operator will update the user it describes
Unlike the Topic Operator, the User Operator does not sync any changes from the Kafka cluster with the OpenShift or Kubernetes resources. Unlike the Kafka topics which might be created by applications directly in Kafka, it is not expected that the users will be managed directly in the Kafka cluster in parallel with the User Operator, so this should not be needed.
The User Operator allows you to declare a KafkaUser as part of your application’s deployment.
When the user is created, the credentials will be created in a Secret.
Your application needs to use the user and its credentials for authentication and to produce or consume messages.
In addition to managing credentials for authentication, the User Operator also manages authorization rules by including a description of the user’s rights in the KafkaUser declaration.
6.2. Mutual TLS authentication for clients
6.2.1. Mutual TLS authentication
Mutual authentication or two-way authentication is when both the server and the client present certificates. Strimzi can configure Kafka to use TLS (Transport Layer Security) to provide encrypted communication between Kafka brokers and clients either with or without mutual authentication. When you configure mutual authentication, the broker authenticates the client and the client authenticates the broker. Mutual TLS authentication is always used for the communication between Kafka brokers and Zookeeper pods.
|
Note
|
In many common uses of TLS (such as the HTTPS protocol used between a web browser and a web server) the authentication is not mutual: Only one party to the communication gets proof of the identity of the other party. |
TLS authentication is more commonly one-way, where only one party authenticates to another. For example, when the HTTPS protocol is used between a web browser and a web server, the authentication is not usually mutual and only the server gets proof of the identity of the browser.
6.2.2. When to use mutual TLS authentication for clients
Mutual TLS authentication is recommended for authenticating Kafka clients when:
-
The client supports authentication using mutual TLS authentication
-
It is necessary to use the TLS certificates rather than passwords
-
You can reconfigure and restart client applications periodically so that they do not use expired certificates.
6.3. Creating a Kafka user with mutual TLS authentication
Prerequisites
-
A running Kafka cluster configured with a listener using TLS authentication.
-
A running User Operator.
Procedure
-
Prepare a YAML file containing the
KafkaUserto be created.An exampleKafkaUserapiVersion: kafka.strimzi.io/v1alpha1 kind: KafkaUser metadata: name: my-user labels: strimzi.io/cluster: my-cluster spec: authentication: type: tls authorization: type: simple acls: - resource: type: topic name: my-topic patternType: literal operation: Read - resource: type: topic name: my-topic patternType: literal operation: Describe - resource: type: group name: my-group patternType: literal operation: Read -
Create the
KafkaUserresource in OpenShift or Kubernetes.On Kubernetes this can be done using
kubectl apply:kubectl apply -f your-fileOn OpenShift this can be done using
oc apply:oc apply -f your-file -
Use the credentials from the secret
my-userin your application
Additional resources
-
For more information about deploying the Cluster Operator, see Cluster Operator.
-
For more information about configuring a listener that authenticates using TLS see Kafka broker listeners.
-
For more information about deploying the Entity Operator, see Entity Operator.
-
For more information about the
KafkaUserobject, seeKafkaUserschema reference.
6.4. SCRAM-SHA authentication
SCRAM (Salted Challenge Response Authentication Mechanism) is an authentication protocol that can establish mutual authentication using passwords. Strimzi can configure Kafka to use SASL SCRAM-SHA-512 to provide authentication on both unencrypted and TLS-encrypted client connections. TLS authentication is always used internally between Kafka brokers and Zookeeper nodes. When used with a TLS client connection, the TLS protocol provides encryption, but is not used for authentication.
The following properties of SCRAM make it safe to use SCRAM-SHA even on unencrypted connections:
-
The passwords are not sent in the clear over the communication channel. Instead the client and the server are each challenged by the other to offer proof that they know the password of the authenticating user.
-
The server and client each generate a new challenge one each authentication exchange. This means that the exchange is resilient against replay attacks.
6.4.1. Supported SCRAM credentials
Strimzi supports SCRAM-SHA-512 only.
When a KafkaUser.spec.authentication.type is configured with scram-sha-512 the User Operator will generate a random 12 character password consisting of upper and lowercase ASCII letters and numbers.
6.4.2. When to use SCRAM-SHA authentication for clients
SCRAM-SHA is recommended for authenticating Kafka clients when:
-
The client supports authentication using SCRAM-SHA-512
-
It is necessary to use passwords rather than the TLS certificates
-
When you want to have authentication for unencrypted communication
6.5. Creating a Kafka user with SCRAM SHA authentication
Prerequisites
-
A running Kafka cluster configured with a listener using SCRAM SHA authentication.
-
A running User Operator.
Procedure
-
Prepare a YAML file containing the
KafkaUserto be created.An exampleKafkaUserapiVersion: kafka.strimzi.io/v1alpha1 kind: KafkaUser metadata: name: my-user labels: strimzi.io/cluster: my-cluster spec: authentication: type: scram-sha-512 authorization: type: simple acls: - resource: type: topic name: my-topic patternType: literal operation: Read - resource: type: topic name: my-topic patternType: literal operation: Describe - resource: type: group name: my-group patternType: literal operation: Read -
Create the
KafkaUserresource in OpenShift or Kubernetes.On Kubernetes this can be done using
kubectl apply:kubectl apply -f your-fileOn OpenShift this can be done using
oc apply:oc apply -f your-file -
Use the credentials from the secret
my-userin your application
Additional resources
-
For more information about deploying the Cluster Operator, see Cluster Operator.
-
For more information about configuring a listener that authenticates using SCRAM SHA see Kafka broker listeners.
-
For more information about deploying the Entity Operator, see Entity Operator.
-
For more information about the
KafkaUserobject, seeKafkaUserschema reference.
6.6. Editing a Kafka user
This procedure describes how to change the configuration of an existing Kafka user by using a KafkaUser OpenShift or Kubernetes resource.
Prerequisites
-
A running Kafka cluster.
-
A running User Operator.
-
An existing
KafkaUserto be changed
Procedure
-
Prepare a YAML file containing the desired
KafkaUser.An exampleKafkaUserapiVersion: kafka.strimzi.io/v1alpha1 kind: KafkaUser metadata: name: my-user labels: strimzi.io/cluster: my-cluster spec: authentication: type: tls authorization: type: simple acls: - resource: type: topic name: my-topic patternType: literal operation: Read - resource: type: topic name: my-topic patternType: literal operation: Describe - resource: type: group name: my-group patternType: literal operation: Read -
Update the
KafkaUserresource in OpenShift or Kubernetes.On Kubernetes this can be done using
kubectl apply:kubectl apply -f your-fileOn OpenShift this can be done using
oc apply:oc apply -f your-file -
Use the updated credentials from the
my-usersecret in your application.
Additional resources
-
For more information about deploying the Cluster Operator, see Cluster Operator.
-
For more information about deploying the Entity Operator, see Entity Operator.
-
For more information about the
KafkaUserobject, seeKafkaUserschema reference.
6.7. Deleting a Kafka user
This procedure describes how to delete a Kafka user created with KafkaUser OpenShift or Kubernetes resource.
Prerequisites
-
A running Kafka cluster.
-
A running User Operator.
-
An existing
KafkaUserto be deleted.
Procedure
-
Delete the
KafkaUserresource in OpenShift or Kubernetes.On Kubernetes this can be done using
kubectl:kubectl delete kafkauser your-user-nameOn OpenShift this can be done using
oc:oc delete kafkauser your-user-nameAdditional resources-
For more information about deploying the Cluster Operator, see Cluster Operator.
-
For more information about the
KafkaUserobject, seeKafkaUserschema reference.
-
6.8. Kafka User resource
The KafkaUser resource is used to declare a user with its authentication mechanism, authorization mechanism, and access rights.
6.8.1. Authentication
Authentication is configured using the authentication property in KafkaUser.spec.
The authentication mechanism enabled for this user will be specified using the type field.
Currently, the only supported authentication mechanisms are the TLS Client Authentication mechanism and the SCRAM-SHA-512 mechanism.
When no authentication mechanism is specified, User Operator will not create the user or its credentials.
TLS Client Authentication
To use TLS client authentication, set the type field to tls.
An example of
KafkaUser with enabled TLS Client AuthenticationapiVersion: kafka.strimzi.io/v1alpha1
kind: KafkaUser
metadata:
name: my-user
labels:
strimzi.io/cluster: my-cluster
spec:
authentication:
type: tls
# ...When the user is created by the User Operator, it will create a new secret with the same name as the KafkaUser resource.
The secret will contain a public and private key which should be used for the TLS Client Authentication.
Bundled with them will be the public key of the client certification authority which was used to sign the user certificate.
All keys will be in X509 format.
An example of the
Secret with user credentialsapiVersion: v1
kind: Secret
metadata:
name: my-user
labels:
strimzi.io/kind: KafkaUser
strimzi.io/cluster: my-cluster
type: Opaque
data:
ca.crt: # Public key of the Clients CA
user.crt: # Public key of the user
user.key: # Private key of the userSCRAM-SHA-512 Authentication
To use SCRAM-SHA-512 authentication mechanism, set the type field to scram-sha-512.
An example of
KafkaUser with enabled SCRAM-SHA-512 authenticationapiVersion: kafka.strimzi.io/v1alpha1
kind: KafkaUser
metadata:
name: my-user
labels:
strimzi.io/cluster: my-cluster
spec:
authentication:
type: scram-sha-512
# ...When the user is created by the User Operator, the User Operator will create a new secret with the same name as the KafkaUser resource.
The secret will contain the generated password in the password key.
An example of the
Secret with user credentialsapiVersion: v1
kind: Secret
metadata:
name: my-user
labels:
strimzi.io/kind: KafkaUser
strimzi.io/cluster: my-cluster
type: Opaque
data:
password: # Generated password6.8.2. Authorization
Authorization is configured using the authorization property in KafkaUser.spec.
The authorization type enabled for this user will be specified using the type field.
Currently, the only supported authorization type is the Simple authorization.
When no authorization is specified, the User Operator will not provision any access rights for the user.
Simple Authorization
To use Simple Authorization, set the type property to simple.
Simple authorization is using the SimpleAclAuthorizer plugin.
SimpleAclAuthorizer is the default authorization plugin which is part of Apache Kafka.
Simple Authorization allows you to specify list of ACL rules in the acls property.
The acls property should contain a list of AclRule objects.
AclRule specifies the access rights whcih will be granted to the user.
The AclRule object contains following properties:
type-
Specifies the type of the ACL rule. The type can be either
allowordeny. Thetypefield is optional and when not specified, the ACL rule will be treated asallowrule. operation-
Specifies the operation which will be allowed or denied. Following operations are supported:
-
Read
-
Write
-
Delete
-
Alter
-
Describe
-
All
-
IdempotentWrite
-
ClusterAction
-
Create
-
AlterConfigs
-
DescribeConfigs
NoteNot every operation can be combined with every resource.
-
host-
Specifies a remote host from which is the rule allowed or denied. Use
*to allow or deny the operation from all hosts. Thehostfield is optional and when not specified, the value*will be used as default. resource-
Specifies the resource for which the rule applies. Simple Authorization supports four different resource types:
-
Topics
-
Consumer Groups
-
Clusters
-
Transactional IDs
The resource type can be specified in the
typeproperty. Usetopicfor Topics,groupfor Consumer Groups,clusterfor clusters, andtransactionalIdfor Transactional IDs.Additionally, Topic, Group, and Transactional ID resources allow you to specify the name of the resource for which the rule applies. The name can be specified in the
nameproperty. The name can be either specified as literal or as a prefix. To specify the name as literal, set thepatternTypeproperty to the valueliteral. Literal names will be taken exactly as they are specified in thenamefield. To specify the name as a prefix, set thepatternTypeproperty to the valueprefix. Prefix type names will use the value from thenameonly a prefix and will apply the rule to all resources with names starting with the value. The cluster type resources have no name.
-
For more details about SimpleAclAuthorizer, its ACL rules and the allowed combinations of resources and operations, see Authorization and ACLs.
For more information about the AclRule object, see AclRule schema reference.
An example
KafkaUserapiVersion: kafka.strimzi.io/v1alpha1
kind: KafkaUser
metadata:
name: my-user
labels:
strimzi.io/cluster: my-cluster
spec:
# ...
authorization:
type: simple
acls:
- resource:
type: topic
name: my-topic
patternType: literal
operation: Read
- resource:
type: topic
name: my-topic
patternType: literal
operation: Describe
- resource:
type: group
name: my-group
patternType: prefix
operation: Read6.8.3. Additional resources
-
For more information about the
KafkaUserobject, seeKafkaUserschema reference. -
For more information about the TLS Client Authentication, see Mutual TLS authentication for clients.
-
For more information about the SASL SCRAM-SHA-512 authentication, see SCRAM-SHA authentication.
7. Security
Strimzi supports encrypted communication between the Kafka and Strimzi components using the TLS protocol. Communication between Kafka brokers (interbroker communication), between Zookeeper nodes (internodal communication), and between these and the Strimzi operators is always encrypted. Communication between Kafka clients and Kafka brokers is encrypted according to how the cluster is configured. For the Kafka and Strimzi components, TLS certificates are also used for authentication.
The Cluster Operator automatically sets up TLS certificates to enable encryption and authentication within your cluster. It also sets up other TLS certificates if you want to enable encryption or TLS authentication between Kafka brokers and clients.
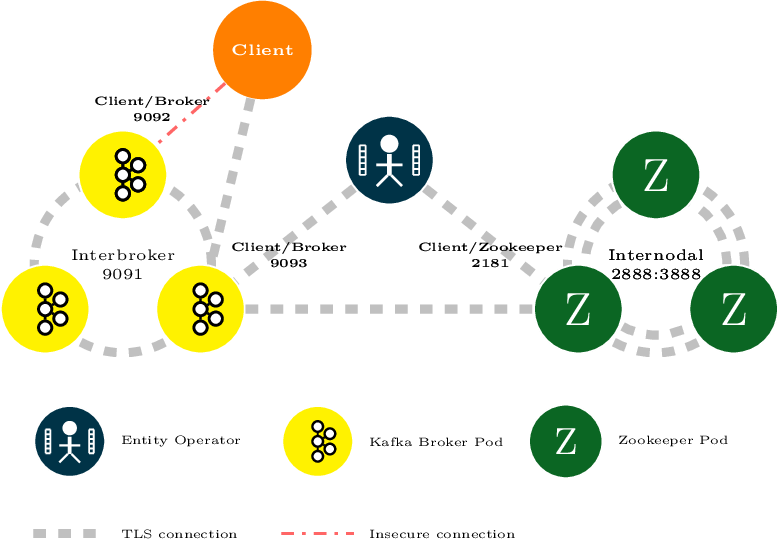
Figure 3. Example architecture diagram of the communication secured by TLS.
7.1. Certificate Authorities
To support encryption, each Strimzi component needs its own private keys and public key certificates. All component certificates are signed by a Certificate Authority (CA) called the cluster CA.
Similarly, each Kafka client application connecting using TLS client authentication needs private keys and certificates. The clients CA is used to sign the certificates for the Kafka clients.
7.1.1. CA certificates
Each CA has a self-signed public key certificate.
Kafka brokers are configured to trust certificates signed by either the clients CA or the cluster CA. Components to which clients do not need to connect, such as Zookeeper, only trust certificates signed by the cluster CA. Client applications that perform mutual TLS authentication have to trust the certificates signed by the cluster CA.
By default, Strimzi generates and renews CA certificates automatically. You can configure the management of CA certificates in the Kafka.spec.clusterCa and Kafka.spec.clientsCa objects.
7.2. Certificates and Secrets
Strimzi stores CA, component and Kafka client private keys and certificates in Secrets.
All keys are 2048 bits in size.
CA certificate validity periods, expressed as a number of days after certificate generation, can be configured in Kafka.spec.clusterCa.validityDays
and Kafka.spec.clusterCa.validityDays.
7.2.1. Cluster CA Secrets
Secret name |
Field within Secret |
Description |
|---|---|---|
|
|
The current private key for the cluster CA. |
|
|
The current certificate for the cluster CA. |
|
|
Certificate for Kafka broker pod <num>. Signed by a current or former cluster CA private key in |
|
Private key for Kafka broker pod <num>. |
|
|
|
Certificate for Zookeeper node <num>. Signed by a current or former cluster CA private key in |
|
Private key for Zookeeper pod <num>. |
|
|
|
Certificate for TLS communication between the Entity Operator and Kafka or Zookeeper.
Signed by a current or former cluster CA private key in |
|
Private key for TLS communication between the Entity Operator and Kafka or Zookeeper |
The CA certificates in <cluster>-cluster-ca-cert must be trusted by Kafka client applications so that they validate the Kafka broker certificates when connecting to Kafka brokers over TLS.
|
Note
|
Only <cluster>-cluster-ca-cert needs to be used by clients.
All other Secrets in the table above only need to be accessed by the
Strimzi components.
You can enforce this using OpenShift or Kubernetes role-based access controls if necessary.
|
7.2.2. Client CA Secrets
Secret name |
Field within Secret |
Description |
|---|---|---|
|
|
The current private key for the clients CA. |
|
|
The current certificate for the clients CA. |
The certificates in <cluster>-clients-ca-cert are those which the Kafka brokers trust.
|
Note
|
<cluster>-cluster-ca is used to sign certificates of client applications.
It needs to be accessible to the Strimzi components and for administrative access if you are intending to issue application certificates without using the User Operator.
You can enforce this using OpenShift or Kubernetes role-based access controls if necessary.
|
7.2.3. User Secrets
Secret name |
Field within Secret |
Description |
|---|---|---|
|
|
Certificate for the user, signed by the clients CA |
|
Private key for the user |
7.3. Installing your own CA certificates
This procedure describes how to install your own CA certificates and private keys instead of using CA certificates and private keys generated by the Cluster Operator.
Prerequisites
-
The Cluster Operator is running.
-
A Kafka cluster is not yet deployed.
-
Your own X.509 certificates and keys in PEM format for the cluster CA or clients CA.
-
If you want to use a cluster or clients CA which is not a Root CA, you have to include the whole chain in the certificate file. The chain should be in the following order:
-
The cluster or clients CA
-
One or more intermediate CAs
-
The root CA
-
-
All CAs in the chain should be configured as a CA in the X509v3 Basic Constraints.
-
Procedure
-
Put your CA certificate in the corresponding
Secret(<cluster>-cluster-ca-certfor the cluster CA or<cluster>-clients-ca-certfor the clients CA):On Kubernetes, run the following commands:
# Delete any existing secret (ignore "Not Exists" errors) kubectl delete secret <ca-cert-secret> # Create and label the new one kubectl create secret generic <ca-cert-secret> --from-file=ca.crt=<ca-cert-file>On OpenShift, run the following commands:
# Delete any existing secret (ignore "Not Exists" errors) oc delete secret <ca-cert-secret> # Create the new one oc create secret generic <ca-cert-secret> --from-file=ca.crt=<ca-cert-file> -
Put your CA key in the corresponding
Secret(<cluster>-cluster-cafor the cluster CA or<cluster>-clients-cafor the clients CA)On Kubernetes, run the following commands:
# Delete the existing secret kubectl delete secret <ca-key-secret> # Create the new one kubectl create secret generic <ca-key-secret> --from-file=ca.key=<ca-key-file>On OpenShift, run the following commands:
# Delete the existing secret oc delete secret <ca-key-secret> # Create the new one oc create secret generic <ca-key-secret> --from-file=ca.key=<ca-key-file> -
Label both
Secretswith labelsstrimzi.io/kind=Kafkaandstrimzi.io/cluster=<my-cluster>:On Kubernetes, run the following commands:
kubectl label secret <ca-cert-secret> strimzi.io/kind=Kafka strimzi.io/cluster=<my-cluster> kubectl label secret <ca-key-secret> strimzi.io/kind=Kafka strimzi.io/cluster=<my-cluster>On OpenShift, run the following commands:
oc label secret <ca-cert-secret> strimzi.io/kind=Kafka strimzi.io/cluster=<my-cluster> oc label secret <ca-key-secret> strimzi.io/kind=Kafka strimzi.io/cluster=<my-cluster> -
Create the
Kafkaresource for your cluster, configuring either theKafka.spec.clusterCaor theKafka.spec.clientsCaobject to not use generated CAs:Example fragmentKafkaresource configuring the cluster CA to use certificates you supply for yourselfkind: Kafka version: v1alpha1 spec: # ... clusterCa: generateCertificateAuthority: false
7.4. Certificate renewal
The cluster CA and clients CA certificates are only valid for a limited time period, known as the validity period.
This is usually defined as a number of days since the certificate was generated.
For auto-generated CA certificates, you can configure the validity period in Kafka.spec.clusterCa.validityDays and Kafka.spec.clientsCa.validityDays.
The default validity period for both certificates is 365 days.
Manually-installed CA certificates should have their own validity period defined.
When a CA certificate expires, components and clients which still trust that certificate will not accept TLS connections from peers whose certificate were signed by the CA private key. The components and clients need to trust the new CA certificate instead.
To allow the renewal of CA certificates without a loss of service, the Cluster Operator will initiate certificate renewal before the old CA certificates expire.
You can configure the renewal period in Kafka.spec.clusterCa.renewalDays and Kafka.spec.clientsCa.renewalDays (both default to 30 days).
The renewal period is measured backwards, from the expiry date of the current certificate.
Not Before Not After
| |
|<--------------- validityDays --------------->|
<--- renewalDays --->|The behavior of the Cluster Operator during the renewal period depends on whether the relevant setting is enabled, in either Kafka.spec.clusterCa.generateCertificateAuthority or Kafka.spec.clientsCa.generateCertificateAuthority.
7.4.1. Renewal process with generated CAs
The Cluster Operator performs the following process to renew CA certificates:
-
Generate a new CA certificate, but retaining the existing key. The new certificate replaces the old one with the name
ca.crtwithin the correspondingSecret. -
Generate new client certificates (for Zookeeper nodes, Kafka brokers, and the Entity Operator). This is not strictly necessary because the signing key has not changed, but it keeps the validity period of the client certificate in sync with the CA certificate.
-
Restart Zookeeper nodes so that they will trust the new CA certificate and use the new client certificates.
-
Restart Kafka brokers so that they will trust the new CA certificate and use the new client certificates.
-
Restart the Topic and User Operators so that they will trust the new CA certificate and use the new client certificates.
7.4.2. Client applications
The Cluster Operator is not aware of all the client applications using the Kafka cluster.
|
Important
|
Depending on how your applications are configured, you might need take action to ensure they continue working after certificate renewal. |
Consider the following important points to ensure that client applications continue working.
-
When they connect to the cluster, client applications must trust the cluster CA certificate published in <cluster>-cluster-ca-cert.
-
When using the User Operator to provision client certificates, client applications must use the current
user.crtanduser.keypublished in their<user>Secretwhen they connect to the cluster. For workloads running inside the same OpenShift or Kubernetes cluster this can be achieved by mounting the secrets as a volume and having the client Pods construct their key- and truststores from the current state of theSecrets. For more details on this procedure, see Configuring internal clients to trust the cluster CA. -
When renewing client certificates, if you are provisioning client certificates and keys manually, you must generate new client certificates and ensure the new certificates are used by clients within the renewal period. Failure to do this by the end of the renewal period could result in client applications being unable to connect.
7.5. TLS connections
7.5.1. Zookeeper communication
Zookeeper does not support TLS itself.
By deploying an stunnel sidecar within every Zookeeper pod, the Cluster Operator is able to provide data encryption and authentication between Zookeeper nodes in a cluster.
Zookeeper communicates only with the stunnel sidecar over the loopback interface.
The stunnel sidecar then proxies all Zookeeper traffic, TLS decrypting data upon entry into a Zookeeper pod and TLS encrypting data upon departure from a Zookeeper pod.
This TLS encrypting stunnel proxy is instantiated from the spec.zookeeper.stunnelImage specified in the Kafka resource.
7.5.2. Kafka interbroker communication
Communication between Kafka brokers is done through the REPLICATION listener on port 9091, which is encrypted by default.
Communication between Kafka brokers and Zookeeper nodes uses an stunnel sidecar, as described above.
7.5.3. Topic and User Operators
Like the Cluster Operator, the Topic and User Operators each use an `stunnel` sidecar when communicating with Zookeeper. The Topic Operator connects to Kafka brokers on port 9091.
7.5.4. Kafka Client connections
Encrypted communication between Kafka brokers and clients running within the same OpenShift or Kubernetes cluster is provided through the CLIENTTLS listener on port 9093.
Encrypted communication between Kafka brokers and clients running outside the same OpenShift or Kubernetes cluster is provided through the EXTERNAL listener on port 9094.
|
Note
|
You can use the CLIENT listener on port 9092 for unencrypted communication with brokers.
|
7.6. Configuring internal clients to trust the cluster CA
This procedure describes how to configure a Kafka client that resides inside the OpenShift or Kubernetes cluster — connecting to the tls listener on port 9093 — to trust the cluster CA certificate.
The easiest way to achieve this for an internal client is to use a volume mount to access the Secrets containing the necessary certificates and keys.
Prerequisites
-
The Cluster Operator is running.
-
A
Kafkaresource within the OpenShift or Kubernetes cluster. -
A Kafka client application inside the OpenShift or Kubernetes cluster which will connect using TLS and needs to trust the cluster CA certificate.
Procedure
-
When defining the client
Pod -
The Kafka client has to be configured to trust certificates signed by this CA. For the Java-based Kafka Producer, Consumer, and Streams APIs, you can do this by importing the CA certificate into the JVM’s truststore using the following
keytoolcommand:keytool -keystore client.truststore.jks -alias CARoot -import -file ca.crt -
To configure the Kafka client, specify the following properties:
-
security.protocol: SSLwhen using TLS for encryption (with or without TLS authentication), orsecurity.protocol: SASL_SSLwhen using SCRAM-SHA authentication over TLS. -
ssl.truststore.location: the truststore location where the certificates were imported. -
ssl.truststore.password: the password for accessing the truststore. This property can be omitted if it is not needed by the truststore.
-
Additional resources
-
For the procedure for configuring external clients to trust the cluster CA, see Configuring external clients to trust the cluster CA
7.7. Configuring external clients to trust the cluster CA
This procedure describes how to configure a Kafka client that resides outside the OpenShift or Kubernetes cluster – connecting to the external listener on port 9094 – to trust the cluster CA certificate.
You can use the same procedure to configure clients inside OpenShift or Kubernetes, which connect to the tls listener on port 9093, but it is usually more convenient to access the Secrets using a volume mount in the client Pod.
Follow this procedure when setting up the client and during the renewal period, when the old clients CA certificate is replaced.
|
Important
|
The <cluster-name>-cluster-ca-cert Secret will contain more than one CA certificate during CA certificate renewal. Clients must add all of them to their truststores.
|
Prerequisites
-
The Cluster Operator is running.
-
A
Kafkaresource within the OpenShift or Kubernetes cluster. -
A Kafka client application outside the OpenShift or Kubernetes cluster which will connect using TLS and needs to trust the cluster CA certificate.
Procedure
-
Extract the cluster CA certificate from the generated
<cluster-name>-cluster-ca-certSecret.On Kubernetes, run the following command to extract the certificates:
kubectl get secret <cluster-name>-cluster-ca-cert -o jsonpath='{.data.ca\.crt}' | base64 -d > ca.crtOn OpenShift, run the following command to extract the certificates:
oc extract secret/<cluster-name>-cluster-ca-cert --keys ca.crt -
The Kafka client has to be configured to trust certificates signed by this CA. For the Java-based Kafka Producer, Consumer, and Streams APIs, you can do this by importing the CA certificates into the JVM’s truststore using the following
keytoolcommand:keytool -keystore client.truststore.jks -alias CARoot -import -file ca.crt -
To configure the Kafka client, specify the following properties:
-
security.protocol: SSLwhen using TLS for encryption (with or without TLS authentication), orsecurity.protocol: SASL_SSLwhen using SCRAM-SHA authentication over TLS. -
ssl.truststore.location: the truststore location where the certificates were imported. -
ssl.truststore.password: the password for accessing the truststore. This property can be omitted if it is not needed by the truststore.
-
Additional resources
-
For the procedure for configuring internal clients to trust the cluster CA, see Configuring internal clients to trust the cluster CA
8. Strimzi and Kafka upgrades
Each version of Strimzi supports a range of versions of Apache Kafka. You can upgrade to a higher Kafka version as long as that version is supported by your version of Strimzi. In some cases, you can also downgrade to a lower supported Kafka version.
When a newer version of Strimzi is available, it may provide support for newer versions of Kafka. Therefore, you will need to upgrade to the new version of Strimzi before you can upgrade to a higher supported Kafka version. Upgrading the version of Strimzi is done by upgrading the Cluster Operator deployment to the new version.
8.1. Upgrading the Cluster Operator from 0.10.0 to 0.11.0
This procedure will describe how to upgrade a Cluster Operator deployment from version 0.10.0 to version 0.11.0. The availability of Kafka clusters managed by the Cluster Operator is not affected by the upgrade operation.
Prerequisites
-
An existing version 0.10.0 Cluster Operator deployment to be upgraded.
Procedure
-
Backup the existing Cluster Operator resources.
On Kubernetes use
kubectl get:kubectl get all -l app=strimzi > strimzi-backup.yaml
On OpenShift use
oc get:oc get -l all app=strimzi > strimzi-backup.yaml
-
Update the Cluster Operator. You will need to modify the installation files according to the namespace the Cluster Operator is running in.
On Linux, use:
sed -i 's/namespace: .*/namespace: my-namespace/' install/cluster-operator/*RoleBinding*.yamlOn MacOS, use:
sed -i '' 's/namespace: .*/namespace: my-namespace/' install/cluster-operator/*RoleBinding*.yamlIf you modified one or more environment variables in your existing Cluster Operator
Deployment, editinstall/cluster-operator/050-Deployment-cluster-operator.yamlto reflect the changes that you made. -
When you have an updated configuration you can deploy it along with the rest of the install resources.
On Kubernetes use
kubectl apply:kubectl apply -f install/cluster-operator
On OpenShift use
oc apply:oc apply -f install/cluster-operator
Wait for the associated rolling updates to complete.
-
Update existing resources to cope with deprecated custom resource properties.
-
If you have
Kafkaresources that specifyKafka.spec.topicOperator, rewrite them to useKafka.spec.entityOperator.topicOperatorinstead.
-
8.2. Upgrading the Cluster Operator from 0.9.0 to 0.10.0
This procedure will describe how to upgrade a Cluster Operator deployment from version 0.9.x to version 0.10.0. The availability of Kafka clusters managed by the Cluster Operator is not affected by the upgrade operation.
Prerequisites
-
An existing version 0.9.0 Cluster Operator deployment to be upgraded.
Procedure
-
Update your existing
Kafka,KafkaConnect,KafkaConnectS2I, andKafkaMirrorMakerresources, as follows:-
Add
Kafka.spec.kafka.versionwith the value2.0.1 -
Add
KafkaConnect.spec.versionwith the value2.0.1 -
Add
KafkaConnectS2I.spec.versionwith the value2.0.1 -
Add
KafkaMirrorMaker.spec.versionwith the value2.0.1Wait for the associated rolling updates to complete.
-
-
Backup the existing Cluster Operator resources.
On Kubernetes use
kubectl get:kubectl get all -l app=strimzi > strimzi-backup.yaml
On OpenShift use
oc get:oc get all -l app=strimzi > strimzi-backup.yaml
-
Update the Cluster Operator. You will need to modify the installation files according to the namespace the Cluster Operator is running in.
On Linux, use:
sed -i 's/namespace: .*/namespace: my-namespace/' install/cluster-operator/*RoleBinding*.yamlOn MacOS, use:
sed -i '' 's/namespace: .*/namespace: my-namespace/' install/cluster-operator/*RoleBinding*.yamlIf you modified one or more environment variables in your existing Cluster Operator
Deployment, editinstall/cluster-operator/050-Deployment-cluster-operator.yamlto reflect the changes that you made. -
When you have an updated configuration you can deploy it along with the rest of the install resources.
On Kubernetes use
kubectl apply:kubectl apply -f install/cluster-operator
On OpenShift use
oc apply:oc apply -f install/cluster-operator
Wait for the associated rolling updates to complete.
-
Update existing resources to cope with deprecated custom resource properties.
-
If you have
Kafkaresources that specifyKafka.spec.topicOperator, rewrite them to useKafka.spec.entityOperator.topicOperatorinstead.
-
8.3. Upgrading and downgrading Kafka versions
8.3.1. Versions and images overview
The Cluster Operator embeds knowledge of different Kafka versions, but not of the corresponding images in which those versions are provided.
Using the STRIMZI_KAFKA_IMAGES environment variable, the Cluster Operator is configured with a mapping between the Kafka version and the image to be used when that version is requested in a given Kafka resource.
Each Kafka resource can be configured with a Kafka.spec.kafka.version.
If Kafka.spec.kafka.image is not configured then the default image for the given version will be used.
If Kafka.spec.kafka.image is given, this overrides the default.
|
Warning
|
The Cluster Operator cannot validate that an image actually contains a Kafka broker of the expected version. Take care to ensure that the given image corresponds to the given Kafka version. |
8.3.2. Kafka upgrades using the Cluster Operator
How the Cluster Operator will perform an upgrade depends on the differences between:
-
The interbroker protocol version of the two Kafka versions
-
The log message format version of the two Kafka versions
-
The version of Zookeeper used by the two Kafka versions
When each of these versions is the same, as is typically the case for a patch level upgrade (for example 2.0.0 to 2.0.1), then the Cluster Operator can perform the upgrade using a single rolling update of the Kafka brokers. When one or more of these versions differ, the Cluster Operator will require two or three rolling updates of the Kafka brokers to perform the upgrade.
8.3.3. Upgrading brokers to a newer Kafka version
This procedure describes how to upgrade a Strimzi Kafka cluster from one version to a higher version; for example 2.0.0 to 2.1.0.
Prerequisites
-
The Cluster Operator, which supports both versions of Kafka, is up and running.
-
A
Kafkaresource to be upgraded. -
You have checked that your
Kafka.spec.kafka.configcontains no options that are not supported in the version of Kafka that you are upgrading to.
Procedure
-
Consult the table below and determine whether the new Kafka version has a different log message format version than the previous version.
include::snip-kafka-versions.adoc[leveloffset=+1]
If the log message format versions are the same proceed to the next step. Otherwise, ensure the
Kafka.spec.kafka.confighas thelog.message.format.versionconfigured to the default for the previous version.For example, if upgrading from 2.0.0:
apiVersion: v1alpha1 kind: Kafka spec: # ... kafka: version: 2.0.0 config: log.message.format.version: "2.0" # ...NoteYou must format the value of log.message.format.versionas a string to prevent it from being interpreted as a number.If
log.message.format.versionis unset then set it and wait for the resulting rolling restart of the Kafka cluster to complete. -
Change the
Kafka.spec.kafka.versionto specify the new version, but leave thelog.message.format.versionas the previous version. If the image to be used is different from the image for the given version of Kafka configured in the Cluster Operator’sSTRIMZI_KAFKA_IMAGESthen configure theKafka.spec.kafka.imageas well.For example, if upgrading from Kafka 2.0.0 to 2.1.0:
apiVersion: v1alpha1 kind: Kafka spec: # ... kafka: version: 2.1.0 (1) config: log.message.format.version: "2.0" (2) # ...-
This is changed to the new version
-
This remains at the previous version
-
-
Wait for the Cluster Operator to upgrade the cluster. If the old and new versions of Kafka have different interbroker protocol versions, look in the Cluster Operator logs for an
INFOlevel message in the following format:Reconciliation #<num>(watch) Kafka(<namespace>/<name>): Kafka version upgrade from <from-version> to <to-version>, phase 2 of 2 completedAlternatively, if the old and new versions of Kafka have the same interbroker protocol version, look in the Cluster Operator logs for an
INFOlevel message in the following format:Reconciliation #<num>(watch) Kafka(<namespace>/<name>): Kafka version upgrade from <from-version> to <to-version>, phase 1 of 1 completedFor example, using
grep:oc logs -f <cluster-operator-pod-name> | grep -E "Kafka version upgrade from [0-9.]+ to [0-9.]+, phase ([0-9]+) of \1 completed" -
Upgrade all your client applications to use the new version of the client libraries.
WarningYou cannot downgrade after completing this step. If, for whatever reason, you need to revert the update at this point, follow the procedure Downgrading brokers to an older Kafka version. -
If the log message format versions, as identified in step 1, are the same proceed to the next step. Otherwise change the
log.message.format.versioninKafka.spec.kafka.configto the default version for the new version of Kafka now being used. For example, if upgrading to 2.1.0:apiVersion: v1alpha1 kind: Kafka spec: # ... kafka: version: 2.1.0 config: log.message.format.version: "2.1" # ...Wait for the Cluster Operator to update the cluster.
Additional resources
-
See Downgrading brokers to an older Kafka version for the procedure to downgrade a Strimzi Kafka cluster from one version to a lower version, for example 2.0.1 to 2.0.0.
8.3.4. Kafka downgrades using the Cluster Operator
Whether and how the Cluster Operator will perform a downgrade depends on the differences between:
-
The interbroker protocol version of the two Kafka versions
-
The log message format version of the two Kafka versions
-
The version of Zookeeper used by the two Kafka versions
If the downgraded version of Kafka has the same log message format version then downgrading is always possible. In this case the Cluster Operator will be able to downgrade by performing a single rolling restart of the brokers.
If the downgraded version of Kafka has a different log message format version, then downgrading is only possible if the running cluster has
always had log.message.format.version set to the version used by the downgraded version.
This is typically only the case when the upgrade procedure has been aborted before the log.message.format.version was changed.
In this case the downgrade will require two rolling restarts of the brokers if the interbroker protocol of the two versions is different, or a single rolling restart if they are the same.
8.3.5. Downgrading brokers to an older Kafka version
You can downgrade a Strimzi Kafka cluster from one version to a lower version; for example, from 2.1.0 to 2.0.0.
In this procedure the term previous version means the version being downgraded to (such as 2.0.0), and the term new version means the version being downgraded from (such as 2.1.0).
|
Important
|
Downgrading is not possible if the version being downgraded from has ever used a log.message.format.version that is not supported by the version being downgraded to (including where the default value for log.message.format.version is used).
|
For example:
apiVersion: v1alpha1
kind: Kafka
spec:
# ...
kafka:
version: 2.1.0
config:
log.message.format.version: "2.0"
# ...This resource can be downgraded to Kafka version 2.0.0 because the log.message.format.version has not been changed.
If the log.message.format.version were absent (so that the parameter took its default value for a 2.1.0 broker of 2.1), or was "2.1" then downgrade would not be possible.
Prerequisites
-
The Cluster Operator is up and running.
-
A
Kafkaresource to be downgraded. -
The
Kafka.spec.kafka.confighas alog.message.format.versionthat is supported by the version being downgraded to. -
You have checked that your
Kafka.spec.kafka.configcontains no options which are not supported in the version of Kafka being downgraded to.
Procedure
-
Change the
Kafka.spec.kafka.versionto specify the version being downgraded to. If the image to be used is different from the image for the given version of Kafka configured in the Cluster Operator’sSTRIMZI_KAFKA_IMAGESthen configure theKafka.spec.kafka.imageas well.For example, if downgrading from Kafka 2.1.0 to 2.0.0:
apiVersion: v1alpha1 kind: Kafka spec: # ... kafka: version: 2.0.0 (1) config: log.message.format.version: "2.0" (2) # ...-
This is changed to the downgraded version
-
This is unchanged
NoteIt is necessary to format the value of log.message.format.versionas a string to prevent it being interpreted as a number. -
-
Wait for the Cluster Operator to downgrade the cluster. If both the previous and new versions of Kafka have a different interbroker protocol version look in the Cluster Operator logs for an
INFOlevel message in the following format:Reconciliation #<num>(watch) Kafka(<namespace>/<name>): Kafka version downgrade from <from-version> to <to-version>, phase 2 of 2 completedAlternatively, if both the previous and new versions of Kafka have the same interbroker protocol version look in the Cluster Operator logs for an
INFOlevel message in the following format:Reconciliation #<num>(watch) Kafka(<namespace>/<name>): Kafka version downgrade from <from-version> to <to-version>, phase 1 of 1 completedFor example, using
grep:oc logs -f <cluster-operator-pod-name> | grep -E "Kafka version downgrade from [0-9.]+ to [0-9.]+, phase ([0-9]+) of \1 completed" -
Downgrade each client application to use the previous version of the client libraries.
Appendix A: Frequently Asked Questions
A.1. Cluster Operator
A.1.1. Why do I need cluster admin privileges to install Strimzi?
Additional resources
To install Strimzi, you must have the ability to create Custom Resource Definitions (CRDs). CRDs instruct OpenShift or Kubernetes about resources that are specific to Strimzi, such as Kafka, KafkaConnect, and so on. Because CRDs are a cluster-scoped resource rather than being scoped to a particular OpenShift or Kubernetes namespace, they typically require cluster admin privileges to install.
In addition, you must also have the ability to create ClusterRoles and ClusterRoleBindings. Like CRDs, these are cluster-scoped resources that typically require cluster admin privileges.
The cluster administrator can inspect all the resources being installed (in the /install/ directory) to assure themselves that the ClusterRoles do not grant unnecessary privileges. For more information about why the Cluster Operator installation resources grant the ability to create ClusterRoleBindings see the following question.
After installation, the Cluster Operator will run as a regular Deployment; any non-admin user with privileges to access the Deployment can configure it.
By default, normal users will not have the privileges necessary to manipulate the custom resources, such as Kafka, KafkaConnect and so on, which the Cluster Operator deals with.
These privileges can be granted using normal RBAC resources by the cluster administrator. See this procedure for more details of how to do this.
A.1.2. Why does the Cluster Operator require the ability to create ClusterRoleBindings? Is that not a security risk?
OpenShift or Kubernetes has built-in privilege escalation prevention. That means that the Cluster Operator cannot grant privileges it does not have itself. Which in turn means that the Cluster Operator needs to have the privileges necessary for all the components it orchestrates.
In the context of this question there are two places where the Cluster Operator needs to create bindings to ClusterRoleBindings to ServiceAccounts:
-
The Topic Operator and User Operator need to be able to manipulate
KafkaTopicsandKafkaUsers, respectively. The Cluster Operator therefore needs to be able to grant them this access, which it does by creating aRoleandRoleBinding. For this reason the Cluster Operator itself needs to be able to createRolesandRoleBindingsin the namespace that those operators will run in. However, because of the privilege escalation prevention, the Cluster Operator cannot grant privileges it does not have itself (in particular it cannot grant such privileges in namespace it cannot access). -
When using rack-aware partition assignment, Strimzi needs to be able to discover the failure domain (for example, the Availability Zone in AWS) of the node on which a broker pod is assigned. To do this the broker pod needs to be able to get information about the
Nodeit is running on. ANodeis a cluster-scoped resource, so access to it can only be granted via aClusterRoleBinding(not a namespace-scopedRoleBinding). Therefore the Cluster Operator needs to be able to createClusterRoleBindings. But again, because of privilege escalation prevention, the Cluster Operator cannot grant privileges it does not have itself (so it cannot, for example, create aClusterRoleBindingto aClusterRoleto grant privileges that the Cluster Operator does not not already have).
A.1.3. Why can standard OpenShift or Kubernetes users not create the custom resource (Kafka, KafkaTopic, and so on)?
Because, when they installed Strimzi, the OpenShift or Kubernetes cluster administrator did not grant the necessary privileges to standard users.
See this FAQ answer for more details.
A.1.4. Log contains warnings about failing to acquire lock
For each cluster, the Cluster Operator always executes only one operation at a time. The Cluster Operator uses locks to make sure that there are never two parallel operations running for the same cluster. In case an operation requires more time to complete, other operations will wait until it is completed and the lock is released.
- INFO
-
Examples of cluster operations are cluster creation, rolling update, scale down or scale up and so on.
If the wait for the lock takes too long, the operation times out and the following warning message will be printed to the log:
2018-03-04 17:09:24 WARNING AbstractClusterOperations:290 - Failed to acquire lock for kafka cluster lock::kafka::myproject::my-clusterDepending on the exact configuration of STRIMZI_FULL_RECONCILIATION_INTERVAL_MS and STRIMZI_OPERATION_TIMEOUT_MS, this
warning message may appear regularly without indicating any problems. The operations which time out will be picked up by
the next periodic reconciliation. It will try to acquire the lock again and execute.
Should this message appear periodically even in situations when there should be no other operations running for a given cluster, it might indicate that due to some error the lock was not properly released. In such cases it is recommended to restart the cluster operator.
A.1.5. Hostname verification fails when connecting to NodePorts using TLS
Currently, off-cluster access using NodePorts with TLS encryption enabled does not support TLS hostname verification. As a result, the clients that verify the hostname will fail to connect. For example, the Java client will fail with the following exception:
Caused by: java.security.cert.CertificateException: No subject alternative names matching IP address 168.72.15.231 found
at sun.security.util.HostnameChecker.matchIP(HostnameChecker.java:168)
at sun.security.util.HostnameChecker.match(HostnameChecker.java:94)
at sun.security.ssl.X509TrustManagerImpl.checkIdentity(X509TrustManagerImpl.java:455)
at sun.security.ssl.X509TrustManagerImpl.checkIdentity(X509TrustManagerImpl.java:436)
at sun.security.ssl.X509TrustManagerImpl.checkTrusted(X509TrustManagerImpl.java:252)
at sun.security.ssl.X509TrustManagerImpl.checkServerTrusted(X509TrustManagerImpl.java:136)
at sun.security.ssl.ClientHandshaker.serverCertificate(ClientHandshaker.java:1501)
... 17 moreTo connect, you must disable hostname verification.
In the Java client, you can do this by setting the configuration option ssl.endpoint.identification.algorithm to an empty string.
When configuring the client using a properties file, you can do it this way:
ssl.endpoint.identification.algorithm=When configuring the client directly in Java, set the configuration option to an empty string:
props.put("ssl.endpoint.identification.algorithm", "");Appendix B: Installing OpenShift or Kubernetes cluster
The easiest way to get started with OpenShift or Kubernetes is using the Minikube, Minishift or oc cluster up
utilities. This section provides basic guidance on how to use them. More details are provided on the websites of
the tools themselves.
B.1. Kubernetes
In order to interact with a Kubernetes cluster the kubectl
utility needs to be installed.
The easiest way to get a running Kubernetes cluster is using Minikube. Minikube can be downloaded and installed
from the Kubernetes website. Depending on the number of brokers
you want to deploy inside the cluster and if you need Kafka Connect running as well, it could be worth running Minikube
at least with 4 GB of RAM instead of the default 2 GB.
Once installed, it can be started using:
minikube start --memory 4096B.2. OpenShift
In order to interact with an OpenShift cluster, the oc utility is needed.
An OpenShift cluster can be started in two different ways. The oc utility can start a cluster locally using the
command:
oc cluster upThis command requires Docker to be installed. More information about this way can be found here.
Another option is to use Minishift. Minishift is an OpenShift installation within a VM. It can be downloaded and
installed from the Minishift website. Depending on the number of brokers
you want to deploy inside the cluster and if you need Kafka Connect running as well, it could be worth running Minishift
at least with 4 GB of RAM instead of the default 2 GB.
Once installed, Minishift can be started using the following command:
minishift start --memory 4GBAppendix C: Metrics
This section describes how to monitor Strimzi Kafka and ZooKeeper clusters using Grafana dashboards. In order to run the example dashboards you must configure Prometheus server and add the appropriate Prometheus JMX Exporter rules to your Kafka cluster resource.
|
Warning
|
The resources referenced in this section serve as a good starting point for setting up monitoring, but they are provided as an example only. If you require further support on configuration and running Prometheus or Grafana in production then please reach out to their respective communities. |
When adding Prometheus and Grafana servers to an Apache Kafka deployment using minikube or minishift, the memory available to the virtual machine should be increased (to 4 GB of RAM, for example, instead of the default 2 GB). Information on how to increase the default amount of memory can be found in the following section Installing OpenShift or Kubernetes cluster.
C.1. Kafka Metrics Configuration
Strimzi uses the Prometheus JMX Exporter to export JMX metrics from Kafka and ZooKeeper to a Prometheus HTTP metrics endpoint that is scraped by Prometheus server.
The Grafana dashboard relies on the Kafka and ZooKeeper Prometheus JMX Exporter relabeling rules defined in the example Kafka resource configuration in kafka-metrics.yaml.
Copy this configuration to your own Kafka resource definition, or run this example, in order to use the provided Grafana dashboards.
C.1.1. Deploying on OpenShift
To deploy the example Kafka cluster the following command should be executed:
oc apply -f https://raw.githubusercontent.com/strimzi/strimzi-kafka-operator/0.11.0/metrics/examples/kafka/kafka-metrics.yamlC.1.2. Deploying on Kubernetes
To deploy the example Kafka cluster the following command should be executed:
kubectl apply -f https://raw.githubusercontent.com/strimzi/strimzi-kafka-operator/0.11.0/metrics/examples/kafka/kafka-metrics.yamlC.2. Prometheus
The provided Prometheus prometheus.yaml YAML file describes all the resources required by Prometheus in order to effectively monitor a Strimzi Kafka & ZooKeeper cluster.
These resources lack important production configuration to run a healthy and highly available Prometheus server.
They should only be used to demonstrate this Grafana dashboard example.
The following resources are defined:
-
A
ClusterRolethat grants permissions to read Prometheus health endpoints of the Kubernetes system, including cAdvisor and kubelet for container metrics. The Prometheus server configuration uses the Kubernetes service discovery feature in order to discover the pods in the cluster from which it gets metrics. In order to have this feature working, it is necessary for the service account used for running the Prometheus service pod to have access to the API server to get the pod list. -
A
ServiceAccountfor the Prometheus pods to run under. -
A
ClusterRoleBindingwhich binds the aforementionedClusterRoleto theServiceAccount. -
A
Deploymentto manage the actual Prometheus server pod. -
A
ConfigMapto manage the configuration of Prometheus Server. -
A
Serviceto provide an easy to reference hostname for other services to connect to Prometheus server (such as Grafana).
Prometheus also provides an alerting system through the alert manager component.
In order to enable alerting, the provided alerting-rules.yaml file describes a ConfigMap resource which defines sample alerting rules on Kafka and Zookeeper metrics.
When an alert condition is evaluated as true on the Prometheus server, it sends the alert data to the alert manager which then uses the configured notification methods to notify the user.
More information about how to set up alerting rules here.
C.2.1. Deploying on OpenShift
The provided prometheus.yaml file, with all the Prometheus related resources, creates a ClusterRoleBinding in the myproject namespace.
It also discovers an alert manager instance in the same namespace.
If you are using a different namespace, download the resource file and update it as follows:
curl -s https://raw.githubusercontent.com/strimzi/strimzi-kafka-operator/0.11.0/metrics/examples/prometheus/prometheus.yaml | sed -e 's/namespace: .*/namespace: _my-namespace_/;s/regex: myproject/regex: _my-namespace_/' > prometheus.yamlThe provided alerting-rules.yaml file creates a ConfigMap with sample alerting rules; download the resource file as follows:
curl -s https://raw.githubusercontent.com/strimzi/strimzi-kafka-operator/0.11.0/metrics/examples/prometheus/alerting-rules.yaml > alerting-rules.yamlTo deploy all these resources you can run the following.
oc login -u system:admin
oc apply -f alerting-rules.yaml
oc apply -f prometheus.yamlC.2.2. Deploying on Kubernetes
The provided prometheus.yaml file, with all the Prometheus related resources, creates a ClusterRoleBinding in the myproject namespace.
If you are using a different namespace, download the resource file and update it as follows:
curl -s https://raw.githubusercontent.com/strimzi/strimzi-kafka-operator/0.11.0/metrics/examples/prometheus/prometheus.yaml | sed -e 's/namespace: .*/namespace: _my-namespace_/;s/regex: myproject/regex: _my-namespace_/' > prometheus.yamlThe provided alerting-rules.yaml file creates a ConfigMap with sample alerting rules; download the resource file as follows:
curl -s https://raw.githubusercontent.com/strimzi/strimzi-kafka-operator/0.11.0/metrics/examples/prometheus/alerting-rules.yaml > alerting-rules.yamlTo deploy all these resources you can run the following.
kubectl apply -f alerting-rules.yaml
kubectl apply -f prometheus.yamlC.3. Grafana
A Grafana server is necessary to get a visualisation of the Prometheus metrics. The source for the Grafana docker image used can be found in the ./metrics/examples/grafana/grafana-openshift directory.
C.3.1. Deploying on OpenShift
To deploy Grafana the following commands should be executed:
oc apply -f https://raw.githubusercontent.com/strimzi/strimzi-kafka-operator/0.11.0/metrics/examples/grafana/grafana.yamlC.3.2. Deploying on Kubernetes
To deploy Grafana the following commands should be executed:
kubectl apply -f https://raw.githubusercontent.com/strimzi/strimzi-kafka-operator/0.11.0/metrics/examples/grafana/grafana.yamlC.4. Grafana dashboard
As an example, and in order to visualize the exported metrics in Grafana, two sample dashboards are provided strimzi-kafka.json and strimzi-zookeeper.json.
These dashboards represent a good starting point for key metrics to monitor Kafka and ZooKeeper clusters, but depending on your infrastructure you may need to update or add to them.
Please note that they are not representative of all the metrics available.
No alerting rules are defined.
The Grafana Prometheus data source, and the above dashboards, can be set up in Grafana by following these steps.
|
Note
|
For accessing the dashboard, you can use the port-forward command for forwarding traffic from the Grafana pod to the host. For example, you can access the Grafana UI by running oc port-forward grafana-1-fbl7s 3000:3000 (or using kubectl instead of oc) and then pointing a browser to http://localhost:3000.
|
-
Access to the Grafana UI using
admin/admincredentials. On the following view you can choose to skip resetting the admin password, or set it to a password you desire.
-
Click on the "Add data source" button from the Grafana home in order to add Prometheus as data source.

-
Fill in the information about the Prometheus data source, specifying a name and "Prometheus" as type. In the URL field, the connection string to the Prometheus server (that is,
http://prometheus:9090) should be specified. After "Add" is clicked, Grafana will test the connection to the data source.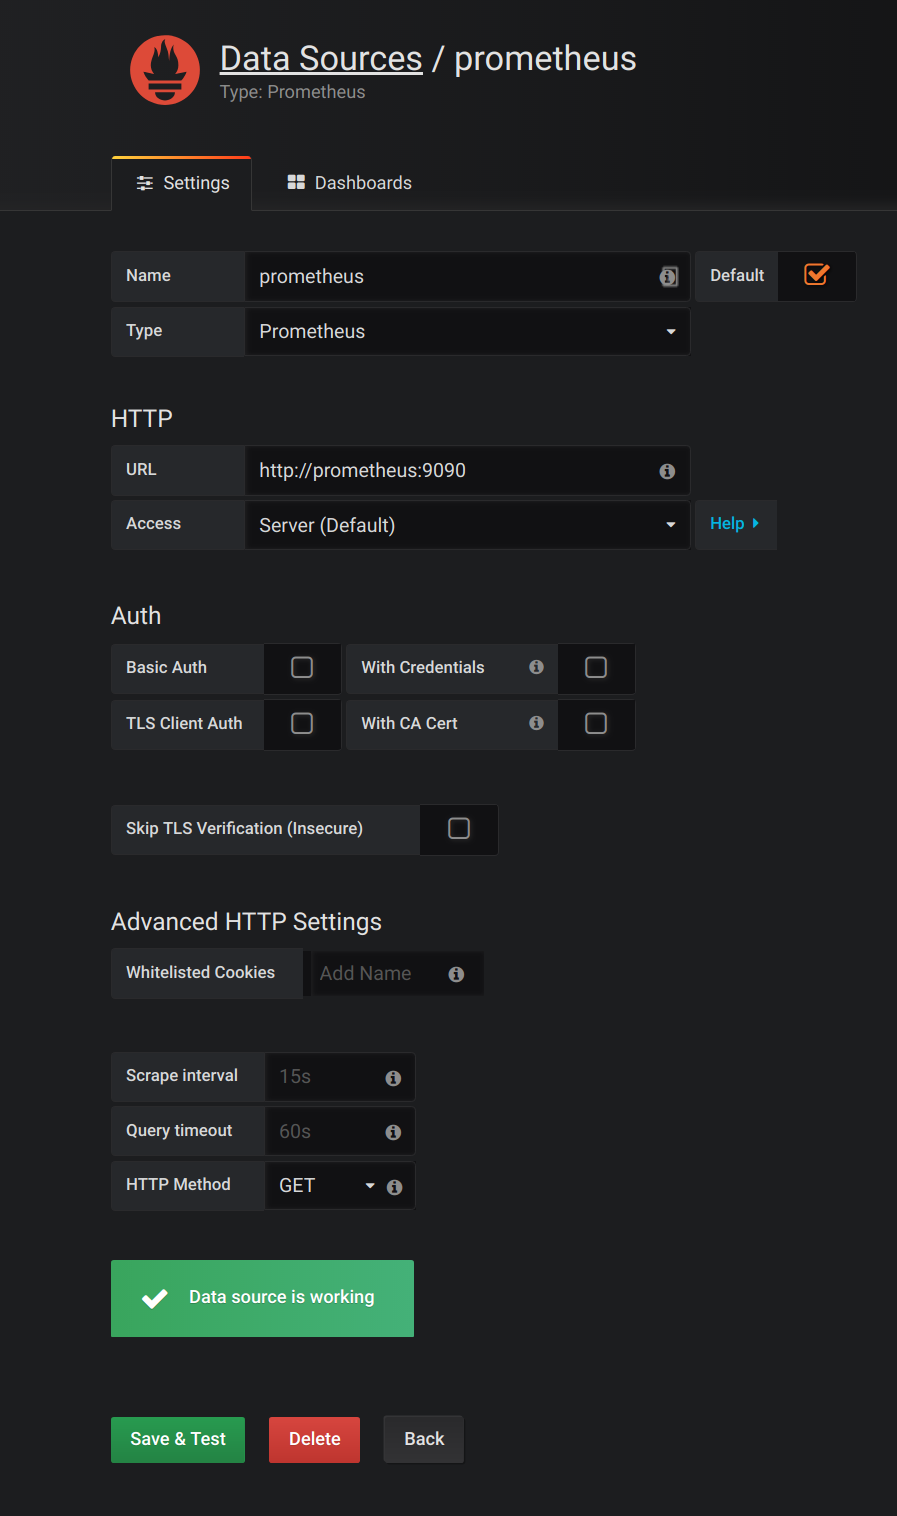
-
From the top left menu, click on "Dashboards" and then "Import" to open the "Import Dashboard" window where the provided
strimzi-kafka.jsonandstrimzi-zookeeper.jsonfiles can be imported or their content pasted.
-
After importing the dashboards, the Grafana dashboard homepage will now list two dashboards for you to choose from. After your Prometheus server has been collecting metrics for a Strimzi cluster for some time you should see a populated dashboard such as the examples list below.
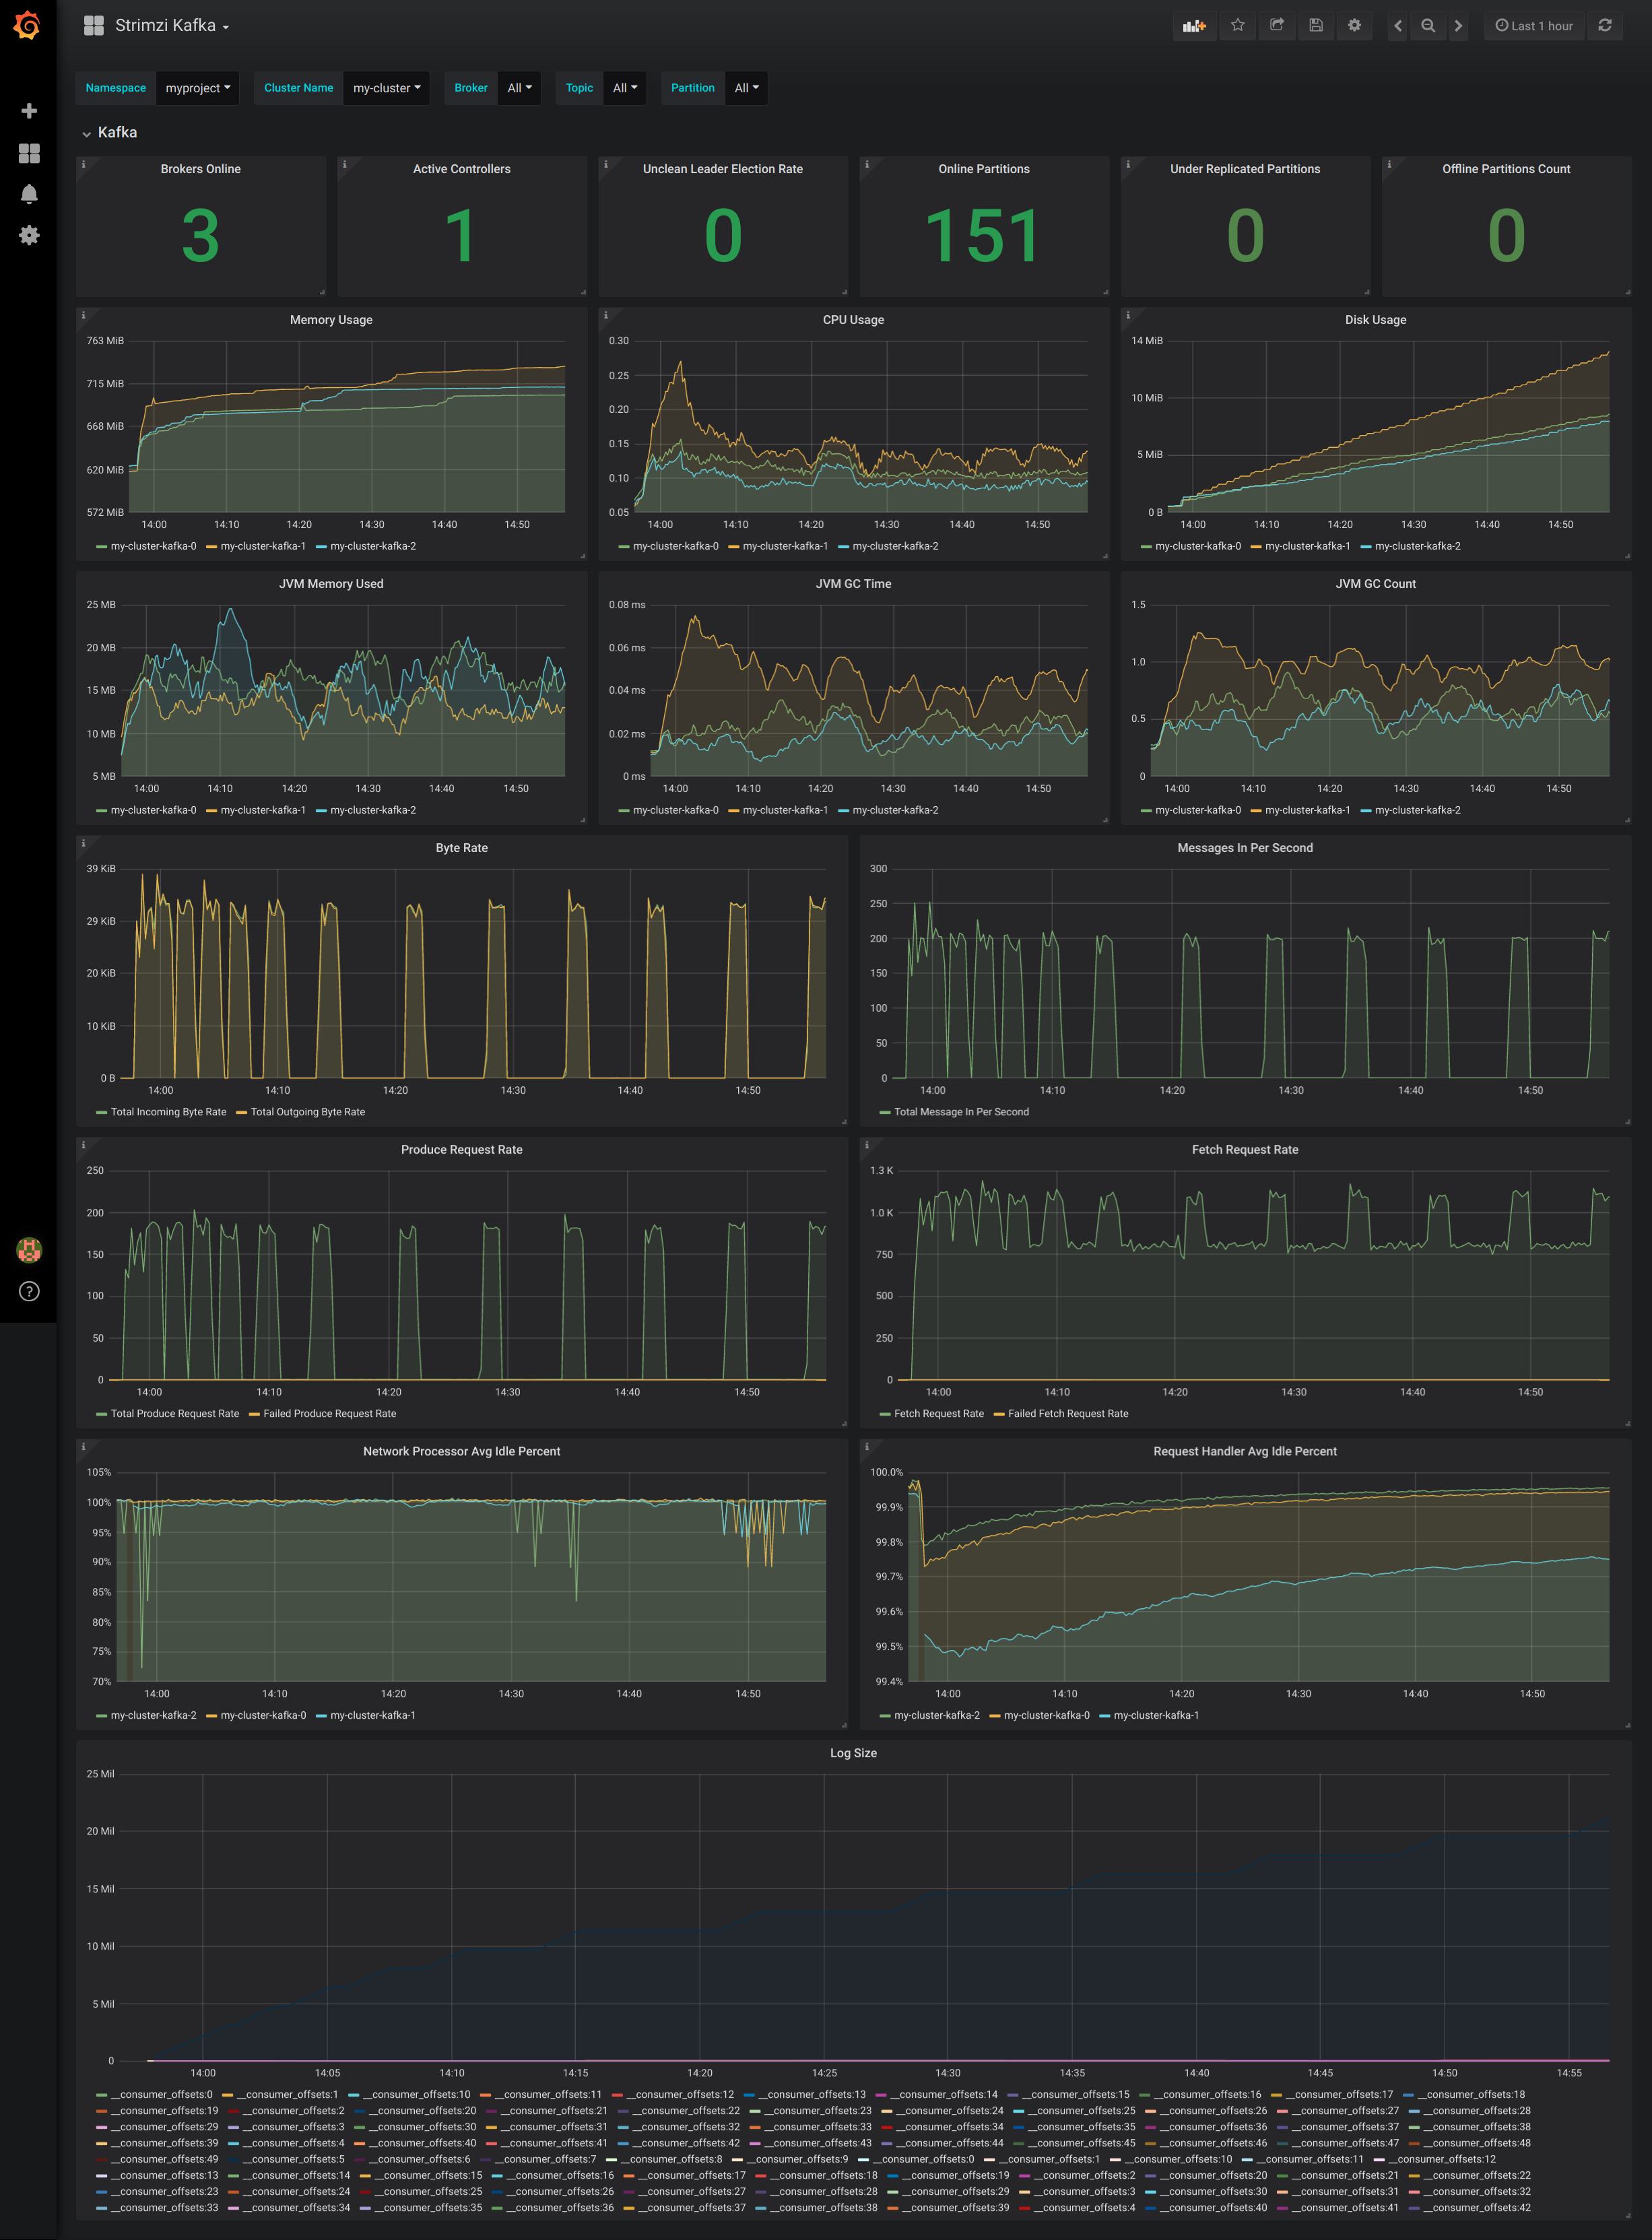
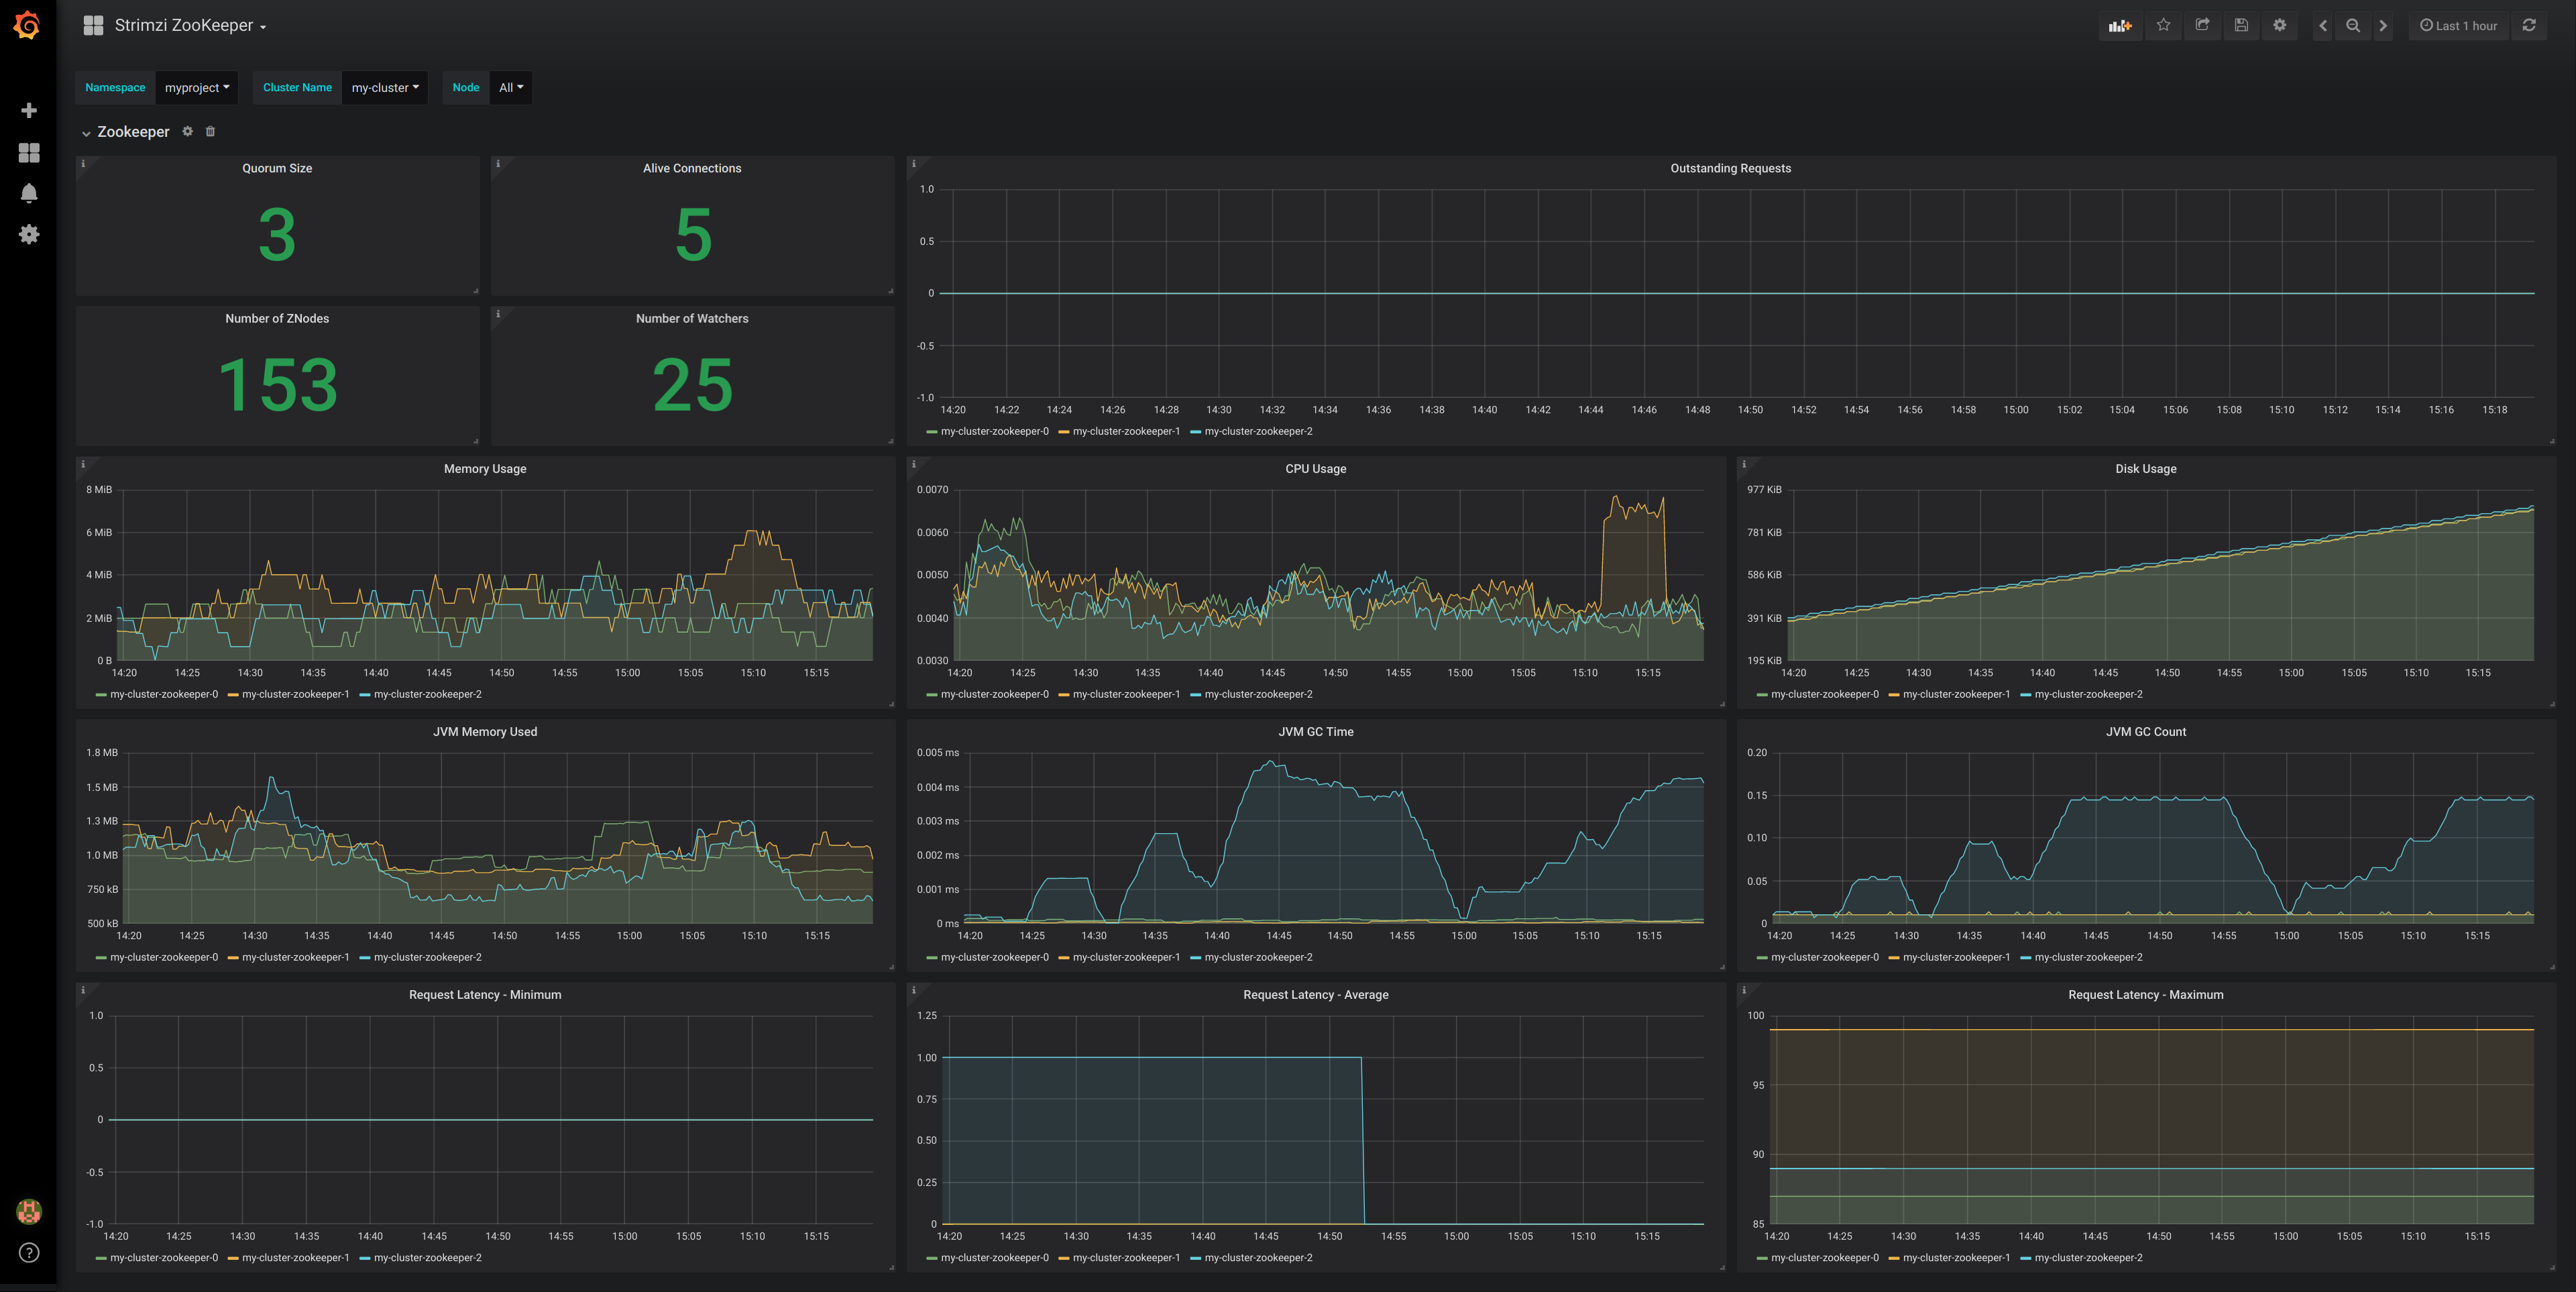
C.4.3. Metrics References
To learn more about what metrics are available to monitor for Kafka, ZooKeeper, and Kubernetes in general, please review the following resources.
-
Apache Kafka Monitoring - A list of JMX metrics exposed by Apache Kafka. It includes a description, JMX mbean name, and in some cases a suggestion on what is a normal value returned.
-
ZooKeeper JMX - A list of JMX metrics exposed by Apache ZooKeeper.
-
Prometheus - Monitoring Docker Container Metrics using cAdvisor - cAdvisor (short for container Advisor) analyzes and exposes resource usage (such as CPU, Memory, and Disk) and performance data from running containers within pods on Kubernetes. cAdvisor is bundled along with the kubelet binary so that it is automatically available within Kubernetes clusters. This reference describes how to monitor cAdvisor metrics in various ways using Prometheus.
-
cAdvisor Metrics - A full list of cAdvisor metrics as exposed through Prometheus.
-
C.5. Prometheus alerting
In the monitoring space, one of the useful aspects is to be notified when some metrics conditions are verified. They allow a human operator to get notifications about problems in the monitored system.
Prometheus allows to write so called "alerting rules" which describe such a conditions using PromQL expressions that are continuously evaluated. When an expression becomes true, the described condition is met and the Prometheus server fires an alert.
Prometheus itself is not responsible for sending notifications to the users when an alert is fired. A different component, the Prometheus alert manager, is in charge to do so, sending emails, chat messages or using different notification methods. When an alert condition is verified, the alert is fired and the Prometheus server sends it to the alert manager which will send notifications.
C.6. Prometheus alert manager
Other than a server for scraping metrics, Prometheus provides an alerting system through the alert manager component. It is possible to declare alerting rules on the Prometheus server in order to be notified about specific conditions in the metrics. When an alert condition is evaluated as true, Prometheus sends alert data to the alert manager which then sends notifications out. Notifications can be sent via methods such as email, Slack, PagerDuty and HipChat
The provided Prometheus alertmanager.yaml YAML file describes all the resources required for deploying and configuring the alert manager.
The following resources are defined:
-
A
Deploymentto manage the actual alert manager pod. -
A
ConfigMapto manage the configuration of the alert manager. -
A
Serviceto provide an easy to reference hostname for other services to connect to alert manager (such as Prometheus).
The provided sample configuration configures the alert manager to send notification to a Slack channel. Before deploying the alert manager it is needed to update the following parameters:
-
The
slack_api_urlfield with the actual value of the Slack API URL related to the application for the Slack workspace. -
The
channelfield with the actual Slack channel on which sending the notifications.
C.6.1. Deploying on OpenShift
To deploy the alert manager the following commands should be executed:
oc apply -f https://raw.githubusercontent.com/strimzi/strimzi-kafka-operator/0.11.0/metrics/examples/prometheus/alertmanager.yamlC.6.2. Deploying on Kubernetes
To deploy the alert manager the following commands should be executed:
kubectl apply -f https://raw.githubusercontent.com/strimzi/strimzi-kafka-operator/0.11.0/metrics/examples/prometheus/alertmanager.yamlC.6.3. Alerts examples
The provided alerting-rules.yaml YAML file provides the following sample alerting rules on Kafka and Zookeeper metrics.
Kafka alerts are:
-
UnderReplicatedPartitions: the under replicated partitions metric gives the number of partitions for which the current broker is the leader replica but the follower replicas are not caught up. This metric provides insights about offline brokers which hosts the follower replicas. This alert is raised when this value is greater than zero, providing the information of the under replicated partitions for each broker. -
AbnormalControllerState: the active controller metric indicate if the current broker is the controller for the cluster. It can just be 0 or 1. During the life of a cluster, only one broker should be the controller and the cluster needs to have always an active controller. Having two or more brokers saying that they are controllers indicates a problem. This alert is raised when the sum of all the values for this metric on all broker is not equals to 1. It means that there is no active controller (the sum is 0) or more than one controller (the sum is greater than 1). -
UnderMinIsrPartitionCount: the Kafka brokermin.insync.replicasallows to specify the minimum number of replicas that have to acknowledge a write operation for successful in order to be in-sync. The under min ISR partition count metric defines the number of partitions that this broker leads for which in-sync replicas count is less than the min in-sync. This alert is raised when this value is greater than zero, providing the information of the under min ISR partition count for each broker. -
OfflineLogDirectoryCount: the offline log directory count metric indicate the number of log directories which are offline (due to an hardware failure for example) so that the broker cannot store incoming messages anymore. This alert is raised when this value is greater than zero, providing the information of the number of offline log directories for each broker. -
KafkaRunningOutOfSpace: the running out of space metric indicates the remaining amount of disk space that can be used for writing Kafka’s data. This alert is raised when this value is lower than 5GiB. It provides information on the disk that is running out of space for each persistent volume claim. NOTE: The availability of this metric and alert is dependent on your version of OpenShift or Kubernetes.
Zookeeper alerts are:
-
AvgRequestLatency: the average request latency metric indicates the amount of time it takes for the server to respond to a client request. This alert is raised when this value is greater than 10 (ticks), providing the actual value of the average request latency for each server. -
OutstandingRequests: the outstanding requests metric indicates the number of queued requests in the server. This value goes up when the server receives more requests than it can process. This alert is raised when this value is greater than 10 (ticks), providing the actual number of outstanding requests for each server. -
ZookeeperRunningOutOfSpace: the running out of space metric indicates the remaining amount of disk space that can be used for writing data to Zookeeper. This alert is raised when this value is lower than 5GiB. It provides information on the disk that is running out of space for each persistent volume claim. Note: The availability of this metric and alert is dependent on your version of OpenShift or Kubernetes.
Appendix D: Custom Resource API Reference
D.1. Kafka schema reference
| Field | Description |
|---|---|
spec |
The specification of the Kafka and Zookeeper clusters, and Topic Operator. |
D.2. KafkaSpec schema reference
Used in: Kafka
| Field | Description |
|---|---|
kafka |
Configuration of the Kafka cluster. |
zookeeper |
Configuration of the Zookeeper cluster. |
topicOperator |
Configuration of the Topic Operator. |
entityOperator |
Configuration of the Entity Operator. |
clusterCa |
Configuration of the cluster certificate authority. |
clientsCa |
Configuration of the clients certificate authority. |
maintenanceTimeWindows |
A list of time windows for the maintenance tasks (that is, certificates renewal). Each time window is defined by a cron expression. |
string array |
D.3. KafkaClusterSpec schema reference
Used in: KafkaSpec
| Field | Description |
|---|---|
replicas |
The number of pods in the cluster. |
integer |
|
image |
The docker image for the pods. The default value depends on the configured |
string |
|
storage |
Storage configuration (disk). Cannot be updated. The type depends on the value of the |
listeners |
Configures listeners of Kafka brokers. |
authorization |
Authorization configuration for Kafka brokers. The type depends on the value of the |
config |
The kafka broker config. Properties with the following prefixes cannot be set: listeners, advertised., broker., listener., host.name, port, inter.broker.listener.name, sasl., ssl., security., password., principal.builder.class, log.dir, zookeeper.connect, zookeeper.set.acl, authorizer., super.user. |
map |
|
rack |
Configuration of the |
brokerRackInitImage |
The image of the init container used for initializing the |
string |
|
affinity |
Pod affinity rules.See external documentation of core/v1 affinity. |
tolerations |
Pod’s tolerations.See external documentation of core/v1 tolerations. |
Toleration array |
|
livenessProbe |
Pod liveness checking. |
readinessProbe |
Pod readiness checking. |
jvmOptions |
JVM Options for pods. |
resources |
Resource constraints (limits and requests). |
metrics |
The Prometheus JMX Exporter configuration. See https://github.com/prometheus/jmx_exporter for details of the structure of this configuration. |
map |
|
logging |
Logging configuration for Kafka. The type depends on the value of the |
tlsSidecar |
TLS sidecar configuration. |
template |
Template for Kafka cluster resources. The template allows users to specify how are the |
version |
The kafka broker version. Defaults to 2.1.0. Consult the user documentation to understand the process required to upgrade or downgrade the version. |
string |
D.4. EphemeralStorage schema reference
Used in: JbodStorage, KafkaClusterSpec, ZookeeperClusterSpec
The type property is a discriminator that distinguishes the use of the type EphemeralStorage from PersistentClaimStorage.
It must have the value ephemeral for the type EphemeralStorage.
| Field | Description |
|---|---|
id |
Storage identification number. It is mandatory only for storage volumes defined in a storage of type 'jbod'. |
integer |
|
type |
Must be |
string |
D.5. PersistentClaimStorage schema reference
Used in: JbodStorage, KafkaClusterSpec, ZookeeperClusterSpec
The type property is a discriminator that distinguishes the use of the type PersistentClaimStorage from EphemeralStorage.
It must have the value persistent-claim for the type PersistentClaimStorage.
| Field | Description |
|---|---|
type |
Must be |
string |
|
size |
When type=persistent-claim, defines the size of the persistent volume claim (i.e 1Gi). Mandatory when type=persistent-claim. |
string |
|
selector |
Specifies a specific persistent volume to use. It contains key:value pairs representing labels for selecting such a volume. |
map |
|
deleteClaim |
Specifies if the persistent volume claim has to be deleted when the cluster is un-deployed. |
boolean |
|
class |
The storage class to use for dynamic volume allocation. |
string |
|
id |
Storage identification number. It is mandatory only for storage volumes defined in a storage of type 'jbod'. |
integer |
D.6. JbodStorage schema reference
Used in: KafkaClusterSpec
The type property is a discriminator that distinguishes the use of the type JbodStorage from EphemeralStorage, PersistentClaimStorage.
It must have the value jbod for the type JbodStorage.
| Field | Description |
|---|---|
type |
Must be |
string |
|
volumes |
List of volumes as Storage objects representing the JBOD disks array. |
D.7. KafkaListeners schema reference
Used in: KafkaClusterSpec
| Field | Description |
|---|---|
plain |
Configures plain listener on port 9092. |
tls |
Configures TLS listener on port 9093. |
external |
Configures external listener on port 9094. The type depends on the value of the |
|
D.8. KafkaListenerPlain schema reference
Used in: KafkaListeners
| Field | Description |
|---|---|
authentication |
Authentication configuration for this listener. Since this listener does not use TLS transport you cannot configure an authentication with |
|
|
networkPolicyPeers |
List of peers which should be able to connect to this listener. Peers in this list are combined using a logical OR operation. If this field is empty or missing, all connections will be allowed for this listener. If this field is present and contains at least one item, the listener only allows the traffic which matches at least one item in this list.See external documentation of networking/v1 networkpolicypeer. |
NetworkPolicyPeer array |
D.9. KafkaListenerAuthenticationTls schema reference
Used in: KafkaListenerExternalLoadBalancer, KafkaListenerExternalNodePort, KafkaListenerExternalRoute, KafkaListenerPlain, KafkaListenerTls
The type property is a discriminator that distinguishes the use of the type KafkaListenerAuthenticationTls from KafkaListenerAuthenticationScramSha512.
It must have the value tls for the type KafkaListenerAuthenticationTls.
| Field | Description |
|---|---|
type |
Must be |
string |
D.10. KafkaListenerAuthenticationScramSha512 schema reference
Used in: KafkaListenerExternalLoadBalancer, KafkaListenerExternalNodePort, KafkaListenerExternalRoute, KafkaListenerPlain, KafkaListenerTls
The type property is a discriminator that distinguishes the use of the type KafkaListenerAuthenticationScramSha512 from KafkaListenerAuthenticationTls.
It must have the value scram-sha-512 for the type KafkaListenerAuthenticationScramSha512.
| Field | Description |
|---|---|
type |
Must be |
string |
D.11. KafkaListenerTls schema reference
Used in: KafkaListeners
| Field | Description |
|---|---|
authentication |
Authentication configuration for this listener. The type depends on the value of the |
|
|
networkPolicyPeers |
List of peers which should be able to connect to this listener. Peers in this list are combined using a logical OR operation. If this field is empty or missing, all connections will be allowed for this listener. If this field is present and contains at least one item, the listener only allows the traffic which matches at least one item in this list.See external documentation of networking/v1 networkpolicypeer. |
NetworkPolicyPeer array |
D.12. KafkaListenerExternalRoute schema reference
Used in: KafkaListeners
The type property is a discriminator that distinguishes the use of the type KafkaListenerExternalRoute from KafkaListenerExternalLoadBalancer, KafkaListenerExternalNodePort.
It must have the value route for the type KafkaListenerExternalRoute.
| Field | Description |
|---|---|
type |
Must be |
string |
|
authentication |
Authentication configuration for Kafka brokers. The type depends on the value of the |
|
|
networkPolicyPeers |
List of peers which should be able to connect to this listener. Peers in this list are combined using a logical OR operation. If this field is empty or missing, all connections will be allowed for this listener. If this field is present and contains at least one item, the listener only allows the traffic which matches at least one item in this list.See external documentation of networking/v1 networkpolicypeer. |
NetworkPolicyPeer array |
|
overrides |
Overrides for external bootstrap and broker services and externally advertised addresses. |
D.13. RouteListenerOverride schema reference
Used in: KafkaListenerExternalRoute
| Field | Description |
|---|---|
bootstrap |
External bootstrap service configuration. |
brokers |
External broker services configuration. |
D.14. RouteListenerBootstrapOverride schema reference
Used in: RouteListenerOverride
| Field | Description |
|---|---|
address |
Additional address name for the bootstrap service. The address will be added to the list of subject alternative names of the TLS certificates. |
string |
|
host |
Host for the bootstrap route. This field will be used in the |
string |
D.15. RouteListenerBrokerOverride schema reference
Used in: RouteListenerOverride
| Field | Description |
|---|---|
broker |
Id of the kafka broker (broker identifier). |
integer |
|
advertisedHost |
The host name which will be used in the brokers' |
string |
|
advertisedPort |
The port number which will be used in the brokers' |
integer |
|
host |
Host for the broker route. This field will be used in the |
string |
D.16. KafkaListenerExternalLoadBalancer schema reference
Used in: KafkaListeners
The type property is a discriminator that distinguishes the use of the type KafkaListenerExternalLoadBalancer from KafkaListenerExternalRoute, KafkaListenerExternalNodePort.
It must have the value loadbalancer for the type KafkaListenerExternalLoadBalancer.
| Field | Description |
|---|---|
type |
Must be |
string |
|
authentication |
Authentication configuration for Kafka brokers. The type depends on the value of the |
|
|
networkPolicyPeers |
List of peers which should be able to connect to this listener. Peers in this list are combined using a logical OR operation. If this field is empty or missing, all connections will be allowed for this listener. If this field is present and contains at least one item, the listener only allows the traffic which matches at least one item in this list.See external documentation of networking/v1 networkpolicypeer. |
NetworkPolicyPeer array |
|
overrides |
Overrides for external bootstrap and broker services and externally advertised addresses. |
tls |
Enables TLS encryption on the listener. By default set to |
boolean |
D.17. LoadBalancerListenerOverride schema reference
Used in: KafkaListenerExternalLoadBalancer
| Field | Description |
|---|---|
bootstrap |
External bootstrap service configuration. |
brokers |
External broker services configuration. |
D.18. LoadBalancerListenerBootstrapOverride schema reference
Used in: LoadBalancerListenerOverride
| Field | Description |
|---|---|
address |
Additional address name for the bootstrap service. The address will be added to the list of subject alternative names of the TLS certificates. |
string |
D.19. LoadBalancerListenerBrokerOverride schema reference
Used in: LoadBalancerListenerOverride
| Field | Description |
|---|---|
broker |
Id of the kafka broker (broker identifier). |
integer |
|
advertisedHost |
The host name which will be used in the brokers' |
string |
|
advertisedPort |
The port number which will be used in the brokers' |
integer |
D.20. KafkaListenerExternalNodePort schema reference
Used in: KafkaListeners
The type property is a discriminator that distinguishes the use of the type KafkaListenerExternalNodePort from KafkaListenerExternalRoute, KafkaListenerExternalLoadBalancer.
It must have the value nodeport for the type KafkaListenerExternalNodePort.
| Field | Description |
|---|---|
type |
Must be |
string |
|
authentication |
Authentication configuration for Kafka brokers. The type depends on the value of the |
|
|
networkPolicyPeers |
List of peers which should be able to connect to this listener. Peers in this list are combined using a logical OR operation. If this field is empty or missing, all connections will be allowed for this listener. If this field is present and contains at least one item, the listener only allows the traffic which matches at least one item in this list.See external documentation of networking/v1 networkpolicypeer. |
NetworkPolicyPeer array |
|
overrides |
Overrides for external bootstrap and broker services and externally advertised addresses. |
tls |
Enables TLS encryption on the listener. By default set to |
boolean |
D.21. NodePortListenerOverride schema reference
Used in: KafkaListenerExternalNodePort
| Field | Description |
|---|---|
bootstrap |
External bootstrap service configuration. |
brokers |
External broker services configuration. |
D.22. NodePortListenerBootstrapOverride schema reference
Used in: NodePortListenerOverride
| Field | Description |
|---|---|
address |
Additional address name for the bootstrap service. The address will be added to the list of subject alternative names of the TLS certificates. |
string |
|
nodePort |
Node port for the bootstrap service. |
integer |
D.23. NodePortListenerBrokerOverride schema reference
Used in: NodePortListenerOverride
| Field | Description |
|---|---|
broker |
Id of the kafka broker (broker identifier). |
integer |
|
advertisedHost |
The host name which will be used in the brokers' |
string |
|
advertisedPort |
The port number which will be used in the brokers' |
integer |
|
nodePort |
Node port for the broker service. |
integer |
D.24. KafkaAuthorizationSimple schema reference
Used in: KafkaClusterSpec
The type property is a discriminator that distinguishes the use of the type KafkaAuthorizationSimple from other subtypes which may be added in the future.
It must have the value simple for the type KafkaAuthorizationSimple.
| Field | Description |
|---|---|
type |
Must be |
string |
|
superUsers |
List of super users. Should contain list of user principals which should get unlimited access rights. |
string array |
D.25. Rack schema reference
Used in: KafkaClusterSpec
| Field | Description |
|---|---|
topologyKey |
A key that matches labels assigned to the OpenShift or Kubernetes cluster nodes. The value of the label is used to set the broker’s |
string |
D.26. Probe schema reference
| Field | Description |
|---|---|
initialDelaySeconds |
The initial delay before first the health is first checked. |
integer |
|
timeoutSeconds |
The timeout for each attempted health check. |
integer |
D.27. JvmOptions schema reference
Used in: KafkaClusterSpec, KafkaConnectS2ISpec, KafkaConnectSpec, KafkaMirrorMakerSpec, ZookeeperClusterSpec
| Field | Description |
|---|---|
-XX |
A map of -XX options to the JVM. |
map |
|
-Xms |
-Xms option to to the JVM. |
string |
|
-Xmx |
-Xmx option to to the JVM. |
string |
|
gcLoggingEnabled |
Specifies whether the Garbage Collection logging is enabled. The default is true. |
boolean |
D.28. Resources schema reference
Used in: EntityTopicOperatorSpec, EntityUserOperatorSpec, KafkaClusterSpec, KafkaConnectS2ISpec, KafkaConnectSpec, KafkaMirrorMakerSpec, TlsSidecar, TopicOperatorSpec, ZookeeperClusterSpec
| Field | Description |
|---|---|
limits |
Resource limits applied at runtime. |
requests |
Resource requests applied during pod scheduling. |
D.29. CpuMemory schema reference
Used in: Resources
| Field | Description |
|---|---|
cpu |
CPU. |
string |
|
memory |
Memory. |
string |
D.30. InlineLogging schema reference
Used in: EntityTopicOperatorSpec, EntityUserOperatorSpec, KafkaClusterSpec, KafkaConnectS2ISpec, KafkaConnectSpec, KafkaMirrorMakerSpec, TopicOperatorSpec, ZookeeperClusterSpec
The type property is a discriminator that distinguishes the use of the type InlineLogging from ExternalLogging.
It must have the value inline for the type InlineLogging.
| Field | Description |
|---|---|
type |
Must be |
string |
|
loggers |
A Map from logger name to logger level. |
map |
D.31. ExternalLogging schema reference
Used in: EntityTopicOperatorSpec, EntityUserOperatorSpec, KafkaClusterSpec, KafkaConnectS2ISpec, KafkaConnectSpec, KafkaMirrorMakerSpec, TopicOperatorSpec, ZookeeperClusterSpec
The type property is a discriminator that distinguishes the use of the type ExternalLogging from InlineLogging.
It must have the value external for the type ExternalLogging.
| Field | Description |
|---|---|
type |
Must be |
string |
|
name |
The name of the |
string |
D.32. TlsSidecar schema reference
| Field | Description |
|---|---|
image |
The docker image for the container. |
string |
|
livenessProbe |
Pod liveness checking. |
logLevel |
The log level for the TLS sidecar. Default value is |
string (one of [emerg, debug, crit, err, alert, warning, notice, info]) |
|
readinessProbe |
Pod readiness checking. |
resources |
Resource constraints (limits and requests). |
D.33. KafkaClusterTemplate schema reference
Used in: KafkaClusterSpec
| Field | Description |
|---|---|
statefulset |
Template for Kafka |
pod |
Template for Kafka |
bootstrapService |
Template for Kafka bootstrap |
brokersService |
Template for Kafka broker |
externalBootstrapRoute |
Template for Kafka external bootstrap |
externalBootstrapService |
Template for Kafka external bootstrap |
perPodRoute |
Template for Kafka per-pod |
perPodService |
Template for Kafka per-pod |
podDisruptionBudget |
Template for Kafka |
D.34. ResourceTemplate schema reference
Used in: EntityOperatorTemplate, KafkaClusterTemplate, KafkaConnectTemplate, KafkaMirrorMakerTemplate, ZookeeperClusterTemplate
| Field | Description |
|---|---|
metadata |
Metadata which should be applied to the resource. |
D.35. MetadataTemplate schema reference
| Field | Description |
|---|---|
labels |
Labels which should be added to the resource template. Can be applied to different resources such as |
map |
|
annotations |
Annotations which should be added to the resource template. Can be applied to different resources such as |
map |
D.36. PodTemplate schema reference
Used in: EntityOperatorTemplate, KafkaClusterTemplate, KafkaConnectTemplate, KafkaMirrorMakerTemplate, ZookeeperClusterTemplate
| Field | Description |
|---|---|
metadata |
Metadata which should be applied to the resource. |
imagePullSecrets |
List of references to secrets in the same namespace to use for pulling any of the images used by this Pod.See external documentation of core/v1 localobjectreference. |
LocalObjectReference array |
|
securityContext |
Configures pod-level security attributes and common container settings.See external documentation of core/v1 podsecuritycontext. |
terminationGracePeriodSeconds |
The grace period is the duration in seconds after the processes running in the pod are sent a termination signal and the time when the processes are forcibly halted with a kill signal. Set this value longer than the expected cleanup time for your process.Value must be non-negative integer. The value zero indicates delete immediately. Defaults to 30 seconds. |
integer |
D.37. PodDisruptionBudgetTemplate schema reference
Used in: KafkaClusterTemplate, KafkaConnectTemplate, KafkaMirrorMakerTemplate, ZookeeperClusterTemplate
| Field | Description |
|---|---|
metadata |
Metadata which should be applied to the |
maxUnavailable |
Maximum number of unavailable pods to allow voluntary Pod eviction. A Pod eviction will only be allowed when "maxUnavailable" or fewer pods are unavailable after the eviction. Setting this value to 0 will prevent all voluntary evictions and the pods will need to be evicted manually. Defaults to 1. |
integer |
D.38. ZookeeperClusterSpec schema reference
Used in: KafkaSpec
| Field | Description |
|---|---|
replicas |
The number of pods in the cluster. |
integer |
|
image |
The docker image for the pods. |
string |
|
storage |
Storage configuration (disk). Cannot be updated. The type depends on the value of the |
config |
The zookeeper broker config. Properties with the following prefixes cannot be set: server., dataDir, dataLogDir, clientPort, authProvider, quorum.auth, requireClientAuthScheme. |
map |
|
affinity |
Pod affinity rules.See external documentation of core/v1 affinity. |
tolerations |
Pod’s tolerations.See external documentation of core/v1 tolerations. |
Toleration array |
|
livenessProbe |
Pod liveness checking. |
readinessProbe |
Pod readiness checking. |
jvmOptions |
JVM Options for pods. |
resources |
Resource constraints (limits and requests). |
metrics |
The Prometheus JMX Exporter configuration. See https://github.com/prometheus/jmx_exporter for details of the structure of this configuration. |
map |
|
logging |
Logging configuration for Zookeeper. The type depends on the value of the |
tlsSidecar |
TLS sidecar configuration. |
template |
Template for Zookeeper cluster resources. The template allows users to specify how are the |
D.39. ZookeeperClusterTemplate schema reference
Used in: ZookeeperClusterSpec
| Field | Description |
|---|---|
statefulset |
Template for Zookeeper |
pod |
Template for Zookeeper |
clientService |
Template for Zookeeper client |
nodesService |
Template for Zookeeper nodes |
podDisruptionBudget |
Template for Zookeeper |
D.40. TopicOperatorSpec schema reference
Used in: KafkaSpec
| Field | Description |
|---|---|
watchedNamespace |
The namespace the Topic Operator should watch. |
string |
|
image |
The image to use for the Topic Operator. |
string |
|
reconciliationIntervalSeconds |
Interval between periodic reconciliations. |
integer |
|
zookeeperSessionTimeoutSeconds |
Timeout for the Zookeeper session. |
integer |
|
affinity |
Pod affinity rules.See external documentation of core/v1 affinity. |
resources |
Resource constraints (limits and requests). |
topicMetadataMaxAttempts |
The number of attempts at getting topic metadata. |
integer |
|
tlsSidecar |
TLS sidecar configuration. |
logging |
Logging configuration. The type depends on the value of the |
jvmOptions |
JVM Options for pods. |
D.41. EntityOperatorJvmOptions schema reference
| Field | Description |
|---|---|
gcLoggingEnabled |
Specifies whether the Garbage Collection logging is enabled. The default is true. |
boolean |
D.42. EntityOperatorSpec schema reference
Used in: KafkaSpec
| Field | Description |
|---|---|
topicOperator |
Configuration of the Topic Operator. |
userOperator |
Configuration of the User Operator. |
affinity |
Pod affinity rules.See external documentation of core/v1 affinity. |
tolerations |
Pod’s tolerations.See external documentation of core/v1 tolerations. |
Toleration array |
|
tlsSidecar |
TLS sidecar configuration. |
template |
Template for Entity Operator resources. The template allows users to specify how is the |
D.43. EntityTopicOperatorSpec schema reference
Used in: EntityOperatorSpec
| Field | Description |
|---|---|
watchedNamespace |
The namespace the Topic Operator should watch. |
string |
|
image |
The image to use for the Topic Operator. |
string |
|
reconciliationIntervalSeconds |
Interval between periodic reconciliations. |
integer |
|
zookeeperSessionTimeoutSeconds |
Timeout for the Zookeeper session. |
integer |
|
resources |
Resource constraints (limits and requests). |
topicMetadataMaxAttempts |
The number of attempts at getting topic metadata. |
integer |
|
logging |
Logging configuration. The type depends on the value of the |
jvmOptions |
JVM Options for pods. |
D.44. EntityUserOperatorSpec schema reference
Used in: EntityOperatorSpec
| Field | Description |
|---|---|
watchedNamespace |
The namespace the User Operator should watch. |
string |
|
image |
The image to use for the User Operator. |
string |
|
reconciliationIntervalSeconds |
Interval between periodic reconciliations. |
integer |
|
zookeeperSessionTimeoutSeconds |
Timeout for the Zookeeper session. |
integer |
|
resources |
Resource constraints (limits and requests). |
logging |
Logging configuration. The type depends on the value of the |
jvmOptions |
JVM Options for pods. |
D.45. EntityOperatorTemplate schema reference
Used in: EntityOperatorSpec
| Field | Description |
|---|---|
deployment |
Template for Entity Operator |
pod |
Template for Entity Operator |
D.46. CertificateAuthority schema reference
Used in: KafkaSpec
Configuration of how TLS certificates are used within the cluster. This applies to certificates used for both internal communication within the cluster and to certificates used for client access via Kafka.spec.kafka.listeners.tls.
| Field | Description |
|---|---|
generateCertificateAuthority |
If true then Certificate Authority certificates will be generated automatically. Otherwise the user will need to provide a Secret with the CA certificate. Default is true. |
boolean |
|
validityDays |
The number of days generated certificates should be valid for. The default is 365. |
integer |
|
renewalDays |
The number of days in the certificate renewal period. This is the number of days before the a certificate expires during which renewal actions may be performed. When |
integer |
|
certificateExpirationPolicy |
How should CA certificate expiration be handled when |
string (one of [replace-key, renew-certificate]) |
D.47. KafkaConnect schema reference
| Field | Description |
|---|---|
spec |
The specification of the Kafka Connect deployment. |
D.48. KafkaConnectSpec schema reference
Used in: KafkaConnect
| Field | Description |
|---|---|
replicas |
The number of pods in the Kafka Connect group. |
integer |
|
image |
The docker image for the pods. |
string |
|
livenessProbe |
Pod liveness checking. |
readinessProbe |
Pod readiness checking. |
jvmOptions |
JVM Options for pods. |
affinity |
Pod affinity rules.See external documentation of core/v1 affinity. |
tolerations |
Pod’s tolerations.See external documentation of core/v1 tolerations. |
Toleration array |
|
logging |
Logging configuration for Kafka Connect. The type depends on the value of the |
metrics |
The Prometheus JMX Exporter configuration. See https://github.com/prometheus/jmx_exporter for details of the structure of this configuration. |
map |
|
template |
Template for Kafka Connect and Kafka Connect S2I resources. The template allows users to specify how is the |
authentication |
Authentication configuration for Kafka Connect. The type depends on the value of the |
|
|
bootstrapServers |
Bootstrap servers to connect to. This should be given as a comma separated list of <hostname>:<port> pairs. |
string |
|
config |
The Kafka Connect configuration. Properties with the following prefixes cannot be set: ssl., sasl., security., listeners, plugin.path, rest., bootstrap.servers. |
map |
|
externalConfiguration |
Pass data from Secrets or ConfigMaps to the Kafka Connect pods and use them to configure connectors. |
resources |
Resource constraints (limits and requests). |
tls |
TLS configuration. |
version |
The Kafka Connect version. Defaults to 2.1.0. Consult the user documentation to understand the process required to upgrade or downgrade the version. |
string |
D.49. KafkaConnectTemplate schema reference
Used in: KafkaConnectS2ISpec, KafkaConnectSpec
| Field | Description |
|---|---|
deployment |
Template for Kafka Connect |
pod |
Template for Kafka Connect |
apiService |
Template for Kafka Connect API |
podDisruptionBudget |
Template for Kafka Connect |
D.50. KafkaConnectAuthenticationTls schema reference
Used in: KafkaConnectS2ISpec, KafkaConnectSpec
The type property is a discriminator that distinguishes the use of the type KafkaConnectAuthenticationTls from KafkaConnectAuthenticationScramSha512.
It must have the value tls for the type KafkaConnectAuthenticationTls.
| Field | Description |
|---|---|
certificateAndKey |
Certificate and private key pair for TLS authentication. |
type |
Must be |
string |
D.51. CertAndKeySecretSource schema reference
| Field | Description |
|---|---|
certificate |
The name of the file certificate in the Secret. |
string |
|
key |
The name of the private key in the Secret. |
string |
|
secretName |
The name of the Secret containing the certificate. |
string |
D.52. KafkaConnectAuthenticationScramSha512 schema reference
Used in: KafkaConnectS2ISpec, KafkaConnectSpec
The type property is a discriminator that distinguishes the use of the type KafkaConnectAuthenticationScramSha512 from KafkaConnectAuthenticationTls.
It must have the value scram-sha-512 for the type KafkaConnectAuthenticationScramSha512.
| Field | Description |
|---|---|
passwordSecret |
Password used for the authentication. |
type |
Must be |
string |
|
username |
Username used for the authentication. |
string |
D.53. PasswordSecretSource schema reference
| Field | Description |
|---|---|
password |
The name of the key in the Secret under which the password is stored. |
string |
|
secretName |
The name of the Secret containing the password. |
string |
D.54. ExternalConfiguration schema reference
Used in: KafkaConnectS2ISpec, KafkaConnectSpec
| Field | Description |
|---|---|
env |
Allows to pass data from Secret or ConfigMap to the Kafka Connect pods as environment variables. |
|
|
volumes |
Allows to pass data from Secret or ConfigMap to the Kafka Connect pods as volumes. |
D.55. ExternalConfigurationEnv schema reference
Used in: ExternalConfiguration
| Field | Description |
|---|---|
name |
Name of the environment variable which will be passed to the Kafka Connect pods. The name of the environment variable cannot start with |
string |
|
valueFrom |
Value of the environment variable which will be passed to the Kafka Connect pods. It can be passed either as a reference to Secret or ConfigMap field. The field has to specify exactly one Secret or ConfigMap. |
D.56. ExternalConfigurationEnvVarSource schema reference
Used in: ExternalConfigurationEnv
| Field | Description |
|---|---|
configMapKeyRef |
Refernce to a key in a ConfigMap.See external documentation of core/v1 ConfigMapKeySelector. |
secretKeyRef |
Reference to a key in a Secret.See external documentation of core/v1 SecretKeySelector. |
D.57. ExternalConfigurationVolumeSource schema reference
Used in: ExternalConfiguration
| Field | Description |
|---|---|
configMap |
Reference to a key in a ConfigMap. Exactly one Secret or ConfigMap has to be specified.See external documentation of core/v1 ConfigMapVolumeSource. |
name |
Name of the volume which will be added to the Kafka Connect pods. |
string |
|
secret |
Reference to a key in a Secret. Exactly one Secret or ConfigMap has to be specified.See external documentation of core/v1 SecretVolumeSource. |
D.58. KafkaConnectTls schema reference
Used in: KafkaConnectS2ISpec, KafkaConnectSpec
| Field | Description |
|---|---|
trustedCertificates |
Trusted certificates for TLS connection. |
|
D.59. CertSecretSource schema reference
Used in: KafkaConnectTls, KafkaMirrorMakerTls
| Field | Description |
|---|---|
certificate |
The name of the file certificate in the Secret. |
string |
|
secretName |
The name of the Secret containing the certificate. |
string |
D.60. KafkaConnectS2I schema reference
| Field | Description |
|---|---|
spec |
The specification of the Kafka Connect deployment. |
D.61. KafkaConnectS2ISpec schema reference
Used in: KafkaConnectS2I
| Field | Description |
|---|---|
replicas |
The number of pods in the Kafka Connect group. |
integer |
|
image |
The docker image for the pods. |
string |
|
livenessProbe |
Pod liveness checking. |
readinessProbe |
Pod readiness checking. |
jvmOptions |
JVM Options for pods. |
affinity |
Pod affinity rules.See external documentation of core/v1 affinity. |
logging |
Logging configuration for Kafka Connect. The type depends on the value of the |
metrics |
The Prometheus JMX Exporter configuration. See https://github.com/prometheus/jmx_exporter for details of the structure of this configuration. |
map |
|
template |
Template for Kafka Connect and Kafka Connect S2I resources. The template allows users to specify how is the |
authentication |
Authentication configuration for Kafka Connect. The type depends on the value of the |
|
|
bootstrapServers |
Bootstrap servers to connect to. This should be given as a comma separated list of <hostname>:<port> pairs. |
string |
|
config |
The Kafka Connect configuration. Properties with the following prefixes cannot be set: ssl., sasl., security., listeners, plugin.path, rest., bootstrap.servers. |
map |
|
externalConfiguration |
Pass data from Secrets or ConfigMaps to the Kafka Connect pods and use them to configure connectors. |
insecureSourceRepository |
When true this configures the source repository with the 'Local' reference policy and an import policy that accepts insecure source tags. |
boolean |
|
resources |
Resource constraints (limits and requests). |
tls |
TLS configuration. |
tolerations |
Pod’s tolerations.See external documentation of core/v1 tolerations. |
Toleration array |
|
version |
The Kafka Connect version. Defaults to 2.1.0. Consult the user documentation to understand the process required to upgrade or downgrade the version. |
string |
D.62. KafkaTopic schema reference
| Field | Description |
|---|---|
spec |
The specification of the topic. |
D.63. KafkaTopicSpec schema reference
Used in: KafkaTopic
| Field | Description |
|---|---|
partitions |
The number of partitions the topic should have. This cannot be decreased after topic creation. It can be increased after topic creation, but it is important to understand the consequences that has, especially for topics with semantic partitioning. |
integer |
|
replicas |
The number of replicas the topic should have. |
integer |
|
config |
The topic configuration. |
map |
|
topicName |
The name of the topic. When absent this will default to the metadata.name of the topic. It is recommended to not set this unless the topic name is not a valid Kubernetes resource name. |
string |
D.64. KafkaUser schema reference
| Field | Description |
|---|---|
spec |
The specification of the user. |
D.65. KafkaUserSpec schema reference
Used in: KafkaUser
| Field | Description |
|---|---|
authentication |
Authentication mechanism enabled for this Kafka user. The type depends on the value of the |
|
|
authorization |
Authorization rules for this Kafka user. The type depends on the value of the |
D.66. KafkaUserTlsClientAuthentication schema reference
Used in: KafkaUserSpec
The type property is a discriminator that distinguishes the use of the type KafkaUserTlsClientAuthentication from KafkaUserScramSha512ClientAuthentication.
It must have the value tls for the type KafkaUserTlsClientAuthentication.
| Field | Description |
|---|---|
type |
Must be |
string |
D.67. KafkaUserScramSha512ClientAuthentication schema reference
Used in: KafkaUserSpec
The type property is a discriminator that distinguishes the use of the type KafkaUserScramSha512ClientAuthentication from KafkaUserTlsClientAuthentication.
It must have the value scram-sha-512 for the type KafkaUserScramSha512ClientAuthentication.
| Field | Description |
|---|---|
type |
Must be |
string |
D.68. KafkaUserAuthorizationSimple schema reference
Used in: KafkaUserSpec
The type property is a discriminator that distinguishes the use of the type KafkaUserAuthorizationSimple from other subtypes which may be added in the future.
It must have the value simple for the type KafkaUserAuthorizationSimple.
| Field | Description |
|---|---|
type |
Must be |
string |
|
acls |
List of ACL rules which should be applied to this user. |
|
D.69. AclRule schema reference
Used in: KafkaUserAuthorizationSimple
| Field | Description |
|---|---|
host |
The host from which the action described in the ACL rule is allowed or denied. |
string |
|
operation |
Operation which will be allowed or denied. Supported operations are: Read, Write, Create, Delete, Alter, Describe, ClusterAction, AlterConfigs, DescribeConfigs, IdempotentWrite and All. |
string (one of [Read, Write, Delete, Alter, Describe, All, IdempotentWrite, ClusterAction, Create, AlterConfigs, DescribeConfigs]) |
|
resource |
Indicates the resource for which given ACL rule applies. The type depends on the value of the |
|
|
type |
The type of the rule. Currently the only supported type is |
string (one of [allow, deny]) |
D.70. AclRuleTopicResource schema reference
Used in: AclRule
The type property is a discriminator that distinguishes the use of the type AclRuleTopicResource from AclRuleGroupResource, AclRuleClusterResource, AclRuleTransactionalIdResource.
It must have the value topic for the type AclRuleTopicResource.
| Field | Description |
|---|---|
type |
Must be |
string |
|
name |
Name of resource for which given ACL rule applies. Can be combined with |
string |
|
patternType |
Describes the pattern used in the resource field. The supported types are |
string (one of [prefix, literal]) |
D.71. AclRuleGroupResource schema reference
Used in: AclRule
The type property is a discriminator that distinguishes the use of the type AclRuleGroupResource from AclRuleTopicResource, AclRuleClusterResource, AclRuleTransactionalIdResource.
It must have the value group for the type AclRuleGroupResource.
| Field | Description |
|---|---|
type |
Must be |
string |
|
name |
Name of resource for which given ACL rule applies. Can be combined with |
string |
|
patternType |
Describes the pattern used in the resource field. The supported types are |
string (one of [prefix, literal]) |
D.72. AclRuleClusterResource schema reference
Used in: AclRule
The type property is a discriminator that distinguishes the use of the type AclRuleClusterResource from AclRuleTopicResource, AclRuleGroupResource, AclRuleTransactionalIdResource.
It must have the value cluster for the type AclRuleClusterResource.
| Field | Description |
|---|---|
type |
Must be |
string |
D.73. AclRuleTransactionalIdResource schema reference
Used in: AclRule
The type property is a discriminator that distinguishes the use of the type AclRuleTransactionalIdResource from AclRuleTopicResource, AclRuleGroupResource, AclRuleClusterResource.
It must have the value transactionalId for the type AclRuleTransactionalIdResource.
| Field | Description |
|---|---|
type |
Must be |
string |
|
name |
Name of resource for which given ACL rule applies. Can be combined with |
string |
|
patternType |
Describes the pattern used in the resource field. The supported types are |
string (one of [prefix, literal]) |
D.74. KafkaMirrorMaker schema reference
| Field | Description |
|---|---|
spec |
The specification of the mirror maker. |
D.75. KafkaMirrorMakerSpec schema reference
Used in: KafkaMirrorMaker
| Field | Description |
|---|---|
replicas |
The number of pods in the |
integer |
|
image |
The docker image for the pods. |
string |
|
whitelist |
List of topics which are included for mirroring. This option allows any regular expression using Java-style regular expressions. Mirroring two topics named A and B can be achieved by using the whitelist |
string |
|
consumer |
Configuration of source cluster. |
producer |
Configuration of target cluster. |
resources |
Resource constraints (limits and requests). |
affinity |
Pod affinity rules.See external documentation of core/v1 affinity. |
tolerations |
Pod’s tolerations.See external documentation of core/v1 tolerations. |
Toleration array |
|
jvmOptions |
JVM Options for pods. |
logging |
Logging configuration for Mirror Maker. The type depends on the value of the |
metrics |
The Prometheus JMX Exporter configuration. See JMX Exporter documentation for details of the structure of this configuration. |
map |
|
template |
Template for Kafka Mirror Maker resources. The template allows users to specify how is the |
version |
The Kafka Mirror Maker version. Defaults to 2.1.0. Consult the user documentation to understand the process required to upgrade or downgrade the version. |
string |
D.76. KafkaMirrorMakerConsumerSpec schema reference
Used in: KafkaMirrorMakerSpec
| Field | Description |
|---|---|
numStreams |
Specifies the number of consumer stream threads to create. |
integer |
|
groupId |
A unique string that identifies the consumer group this consumer belongs to. |
string |
|
bootstrapServers |
A list of host:port pairs to use for establishing the initial connection to the Kafka cluster. |
string |
|
authentication |
Authentication configuration for connecting to the cluster. The type depends on the value of the |
|
|
config |
The mirror maker consumer config. Properties with the following prefixes cannot be set: ssl., bootstrap.servers, group.id, sasl., security. |
map |
|
tls |
TLS configuration for connecting to the cluster. |
D.77. KafkaMirrorMakerAuthenticationTls schema reference
The type property is a discriminator that distinguishes the use of the type KafkaMirrorMakerAuthenticationTls from KafkaMirrorMakerAuthenticationScramSha512.
It must have the value tls for the type KafkaMirrorMakerAuthenticationTls.
| Field | Description |
|---|---|
certificateAndKey |
Reference to the |
type |
Must be |
string |
D.78. KafkaMirrorMakerAuthenticationScramSha512 schema reference
The type property is a discriminator that distinguishes the use of the type KafkaMirrorMakerAuthenticationScramSha512 from KafkaMirrorMakerAuthenticationTls.
It must have the value scram-sha-512 for the type KafkaMirrorMakerAuthenticationScramSha512.
| Field | Description |
|---|---|
passwordSecret |
Reference to the |
type |
Must be |
string |
|
username |
Username used for the authentication. |
string |
D.79. KafkaMirrorMakerTls schema reference
| Field | Description |
|---|---|
trustedCertificates |
Trusted certificates for TLS connection. |
|
D.80. KafkaMirrorMakerProducerSpec schema reference
Used in: KafkaMirrorMakerSpec
| Field | Description |
|---|---|
bootstrapServers |
A list of host:port pairs to use for establishing the initial connection to the Kafka cluster. |
string |
|
authentication |
Authentication configuration for connecting to the cluster. The type depends on the value of the |
|
|
config |
The mirror maker producer config. Properties with the following prefixes cannot be set: ssl., bootstrap.servers, sasl., security. |
map |
|
tls |
TLS configuration for connecting to the cluster. |
D.81. KafkaMirrorMakerTemplate schema reference
Used in: KafkaMirrorMakerSpec
| Field | Description |
|---|---|
deployment |
Template for Kafka Mirror Maker |
pod |
Template for Kafka Mirror Maker |
podDisruptionBudget |
Template for Kafka Mirror Maker |