strimzi.io/type: kafka
strimzi.io/kind: clusterStrimzi Documentation (0.2.0)
Strimzi Documentation (0.2.0)
Strimzi provides a way to run an Apache Kafka cluster on Kubernetes or OpenShift in various deployment configurations. This guide describes how to install and use Strimzi.
Content
- 1. Overview
- 2. Getting started
- 3. Cluster Controller
- 4. Topic Controller
- Appendix A: Frequently Asked Questions
- Appendix B: Installing Kubernetes and OpenShift cluster
1. Overview
Apache Kafka is a popular platform for streaming data delivery and processing. For more details about Apache Kafka itself visit Apache Kafka website. The aim of Strimzi is to make it easy to run Apache Kafka on Kubernetes and OpenShift.
Strimzi consists of two main components:
- Cluster Controller
-
Responsible for deploying and managing Apache Kafka clusters within a Kubernetes or OpenShift cluster
- Topic Controller
-
Responsible for managing Kafka topics within a Kafka cluster running within Kubernetes or OpenShift
2. Getting started
2.1. Prerequisites
A Kubernetes or OpenShift cluster is required to deploy Strimzi. Strimzi supports all kinds of clusters - from public and
private clouds down to local deployments intended for development purposes. This guide expects that a Kubernetes or
OpenShift cluster is available and the kubectl or oc command line tools are installed and configured to connect
to the running cluster.
When no existing Kubernetes or OpenShift cluster is available, Minikube or Minishift can be used to create a local
cluster. More details can be found in Appendix B, Installing Kubernetes and OpenShift cluster
In order to execute the commands in this guide, your Kubernetes/OpenShift user needs to have the rights to create and manage RBAC resources (Roles and Role Bindings).
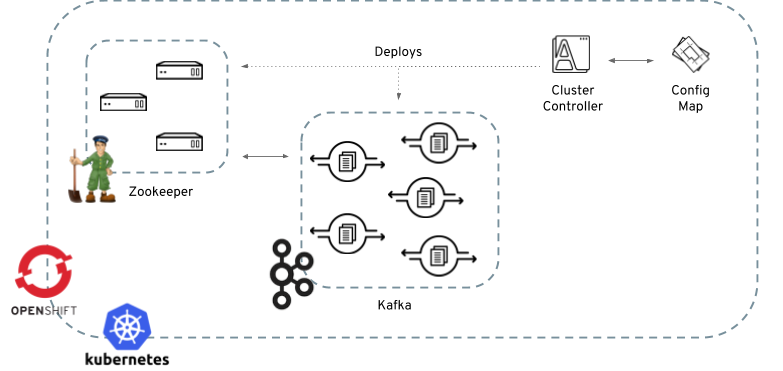
2.2. Cluster Controller
Strimzi uses a component called the Cluster Controller to deploy and manage Kafka (including Zookeeper) and Kafka Connect clusters. The Cluster Controller is deployed as a process running inside your Kubernetes or OpenShift cluster. To deploy a Kafka cluster, a ConfigMap with the cluster configuration has to be created. Based on the information in that ConfigMap, the Cluster Controller will deploy a corresponding Kafka cluster. By default, the ConfigMap needs to be labeled with following labels:
and contain the cluster configuration in a specific format. The ConfigMap format is described in Section 3.2, “Format of the cluster ConfigMap”.
Strimzi contains example YAML files which make deploying a Cluster Controller easier.
2.2.1. Deploying to Kubernetes
To deploy the Cluster Controller on Kubernetes, the following command should be executed:
kubectl create -f examples/install/cluster-controllerTo verify whether the Cluster Controller has been deployed successfully, the Kubernetes Dashboard or the following command can be used:
kubectl describe all2.2.2. Deploying to OpenShift
To deploy the Cluster Controller on OpenShift, the following commands should be executed:
oc create -f examples/install/cluster-controller
oc create -f examples/templates/cluster-controller
To verify whether the Cluster Controller has been deployed successfully, the OpenShift console or the following command can be used:
oc describe all2.3. Kafka broker
Strimzi uses StatefulSets feature of Kubernetes/OpenShift to deploy Kafka brokers. With StatefulSets, the pods receive a unique name and network identity and that makes it easier to identify the individual Kafka broker pods and set their identity (broker ID). The deployment uses regular and headless services:
-
regular services can be used as bootstrap servers for Kafka clients
-
headless services are needed to have DNS resolve the pods IP addresses directly
As well as Kafka, Strimzi also installs a Zookeeper cluster and configures the Kafka brokers to connect to it. The Zookeeper cluster also uses StatefulSets.
Strimzi provides two flavors of Kafka broker deployment: ephemeral and persistent.
The ephemeral flavour is suitable only for development and testing purposes and not for production. The
ephemeral flavour uses emptyDir volumes for storing broker information (Zookeeper) and topics/partitions
(Kafka). Using emptyDir volume means that its content is strictly related to the pod life cycle (it is
deleted when the pod goes down). This makes the in-memory deployment well-suited to development and testing because
you don’t have to provide persistent volumes.
The persistent flavour uses PersistentVolumes to store Zookeeper and Kafka data. The PersistentVolume is acquired using a PersistentVolumeClaim – that makes it independent of the actual type of the PersistentVolume. For example, it can use HostPath volumes on Minikube or Amazon EBS volumes in Amazon AWS deployments without any changes in the YAML files. The PersistentVolumeClaim can use a StorageClass to trigger automatic volume provisioning.
To deploy a Kafka cluster, a ConfigMap with the cluster configuration has to be created. By default, the ConfigMap should have the following labels:
strimzi.io/type: kafka
strimzi.io/kind: cluster
Example ConfigMaps and the details about the ConfigMap format are in Section 3.2.1, “Kafka”.
2.3.1. Deploying to Kubernetes
To deploy a Kafka broker on Kubernetes, the corresponding ConfigMap has to be created. To create the ephemeral cluster using the provided example ConfigMap, the following command should be executed:
kubectl apply -f examples/configmaps/cluster-controller/kafka-ephemeral.yamlAnother example ConfigMap is provided for persistent Kafka cluster. To deploy it, the following command should be run:
kubectl apply -f examples/configmaps/cluster-controller/kafka-persistent.yaml2.3.2. Deploying to OpenShift
For OpenShift, the Kafka broker is provided in the form of a template. The cluster can be deployed from the template either using the command line or using the OpenShift console. To create the ephemeral cluster, the following command should be executed:
oc new-app strimzi-ephemeralSimilarly, to deploy a persistent Kafka cluster the following command should be run:
oc new-app strimzi-persistent2.4. Kafka Connect
The Cluster Controller can also deploy a Kafka Connect cluster which
can be used with either of the Kafka broker deployments described above. It is implemented as a Deployment with a
configurable number of workers. The default image currently contains only the Connectors distributed with Apache Kafka
Connect: FileStreamSinkConnector and FileStreamSourceConnector. The REST interface for managing the Kafka Connect
cluster is exposed internally within the Kubernetes/OpenShift cluster as kafka-connect service on port 8083.
Example ConfigMaps and the details about the ConfigMap format for deploying Kafka Connect can be found in Section 3.2.2, “Kafka Connect”.
2.4.1. Deploying to Kubernetes
To deploy Kafka Connect on Kubernetes, the corresponding ConfigMap has to be created. An example ConfigMap can be created using the following command:
kubectl apply -f examples/configmaps/cluster-controller/kafka-connect.yaml2.4.2. Deploying to OpenShift
On OpenShift, Kafka Connect is provided in the form of a template. It can be deployed from the template either using the command line or using the OpenShift console. To create a Kafka Connect cluster from the command line, the following command should be run:
oc new-app strimzi-connect2.4.3. Using Kafka Connect with additional plugins
Strimzi Docker images for Kafka Connect contain, by default, only the FileStreamSinkConnector and
FileStreamSourceConnector connectors which are part of Apache Kafka.
To facilitate deployment with 3rd party connectors, Kafka Connect is configured to automatically load all
plugins/connectors which are present in the /opt/kafka/plugins directory during startup. There are two ways of adding
custom plugins into this directory:
-
Using a custom Docker image
-
Using the OpenShift build system with the Strimzi S2I image
Create a new image based on strimzi/kafka-connect
Strimzi provides its own Docker image for running Kafka Connect which can be found on Docker Hub as
strimzi/kafka-connect. This image could be used as a base image for
building a new custom image with additional plugins. The following steps describe the process for creating such a custom image:
-
Create a new
Dockerfilewhich usesstrimzi/kafka-connectas the base imageFROM strimzi/kafka-connect:latest USER root:root COPY ./my-plugin/ /opt/kafka/plugins/ USER kafka:kafka -
Build the Docker image and upload it to the appropriate Docker repository
-
Use the new Docker image in the Kafka Connect deployment:
-
On OpenShift, the template parameters
IMAGE_REPO_NAME,IMAGE_NAMEandIMAGE_TAGcan be changed to point to the new image when the Kafka Connect cluster is being deployed -
On Kubernetes, the Kafka Connect ConfigMap has to be modified to use the new image
-
Using OpenShift Build and S2I image
OpenShift supports Builds which can be used together with
Source-to-Image (S2I) framework to create
new Docker images. OpenShift Build takes a builder image with S2I support together with source code and/or binaries
provided by the user and uses them to build a new Docker image. The newly created Docker Image will be stored in
OpenShift’s local Docker repository and can then be used in deployments. Strimzi provides a Kafka Connect builder
image strimzi/kafka-connect-s2i with such S2I support. It takes user-provided
binaries (with plugins and connectors) and creates a new Kafka Connect image. This enhanced Kafka Connect image can be
used with our Kafka Connect deployment.
The S2I deployment is again provided as an OpenShift template. It can be deployed from the template either using the command line or using the OpenShift console. To create Kafka Connect S2I cluster from the command line, the following command should be run:
oc new-app strimzi-connect-s2iOnce the cluster is deployed, a new Build can be triggered from the command line:
-
A directory with Kafka Connect plugins has to be prepared first. For example:
$ tree ./my-plugins/ ./my-plugins/ ├── debezium-connector-mongodb │ ├── bson-3.4.2.jar │ ├── CHANGELOG.md │ ├── CONTRIBUTE.md │ ├── COPYRIGHT.txt │ ├── debezium-connector-mongodb-0.7.1.jar │ ├── debezium-core-0.7.1.jar │ ├── LICENSE.txt │ ├── mongodb-driver-3.4.2.jar │ ├── mongodb-driver-core-3.4.2.jar │ └── README.md ├── debezium-connector-mysql │ ├── CHANGELOG.md │ ├── CONTRIBUTE.md │ ├── COPYRIGHT.txt │ ├── debezium-connector-mysql-0.7.1.jar │ ├── debezium-core-0.7.1.jar │ ├── LICENSE.txt │ ├── mysql-binlog-connector-java-0.13.0.jar │ ├── mysql-connector-java-5.1.40.jar │ ├── README.md │ └── wkb-1.0.2.jar └── debezium-connector-postgres ├── CHANGELOG.md ├── CONTRIBUTE.md ├── COPYRIGHT.txt ├── debezium-connector-postgres-0.7.1.jar ├── debezium-core-0.7.1.jar ├── LICENSE.txt ├── postgresql-42.0.0.jar ├── protobuf-java-2.6.1.jar └── README.md -
To start a new image build using the prepared directory, the following command has to be run:
oc start-build my-connect-cluster-connect --from-dir ./my-plugins/The name of the build should be changed according to the cluster name of the deployed Kafka Connect cluster.
-
Once the build is finished, the new image will be used automatically by the Kafka Connect deployment.
2.5. Topic Controller
Strimzi uses a component called the Topic Controller to manage topics in the Kafka cluster. The Topic Controller is deployed as a process running inside a Kubernetes/OpenShift cluster. To create a new Kafka topic, a ConfigMap with the related configuration (name, partitions, replication factor, …) has to be created. Based on the information in that ConfigMap, the Topic Controller will create a corresponding Kafka topic in the cluster.
Deleting a topic ConfigMap raises the deletion of the corresponding Kafka topic as well.
The Cluster Controller is able to deploy a Topic Controller, which can be configured in the cluster ConfigMap. Alternatively, it is possible to deploy a Topic Controller manually, rather than having it deployed by the Cluster Controller.
2.5.1. Deploying through the Cluster Controller
To deploy the Topic Controller through the Cluster Controller, its configuration needs to be provided in the cluster
ConfigMap in the topic-controller-config field as a JSON string.
For more information on the JSON configuration format see Section 3.2.1.3, “Topic controller”.
2.5.2. Deploying standalone Topic Controller
If you are not going to deploy the Kafka cluster using the Cluster Controller but you already have a Kafka cluster deployed on Kubernetes or OpenShift, it could be useful to deploy the Topic Controller using the provided YAML files. In that case you can still leverage on the Topic Controller features of managing Kafka topics through related ConfigMaps.
Deploying to Kubernetes
To deploy the Topic Controller on Kubernetes (not through the Cluster Controller), the following command should be executed:
kubectl create -f examples/install/topic-controller.yamlTo verify whether the Topic Controller has been deployed successfully, the Kubernetes Dashboard or the following command can be used:
kubectl describe allDeploying to OpenShift
To deploy the Topic Controller on OpenShift (not through the Cluster Controller), the following command should be executed:
oc create -f examples/install/topic-controllerTo verify whether the Topic Controller has been deployed successfully, the OpenShift console or the following command can be used:
oc describe all2.5.3. Topic ConfigMap
When the Topic Controller is deployed by the Cluster Controller it will be configured to watch for "topic ConfigMaps" which are those with the following labels:
strimzi.io/cluster: <cluster-name>
strimzi.io/kind: topic
When the Topic Controller is deployed manually the strimzi.io/cluster label is not necessary.
The topic ConfigMap contains the topic configuration in a specific format. The ConfigMap format is described in Section 4.3, “Format of the ConfigMap”.
3. Cluster Controller
The cluster controller is in charge of deploying a Kafka cluster alongside a Zookeeper ensemble. As part of the Kafka cluster, it can also deploy the topic controller which provides operator-style topic management via ConfigMaps. The cluster controller is also able to deploy a Kafka Connect cluster which connects to an existing Kafka cluster. On OpenShift such a cluster can be deployed using the Source2Image feature, providing an easy way of including more connectors.
When the cluster controller is up, it starts to "watch" for ConfigMaps containing the Kafka or Kafka Connect
cluster configuration. Such ConfigMaps need to have a specific label which is, by default, strimzi.io/kind=cluster
(as described later) that can be changed through a corresponding environment variable.
When a new ConfigMap is created in the Kubernetes/OpenShift cluster, the controller gets the cluster configuration from
its data section and starts creating a new Kafka or Kafka Connect cluster by creating the necessary Kubernetes/OpenShift
resources, such as StatefulSets, ConfigMaps, Services etc.
Every time the ConfigMap is updated by the user with some changes in the data section, the controller performs corresponding
updates on the Kubernetes/OpenShift resources which make up the Kafka or Kafka Connect cluster. Resources are either patched
or deleted and then re-created in order to make the Kafka or Kafka Connect cluster reflect the state of the cluster ConfigMap.
This might cause a rolling update which might lead to service disruption.
Finally, when the ConfigMap is deleted, the controller starts to un-deploy the cluster deleting all the related Kubernets/OpenShift resources.
3.1. Reconciliation
Although the controller reacts to all notifications about the cluster ConfigMaps received from the Kubernetes/OpenShift cluster, if the controller is not running, or if a notification is not received for any reason, the ConfigMaps will get out of sync with the state of the running Kubernetes/OpenShift cluster.
In order to handle failovers properly, a periodic reconciliation process is executed by the cluster controller so that it can compare the state of the ConfigMaps with the current cluster deployment in order to have a consistent state across all of them.
3.2. Format of the cluster ConfigMap
By default, the controller watches for ConfigMaps having the label strimzi.io/kind=cluster in order to find and get
configuration for a Kafka or Kafka Connect cluster to deploy. The label is configurable through the STRIMZI_CONFIGMAP_LABELS
environment variable.
In order to distinguish which "type" of cluster to deploy, Kafka or Kafka Connect, the controller checks the
strimzi.io/type label which can have one of the the following values :
-
kafka: the ConfigMap provides configuration for a Kafka cluster (with Zookeeper ensemble) deployment -
kafka-connect: the ConfigMap provides configuration for a Kafka Connect cluster deployment -
kafka-connect-s2i: the ConfigMap provides configuration for a Kafka Connect cluster deployment using Build and Source2Image features (works only with OpenShift)
The data section of such ConfigMaps contains different keys depending on the "type" of deployment as described in the
following sections.
3.2.1. Kafka
In order to configure a Kafka cluster deployment, it’s possible to specify the following fields in the data section of
the related ConfigMap :
-
kafka-nodes: number of Kafka broker nodes. Default is 3 -
kafka-image: the Docker image to use for the Kafka brokers. Default isstrimzi/kafka:latest -
kafka-healthcheck-delay: the initial delay for the liveness and readiness probes for each Kafka broker node. Default is 15 -
kafka-healthcheck-timeout: the timeout on the liveness and readiness probes for each Kafka broker node. Default is 5 -
zookeeper-nodes: number of Zookeeper nodes -
zookeeper-image: the Docker image to use for the Zookeeper nodes. Default isstrimzi/zookeeper:latest -
zookeeper-healthcheck-delay: the initial delay for the liveness and readiness probes for each Zookeeper node. Default is 15 -
zookeeper-healthcheck-timeout: the timeout on the liveness and readiness probes for each Zookeeper node. Default is 5 -
KAFKA_DEFAULT_REPLICATION_FACTOR: the default replication factors for automatically created topics. It sets thedefault.replication.factorproperty in the properties configuration file used by Kafka broker nodes on startup. Default is 3 -
KAFKA_OFFSETS_TOPIC_REPLICATION_FACTOR: the replication factor for the offsets topic. It sets theoffsets.topic.replication.factorproperty in the properties configuration file used by Kafka broker nodes on startup. Default is 3 -
KAFKA_TRANSACTION_STATE_LOG_REPLICATION_FACTOR: the replication factor for the transaction topic. It sets thetransaction.state.log.replication.factorproperty in the properties configuration file used by Kafka broker nodes on startup. Default is 3 -
kafka-storage: a JSON string representing the storage configuration for the Kafka broker nodes. See related section -
zookeeper-storage: a JSON string representing the storage configuration for the Zookeeper nodes. See related section -
kafka-metrics-config: a JSON string representing the JMX exporter configuration for exposing metrics from Kafka broker nodes. Removing this field means having no metrics exposed. -
zookeeper-metrics-config: a JSON string representing the JMX exporter configuration for exposing metrics from Zookeeper nodes. Removing this field means having no metrics exposed. -
topic-controller-config: a JSON string representing the topic controller configuration. See the Section 3.2.1.3, “Topic controller” documentation for further details. More info about the topic controller in the related Section 2.5, “Topic Controller” documentation page.
The following is an example of a ConfigMap for a Kakfa cluster.
Example Kafka cluster ConfigMap
apiVersion: v1
kind: ConfigMap
metadata:
  name: my-cluster
  labels:
    strimzi.io/kind: cluster
    strimzi.io/type: kafka
data:
  kafka-nodes: "3"
  kafka-image: "strimzi/kafka:latest"
  kafka-healthcheck-delay: "15"
  kafka-healthcheck-timeout: "5"
  zookeeper-nodes: "1"
  zookeeper-image: "strimzi/zookeeper:latest"
  zookeeper-healthcheck-delay: "15"
  zookeeper-healthcheck-timeout: "5"
  KAFKA_DEFAULT_REPLICATION_FACTOR: "3"
  KAFKA_OFFSETS_TOPIC_REPLICATION_FACTOR: "3"
  KAFKA_TRANSACTION_STATE_LOG_REPLICATION_FACTOR: "3"
  kafka-storage: |-
    { "type": "ephemeral" }
  zookeeper-storage: |-
    { "type": "ephemeral" }
  kafka-metrics-config: |-
    {
      "lowercaseOutputName": true,
      "rules": [
          {
            "pattern": "kafka.server<type=(.+), name=(.+)PerSec\\w*><>Count",
            "name": "kafka_server_$1_$2_total"
          },
          {
            "pattern": "kafka.server<type=(.+), name=(.+)PerSec\\w*, topic=(.+)><>Count",
            "name": "kafka_server_$1_$2_total",
            "labels":
            {
              "topic": "$3"
            }
          }
      ]
    }
  zookeeper-metrics-config: |-
    {
      "lowercaseOutputName": true
    }
The resources created by the cluster controller into the Kubernetes/OpenShift cluster will be the following :
-
[cluster-name]-zookeeperStatefulSet which is in charge to create the Zookeeper node pods -
[cluster-name]-kafkaStatefulSet which is in charge to create the Kafka broker pods -
[cluster-name]-zookeeper-headlessService needed to have DNS resolve the Zookeeper pods IP addresses directly -
[cluster-name]-kafka-headlessService needed to have DNS resolve the Kafka broker pods IP addresses directly -
[cluster-name]-zookeeperService used by Kafka brokers to connect to Zookeeper nodes as clients -
[cluster-name]-kafkaService can be used as bootstrap servers for Kafka clients -
[cluster-name]-zookeeper-metrics-configConfigMap which contains the Zookeeper metrics configuration and mounted as a volume by the Zookeeper node pods -
[cluster-name]-kafka-metrics-configConfigMap which contains the Kafka metrics configuration and mounted as a volume by the Kafka broker pods
Storage
Both Kafka and Zookeeper save data to files.
Strimzi allows to save such data in an "ephemeral" way (using emptyDir) or in a "persistent-claim" way using persistent
volumes.
It’s possible to provide the storage configuration in the related ConfigMap using a JSON string as value for the
kafka-storage and zookeeper-storage fields.
|
Important
|
The kafka-storage and zookeeper-storage fields can’t be changed when the cluster is up.
|
The JSON representation has a mandatory type field for specifying the type of storage to use ("ephemeral" or "persistent-claim").
The "ephemeral" storage is really simple to configure and the related JSON string has the following structure.
Ephemeral storage JSON
{ "type": "ephemeral" }In case of "persistent-claim" type the following fields can be provided as well :
-
size: defines the size of the persistent volume claim (i.e 1Gi) - mandatory -
class: the Kubernetes/OpenShift storage class to use for dynamic volume allocation - optional -
selector: allows to select a specific persistent volume to use. It contains amatchLabelsfield which defines an inner JSON object with key:value representing labels for selecting such a volume - optional -
delete-claim: boolean value which specifies if the persistent volume claim has to be deleted when the cluster is un-deployed. Default isfalse- optional
Persistent storage JSON with 1Gi as size
{ "type": "persistent-claim", "size": "1Gi" }This example demonstrates use of a storage class.
Persistent storage JSON using "storage class"
{
  "type": "persistent-claim",
  "size": "1Gi",
  "class": "my-storage-class"
}
Finally, a selector can be used in order to select a specific labeled persistent volume which provides some needed features (i.e. an SSD)
Persistent storage JSON with "match labels" selector
{
  "type": "persistent-claim",
  "size": "1Gi",
  "selector":
  {
    "matchLabels":
    {
      "hdd-type": "ssd"
    }
  },
  "delete-claim": true
}
When the "persistent-claim" is used, other than the resources already described in the Section 3.2.1, “Kafka” section, the following resources are generated :
-
data-[cluster-name]-kafka-[idx]Persistent Volume Claim for the volume used for storing data for the Kafka broker pod[idx] -
data-[cluster-name]-zookeeper-[idx]Persistent Volume Claim for the volume used for storing data for the Zookeeper node pod[idx]
Metrics
Because Strimzi uses the [JMX exporter](https://github.com/prometheus/jmx_exporter) in order to expose metrics on each node, the JSON string used for metrics configuration in the cluster ConfigMap reflects the related JMX exporter configuration file. For this reason, you can find more information on how to use it in the corresponding GitHub repo.
For more information on how metrics work, the related documentation is available here
Topic controller
Alongside the Kafka cluster and the Zookeeper ensemble, the cluster controller can also deploy the topic controller. In order to do that, the 'topic-controller-config` field has to be put into the data section of the cluster ConfigMap. This field is a JSON string containing the topic controller configuration. Without this field, the cluster controller doesn’t deploy the topic controller. It is still possible to deploy the topic controller by creating appropriate Kubernates/OpenShift resources.
The JSON representation of the 'topic-controller-config` has no mandatory fields and if the value is an empty object (just "{ }"), the cluster controller will deploy the topic controller with a default configuration.
The configurable fields are the following :
image-
Docker image to use for the topic controller. Default is
strimzi/topic-controller:latest namespace-
The Kubernetes namespace (OpenShift project) in which the topic controller watches for topic ConfigMaps. Default is the namespace where the topic controller is running
reconciliationIntervalMs-
The interval between periodic reconciliations in milliseconds. Default is 900000 (15 minutes).
zookeeperSessionTimeoutMs-
The Zookeeper session timeout in milliseconds. Default is 20000 milliseconds (20 seconds).
Example Topic Controller JSON configuration
{ "reconciliationIntervalMs": "900000", "zookeeperSessionTimeoutMs": "20000" }More information about these configuration parameters in the related Section 2.5, “Topic Controller” documentation page.
3.2.2. Kafka Connect
In order to configure a Kafka Connect cluster deployment, it’s possible to specify the following fields in the data section of
the related ConfigMap:
-
nodes: number of Kafka Connect worker nodes. Default is 1 -
image: the Docker image to use for the Kafka Connect workers. Default isstrimzi/kafka-connect:latest. If S2I is used (only on OpenShift), then it should be the related S2I image. -
healthcheck-delay: the initial delay for the liveness and readiness probes for each Kafka Connect worker node. Default is 60 -
healthcheck-timeout: the timeout on the liveness and readiness probes for each Kafka Connect worker node. Default is 5 -
KAFKA_CONNECT_BOOTSTRAP_SERVERS: a list of host/port pairs to use for establishing the initial connection to the Kafka cluster. It sets thebootstrap.serversproperty in the properties configuration file used by Kafka Connect worker nodes on startup. Default ismy-cluster-kafka:9092 -
KAFKA_CONNECT_GROUP_ID: a unique string that identifies the Connect cluster group this worker belongs to. It sets thegroup.idproperty in the properties configuration file used by Kafka Connect worker nodes on startup. Default ismy-connect-cluster -
KAFKA_CONNECT_KEY_CONVERTER: converter class used to convert keys between Kafka Connect format and the serialized form that is written to Kafka. It sets thekey.converterproperty in the properties configuration file used by Kafka Connect worker nodes on startup. Default isorg.apache.kafka.connect.json.JsonConverter -
KAFKA_CONNECT_KEY_CONVERTER_SCHEMAS_ENABLE: if Kafka Connect transformation on keys are with or without schemas. It sets thekey.converter.schemas.enableproperty in the properties configuration file used by Kafka Connect worker nodes on startup. Default is true -
KAFKA_CONNECT_VALUE_CONVERTER: converter class used to convert values between Kafka Connect format and the serialized form that is written to Kafka. It sets thevalue.converterproperty in the properties configuration file used by Kafka Connect worker nodes on startup. Default isorg.apache.kafka.connect.json.JsonConverter -
KAFKA_CONNECT_VALUE_CONVERTER_SCHEMAS_ENABLE: if Kafka Connect transformation on values are with or without schemas. It sets thevalue.converter.schemas.enableproperty in the properties configuration file used by Kafka Connect worker nodes on startup. Default is true -
KAFKA_CONNECT_CONFIG_STORAGE_REPLICATION_FACTOR: replication factor used when creating the configuration storage topic. It sets theconfig.storage.replication.factorproperty in the properties configuration file used by Kafka Connect worker nodes on startup. Default is 3 -
KAFKA_CONNECT_OFFSET_STORAGE_REPLICATION_FACTOR: replication factor used when creating the offset storage topic. It sets theoffset.storage.replication.factorproperty in the properties configuration file used by Kafka Connect worker nodes on startup. Default is 3 -
KAFKA_CONNECT_STATUS_STORAGE_REPLICATION_FACTOR: replication factor used when creating the status storage topic. It sets thestatus.storage.replication.factorproperty in the properties configuration file used by Kafka Connect worker nodes on startup. Default is 3
The following is an example of cluster configuration ConfigMap is the following.
Example Kafka Connect cluster ConfigMap
apiVersion: v1
kind: ConfigMap
metadata:
  name: my-connect-cluster
  labels:
    strimzi.io/kind: cluster
    strimzi.io/type: kafka-connect
data:
  nodes: "1"
  image: "strimzi/kafka-connect:latest"
  healthcheck-delay: "60"
  healthcheck-timeout: "5"
  KAFKA_CONNECT_BOOTSTRAP_SERVERS: "my-cluster-kafka:9092"
  KAFKA_CONNECT_GROUP_ID: "my-connect-cluster"
  KAFKA_CONNECT_KEY_CONVERTER: "org.apache.kafka.connect.json.JsonConverter"
  KAFKA_CONNECT_KEY_CONVERTER_SCHEMAS_ENABLE: "true"
  KAFKA_CONNECT_VALUE_CONVERTER: "org.apache.kafka.connect.json.JsonConverter"
  KAFKA_CONNECT_VALUE_CONVERTER_SCHEMAS_ENABLE: "true"
  KAFKA_CONNECT_CONFIG_STORAGE_REPLICATION_FACTOR: "3"
  KAFKA_CONNECT_OFFSET_STORAGE_REPLICATION_FACTOR: "3"
  KAFKA_CONNECT_STATUS_STORAGE_REPLICATION_FACTOR: "3"
The resources created by the cluster controller into the Kubernetes/OpenShift cluster will be the following :
-
[connect-cluster-name]-connect Deployment which is in charge to create the Kafka Connect worker node pods
-
[connect-cluster-name]-connect Service which exposes the REST interface for managing the Kafka Connect cluster
3.3. Provisioning Role-Based Access Control (RBAC) for the controller
For the controller to function it needs permission within the Kubernetes/OpenShift cluster to interact with the resources it manages (ConfigMaps, Pods, Deployments, StatefulSets, Services etc). Such permission is described in terms of Kubernetes/OpenShift role-based access controls.
3.3.1. Using a ServiceAccount
The controller is best run using a ServiceAccount:
Example ServiceAccount for the Cluster Controller
apiVersion: v1
kind: ServiceAccount
metadata:
  name: strimzi-cluster-controller
  labels:
    app: strimzi
The Deployment of the controller then needs to specify this in the serviceAccountName of its template´s
spec:
Partial example Deployment for the Cluster Controller
apiVersion: extensions/v1beta1
kind: Deployment
metadata:
  name: strimzi-cluster-controller
spec:
  replicas: 1
  template:
    metadata:
      labels:
        name: strimzi-cluster-controller
    spec:
      serviceAccountName: strimzi-cluster-controller
      containers:
# etc ...
Note line 12, where the the strimzi-cluster-controller ServiceAccount is specified as the serviceAccountName.
3.3.2. Defining a Role
The controller needs to operate using a Role that gives it access to the necessary resources
Example Role for the Cluster Controller
apiVersion: rbac.authorization.k8s.io/v1beta1
kind: Role
metadata:
  name: strimzi-cluster-controller-role
  labels:
    app: strimzi
rules:
- apiGroups:
  - ""
  resources:
  - configmaps
  verbs:
  - get
  - list
  - watch
  - create
  - delete
  - patch
  - update
- apiGroups:
  - ""
  resources:
  - pods
  verbs:
  - get
  - list
  - watch
  - delete
- apiGroups:
  - ""
  resources:
  - services
  verbs:
  - get
  - list
  - watch
  - create
  - delete
  - patch
  - update
- apiGroups:
  - ""
  resources:
  - endpoints
  verbs:
  - get
  - list
  - watch
- apiGroups:
  - "extensions"
  resources:
  - deployments
  - deployments/scale
  - replicasets
  verbs:
  - get
  - list
  - watch
  - create
  - delete
  - patch
  - update
- apiGroups:
  - "apps"
  resources:
  - deployments
  - deployments/scale
  - deployments/status
  - statefulsets
  verbs:
  - get
  - list
  - watch
  - create
  - delete
  - patch
  - update
# OpenShift S2I requirements
- apiGroups:
  - "extensions"
  resources:
  - replicationcontrollers
  verbs:
  - get
  - list
  - watch
  - create
  - delete
  - patch
  - update
- apiGroups:
  - apps.openshift.io
  resources:
  - deploymentconfigs
  - deploymentconfigs/scale
  - deploymentconfigs/status
  - deploymentconfigs/finalizers
  verbs:
  - get
  - list
  - watch
  - create
  - delete
  - patch
  - update
- apiGroups:
  - build.openshift.io
  resources:
  - buildconfigs
  - builds
  verbs:
  - create
  - delete
  - get
  - list
  - patch
  - watch
  - update
- apiGroups:
  - image.openshift.io
  resources:
  - imagestreams
  - imagestreams/status
  verbs:
  - create
  - delete
  - get
  - list
  - watch
  - patch
  - update
- apiGroups:
  - ""
  resources:
  - replicationcontrollers
  verbs:
  - get
  - list
  - watch
  - create
  - delete
  - patch
  - update
3.3.3. Defining a RoleBinding
Finally, the controller needs a RoleBinding which associates its Role with its ServiceAccount
Example RoleBinding for the Cluster Controller
apiVersion: rbac.authorization.k8s.io/v1beta1
kind: RoleBinding
metadata:
  name: strimzi-cluster-controller-binding
  labels:
    app: strimzi
subjects:
  - kind: ServiceAccount
    name: strimzi-cluster-controller
roleRef:
  kind: Role
  name: strimzi-cluster-controller-role
  apiGroup: rbac.authorization.k8s.io
3.4. Controller configuration
The controller itself can be configured through the following environment variables.
STRIMZI_CONFIGMAP_LABELS-
Required. The Kubernetes/OpenShift label selector used to identify ConfigMaps to be managed by the controller.
STRIMZI_NAMESPACE-
Required. A comma-separated list of namespaces that the controller should operate in. The Cluster Controller deployment might use the Kubernetes Downward API to set this automatically to the namespace the Cluster Controller is deployed in. See the example below:
env: - name: STRIMZI_NAMESPACE valueFrom: fieldRef: fieldPath: metadata.namespace STRIMZI_FULL_RECONCILIATION_INTERVAL_MS-
Optional, default: 120000 ms. The interval between periodic reconciliations, in milliseconds.
STRIMZI_OPERATION_TIMEOUT_MS-
Optional, default: 60000 ms. The timeout for internal operations, in milliseconds. This value should be increased when using Strimzi on clusters where regular Kubernetes operations take longer than usual (because of slow downloading of Docker images, for example).
3.4.1. Watching multiple namespaces
The STRIMZI_NAMESPACE environment variable can be used to configure a single controller instance
to operate in multiple namespaces. For each namespace given, the controller will watch for cluster ConfigMaps
and perform periodic reconciliation. To be able to do this, the controller’s ServiceAccount needs
access to the necessary resources in those other namespaces. This can be done by creating an additional
RoleBinding in each of those namespaces, associating the controller’s ServiceAccount
(strimzi-cluster-controller in the examples) with the controller’s
Role (strimzi-controller-role in the examples).
Suppose, for example, that a controller deployed in namespace foo needs to operate in namespace bar.
The following RoleBinding would grant the necessary permissions:
Example RoleBinding for a controller to operate in namespace
barapiVersion: v1
kind: RoleBinding
metadata:
name: strimzi-cluster-controller-binding-bar
namespace: bar
labels:
app: strimzi
subjects:
- kind: ServiceAccount
name: strimzi-cluster-controller
namespace: foo
roleRef:
kind: Role
name: strimzi-cluster-controller-role
apiGroup: v14. Topic Controller
The Topic Controller is in charge of managing topics in a Kafka cluster. The Topic Controller is deployed as a process running inside a Kubernetes/OpenShift cluster. It can be deployed through the Cluster Controller or "manually" through provided YAML files.
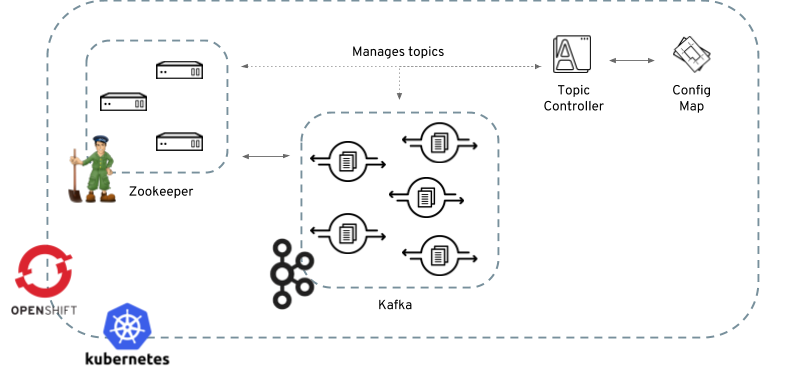
The role of the topic controller is to keep a set of Kubernetes ConfigMaps describing Kafka topics in-sync with corresponding Kafka topics.
Specifically:
-
if a config map is created, the controller will create the topic it describes
-
if a config map is deleted, the controller will delete the topic it describes
-
if a config map is changed, the controller will update the topic it describes
And also, in the other direction:
-
if a topic is created, the controller will create a config map describing it
-
if a topic is deleted, the controller will create the config map describing it
-
if a topic is changed, the controller will update the config map describing it
This is beneficial to a Kubernetes/OpenShift-centric style of deploying applications, because it allows you to declare a ConfigMap as part of your applications deployment and the controller will take care of creating the topic for you, so your application just needs to deal with producing and/or consuming from the necessary topics.
Should the topic be reconfigured, reassigned to different Kafka nodes etc, the ConfigMap will always be up to date.
4.1. Reconciliation
A fundamental problem that the controller has to solve is that there is no single source of truth: Both the ConfigMap and the topic can be modified independently of the controller. Complicating this, the topic controller might not always be able to observe changes at each end in real time (the controller might be down etc).
To resolve this, the controller maintains its own private copy of the information about each topic. When a change happens either in the Kafka cluster, or in Kubernetes/OpenShift, it looks at both the state of the other system, and at its private copy in order to determine what needs to change to keep everything in sync. The same thing happens whenever the controller starts, and periodically while its running.
For example, suppose the topic controller is not running, and a ConfigMap "my-topic" gets created. When the controller starts it will lack a private copy of "my-topic", so it can infer that the ConfigMap has been created since it was last running. The controller will create the topic corresponding to "my-topic" and also store a private copy of the metadata for "my-topic".
The private copy allows the controller to cope with scenarios where the topic config gets changed both in Kafka and in Kubernetes/OpenShift, so long as the changes are not incompatible (e.g. both changing the same topic config key, but to different values). In the case of incompatible changes, the Kafka configuration wins, and the ConfigMap will be updated to reflect that. Defaulting to the Kafka configuration ensures that, in the worst case, data won’t be lost.
The private copy is held in the same ZooKeeper ensemble used by Kafka itself. This mitigates availability concerns, because if ZooKeeper is not running then Kafka itself cannot run, so the controller will be no less available than it would even if it was stateless.
4.2. Usage Recommendations
-
Try to either always operate on ConfigMaps or always operate directly on topics.
-
When creating a ConfigMap:
-
Remember that you can’t easily change the name later.
-
Choose a name for the ConfigMap that reflects the name of the topic it describes.
-
Ideally the ConfigMap’s
metadata.nameshould be the same as itsdata.name. To do this, the topic name will have to be a valid Kubernetes resource name.
-
-
When creating a topic:
-
Remember that you can’t change the name later.
-
It’s best to use a name that is a valid Kubernetes resource name, otherwise the controller will have to sanitize the name when creating the corresponding ConfigMap.
-
4.3. Format of the ConfigMap
By default, the controller only considers ConfigMaps having the label strimzi.io/kind=topic,
but this is configurable via the STRIMZI_CONFIGMAP_LABELS environment variable.
The data of such ConfigMaps supports the following keys:
-
nameThe name of the topic. Optional; if this is absent the name of the ConfigMap itself is used. -
partitionsThe number of partitions of the Kafka topic. This can be increased, but not decreased. Required. -
replicasThe number of replicas of the Kafka topic. Required. -
configA string in JSON format representing the topic configuration. Optional, defaulting to the empty set.
4.4. Example
Suppose you want to create a topic called "orders" with 10 partitions and 2 replicas.
You would first prepare a ConfigMap:
Topic declaration ConfigMap
apiVersion: v1
kind: ConfigMap
metadata:
  name: orders
  labels:
    strimzi.io/kind: topic
data:
  name: orders
  partitions: "10"
  replicas: "2"
Because the config key is omitted from the data the topic’s config will be empty, and thus default to the
Kafka broker default.
You would then create this ConfigMap in Kubernetes:
kubectl create -f orders-topic.yamlOr in OpenShift:
oc create -f orders-topic.yamlThat’s it! The controller will create the topic "orders".
Suppose you later want to change the log segment retention time to 4 days,
you can update orders-topic.yaml like this:
Topic declaration ConfigMap with "config" update
apiVersion: v1
kind: ConfigMap
metadata:
  name: orders
  labels:
    strimzi.io/kind: topic
data:
  name: orders
  partitions: "10"
  replicas: "2"
  config: '{ "retention.ms":"345600000" }'
And use oc update -f or kubectl update -f to up update the ConfigMap
in OpenShift/Kubernetes.
4.5. Unsupported operations
-
You can’t change the
data.namekey in a ConfigMap, because Kafka doesn’t support changing topic names. -
You can’t decrease the
data.partitions, because Kafka doesn’t support this. -
You should exercise caution in increasing
data.partitionsfor topics with keys, as it will change how records are partitioned.
4.6. Controller environment
The controller is configured from environment variables:
-
STRIMZI_CONFIGMAP_LABELS– The Kubernetes label selector used to identify ConfigMaps to be managed by the controller. Default:strimzi.io/kind=topic. -
STRIMZI_ZOOKEEPER_SESSION_TIMEOUT_MS– The Zookeeper session timeout, in milliseconds. For example10000. Default:20000(20 seconds). -
STRIMZI_KAFKA_BOOTSTRAP_SERVERS– The list of Kafka bootstrap servers. This variable is mandatory. -
STRIMZI_ZOOKEEPER_CONNECT– The Zookeeper connection information. This variable is mandatory. -
STRIMZI_FULL_RECONCILIATION_INTERVAL_MS– The interval between periodic reconciliations, in milliseconds.
If the controller configuration needs to be changed the process must be killed and restarted. Since the controller is intended to execute within Kubernetes, this can be achieved by deleting the pod.
Appendix A: Frequently Asked Questions
A.1. Cluster Controller
A.1.1. Log contains warnings about failing to acquire lock
For each cluster, the Cluster Controller always executes only one operation at a time. The Cluster Controller uses locks to make sure that there are never two parallel operations running for the same cluster. In case an operation requires more time to complete, other operations will wait until it is completed and the lock is released.
- INFO
-
Examples of cluster operations are cluster creation, rolling update, scale down or scale up etc.
If the wait for the lock takes too long, the operation times out and the following warning message will be printed to the log:
---
2018-03-04 17:09:24 WARNING AbstractClusterOperations:290 - Failed to acquire lock for kafka cluster lock::kafka::myproject::my-cluster
---
Depending on the exact configuration of STRIMZI_FULL_RECONCILIATION_INTERVAL_MS and STRIMZI_OPERATION_TIMEOUT_MS, this
warning message may appear regularly without indicating any problems. The operations which time out will be picked up by
the next periodic reconciliation. It will try to acquire the lock again and execute.
Should this message appear periodically even in situations when there should be no other operations running for a given cluster, it might indicate that due to some error the lock was not properly released. In such cases it is recommended to restart the cluster controller.
Appendix B: Installing Kubernetes and OpenShift cluster
The easiest way to get started with Kubernetes or OpenShift is using the Minikube, Minishift or oc cluster up
utilities. This section provides basic guidance on how to use them. More details are provided on the websites of
the tools themselves.
B.1. Kubernetes
In order to interact with a Kubernetes cluster the kubectl
utility needs to be installed.
The easiest way to get a running Kubernetes cluster is using Minikube. Minikube can be downloaded and installed
from the Kubernetes website. Depending on the number of brokers
you want to deploy inside the cluster and if you need Kafka Connect running as well, it could be worth running Minikube
at least with 4 GB of RAM instead of the default 2 GB.
Once installed, it can be started using:
minikube start --memory 4096B.2. OpenShift
In order to interact with an OpenShift cluster, the oc utility is needed.
An OpenShift cluster can be started in two different ways. The oc utility can start a cluster locally using the
command:
oc cluster upThis command requires Docker to be installed. More information about this way can be found here.
Another option is to use Minishift. MiniShift is an OpenShift installation within a VM. It can be downloaded and
installed from the Minishift website. Depending on the number of brokers
you want to deploy inside the cluster and if you need Kafka Connect running as well, it could be worth running Minishift
at least with 4 GB of RAM instead of the default 2 GB.
Once installed, Minishift can be started using the following command:
minishift start --memory 4GB