sed -i 's/namespace: .*/namespace: my-namespace/' install/cluster-operator/*RoleBinding*.yamlStrimzi Quick Start Guide (0.15.0)
Strimzi Quick Start Guide (0.15.0)
Table of Contents
1. Overview of Strimzi
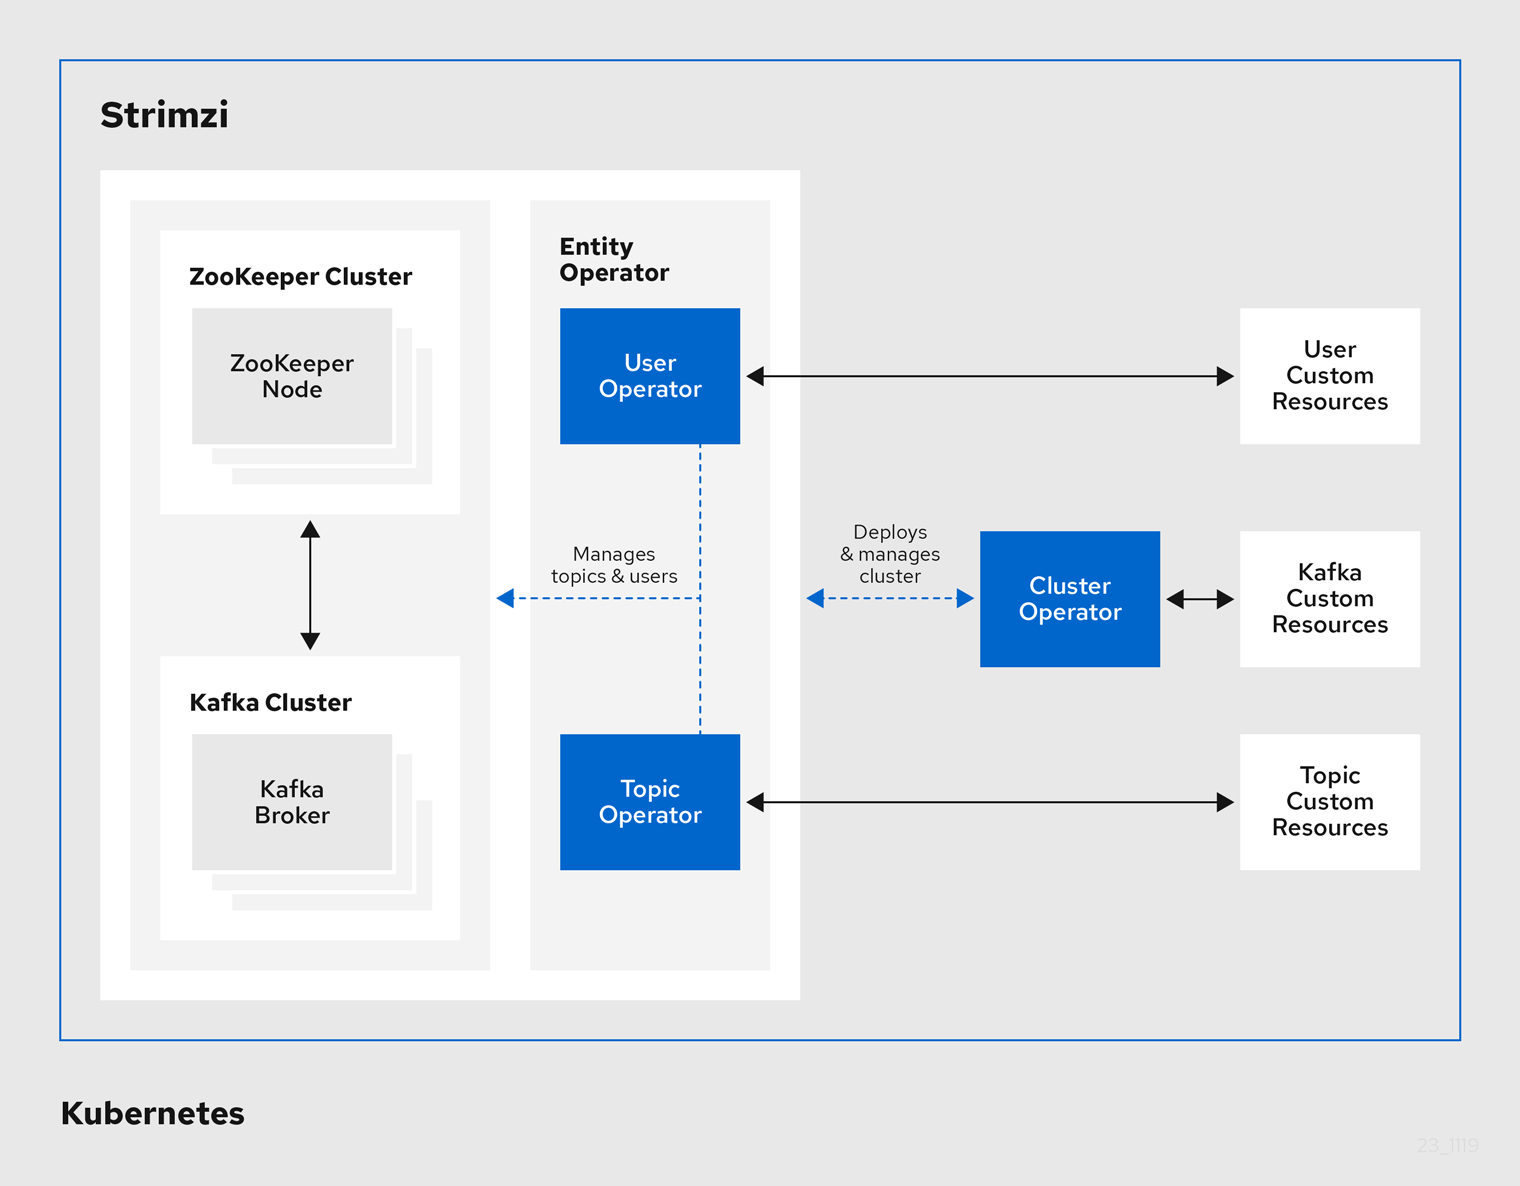
Strimzi is based on Apache Kafka, a popular platform for streaming data delivery and processing. Strimzi makes it easy to run Apache Kafka on Kubernetes.
Strimzi provides three operators:
- Cluster Operator
-
Responsible for deploying and managing Apache Kafka clusters within a Kubernetes cluster.
- Topic Operator
-
Responsible for managing Kafka topics within a Kafka cluster running within a Kubernetes cluster.
- User Operator
-
Responsible for managing Kafka users within a Kafka cluster running within a Kubernetes cluster.
|
Note
|
The Cluster Operator can deploy the Topic Operator and User Operator (as part of an Entity Operator configuration) at the same time as a Kafka cluster. |
Operators within the Strimzi architecture
1.1. Kafka Key Features
-
Designed for horizontal scalability
-
Message ordering guarantee at the partition level
-
Message rewind/replay
-
"Long term" storage allows the reconstruction of an application state by replaying the messages
-
Combines with compacted topics to use Kafka as a key-value store
-
Additional resources
-
For more information about Apache Kafka, see the Apache Kafka website.
1.2. Document Conventions
Replaceables
In this document, replaceable text is styled in monospace and italics.
For example, in the following code, you will want to replace my-namespace with the name of your namespace:
2. Try Strimzi
Use the instructions in this Quick Start Guide to install Strimzi and start sending and receiving messages from a topic in minutes.
You will:
-
Install and start Minikube
-
Install Strimzi
-
Create a Kafka cluster
-
Access the Kafka cluster to send and receive messages
Ensure you have the prerequisites and then follow the tasks in the order provided in this chapter.
2.2. Downloading Strimzi
Download a ZIP file that contains the resources required for installation along with examples for configuration.
Prerequisites
-
Access to GitHub
Procedure
-
Download the
strimzi-x.y.z.zipfile from GitHub. -
Unzip the file to any destination.
-
On Windows or Mac, you can extract the contents of the ZIP archive by double clicking on the ZIP file.
-
On Linux, open a terminal window in the target machine and navigate to where the ZIP file was downloaded.
Extract the ZIP file by executing the following command:
unzip strimzi-xyz.zip
-
2.3. Installing Strimzi
Using the download files, install Strimzi with the Custom Resource Definitions (CRDs) and RBAC configuration required for deployment.
In this task you create namespaces in the cluster for your deployment. It is good practice to use namespaces to separate functions.
Prerequisites
-
Installation requires a Kubernetes account with cluster admin credentials.
Procedure
-
Log in to the Kubernetes cluster with cluster admin privileges.
-
Create a new
kafkanamespace for the Strimzi Kafka Cluster Operator.kubectl create ns kafka -
Modify the installation files to reference the
kafkanamespace where you will install the Strimzi Kafka Cluster Operator.NoteBy default, the files work in the myprojectnamespace.-
On Linux, use:
sed -i 's/namespace: .*/namespace: kafka/' install/cluster-operator/*RoleBinding*.yaml -
On Mac, use:
sed -i '' 's/namespace: .*/namespace: kafka/' install/cluster-operator/*RoleBinding*.yaml
-
-
Create a new
my-kafka-projectnamespace where you will deploy your Kafka cluster.kubectl create ns my-kafka-project -
Edit the
install/cluster-operator/050-Deployment-strimzi-cluster-operator.yamlfile and set theSTRIMZI_NAMESPACEenvironment variable to the namespacemy-kafka-project.# ... env: - name: STRIMZI_NAMESPACE value: my-kafka-project # ... -
Deploy the CRDs and role-based access control (RBAC) resources to manage the CRDs.
kubectl apply -f install/cluster-operator/ -n kafka -
Give permission to the Cluster Operator to watch the
my-kafka-projectnamespace.kubectl apply -f install/cluster-operator/020-RoleBinding-strimzi-cluster-operator.yaml -n my-kafka-projectkubectl apply -f install/cluster-operator/032-RoleBinding-strimzi-cluster-operator-topic-operator-delegation.yaml -n my-kafka-projectkubectl apply -f install/cluster-operator/031-RoleBinding-strimzi-cluster-operator-entity-operator-delegation.yaml -n my-kafka-projectThe commands create role bindings that grant permission for the Cluster Operator to access the Kafka cluster.
2.4. Creating a cluster
Create a Kafka cluster, then a topic within the cluster.
When you create a cluster, the Cluster Operator you deployed watches for new Kafka resources.
Prerequisites
-
For the Kafka cluster, a Cluster Operator is deployed
-
For the topic, a running Kafka cluster
Procedure
-
Log in to the Kubernetes cluster as a non-privileged user.
-
Create a new
my-clusterKafka cluster with one ZooKeeper and one Kafka broker.-
Use
persistent-claimstorage -
Expose the Kafka cluster outside of the Kubernetes cluster using an external listener configured to use a
nodeport.cat << EOF | kubectl create -n my-kafka-project -f - apiVersion: kafka.strimzi.io/v1beta1 kind: Kafka metadata: name: my-cluster spec: kafka: replicas: 1 listeners: plain: {} tls: {} external: type: nodeport tls: false storage: type: jbod volumes: - id: 0 type: persistent-claim size: 100Gi deleteClaim: false config: offsets.topic.replication.factor: 1 transaction.state.log.replication.factor: 1 transaction.state.log.min.isr: 1 zookeeper: replicas: 1 storage: type: persistent-claim size: 100Gi deleteClaim: false entityOperator: topicOperator: {} userOperator: {} EOF
-
-
Wait for the cluster to be deployed:
kubectl wait kafka/my-cluster --for=condition=Ready --timeout=300s -n my-kafka-project -
When your cluster is ready, create a topic to publish and subscribe from your external client.
Create the following
my-topiccustom resource definition with 3 partitions and replication factor 1 in themy-clusterKafka cluster:cat << EOF | kubectl create -n my-kafka-project -f - apiVersion: kafka.strimzi.io/v1beta1 kind: KafkaTopic metadata: name: my-topic labels: strimzi.io/cluster: "my-cluster" spec: partitions: 3 replicas: 1 EOF
2.5. Sending and receiving messages from a topic
Test your Strimzi installation by sending and receiving messages to my-topic from outside the cluster.
Use a terminal to run a Kafka producer and consumer on a local machine.
Prerequisites
-
Strimzi is installed on the Kubernetes cluster
-
ZooKeeper and Kafka are running
Procedure
-
Download the latest Kafka binaries and install Kafka on your local machine.
-
Find the port of the bootstrap service:
kubectl get service my-cluster-kafka-external-bootstrap -n my-kafka-project -o=jsonpath='{.spec.ports[0].nodePort}{"\n"}' -
Find the IP address of the Minikube node:
kubectl get nodes --output=jsonpath='{range .items[*]}{.status.addresses[?(@.type=="InternalIP")].address}{"\n"}{end}' -
Open a terminal and start the Kafka console producer with the topic
my-topic:bin/kafka-console-producer.sh --broker-list <node-address>:_<node-port>_ --topic my-topic -
Type your message into the console where the producer is running.
-
Press Enter to send the message.
-
Open a new terminal tab or window and start the consumer to receive the messages:
bin/kafka-console-consumer.sh --bootstrap-server <node-address>:_<node-port>_ --topic my-topic --from-beginning -
Confirm that you see the incoming messages in the consumer console.
-
Press Crtl+C to exit the Kafka console producer and consumer.